
I wanted to branch out a little bit and try something that wasn't a card for today's project. What else goes with birthday gifting better than an adorable window bag? Not much!
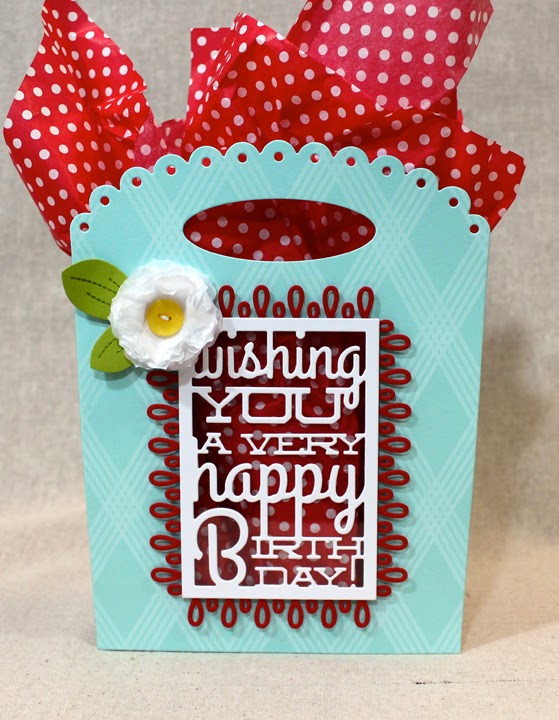
I began by die cutting two of the Front & Center #1 shapes from Aqua Mist cardstock. Then, I stamped them with Background Basics: Super Stripes using Fresh Snow ink and set them aside for a moment. Next, I die cut my sentiment frame from a piece of white cardstock that I had run through my Xyron. That piece was adhered to a panel of Clearly Creative cardstock. Then, I traced lightly around the die cut onto the front panel of my gift bag. I used a craft knife to cut inside that line (by about 3/16" or so) to create the window in the front panel. Then, I adhered that panel to a white lunch sack.

To get the window in the bag, I placed a piece of chipboard inside the bag and used the cuts in my Front & Center piece as a guide to trim the gift bag. The chipboard keeps you from inadvertently cutting through both sides of the bag. I removed the chipboard and adhered my back bag panel into place. I adhered my sentiment window into place with thin strips of foam tape. The hole in the bag should be small enough that your window has plenty of area to attach.

The bag still felt a little unfinished, so I created a little flower embellishment using layers of scrunched tissue paper, the middle Beautiful Blooms II #1 die, and a Lemon Tart button stitched through the center. The flower needed a leaf and the new Leave It Be dies were the perfect solution! I stamped my leaf shape with the coordinating detail image and heat embossed it with clear powder. The flower was adhered to the bag front with a bit of foam tape. I finished off my little gift bag by stuffing it with a bit of red and white polka dotty tissue paper.
I'm so glad you joined me today! I have one more day of countdown to share a project with you, so I hope you'll stop by tomorrow to see what I have up my sleeve. Until then, Nichole, Ashley, Betsy, Cristina, Danielle, Dawn, Erin, Heather, Laura, Melissa Phillips, and Melissa Bickford all have projects to share with you! Have a wonderful day and I'll see you tomorrow morning!
Recipe:
Stamps: Leave It Be (available February 15th), Background Basics: Super Stripes - Papertrey Ink
Cardstock: Aqua Mist, Simply Chartreuse, Pure Poppy, Clearly Creative Cardstock - Papertrey Ink; white
Ink: Fresh Snow - Papertrey Ink; VersaMark - Tsukineko
Other: Text Block: Birthday Die (available February 15th), Leave It Be Die Collection (available February 15th), Front & Center #1 Die, Loop De Loop II Border Die, Beautiful Blooms II #1 Die Collection, Lemon Tart Button - Papertrey Ink; Foam Tape - Scotch; Clear Embossing Powder - Filigree; White Tissue Paper, Polka Dot Tissue Paper - Target; White Crochet Thread; Xyron; Scor Tape
6 comments:
Love how you used the cover plate. So cute
What a great gift bag!
Love your gift bag project! That little flower is the perfect finishing touch and caught my eye immediately! Awesome job!
Adorable bag, Lizzie! So glad you shared how you created this beauty.
Love the gift bag.
Love this Lizzie. So cute.
Post a Comment