Good morning, friends! I'm popping in today with Dawn McVey and Michelle Leone for this week's Papertrey Ink Throwback Thursday feature. This week, we're revisiting Dawn's Enclosed: Cupcake collection. Who doesn't love a cupcake, am I right?! The Enclosed: Cupcake is such a great size for making a statement on the front of a project. You can keep it simple or dress it up as much as you like thanks to the coordinating embellishments. It's such a fabulous design and it was truly a joy to pull out and use again. I just may need to make a few more to have on hand for some upcoming birthdays!
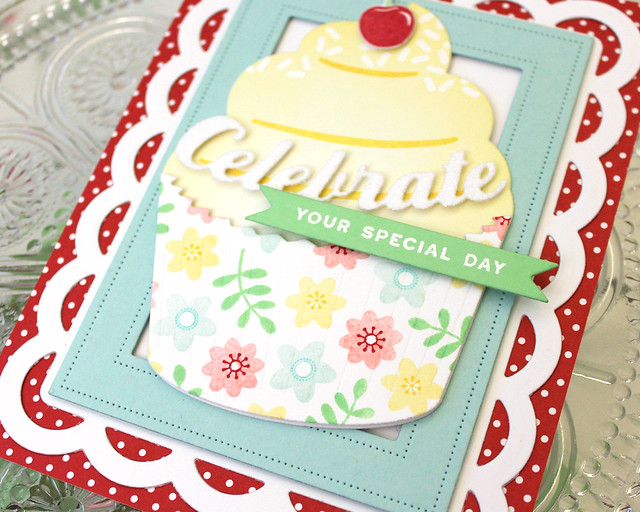
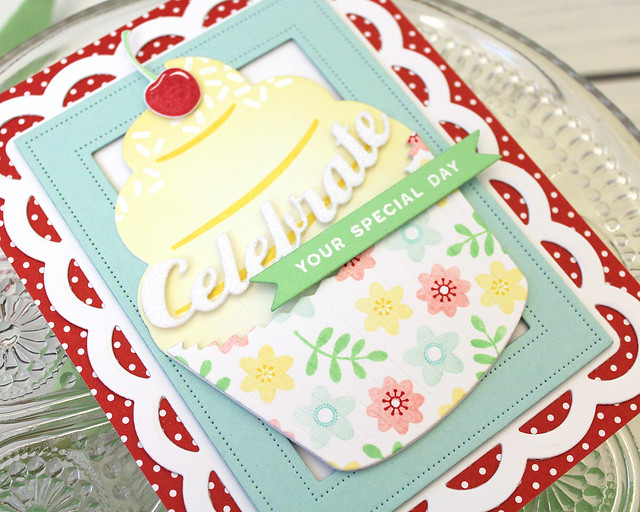
When I started thinking about my project, I couldn't get the idea of a pretty floral baking cup out of my head. I know the baking cups are probably the least savored part of the cupcake experience, but that doesn't stop me from using decorative ones when I make cupcakes. So I thought today I would add a little baking cup whimsy to my project for today. That baking cup set the tone for my color palette.
I began by stamping a piece of white cardstock with the flowers and greenery from A Bit More: Butterfly Blooms. I die cut that with the baking cup die and set it aside. Next, I sponged a piece of white cardstock with Harvest Gold ink and die cut it with the solid cupcake die. I used the swirl lines from the coordinating mini stamp set to give my frosting a bit of interest. I also used the sprinkles from the same set to heat emboss white sprinkles on the top of the cupcake. I attached the baking cup to the cupcake and embellished with a stamped cherry before putting that aside for a moment.
Next, I built up my card base. I covered a white card front with Bitty Big: Pure Poppy paper and then attached a Scallop Stackers: Medium shape and an Aqua Mist Pierced Feature Frame. I adhered the cupcake in the center of the frames at a slight angle to give the design movement. Then, I xyroned a piece of white cardstock and die cut it with the outline cupcake shape. I trimmed out the "celebrate" greeting, removed the adhesive backing, and coated the die cut with glitter. I adhered that to the cupcake with foam tape and then added a Vintage Jadeite banner that I had heat embossed with the Forest Floor: Summer sentiment. Isn't it just the cutest?! Dawn's fabulous set made it so easy!
Make sure to pop in on Dawn and Michelle today to see how they've used these stamps and dies today. Have a great one and I'll see you again soon!
Good morning, friends! It's Day 5 of the Papertrey Ink July countdown and today we're showcasing Betsy's new Orchid Expressions and Words To Live By sets. Some of you have been anxiously awaiting an orchid from Betsy since her Cloche Quarters: Summer Fillers set came out and you're definitely not going to be disappointed! Betsy has come through with a large-scale, multi-stamp orchid that will take your breath away. Enough chatter, let's get to it!
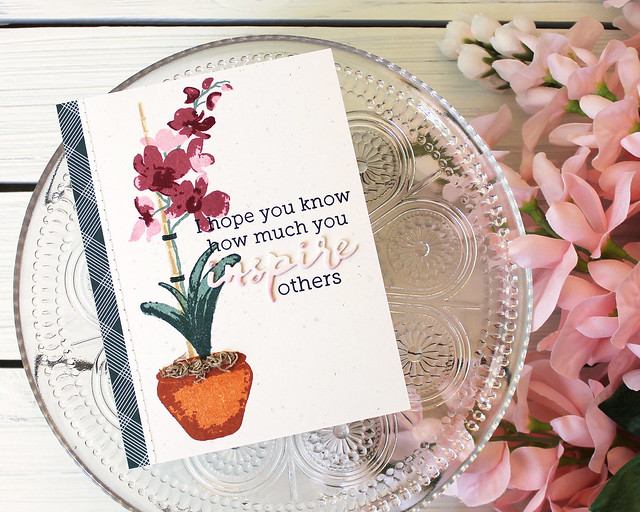
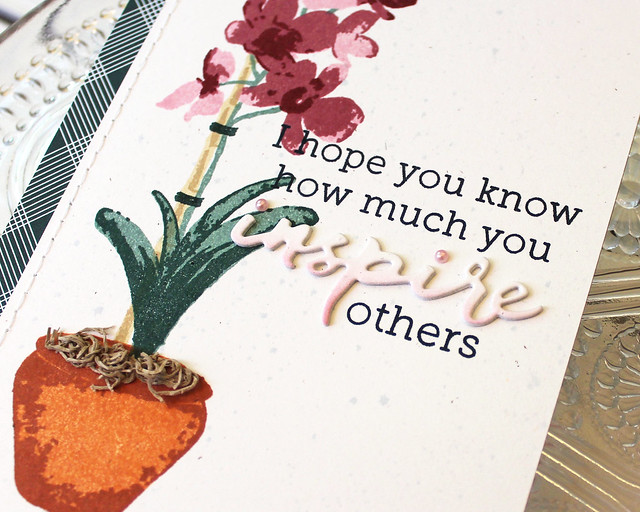
I began by card today by splattering some Spring Rain ink onto a Rustic White panel. Then I stamped the potted orchid using a whole rainbow of colors. I used Canyon Clay and Americana for the pot, Ocean Tides and Pinefeather for the greenery, Fine Linen and Classic Kraft for the bamboo cane, and Lovely Lady, Autumn Rose, and Scarlet Jewel for the blossoms. Whew! I love that Betsy included so many layers to incorporate color. And they're pretty easy to line up, too!
Next, I stamped the sentiment from Words To Live By: Inspire using Dark Indigo ink. I like the navy blue because it's just a tad softer than black or Smokey Shadow. Then, I sponged some Lovely Lady ink onto a piece of Rustic White cardstock before die cutting it with the Words To Live By: Inspire die. I stacked those die cuts and set them aside.
Then, I stitched the flower panel to a piece of Bitty Big: Pinefeather paper and adhered it to a Classic Kraft card base. I attached my die cut word and used small pearls to dot the eyes (because keeping track of those "i" bits is not my forte). I also used slivers of crunched up Classic Kraft cardstock to create Spanish moss in the flower pot. I really like the texture that adds. And, for the record, I could make one of these cards for everyone on the Papertrey team because they are all such inspiring, creative women and I'm lucky to know them.
Ok, friends. That's all I have for you today. Make sure to pop in on Betsy, Dawn, Heather, Laurie, Melissa B, Melissa P, Michelle, and Stephanie to see more of these great new sets. Have a great weekend and I'll see you again very soon!
Good morning, friends! Welcome back to Day 4 of the Papertrey Ink July countdown. Thank you so much for your kind words about my new Kit 'N Caboodle set that we introduced yesterday. It warms my heart to know how many other cat ladies are out there looking forward to that set! Today I'm back to (officially) introduce my new Pierced Feature Frames Dies, Dawn's Ombre Sentiments: Thinking Of You set, and the newest edition in the Glorious Globes series. That's a lot of good stuff, so let's get started!
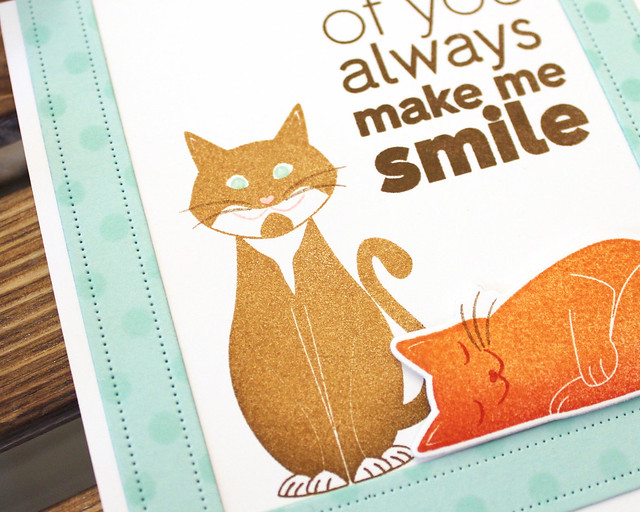
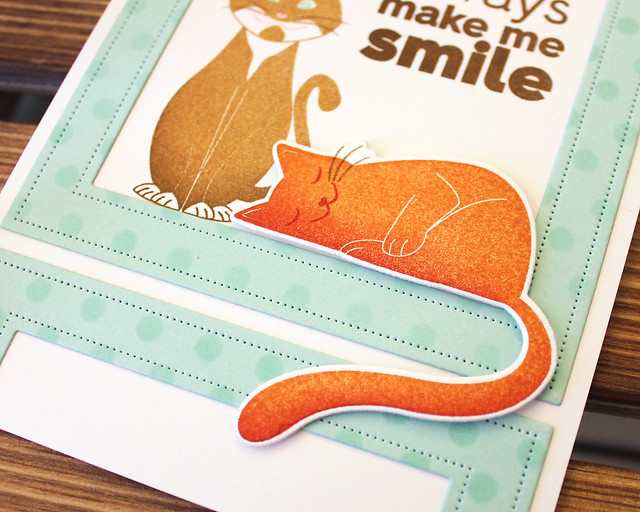
My first card today pairs a sentiment from Dawn's Ombre Sentiments set with the Pierced Feature Frames and a couple of smiling kitties from Kit 'N Caboodle.
I began by sponging a bit of Aqua Mist ink onto the coordinating cardstock through the Stencil Basics: Dots stencil. Then I die cut two of the largest frame in the Pierced Feature Frames collection and set them aside for a moment.
Next, I stamped the tuxedo cat from Kit 'N Caboodle directly on a white card base using Honey Nut and Cocoa Bean inks. I used Pale Peony for his nose and mouth and Aqua Mist for his pretty eyes. The whiskers are second generation Cocoa Bean. I also stamped and die cut the sleeping kitty. I used Canyon Clay and Terra Cotta Tile on his body, Terra Cotta Tile on his facial features, and second generation Cocoa Bean on his whiskers.
I adhered the frames to the card front and then stamped my sentiment in Cocoa Bean. Then, I adhered the sleeping kitty in place using foam tape and embellished the tuxie's eyes with Glossy Accents to give them a little texture. I love that the kitties both appear to be smiling. Their smiles tie in nicely to the greeting.
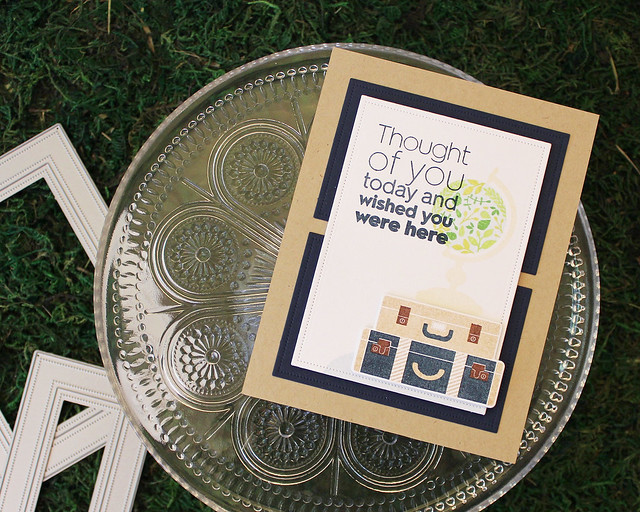
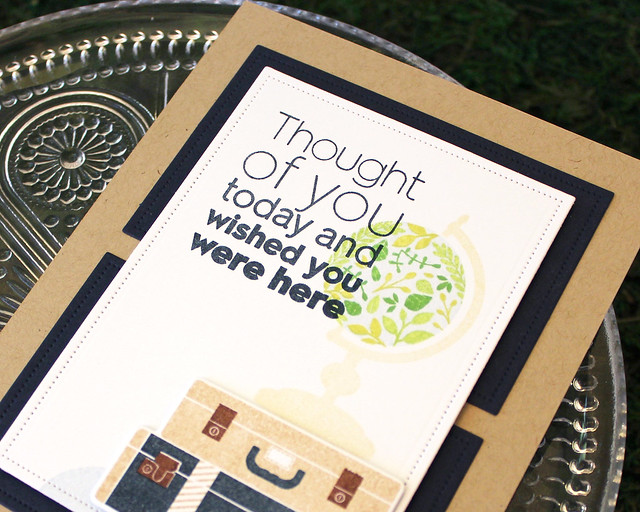
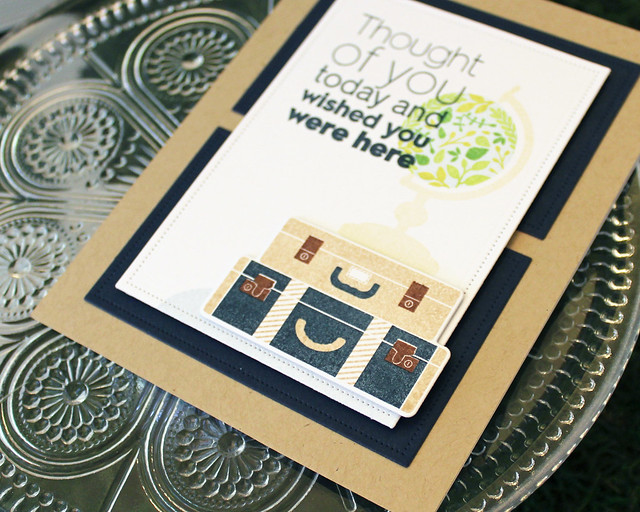
Next up, I have a card pairing another of Dawn's sentiments with the Glorious Globes from this month and last.
I began by stamping the globe from Glorious Globes: July onto a white panel I cut with the Pierced Feature Frames die. I mentioned this the other day, but it bears repeating: The Pierced Feature Frames not only cut a pierced frame, but also a pierced mat that you can use as a focal point. I love that these dies do double duty!
I also stamped a "ground" using one of the cloud shapes from Rebecca's Yellow Sunshine set and the sentiment from Dawn's Ombre Sentiments: Thinking Of You set. Then, I stamped and die cut the luggage from Glorious Globes: June and popped them up with a bit of foam tape.
Next, I die cut two of the smallest frame in the Pierced Feature Frames collection from Dark Indigo cardstock. I adhered them to a Classic Kraft card front and adhered the focal panel over them using foam tape. I like that the two frames have a different style than a simple mat. They give the background a bit more character.
Thank you so much for joining me today! I'll be back tomorrow with more to share, but in the meantime Betsy, Dawn, Heather, Laurie, Melissa B, Melissa P, Michelle, and Stephanie have projects to share highlighting these fabulous new stamps and dies. Have a great day and I'll see you tomorrow!
Welcome back to Day 3 of the Papertrey Ink July countdown. Oh my good golly, friends! I am so excited to share today's projects with you! If you follow me on Instagram you may have noticed that I'm a tiny bit of a crazy cat lady. And by that I mean I 1) talk to my cats (Gus and Louie) like they're people. We have straight up conversations 2) spoil my felines to within an inch of their lives. These guys seriously eat better than some people 3) regularly check the list of adoptable cats at our local shelter to see if I can tempt my husband to let me bring home another one...the list goes on. And on. And on. Trust.
So it just feels natural that I would design a set of kitties for my card making adventures, don't you think? Kit 'N Caboodle is the result and I'm smitten. In this $18 set you'll find three full size kitties, one peek-a-boo kitty, and several sentiments to use with your furry friends. Fun fact: you may notice there are no fishies in the set. Honestly, it's because Gus is allergic to fish and I don't even think about fish when I think about cats since we discovered his allergy. It has totally severed the tie of cats and fish in my noggin. I don't equate one with the other anymore at all. Weird.
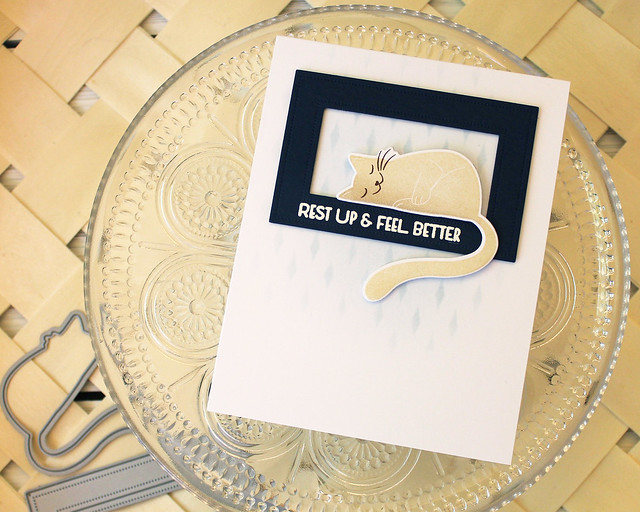
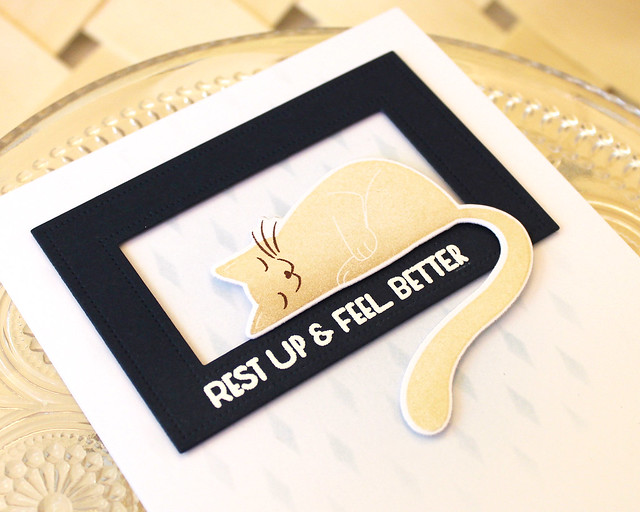
Anyway, let's get on to the projects, shall we? The first one is a get well card with the napping kitty laying on one of the Pierced Feature Frames.
I began by prepping the background by blending a bit of Spring Rain ink onto a white card base. Then I added a bit of pattern by sponging through the Stencil Basics: Diamonds stencil.
Next, I stamped and die cut the kitty using Fine Linen and sponged Classic Kraft inks. I added his facial features and whiskers with Dark Chocolate ink. Then, I die cut it and set it aside for a moment.
I die cut the smallest Feature Frame and heat embossed it with the Kit 'N Caboodle sentiment using white detail powder. I added the frame to the card base with foam adhesive and then nested the kitty inside the opening, making it look like he was resting on the frame itself. You could also have the kitty just sleeping directly on your sentiment too. Isn't he cute?!
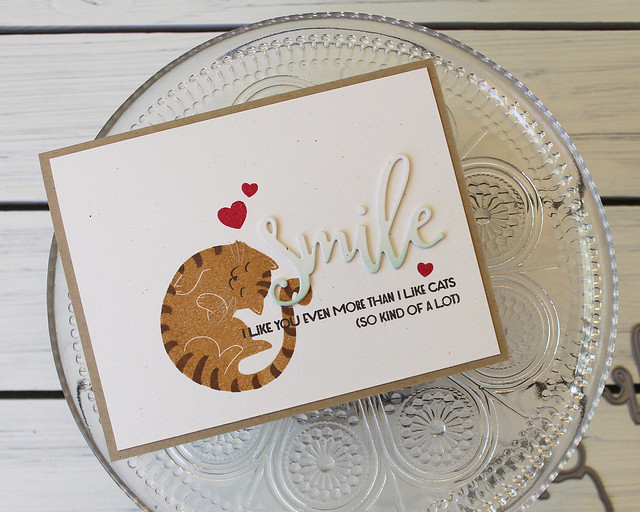
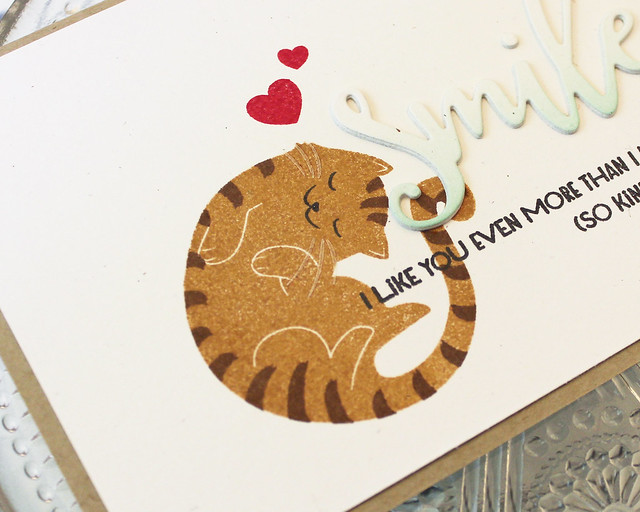
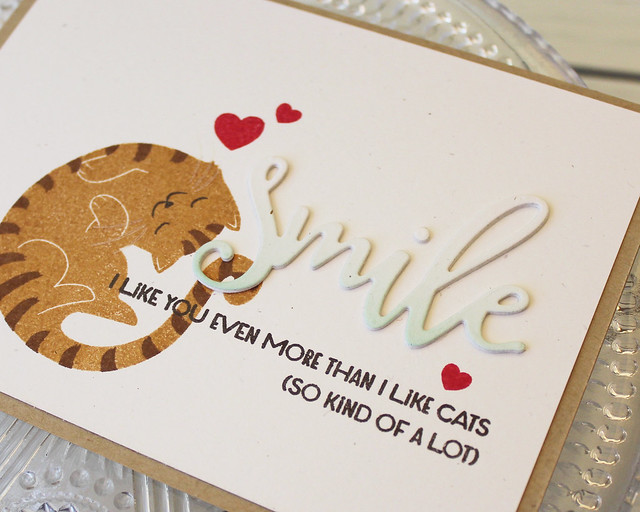
Next up, I have the back sleeper kitty paired with the sentiment die cut from the Bold Borders: Prism die.
Isn't he beautiful?!
This kitty is designed to look like my own tiger striped baby, Gus.
I began by stamping the kitty onto a panel of Rustic White cardstock using Honey Nut and Dark Chocolate inks with facial features in Smokey Shadow. Then, to get the slightly transparent whiskers, I stamped first using Fresh Snow ink and heat embossed with clear powder. You can see the whiskers, but they're a little more subtle than if I had simply stamped them in a dark color.
Next, I stamped my sentiment in Smokey Shadow and Pure Poppy hearts before adhering that panel to a Classic Kraft card base. Then, I sponged a piece of Rustic White cardstock with Aqua Mist ink and die cut the "smile" greeting from the Bold Borders: Prism die.
I stacked a few of the "smile" die cuts and adhered them to the card front. The stacking and the sponging are both subtle, but they work together beautifully to add enough definition to make the greeting pop.
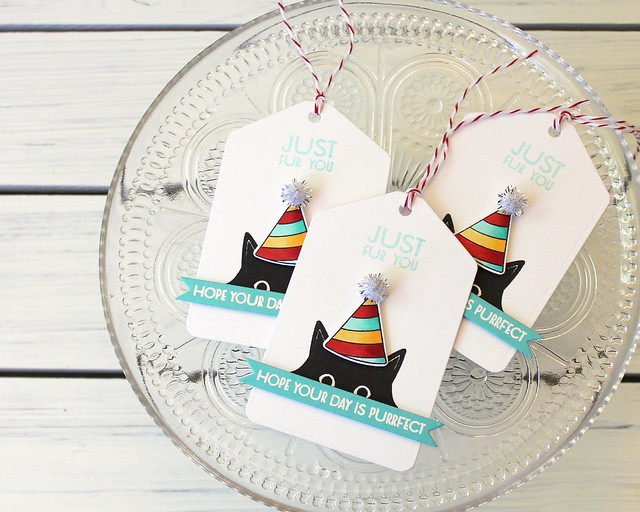
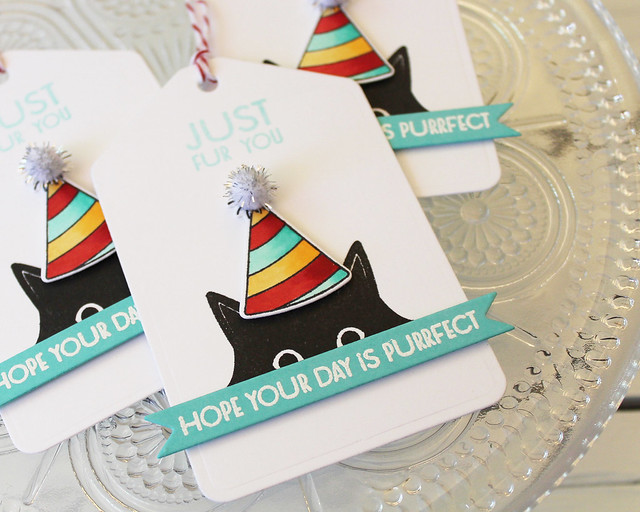
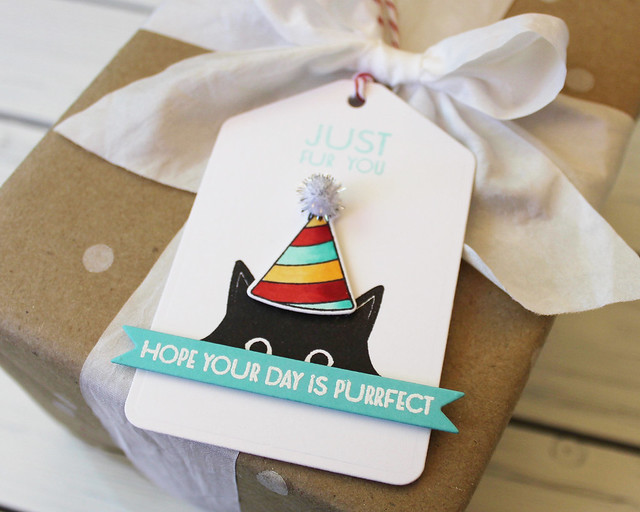
The last project I have to share with you today uses the peek-a-boo kitty on some gift tags.
Comfort is key with this guy
This kitty can be any color you like, but I'm using black today in honor of our little Louie. There actually is a tuxedo cat in the set designed to look just like him, but I couldn't wait to use this kitty, so that image will wait until another day.
These tags are really simple, but so, so fun! I began by die cutting the tags using Tag Sale #10 and stamping the cat face in black ink. Then I stamped the sentiment from the set in Hawaiian Shores and set the tags aside.
Next, I stamped and die cut the party hats from Dress Up Dolls: Birthday. I colored them with Copics and used real glittery pom-poms to embellish the tops. Then, I heat embossed the sentiment from Kit 'N Caboodle onto the Tag Sale #10 banners using white detail powder.
I used foam tape to attach the banners and the party hats to the tags. Then, I used cherry baker's twine for the tag strings. They're simple, but I can tell you right now that I would have an absolute fit if I got one of these on a birthday present. Absolute truth.
I hope you've enjoyed this peek at Kit 'N Caboodle as much as I've enjoyed sharing it with you! I'm so excited to have my kitties in stamp form!!! I'll be back tomorrow with more of this month's release, but in the meantime Betsy, Dawn, Heather, Laurie, Melissa B, Melissa P, Michelle, and Stephanie have projects to share highlighting this set along with my new Sentiment Staples: Thinking of You and Betsy's Shape Shifters: Square 2. Have a great day and I'll see you tomorrow!
Supplies: Rest Up Card Smile Card Just Fur You Tags
Good morning, friends, and welcome back to Day 2 of the Papertrey Ink July countdown! Thank you all so much for your kind words on yesterday's post. I'm excited to be back sharing Rebecca's Yellow Sunshine set, my newest Bold Borders die, and Heather's Banners & Pennants stamps with you today. Let's get going!
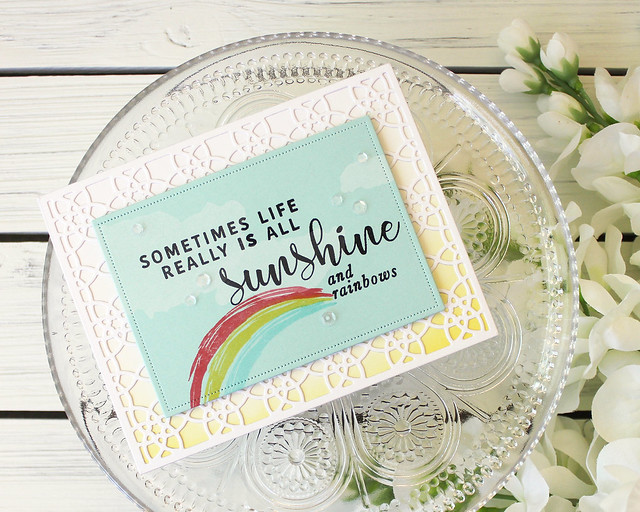
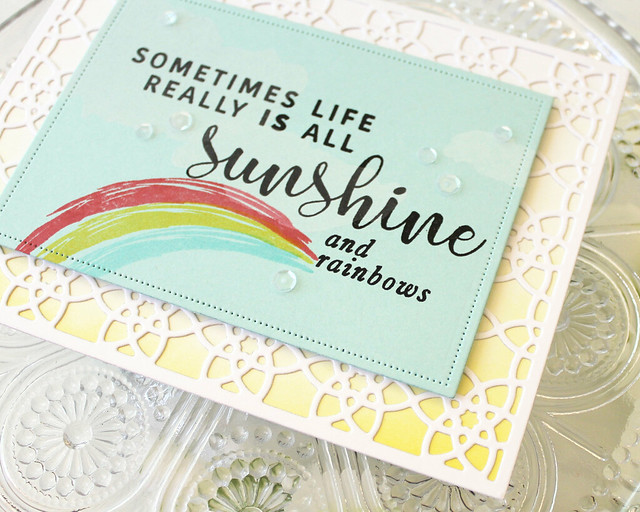
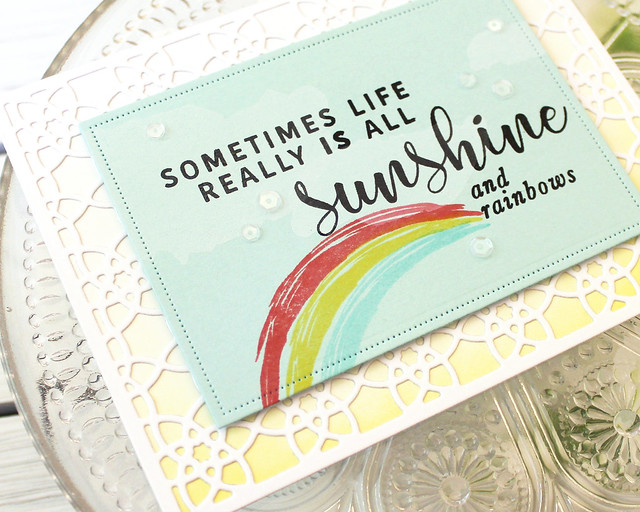
My first card pairs Rebecca's Yellow Sunshine with my Bold Borders: Prism die. I love the cheerful messages in Rebecca's set and I'm sure you will, too!
I began by die cutting a panel using the new Pierced Feature Frames from Aqua Mist cardstock. I stamped the clouds from Rebecca's set onto the panel with Fresh Snow ink and then followed up with the greeting in Versafine Onyx Black. The pigment in the Onyx Black holds up better against the Fresh Snow than a similar colored dye ink. I stamped the arched line three times to create a mini rainbow with Berry Sorbet, Bright Buttercup, and Hawaiian Shores inks.
I set that panel aside while I sponged Bright Buttercup ink onto a white card base. Then, I xyroned a panel of white cardstock before die cutting it with the Bold Borders: Prism Die. By adding the adhesive first and die cutting second I was able to avoid excess adhesive along the edges. I adhered the Bold Borders panel over top of the blending to give the background interest and make the details of the frame pop against the yellow.
Then, I adhered the sentiment panel to the front of the card with foam adhesive and embellished with a sprinkling of sequins from the Sunshine & Rainbows kit. You could also use rainstones or another clear embellishment to get a similar look.
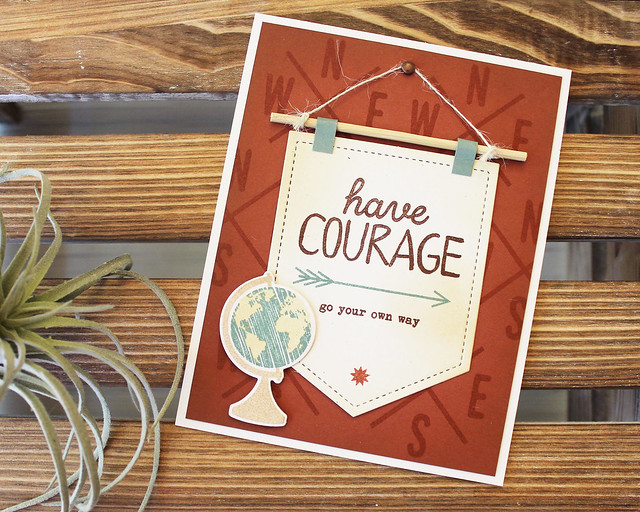
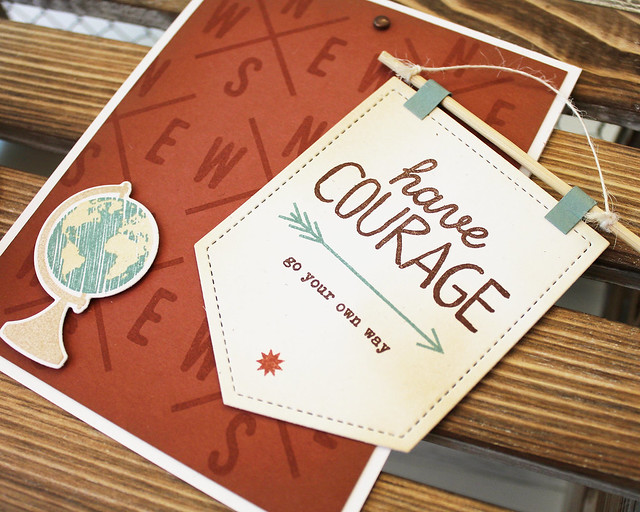
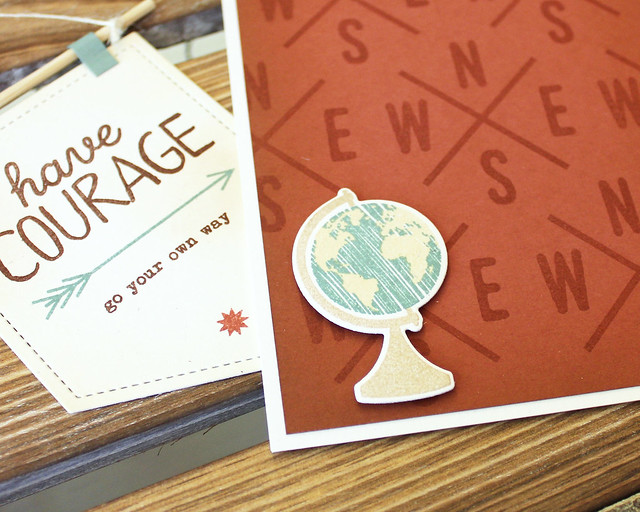
Next up, I have a card made pairing Heather's new Banners & Pennants set with a couple of my previously released Glorious Globes sets. It's even interactive!
I began by creating the mini banner. I die cut a Rustic White banner using the new Banner Die and sponged it with Fine Linen and Classic Kraft inks to age it a bit. I stamped it with the sentiment, arrow, and star from the Banners & Pennants set and then used narrow strips of Ocean Tides cardstock to add loops to the top edge. I used piece of a bamboo skewer to act as the dowel and tied it with Rustic Cream Button Twine to make it hangable.
Next, I created the card itself. I began by creating the background by sponging Classic Kraft ink around the edges of an Americana panel. Then, I repeatedly stamped the directional image using Americana ink to add monochromatic pattern. I used a copper brad to create a hanger and adhered that panel to a Rustic White Card base.
I stamped and die cut a globe using Glorious Globes: Basics and Glorious Globes: April. I hung the banner on the front of the card and then used the globe to secure it without adhering anything down (I used foam tape along the bottom and left edge of the globe where it wouldn't interfere with the banner). I love that the little banner can be removed and hung after the card is opened!
That's all I have to share with you today, but I'll be back with a few more projects showcasing this month's new releases. In the meantime, Betsy, Dawn, Heather, Laurie, Melissa B, Melissa P, Michelle, and Stephanie have projects to share highlighting these great new stamps. Have a great day and I'll see you tomorrow!
Supplies: Sunshine & Rainbows Card Have Courage Card
Good morning, friends, and welcome to this month's Papertrey Ink countdown! There are some amazing new products coming your way over the next several days so hold on to your hats! Please note: All of the new products will be available on July 15th at 10 pm ET. We're kicking things off this month with my newest Corner Adorner stamp set, Dawn's Never Enough Thanks, and Betsy's Fence Line: Summer. Let's take a peek at a few projects!
While I was designing this month's Corner Adorner, I had images of rustic weddings running through my head. Images like this one from Style Me Pretty:
The mix of burlap and lace and romantic flowers makes me such a happy lady. So when I went to use this set for the first time, I couldn't think of a better source of inspiration.
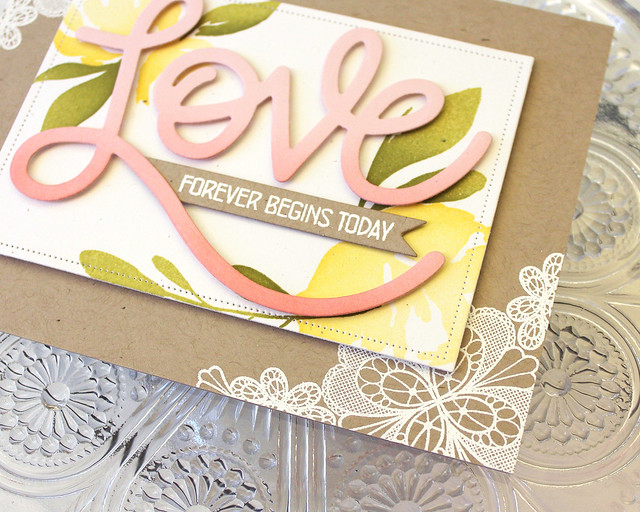
I began by card by heat embossing the lace corners onto Classic Kraft cardstock using white embossing powder. I love the way the details pop off the neutral background. Then, I die cut a panel from Rustic White cardstock using one of my new Pierced Feature Frames dies.
You'll be hearing more about these dies in a few days. I will mention that not only can you cut frames with these dies, but there is a pierced detail along the inside of the frames that embellishes the center panel, too, so you kind of get two for the price of one - a frame and a mat!
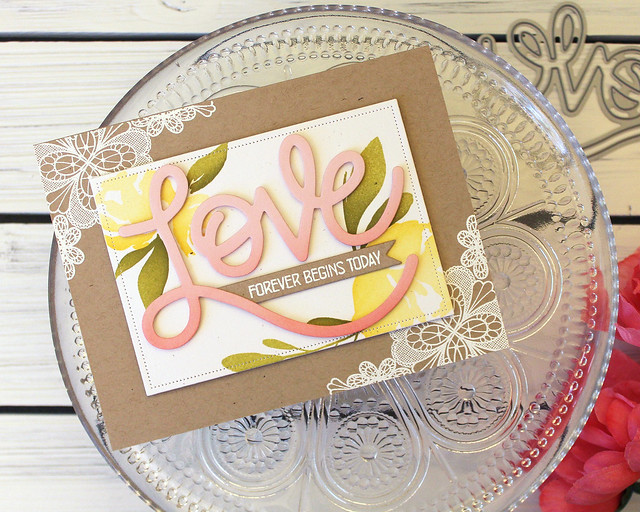
I stamped that layer with flowers and leaves from Botanical Bounty. Then, I sponged a piece of Sweet Blush cardstock with Pale Peony ink. I die cut the Big Love shape and adhered it with foam tape over the flowers. Next, I die cut the small banner from the Tag Sale #10 die and heat embossed the With All My Heart greeting using white embossing powder. I tucked that banner under the die cut greeting to finish the card. It feels just like the inspiration photo to me. A little bit rustic, a little bit romantic, and a little bit of color to add a touch of cheer.
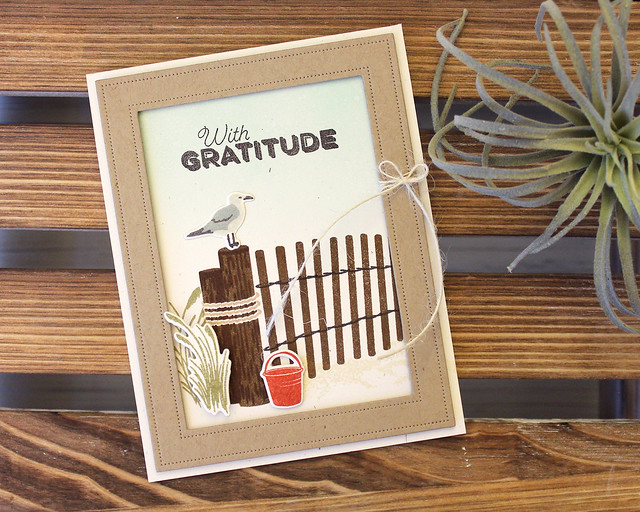
Next up, I've paired Dawn's new Never Enough Thanks with Betsy's Fence Line: Summer to create a thank you card that would be perfect for your favorite beach bum.
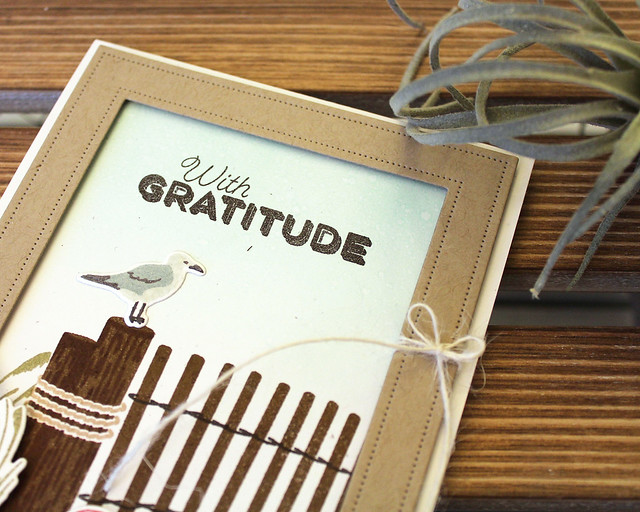
I began by sponging a tad bit of Aqua Mist ink on the top of a Rustic White card base. I speckled it with a bit of water to add a little texture and let it dry thoroughly. If you rush this step you run the risk of your subsequent stamped images bleeding on the damp spots. Next, I stamped the fence in Dark Chocolate and Cocoa Bean inks. I added the wire with Smokey Shadow and the rope around the logs using Classic Kraft.
I used Fine Linen sand and Prairie Grass sedges to add to the scene. I also stamped the sentiment from Dawn's new set using Smokey Shadow ink. Next, I die cut the largest Pierced Feature Frames shape from Classic Kraft and tied it with a rustic jute bow. I adhered it to the card front with foam tape for a bit of dimension.
Then, I stamped and die cut a few of the other accessories from Fence Line: Summer to give the scene added interest. I stamped the sand pail in Terra Cotta Tile and the additional sedge in Prairie Grass. The gull I stamped using Soft Stone, Stormy Sea, and Smokey Shadow inks. I used a mix of flat and dimensional adhesives to create depth.
Thank you so much for joining me today! Make sure to check back tomorrow when I'll have even more to share. In the meantime, Betsy, Dawn, Heather, Laurie, Melissa B, Melissa P, Michelle, and Stephanie have projects to share highlighting these great new stamps. Have a great day and I'll see you tomorrow!
Good morning and welcome to this month’s Stitching Feature! I’m Lizzie Jones your Stitching Ambassador and this moth I’m sharing…wait…do you hear that?
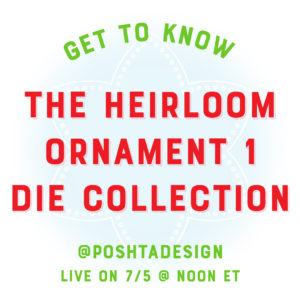
And you know what that means, don’t you? It’s Christmas in July! That’s right, I have a brand new set of ornament dies called the Heirloom Ornaments 1 Die Collection to share today. This collection will be available for purchase on July 15th. We can all use a little extra time to prepare handmade items for the holidays, so hopefully this early release will give you the time you need to make them useful for the upcoming season. Are you ready?!
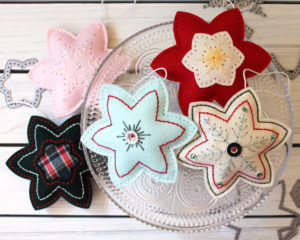
Here’s your first look at several of the ornaments put together.
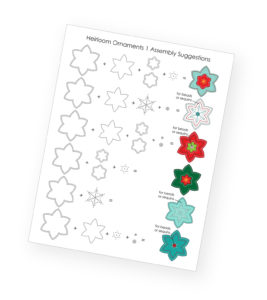
This collection was such a joy to design and it turns out to be even more fun to actually use! The pieces mix and match to create so many design options that no two ornaments will ever have to be exactly alike. I’ve put together a suggestion chart, but it only just scratches the surface of the possibilities.
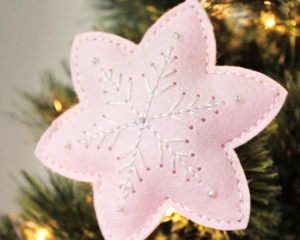
Let’s take a closer look at the ornaments I’ve made to share today! I made all of these double sided (which is to say, they’re identical on both sides). You could always create an embellished side and a plain side to save time or simply stitch your initials and a date on one side to simplify things a bit. This first one keeps things nice and simple with the basic ornament shape and the snowflake design on the inside.
I cut the basic shape from Sweet Blush felt and then used the snowflake insert to add the stitching holes. I designed the snowflake to have a single hole at the end of each branch for a bead, sequin, or both. I used a clear sequin and silver bead threaded together on this ornament.
I also used a single silver thread and two white threads to do the stitching on both the snowflake and the outer edge. The silver thread ties in nicely to the silver beads and makes the whole thing sparkle. I used a loop of white crochet thread to create a hanger (simply sewing it in between the layers of felt to secure it) and stuffed it with polyfil to finish it up.
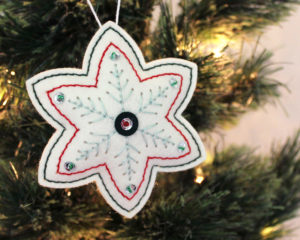
Next up, I have a slightly more stepped up version. On this ornament I used the basic shape and snowflake again, but this time I also incorporated the outline and small circle layer to add in some extra color.
I began by die cutting the primary shape from Vintage Cream felt. I used the outline and snowflake designs to add stitching holes to the basic shape. Those two dies can be used at the same time, making the process quicker! I cut the small circle from Pinefeather felt and set it aside.
I stitched the snowflake with two strands of aqua thread and one strand of silver thread and embellished the ends with silver sequins threaded with green beads. The outline was done in red thread (three strands) and the Pinefeather circle was stitched into place in the center of the snowflake. That was embellished with another silver sequin and a red bead before stuffing with polyfil and stitching up the outside.
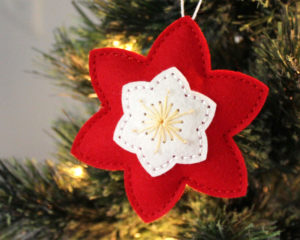
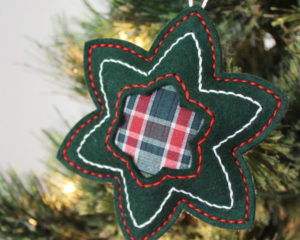
Not only can you create snowflakes with this die collection, but you can make poinsettia ornaments, too! This next ornament shows you the basic poinsettia design.
I began by die cutting the basic shape from Pure Poppy felt. I also die cut the smaller shape from Vintage Cream felt and used the poinsettia center die to create stitching holes. Then, I cut the holes for the Vintage Cream layer with the window die included in the collection (it makes sort of a frame). That die is designed to do double duty. You can stitch your layer in front or behind for two different looks. I’ll show another one here in just a minute.
I used yellow thread to complete the stitching and embellished each of the long stitches with a clear sequin and clear bead to give a bit of sparkle to my flower center. I stitched that to the Pure Poppy layer with white thread and then stitched up the outer edge after stuffing with polyfil.
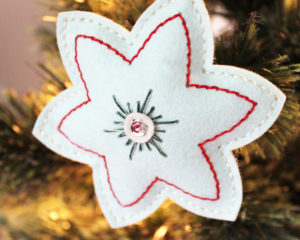
I mentioned that you can use the window in a couple of different ways. Here’s an example of how you can use it to add a peek-a-boo layer. I chose a festive plaid, but you could use it for a monogram, a photo printed on canvas, or even as an opening (if you’re creating flat ornaments rather than stuffed).
I began by die cutting the basic shape from Pinefeather felt, using the window die in the center and the outline around the edge. Then, I die cut the small layer from plaid fabric that I had reinforced with interfacing.
I stitched the plaid piece to the back side of the Pinefeather layer with red thread and then completed the outline with white. I stitched up the outside with red thread and stuffed with polyfil. This one came together quickly and the plaid is such a fun addition!
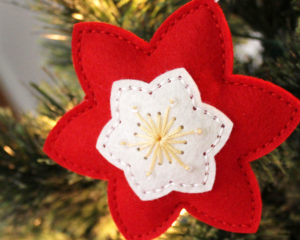
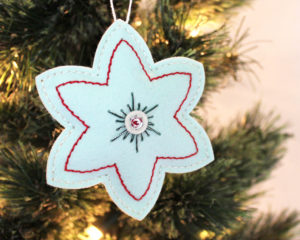
My last ornament of the day uses the flower center and the outline together. I also used the small circle to dress up the flower center and add in another color.
I began by die cutting the basic shape from Aqua Mist felt. I used the outline and flower center dies to add a design to the die cut (again, both can be cut at the same time which makes the process even quicker). I stitched up the center with two threads of dark green and one of silver. Then, I added the small circle and embellished with a silver sequin and red bead.
I stitched the outline with red thread and the outer edge with two strands of white with one strand of silver. Metallic thread can be a bear to use, so incorporating a single thread with other solids makes it far more manageable. Plus, the twinkle you get in the Christmas lights is lovely.
I hope you’re as excited about the Heirloom Ornaments 1 Die Collection as I am! I didn’t expect to have as much fun as I did creating Christmas ornaments when the mercury is topping 90º, but here we are. I plan to make little kits of these to take along on road trips and to appointments so I can get a jump on my holiday decorating. I should be well ahead by December!
Do you have questions about this die collection? Join me at noon today on my Instagram stories to watch a live story about this new collection. Thank you so much for joining me today and I hope to see you soon. Have a great day!