Tuesday, November 22, 2016

Introducing The Moments Inked Meal Planner System


Good morning, everyone! I hope you're having a wonderful week. I'm here today to share with you my thoughts on the new Moments Inked Meal Planner System from Papertrey Ink. Now let me tell you...I have tried a dozen different ways to incorporate meal planning into my routine, but up until now it's managed to be a struggle. Despite my best efforts, I've never been able to keep all of my schedule notes, lists, and menu ideas all in one place. But all that's about to change! Thanks to this system, I'm finally streamlining the menu planning process once and for all!

Meal Planner Review Front Cover

Let's start at the beginning. This planner is the same size as all of the other Moments Inked products, so all of the accessory dies, covers, etc. are completely interchangeable. I added one of the original covers to the front of my Meal Planner and it fit perfectly.

Meal Planner Review Weekly Plan Page

The pages are the same lovely linen stock you've come to expect from the Moments Inked line. And they're printed with Papertrey's bright and colorful signature colors to keep things fresh. There's plenty of space and you can get as detailed as you want, with sections for menu, where to find a recipe, and special prep notes.

Meal Planner Review Schedule Tabs Close Up

I tend to cook on the fly, so the recipes section wasn't as critical for me. So I used that space to include Sean's schedule. Remembering when he's working (it changes often) has been one of my major meal planning challenges in the past. By including the information here (using the schedule flags I already have made) I can more effectively plan meals. I know at a glance when he's going to be home for dinner and when I'm flying solo. And, bonus, I still have space in that section for notes in the event that I happen to have a special recipe that I need to find in a flash.

Meal Planner Review Grocery List

Another reason I'm so in love with this planner is the grocery list section. I've chosen to use the spiral planner (though there is a binder option available, too) because I can leave it in my kitchen rather than in my studio with all of my other planner goodies. That way it's accessible for my husband to add items to the grocery list, too. We've tried several grocery list options over the years, but there's always something that goes wrong (can't find the dry erase marker/pen/notepad, magnet isn't strong enough to keep the list on the fridge, etc). I can tuck a pen in the spiral and store the planner on top of the microwave and we'll always know where everything is. Hooray! As a leftie, I also really like that the grocery and notes page can be flipped out to be nice and flat for writing (rather than fighting with a spiral).

Meal Planner Review Notes & Errands

The double sided page is ingenious, with errands and other shopping notes on the reverse. And the "Notes" section came in very handy for my Thanksgiving prep notes.

Meal Planner Review Detached Grocery List

And I absolutely love the fact that the shopping/errands list is detachable. It tears out super easily and is so convenient to pop in your purse for a trip to the store.

Meal Planner Review Shopping List In Cart

Thank you so much for joining me today. I'm really excited about the Moments Inked Meal Planner and I hope you are too! Have a great week!

Tuesday, November 15, 2016

Release In Review

Good morning and welcome back to my Papertrey Ink November Release Wrap Up post! I have just a few projects left to share with you using this month's brand new products, so let's get to it!

My first project is a gift tag I created by pairing Betsy's What The Doodle: Piece Of Cake and my For You sets.

Wish Big Shaker Tag

I colored the cake with colored pencils and embellished with glitter. Then I created a shaker using my Window Cuts Tag and Basic Cuts Tag, stamping the sentiment inside.

Wish Big Shaker Tag 2

I filled the shaker with pink, yellow, and mint sequins before sealing everything up. I added the cake to the tag with foam tape and used white crochet thread to add a tie. I love a good shaker tag!

Next up, I have another sweet shaker card, this time using Betsy's Dress Up Dolls: Winter Fun set.

Delightful Day Card

I started by sponging a white cardstock frame with Mint Julep ink. I stamped a pattern with Plaid Builder and Background Basics: Super Stripe and set the frame aside. Next, I stamped a panel of white cardstock with the Snowflake Sparkle images and cut a rectangle out of the center. I adhered the mint frame to the white frame and backed that whole panel with clear cardstock.

Delightful Day Close Up

I stamped my little snowman scene on a white card base and added a Copic colored scarf. I created the shaker box area with foam tape and filled it with coarse glitter before sealing everything up. I finished off the card by embellishing the snowflakes with fine sugar cube glitter.

Lastly this month I have a masculine birthday card made with Maile's Splits: Happy Birthday set.

Gold & Black Birthday Card

I began by heat embossing the Splits frame on a white cardstock panel using gold powder. I added the sentiment and a handful of highlights using True Black ink.

Gold & Black Birthday Close Up

Then, I randomly brushed a gold watercolored frame onto a True Black card base. I finished things up by mounting the sentiment panel to the card base with foam tape. It's nice and simple, just the way I like it.

Thank you so much for joining me today! Make sure to check in with Nichole, Amy, Ashley, Betsy, Danielle, Heather, Kay, Laurie, and Melissa to see the rest of their countdown projects. Have a great time hopping around!


Recipes:
Wish Big Tag
Stamps: For You, What The Doodle: Piece Of Cake, Journal Accessories - Papertrey Ink
Cardstock: Pale Peony, Clear Cardstock - Papertrey Ink; white
Ink: Berry Sorbet, Vintage Jadeite - Papertrey Ink; Tuxedo Black - Memento
Other: Window Cuts Tag Die, Basic Cuts Tag Die, What The Doodle: Piece Of Cake Die - Papertrey Ink; Marigold, Blush Pink Sequins - Pretty Pink Posh; Mint Sequins - Amy & Ruby; Foam Tape - Scotch; Fine Crystal Glitter - Martha Stewart Crafts; Colored Pencils - Prismacolor; White Crochet Thread

Delightful Day Shaker Card

Stamps: Snowflake Sparkle, Plaid Builder, Background Basics: Super Stripes, Dress Up Dolls: Winter Fun
Cardstock: Clear Cardstock - Papertrey Ink; White
Ink: Aqua Mist, Mint Julep - Papertrey Ink; Tuxedo Black - Memento
Other: Dress Up Dolls: Winter Fun Die, Double Ups: Rectangles Die, Noted: Scalloped A1 Die Collection - Papertrey Ink; Coarse Crystal Glitter, Fine Sugar Cube Glitter - Martha Stewart Crafts; Markers - Copic; Foam Tape - Scotch

Gold & Black Birthday Card

Stamps: Splits: Happy Birthday - Papertrey Ink
Cardstock: True Black - Papertrey Ink; white
Ink: True Black - Papertrey Ink; VersaMark - Tsukineko
Other: Double Ups: Rectangles Die Collection - Papertrey Ink; Gold Watercolor Paint - Gansai Tambi; Foam Tape - Scotch; Gold Embossing Powder - Filigree

Monday, November 14, 2016

Invitation Inspiration

Good morning, friends, and welcome to Day 5 of the Papertrey Ink November countdown. Today we're talking parties and who doesn't love a great party? The new products we're showcasing will help you create stylish invitations and favors perfect for all ages.

Birthday Candle Party Ensemble

I've created a charming birthday party ensemble just right for a little fella. I had my five-year-old nephew Charlie in mind the whole time I was putting this set together.

Birthday Candle Party Invitation


To create the invitation I sponged a big of Aqua Mist ink on a white cardstock panel. Then stamped a rainbow of candles from Invitation Basics along the bottom edge of the invitation, sponging a darker color on the bottom of each to create depth. Next, I stamped the By Invitation text block in True Black and added the sentiment in Tropical Teal.

I created the coordinating envelope by adding custom labels stamped with images from Invitation Basics.

Envelope Mailing Label

For the front mailing label, I die cut the rectangle using the Noted: Scalloped A1 Die Collection from self-adhesive paper. I stamped the small Invitation Basics candles along the bottom edge using Aqua Mist, Tropical Teal, and Harvest Gold inks. I stamped the dotted lines from Journal Accessories in Aqua Mist ink and added the "To:" from For You in Tropical Teal.

Envelope Party Time Label

I wanted to dress up the back of the envelope a bit, too, so I added a Big Basics: Party Time label. I sponged Aqua Mist and Tropical Teal inks on the self-adhesive sheet before die cutting and then stamped the polka dots before sticking it to the envelope.

No party is complete without favors, so I set about making a coordinating treat box to round out my ensemble.

Birthday Candle Party Favor


I started by sponging Aqua Mist cardstock onto two Favor It Box #3 shapes. I stamped it with the same rainbow of Invitation Basics candles and a sentiment from For You. I assembled the box and stuffed it with bright red crinkle shred. I used New Leaf Saddle Stitch ribbon embellished with a Harvest Gold button and white crochet thread to tie the box closed.

So what do you think? The bright primary colors are great for a young boy, yes? Thank you so much for joining me today. Make sure to visit Nichole, Amy, Ashley, Betsy, Danielle, Heather, Kay, Laurie, Melissa, Erin, Lexi, and Maile to see more inspiration today. Have a great day and I'll see you again tomorrow!

Recipes:
Birthday Candle Party Invitation
Stamps: Invitation Basics, By Invitation - Papertrey Ink
Cardstock: white
Ink: Aqua Mist, Tropical Teal, Green Parakeet, New Leaf, Bright Buttercup, Summer Sunrise, Orange Zest, Pure Poppy, Scarlet Jewel, Harvest Gold, True Black - Papertrey Ink

Birthday Candle Party Invitation Envelope
Stamps: Invitation Basics, Journal Accessories, Bolka Dot Basics II, For You - Papertrey Ink
Cardstock: Self-Adhesive Sheets - Papertrey Ink; True Red Envelope - Paper Source
Ink: Aqua Mist, Tropical Teal, Harvest Gold - Papertrey Ink
Other: Big Basics: Party Time Die, Noted: Scalloped A1 Die Collection - Papertrey Ink

Birthday Candle Party Favor Box
Stamps: Invitation Basics, For You - Papertrey Ink
Cardstock: white
Ink: Aqua Mist, Tropical Teal, Green Parakeet, New Leaf, Bright Buttercup, Summer Sunrise, Orange Zest, Pure Poppy, Scarlet Jewel, Harvest Gold - Papertrey Ink
Other: New Leaf Saddle Stitch Ribbon, Harvest Gold Button, Favor It Box #3 - Papertrey Ink; White Crochet Thread; Red Crinkle Shred

Sunday, November 13, 2016

Birthday Wrap Inspiration

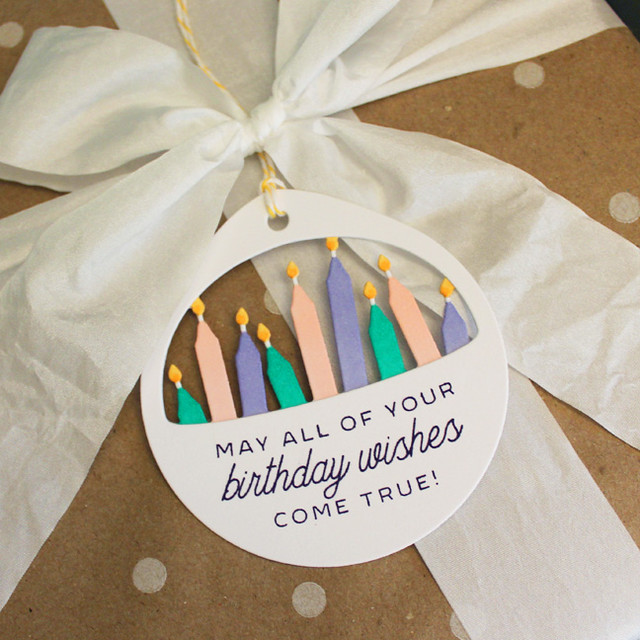
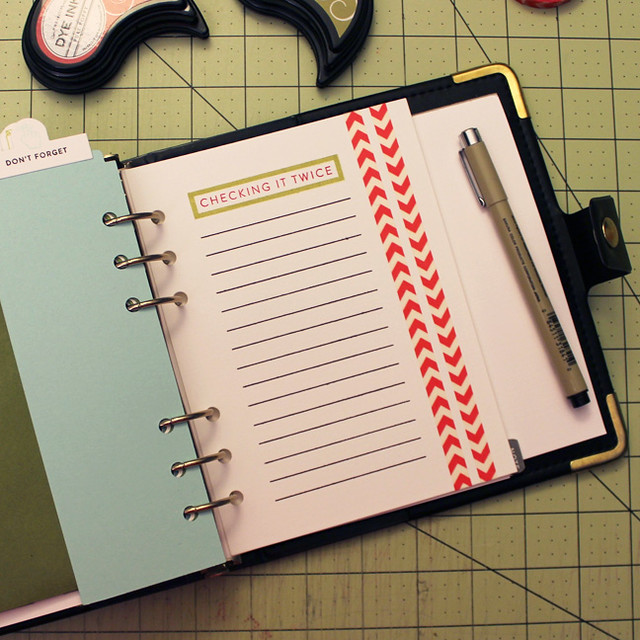
Good morning, everyone, and welcome back to Day 4 of the Papertrey Ink November countdown. Today we're celebrating all things birthday. Birthdays are a big occasion for us stampers - after all, everyone we know celebrates one each year! Today's stamp and die collections are designed to make birthday cards and gift giving even easier and more festive. I have a few projects to share with you, so let's get to it!

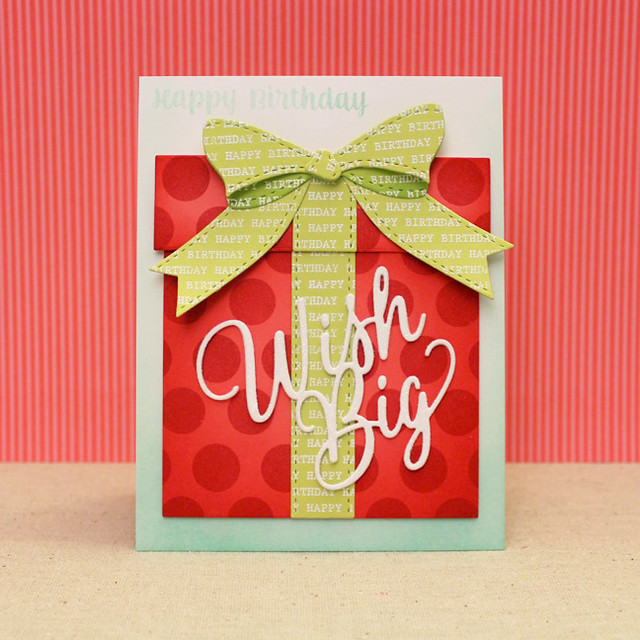
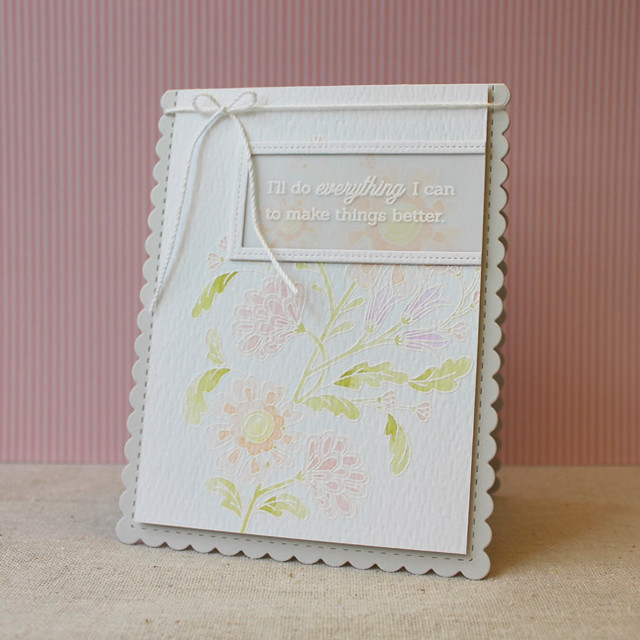
My first card today uses Nichole's Wrap It Up die collection to incorporate a gift card pocket on the front of my birthday card.

Wish Big Gift Box Card


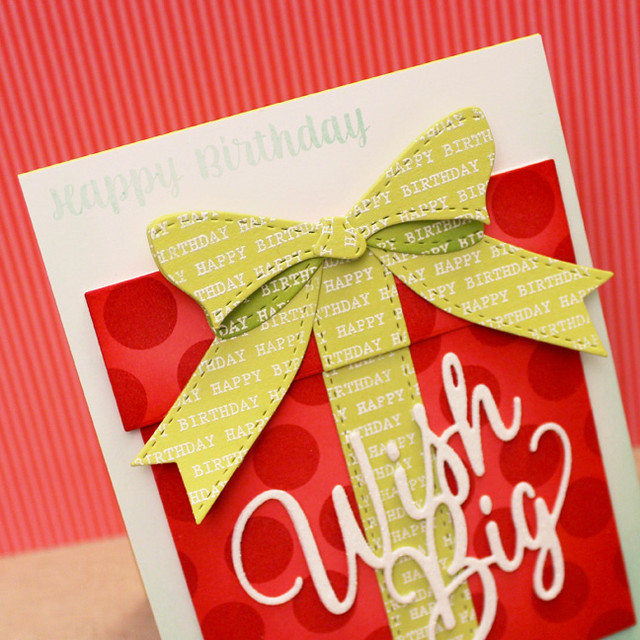
I began by die cutting the pieces of the box from Berry Sorbet cardstock and sponging them with Pure Poppy ink around the edges. I stamped those pieces with polka dots and set them aside.

Wish Big Gift Bow Close Up


Next, I heat embossed the Fill In The Blank text onto Limeade Ice cardstock and die cut it with the Wrap It Up bow pieces. I adhered the bow parts to the box pieces using a mix of flat and foam adhesives.

Wish Big Gift Box Card - Lifted Lid


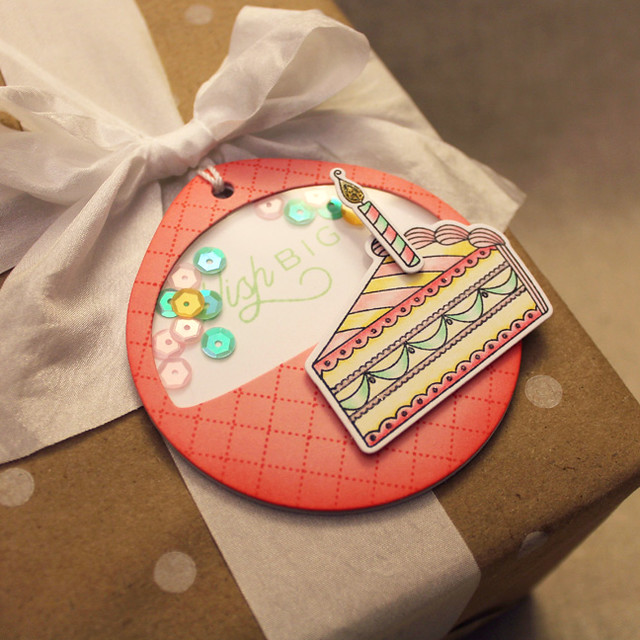
Then I sponged a white card front with Aqua Mist ink and stamped a 
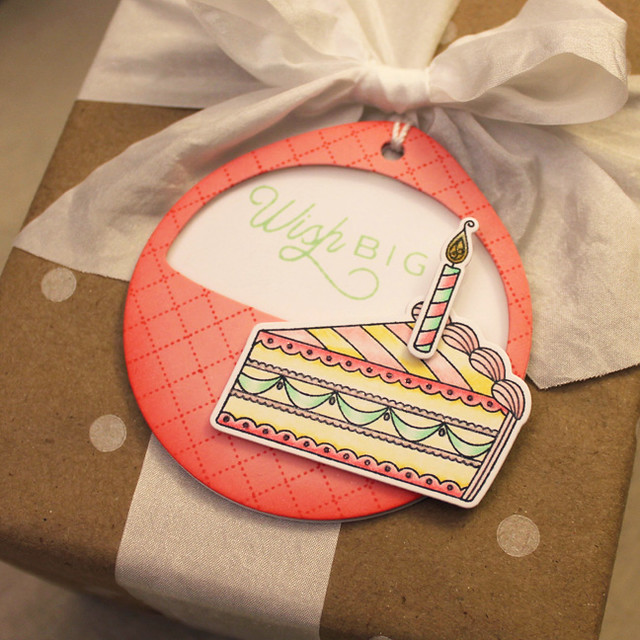
Keep It Simple: Birthday III sentiment also in Aqua Mist ink. I adhered the bottom of the gift box onto the card front, using coaster strips to give it just a bit of depth. I used glittered Big Basics: Wish Big die cuts to embellish the front of the box.

Gift Card Pull


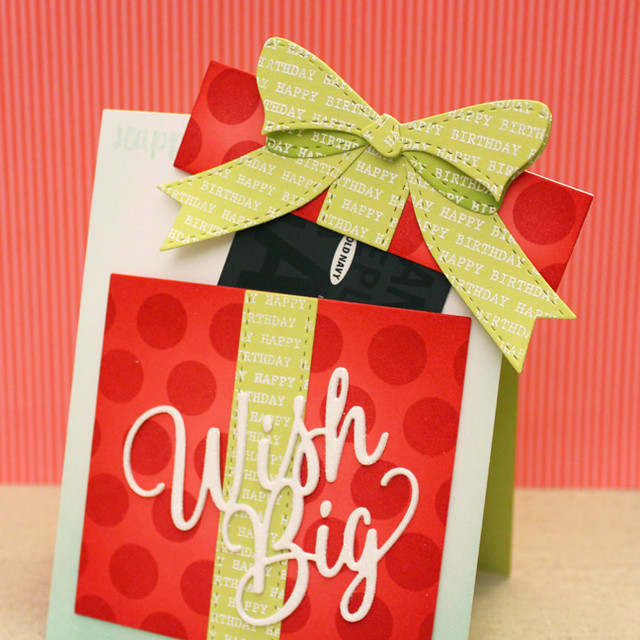
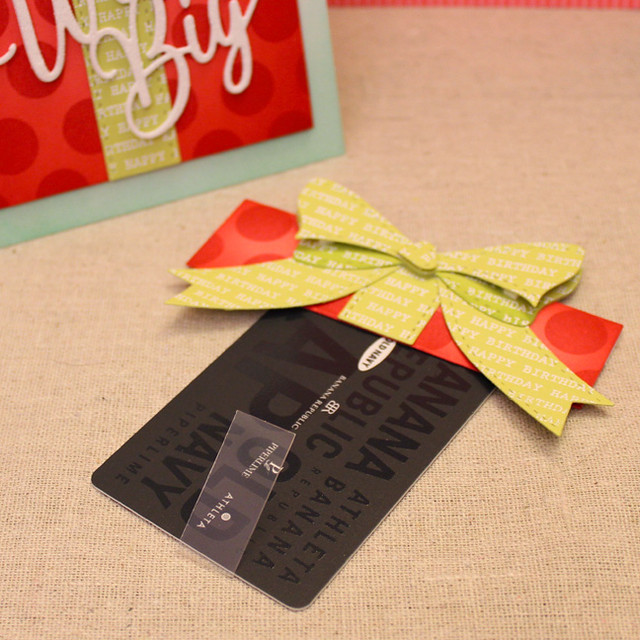
Then, I cut a strip of clear cardstock and scored it about an inch from the end. I adhered it to the back of the gift box lid with foam tape, adding foam tape along the width of the box to even things up. I used a spare lid die cut to cover the foam tape and finish off the back. Then I tucked a gift card into the strip of clear cardstock using the folded end to hold the card in place. That way as the recipient lifts the lid of the box, the gift card pops up too! Fun!

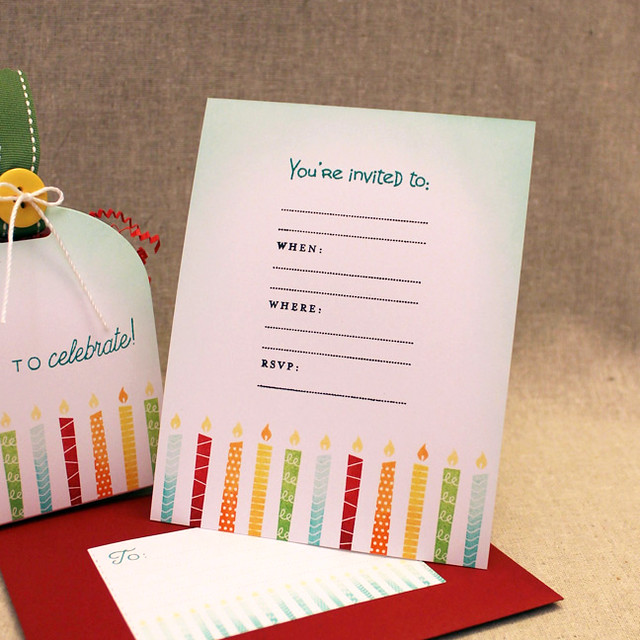
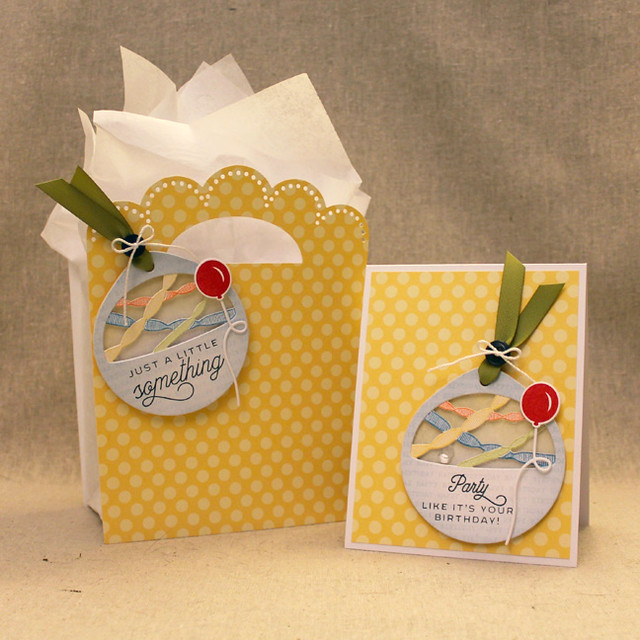
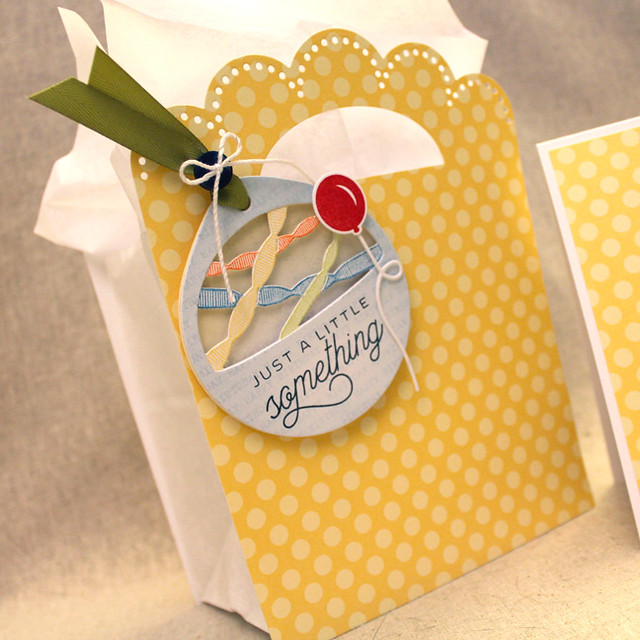
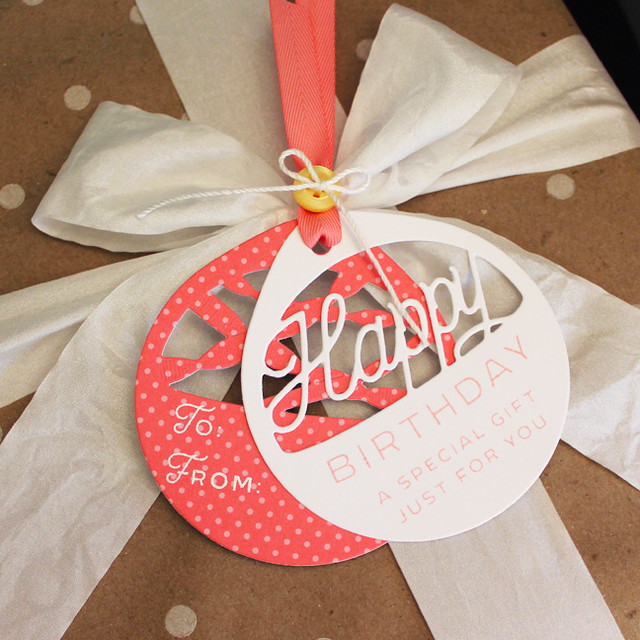
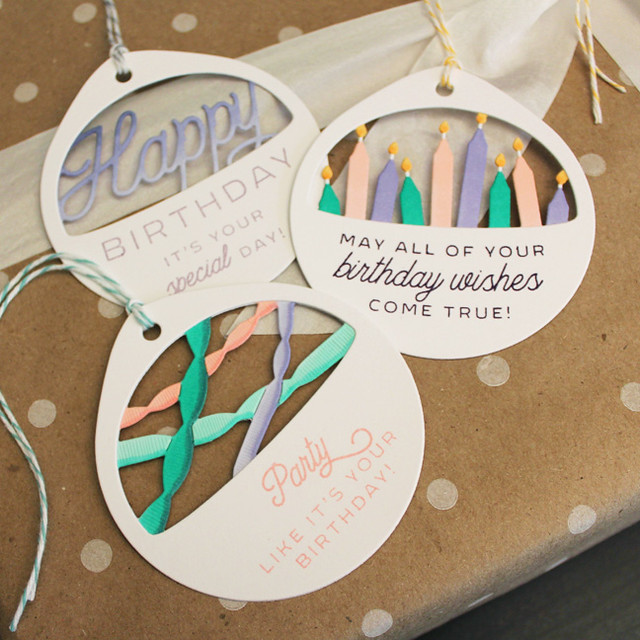
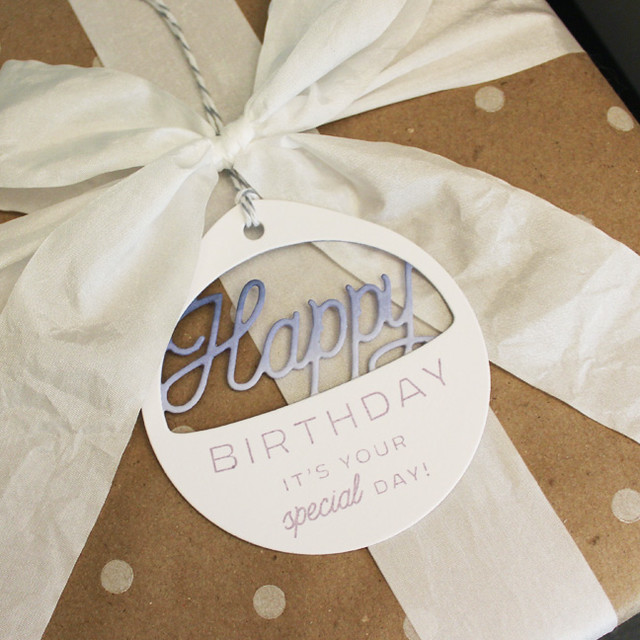
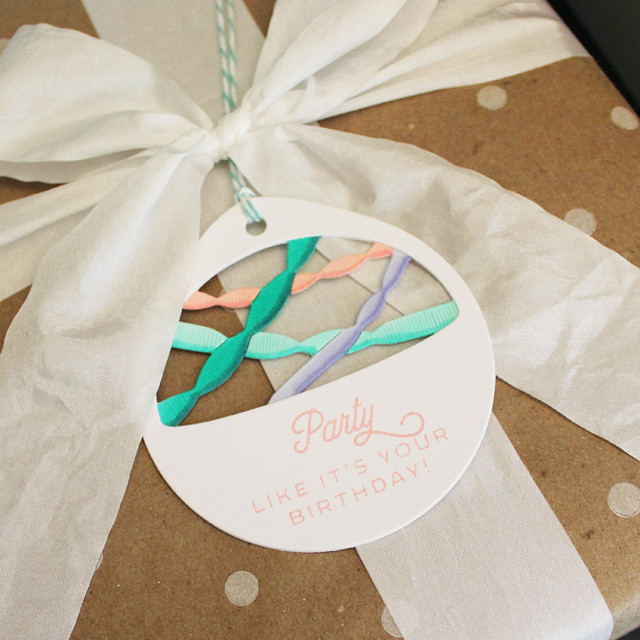
Next up, I have a birthday ensemble using my new For You collection. The card and tag were made similarly, just swapping out the sentiments on each.

Birthday Shaker Ensemble


For each shaker element I cut a front Window Cut Tag from white cardstock, a Basic Cut Tag from clear cardstock, another Basic Cut Tag from white cardstock, and a streamers tag from white cardstock. I sponged the Window Cut Tag shape with Spring Rain ink and then stamped it with the Fill In The Blank text also in Spring Rain ink. I stamped the sentiment from For You in Deep Indigo ink and set it aside.

Party Shaker Card

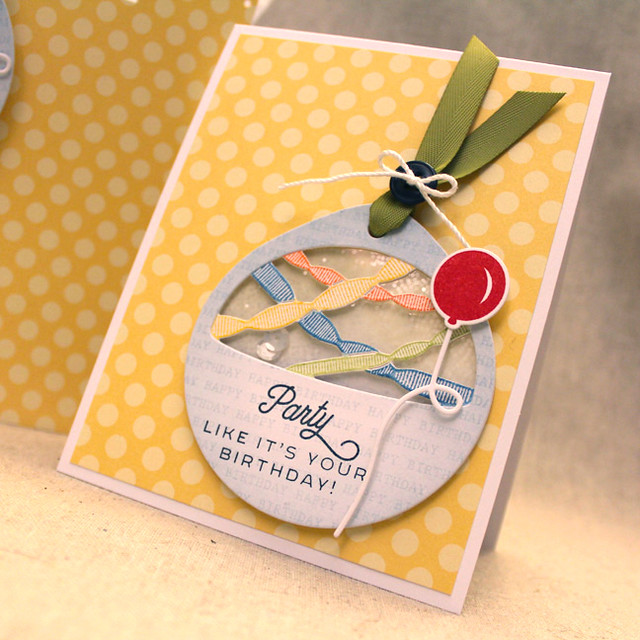
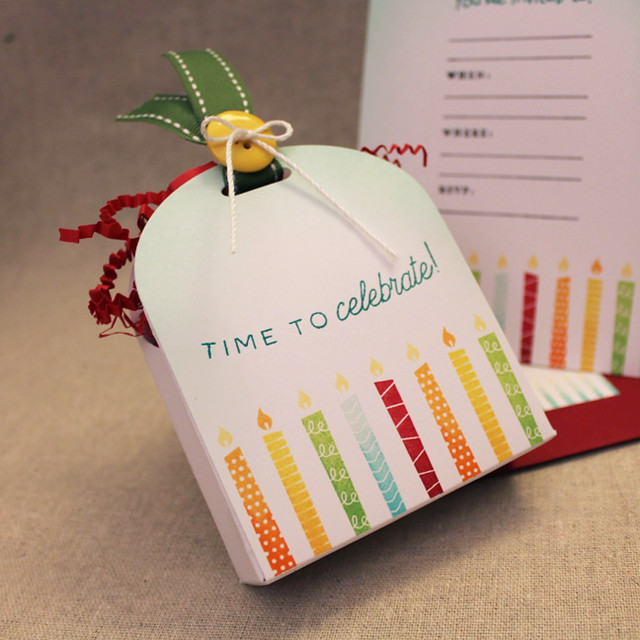
Next, I used colored pencils to color the individual streamers. The colored pencils really make the embossed texture on the streamers stand out. Once that was complete, I adhered the Window Cut Tag frame over the top of the streamers tag and the Basic Cut Tag below. I backed those pieces with foam tape and set it aside. I sponged the remaining Basic Cut Tag with Harvest Gold ink and sprinkled coarse Crystal glitter and sequins in the shaker before sealing everything up. I embellished the shakers with balloons I stamped and cut using the Paper Clippings: Birthday set and balloon strings using the Balloon Strings Die.

A Little Something Shaker Tag


I used Simply Chartreuse twill ribbon and an Enchanted Evening button tied on with white crochet thread to finish things off. I created the card by adhering the shaker to a white card base layered with Harvest Gold patterned paper. I attached the tag to a gift bag I'd created with the Front & Center #2 Die.

Thank you so much for joining me today. Make sure to check in with Nichole, Amy, Ashley, Betsy, DanielleHeather, Kay, Laurie, Melissa, Erin, Lexi, and Maile to see even more from this release. Have a great day and I'll see you again tomorrow!

Recipes:
Wish Big Card
Stamps: Keep It Simple: Birthday III, Fill In The Blank, Polka Dot Basics III - Papertrey Ink
Cardstock: Berry Sorbet, Limeade Ice, Clear Cardstock - Papertrey Ink; white
Ink: Pure Poppy, Aqua Mist, Green Parakeet - Papertrey Ink; VersaMark - Tsukineko
Other: Wrap It Up Die, Big Basic: Wish Big Die, Coaster - Papertrey Ink; Fine Crystal Glitter - Martha Stewart Crafts; Foam Tape - Scotch; Xyron

Party Shaker Card
Stamps: For You, Paper Clippings: Birthday, Fill In The Blank - Papertrey Ink
Cardstock: Harvest Gold Patterned Paper, Clear Cardstock - Papertrey Ink; white
Ink: Spring Rain, Pure Poppy, Dark Indigo - Papertrey Ink
Other: For You Tag Dies, Window Cut Tag Die, Basic Cut Tag Die, Paper Clippings: Birthday Details Die, Balloon Strings Die, Simply Chartreuse Twill Ribbon, Enchanted Evening Button - Papertrey Ink; Foam Tape - Scotch; Coarse Crystal Glitter - Martha Stewart; Marshmallow Sequins - Pretty Pink Posh

A Little Something Shaker Tag & Gift Bag
Stamps: For You, Paper Clippings: Birthday, Fill In The Blank - Papertrey Ink
Cardstock: Harvest Gold Patterned Paper, Clear Cardstock - Papertrey Ink; white
Ink: Spring Rain, Pure Poppy, Dark Indigo - Papertrey Ink
Other: For You Tag Dies, Window Cut Tag Die, Basic Cut Tag Die, Paper Clippings: Birthday Details Die, Balloon Strings Die, Simply Chartreuse Twill Ribbon, Enchanted Evening Button, Front & Center #2 Die - Papertrey Ink; Foam Tape - Scotch; Coarse Crystal Glitter - Martha Stewart; Marshmallow Sequins - Pretty Pink Posh; White Lunch Sack

Saturday, November 12, 2016

Beautiful Inspiration

Good morning, everyone, and welcome to today's Papertrey Ink group post. We're introducing Better Together, the Leaf & Sprig Frames, and Inspired: Mercy today. I love creating with florals. They can be soft and delicate, bold and lively, or anywhere in between. I thought it might be fun to revel in a garden of pastels today.

On my first project, I decided to use pale, delicate watercolor to color the large bouquet from Better Together.

Everything I Can Card

I started by heat embossing the bouquet onto watercolor paper. I used Zig Clean Color pens for the watercolor, scribbling them on an acrylic block and adding water to dilute the color. I set that aside to dry while I heat embossed the sentiment onto vellum cardstock. I adhered that to a Keep It Simple Frames shape and then attached it to the bouquet panel.

Everything I Can Close Up

That whole piece was mounted to a Soft Stone card base that I'd cut with the new Noted: Scalloped A2 Vertical Die. I topped it off with a crochet thread bow and called it good.

My next projects both use the Better Together set, but this time I used an emboss resist technique rather than coloring.

Floral Wedding Ensemble

Let's start with the tag. I began by die cutting the Basic Cut Tag and heat embossing the bouquet with clear powder. I used Aqua Mist ink to sponge around the tag and used a clear Wink Of Stella pen to add hints of glitter here and there.

Happy Wedding Day Tag

Then I die cut the "happy" tag and heat embossed the sentiment from For You set. I stamped the flowers on the tag with Aqua Mist ink and connected the two tag layers with sheer white ribbon. The emboss resist layer shows behind the "happy" so beautifully.

Love For A Lifetime Wedding Card

The card was created very similarly. I began by embossing the bouquet and sponging the Aqua Mist ink before die cutting my card base. Then I die cut the frame using the Noted: Scalloped A2 Vertical Die layers and mounted it to the card base with foam tape. Next, I die cut and heat embossed the Graceful Greetings II sentiment. I positioned it atop a nest of silver thread and adhered it to the card base with foam tape. I used a sprinkling of silver rhinestones to embellish around the sentiment.

My final project today pairs Inspired: Mercy with the new Leaf & Sprig Frames.

Blessed Are The Merciful Card

I bean by die cutting a white card base using the Noted: Scalloped A2 die collection. Then I used the Leaf & Sprig Frames to create a mask, covering the center and "flowers" and sponged Prairie Grass ink through the leaf holes. I used a marker to fill in the flower holes before removing my mask and then used fine crystal glitter to add a little sparkle.

Blessed Are The Merciful Close Up

Next, I used the Noted: Scalloped A2 Vertical Die to cut the stitched rectangle shape and stamped it with the sentiment from Inspired: Mercy. I mounted it to the card base with foam tape and attached a added the die cut "mercy" that I'd sponged with Harvest Gold and Summer Sunrise inks. A simple crochet thread bow finishes it off nicely.

So there you have it. Thank you so much for joining me today! Make sure to pop in on Nichole, Amy, Ashley, Betsy, Danielle, Dawn, Heather, Kay, Laurie, MelissaErinLexi, and Maile to see even more from this release. Have a great day and I'll see you again tomorrow!

Recipes:
Everything I Can Card
Stamps: Better Together - Papertrey Ink
Cardstock: Soft Stone, Vellum - Papertrey Ink; Watercolor Paper - Ranger
Ink: VersaMark - Tsukineko
Other: Noted: Scalloped A2 Vertical Die, Keep It Simple Frames Die - Papertrey Ink; White Detail Embossing Powder - Filigree; Foam Tape - Scotch; White Crochet Thread

Floral Wedding Ensemble
Stamps: Better Together, For You, Graceful Greetings II - Papertrey Ink
Cardstock: White
Ink: Aqua Mist - Papertrey Ink; VersaMark - Tsukineko
Other: For You Tags Die, Basic Cut Tag, Noted: Scalloped A2 Vertical Die - Papertrey Ink; Clear Embossing Powder, Silver Embossing Powder - Filigree; Foam Tape - Scotch; Rhinestones - Mark Richards, Darice, KaiserCraft; Silver Thread - DMC; Sheer White Ribbon

Blessed Are The Merciful Card
Stamps: Inspired: Mercy - Papertrey Ink
Cardstock: Lemon Tart - Papertrey Ink; White
Ink: Prairie Grass, Harvest Gold, Summer Sunrise, Smokey Shadow - Papertrey Ink
Other: Mercy Die, Noted: Scalloped A2 Die, Noted: Scalloped A2 Vertical Die, Leaf & Sprig Frames Die - Papertrey Ink; Foam Tape - Scotch; Fine Crystal Glitter - Martha Stewart Crafts; Crochet Thread

Friday, November 11, 2016

For You - Day 2

Good morning, friends! And welcome back for Day 2 of the Papertrey Ink countdown. I'm sharing more of my new For You collection today with another trio of tags. I mentioned yesterday that this collection is great for gift giving occasions other than birthdays.

Happy Tag Trio

There are separate sentiments for graduation, new home, anniversary, and wedding included in the set to cover many of your potential needs.

Happy New Home Tag

For today's tags, I die cut the streamers tags from Limeade Ice, Summer Sunrise, and Berry Sorbet patterned papers and heat embossed them with the "To:/From:" sentiment from the set.

Happy Graduation Tag

Then, I die cut three Happy tags and stamped them with sentiments from the set using Green Parakeet, Canyon Clay, and Pale Peony inks.

Happy Birthday Streamers Tag

I used twill ribbon matching the patterned papers to connect the two tags and tied on contrasting buttons for a pop of additional color.


Thank you so much for joining me today! Make sure to pop in on Nichole, Betsy, Danielle, Heather, Melissa, Erin, Lexi, and Maile for more of this month's release. See you tomorrow!

Recipe:
Stamps: For You - Papertrey Ink
Cardstock: Limeade Ice, Summer Sunrise, Berry Sorbet Patterned Papers - Papertrey Ink; white
Ink: Green Parakeet, Canyon Clay, Pale Peony - Papertrey Ink; VersaMark - Tsukineko
Other: For You Tag Dies, Berry Sorbet Twill, Limeade Ice Twill, Summer Sunrise Twill, Tropical Teal Button, Lemon Tart Button, Aqua Mist Button - Papertrey Ink; White Crochet Thread; White Embossing Powder - Filigree

Thursday, November 10, 2016

Introducing For You

Good morning and welcome to Papertrey Ink's November countdown! All of the wonderful new products I'll be showing over the next several days will be available on the Papertrey store at 10pm on November 15th.I'm excited to be bringing you an all-occasion follow up to my Christmas Cuts collection called For You.

Birthday Tag Trio

This set of stamps and dies focuses mainly on birthday, but includes options for wedding, graduation, new home and more!

Ombre Birthday Tag

I started by die cutting each of the For You tags from white cardstock. I colored the images with Copic markers and then used the new Window Cut Tag die to cut a second layer for each.

Party Streamers Tag

I stamped the window layers with sentiments from the For You stamp set using Royal Velvet, Pale Peony, and Winter Wisteria inks.

Birthday Wishes Tag

I adhered the two pieces together and tied a length of baker's twine to each one. Easy and super cute!

Thank you so much for joining me today! I'll be back tomorrow with more of the For You collection. In the meantime, make sure to check in with Nichole, Ashley, Betsy, Erin, Lexi, and Maile for more inspiration. See you soon!

Recipe:
Stamps: For You - Papertrey Ink
Cardstock: white
Ink: Royal Velvet, Winter Wisteria, Pale Peony - Papertrey Ink
Other: For You Tag Dies, Window Cut Tag Die - Papertrey Ink; Lemon, Teal, Oyster Baker's Twine - Divine Twine; Markers - Copic

Monday, November 7, 2016

Moments Inked: Holiday Planning


Good morning, friends! It's my turn to show you how I'm using my Moments Inked planner these days, so I thought I'd share the holiday prep section I put together to keep myself organized this yuletide season. I'm a "function over fuss" kind of planner, so my whole system is fairly simple. It works for me though and I'm excited to use it this year.

I created a dashboard and broke the section into three categories: Mail (our Christmas card mailing list), Gift List (a place to organize gift ideas for everyone on our list), and Don't Forget (somewhere to keep those ever-important To Do lists).

Holiday Prep Dashboard

Let's start with the dashboard. I used the large Binder Page Die to cut a full-size page from Ripe Avocado cardstock and stamped it with Fair Isle Borders using Olive Twist ink.

Holiday Prep Tab

I cut a tab using the Binder Listed Die from Fresh Snow Linen cardstock and added a "Holiday Prep" sticker before adhering it to the Ripe Avocado page.

Holiday Mail Section

Next comes the "Mail" divider. I used a Binder Listed shape cut from Pure Poppy and again stamped with Fair Isle Borders, this time in Scarlet Jewel.

Holiday Mail Tab

I used the envelope and sentiment from Everyday Symbols on the label, die cut from Fresh Snow Linen cardstock using the Divided Die.

Christmas Card List Page

The list page itself was cut from Fresh Snow Linen stock and stamped with the lines from the Listed stamp set using Smokey Shadow ink, masking a few of the lines to make them fit the page. I stamped both sides of the page to make sure I'd have plenty of space to add all of the folks on our list this year. I added a little festive flair to the page using the new Chevron Skinny Washi tape. It's just enough to make things pretty, but it was quick and easy to add.

Postage Envelope

I also die cut an A6 envelope with the large Binder Page. This is such a convenient place to keep my postage. I happened to have some stamps left over from last year, so I tucked those inside the envelope so I wouldn't forget to use them when I'm ready to mail this year.

Holiday Gift List Section

Next is my "Gift List" divider. This time the Binder Listed shape is cut from Simply Chartreuse and stamped with Fair Isle Borders in Ripe Avocado.

Holiday Gift List Tab

The gift bag from Everyday Symbols and the sentiment from Listed paired together to decorate the label.

Gift List Pages

On these pages (I did a few) I used the Listed stamp set for both the lines, in Smokey Shadow, and the header images, in Simply Chartreuse. I'll use the headers to write the recipient's name and then write down gift ideas on the lines below. Once again, I used the red Chevron Skinny Washi tape to decorate the binder edge. Simple and functional.

Gift List & Receipts Envelope

I die cut another envelope, this time for receipts, coupons, or other ads that might come in handy while shopping.

Don't Forget Section

The last category of my Holiday Prep section is a general To Do section. I used an Aqua Mist Binder Listed shape stamped with Fair Isle Borders in Hawaiian Shores ink.

Holiday Don't Forget Tab

I used the finger tied with string and sentiment from Everyday Symbols to embellish the Fresh Snow Linen tab.

Holiday To Do List

I used the Posted II stamp set on my To Do list page. I stamped the lines in Smokey Shadow and the header in Simply Chartreuse, making and stamping twice to keep the images separate. I added the sentiment, also from Posted II, in Pure Poppy as a nod to the holiday. I also decorated with a bit more Chevron Skinny Washi tape. This section will be perfect for writing down reminders for things like setting up Gus's Pet Palace reservation and stopping newspaper delivery.

I hope my clean and simple approach to holiday planning has been fun for you to see this morning. Thank you so much for joining me and have a great week!