Friday, August 31, 2018

Design Team Tips: Mini Studio Tour

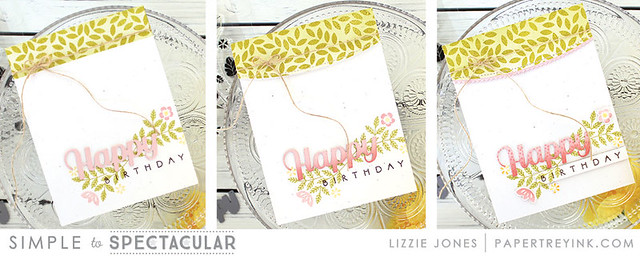
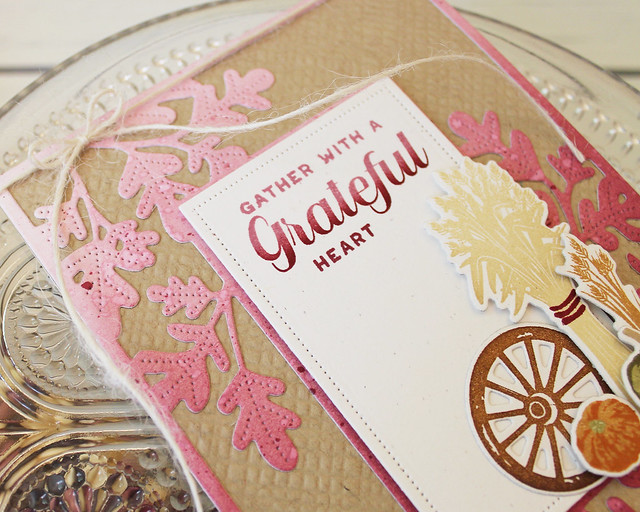
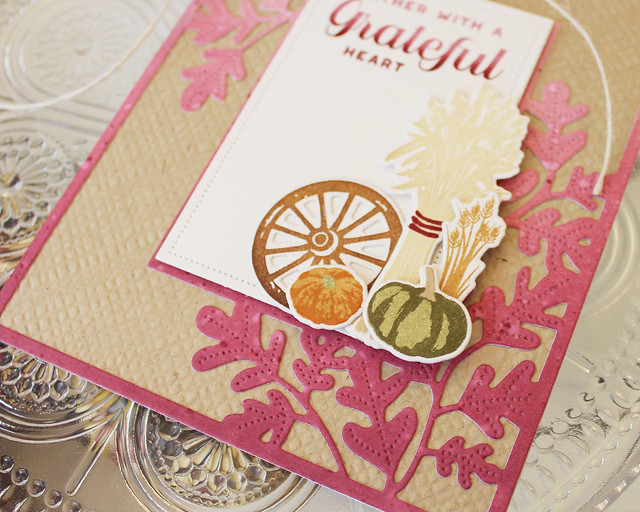
Good morning, friends! It's my turn to share a tip or two for this week's Papertrey Ink Design Team Tips, so I thought I might do a little something different. We all have so many tools, stamp sets, and accoutrements that it can be hard to know how best to corral our favorites so they are easily accessible and always convenient.

LizzieJones_DTTips_MiniStudioTour

So I figured it might be fun to welcome you into my studio and share the ways I keep a few choice selections close at hand. It's time for a mini studio tour!

LizzieJones_DTTips_MiniStudioTour_Desktop1


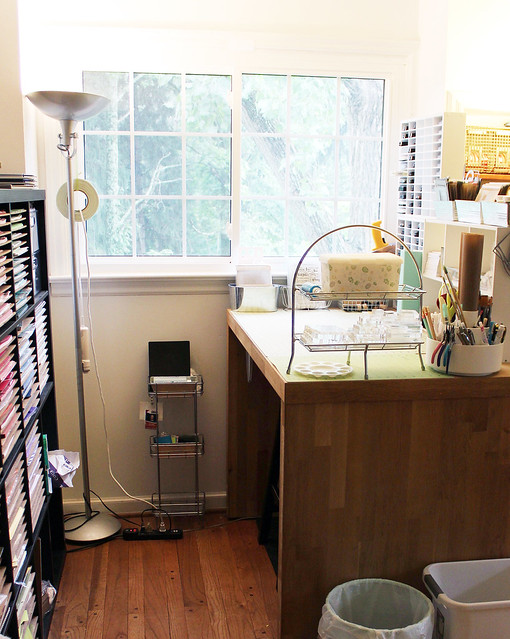
I'm keeping today's tour confined to the area immediately adjacent to my workbench, but there's plenty to see, I promise! I work standing at this counter-height bench with a customized Ikea Kallax standing behind me. Let's start at the left side of my workbench and continue clockwise.

LizzieJones_DTTips_MiniStudioTour_DieCutPlates&Templates

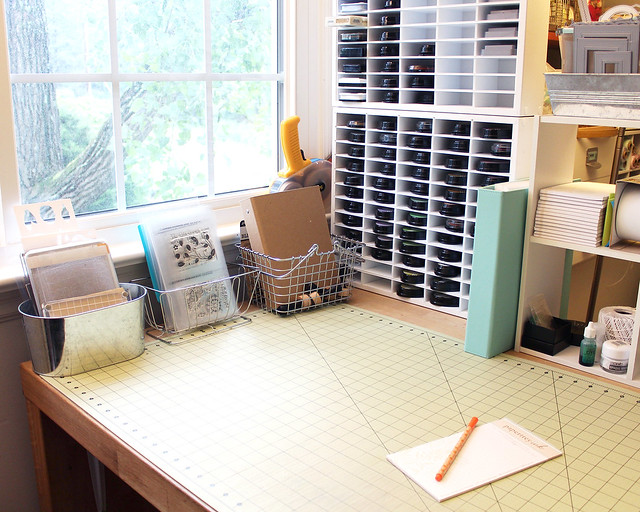
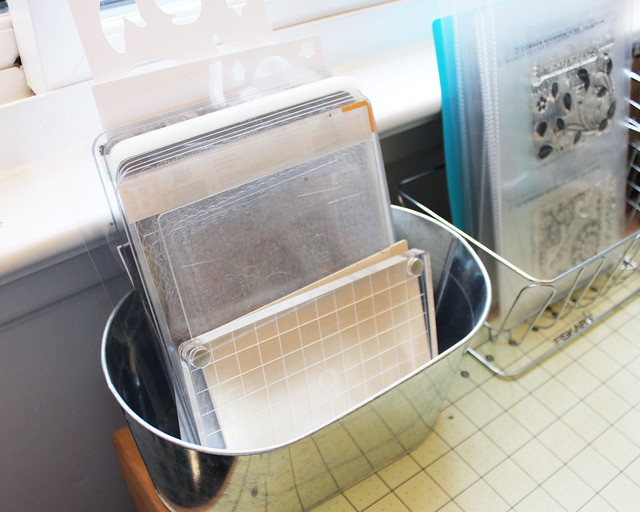
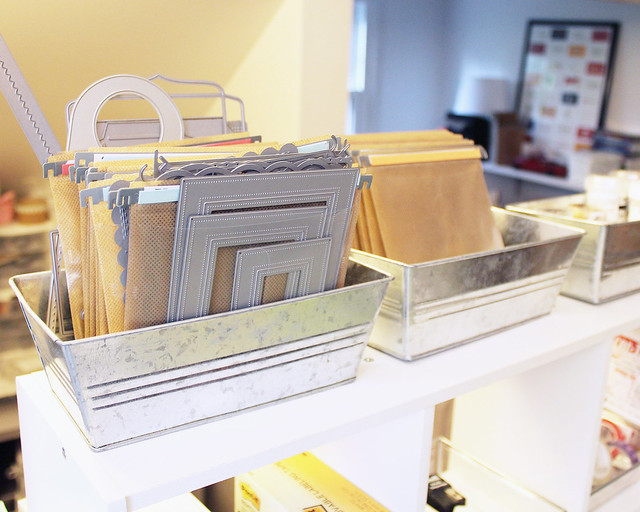
Here to my left while I'm working I have three baskets. In the one on the end I keep die cutting plates, metal shims, embossing pads, and pre-cut shapes I use as templates when I'm designing cards.

LizzieJones_DTTips_MiniStudioTour_DieCutTemplates

I also keep die cut templates that I use for some of my favorite stamp sets. I use them in my stamp platform to make sure I have proper placement on my die cuts. Holding on to the templates saves me time and paper.

LizzieJones_DTTips_MiniStudioTour_FavoriteStamps&Series

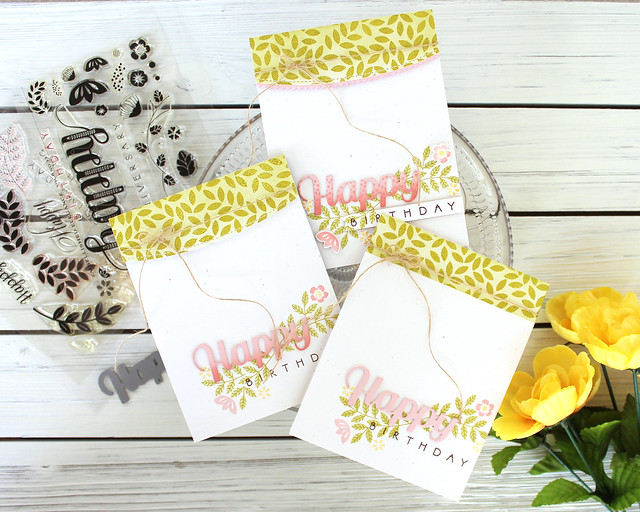
In the next basket I keep a few of my favorite stamp sets (like the Cover Up: Grid and Background Basics: Super Stripes), the monthly series that we're working with for the current year (like Sentiment Staples and Corner Adorner), and the stamp sets for the current month (I put August away in my big cabinet and I'm hiding September, so this basket looks a little thinner than usual). Storing my favorites and frequently used sets in this basket keeps me from having to go back and forth from my bigger storage which, again, saves me time. More time for stamping!

LizzieJones_DTTips_MiniStudioTour_InkStorage

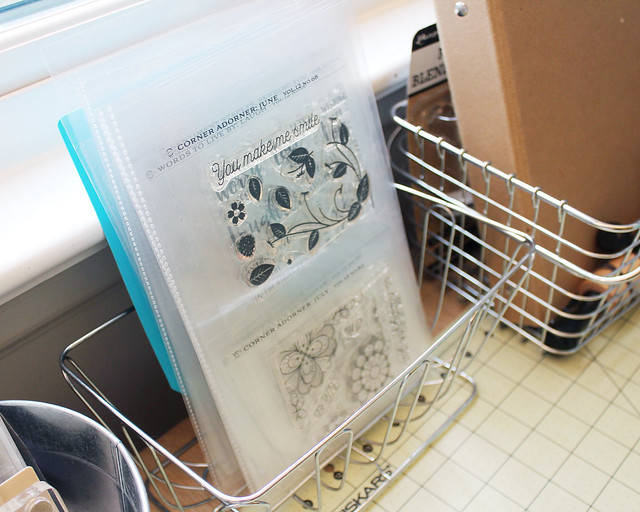
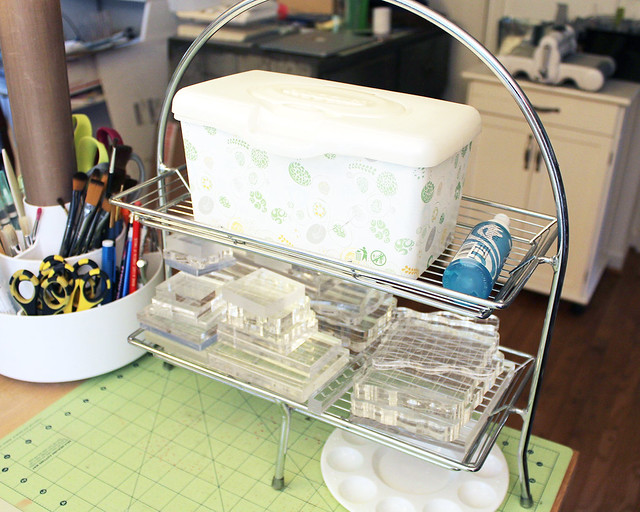
The third basket, the one nearest to my ink pad storage, holds my Blending Sponge Binder and sponge handles. The ink pad storage is from Organize More and I have two stacked on top of one another. They are nicely made and sturdy so I just have them standing on my workbench. There is a wall to support them on the back side, too, to keep them upright. My Stencil Binder is tucked in next to my ink pad storage.

LizzieJones_DTTips_MiniStudioTour_DesktopOrganizer

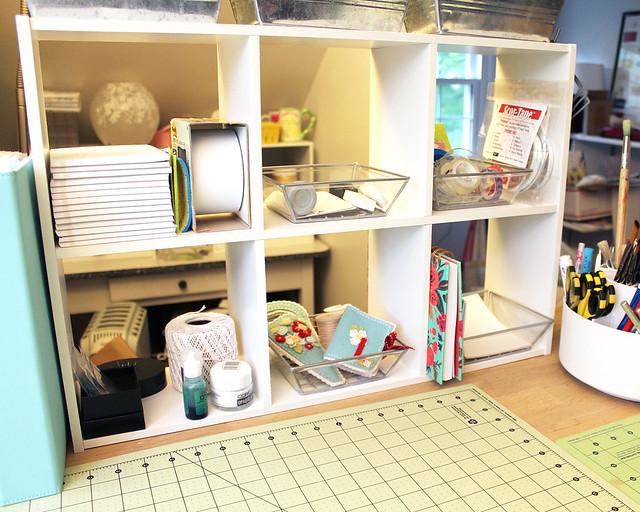
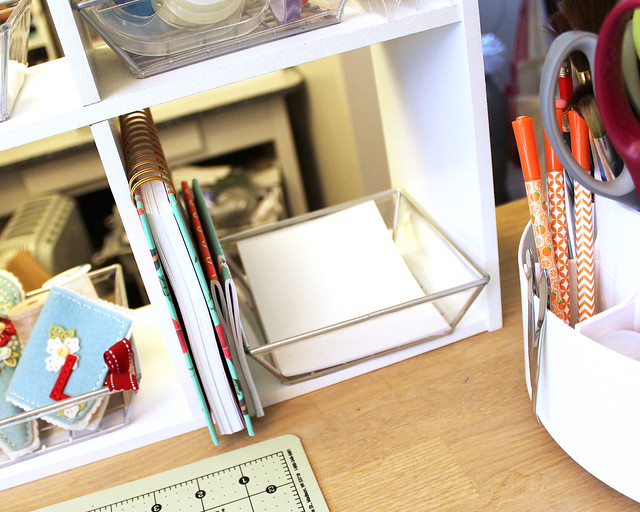
To the right of my Stencil Binder I have a mini six cube organizer. Each cube holds something that I use on a regular basis. For example, I have my masking paper and post it notes in one cube, erasers that I use to prime stamps (which I do every time I use them), adhesives and washi for die cutting, etc.

LizzieJones_DTTips_MiniStudioTour_ScratchPaper

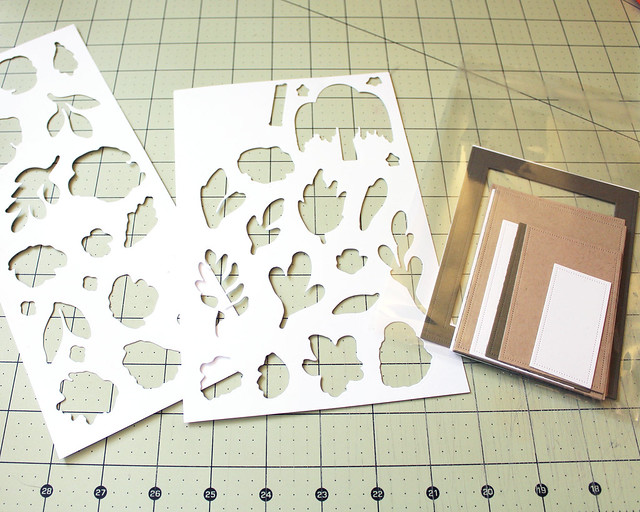
This cube may not look all that exciting, but in this little tray is my secret weapon. These A2 sheets of scrap paper are the foundation of every card. Sometimes I just sketch out an idea (to scale since I have the pre-cut paper). Sometimes I stamp directly onto the paper. Sometimes I arrange die cuts to see how everything fits and then take a photo with my phone so I don't forget the layout. One way or another, each card starts with these pieces of paper.

LizzieJones_DTTips_MiniStudioTour_FavoriteDies

On top of that organizer sit three small tins. I bought these at the Target Dollar Spot ages ago, so I don't know if they still have anything similar, but I love them. The one on the left is for my favorite and most frequently used dies. Some of these are basics that can be used with any stamp set (like my Pierced Feature Frames or select Mix & Mat dies) while others are the coordinating dies that go with a favorite stamp set (like the Botanical Bounty dies). And yet others may coordinate with a stamp set, but I use them independently because they don't require the stamps to make sense (like the Direct Messages Banner Die or the Banner Style Die).

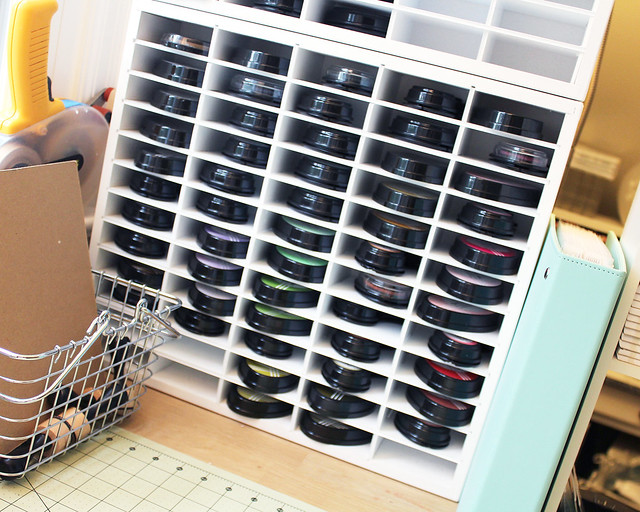
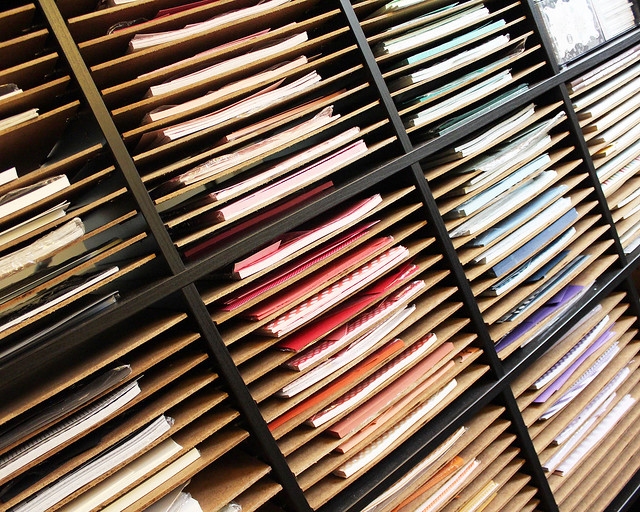
The middle tin is for the current month's dies and the dies that coordinate with a series (like the Words To Live By dies). I still organize my dies in hanging CD sleeves like I showed HERE, but the company has since discontinued those fabric boxes, and I am packed to the gills! So I'm working on a new, very similar solution that I will share when I finally finish it. The color coding concept won't change, but the sleeves probably will.

LizzieJones_DTTips_MiniStudioTour_Embossing&PigmentPowders

The third tin holds my embossing and pigment powders. I don't have many (this is all of them), but I also don't emboss as much as some of you so this works just fine for me. I like having them close at hand though because if I have to go searching I know I'll talk myself out of embossing. I'm sort of a lazy crafter.

LizzieJones_DTTips_MiniStudioTour_ToolCarousel

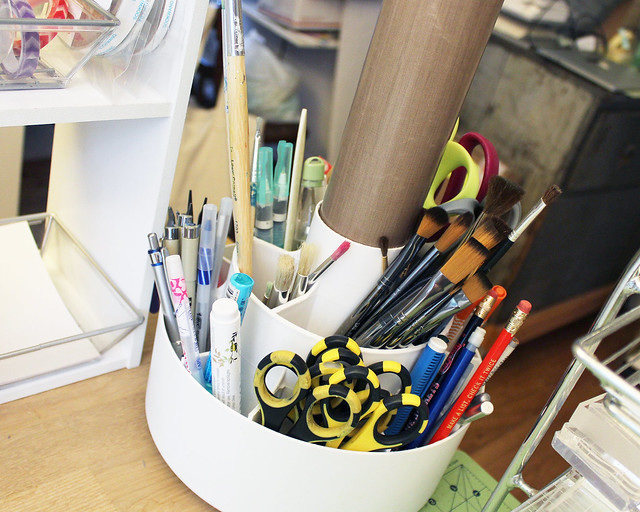
Rounding my desktop corner you see my tool carousel. This is actually a Pampered Chef utensil caddy that we received as a wedding gift nearly 15 years ago. It had outlived its usefulness in our kitchen, so I repurposed it here in my studio. It holds all of the essentials so I never have to go in search of anything. I have all of the pens, paint brushes, scissors, glue pens, Xactos, and scoring tools I could ever want right here at my fingertips. Repurposing something you already own is a great way to save money that you could use on a new tool or stamps, am I right?!

LizzieJones_DTTips_MiniStudioTour_Blocks&Cleaning

Another repurposed item from my craft show days is this dessert stand that I used to use to display stationery at shows. I keep all of my blocks on the bottom (despite the popularity of stamping platforms I still love blocks and use them every time I stamp) and my wipes and cleaning solution are there on the top. Having these things right here makes it easy for me to clean my stamps more quickly which helps reduce really stubborn ink stains (I'm looking at you, Scarlet Jewel).

LizzieJones_DTTips_MiniStudioTour_HangingTools

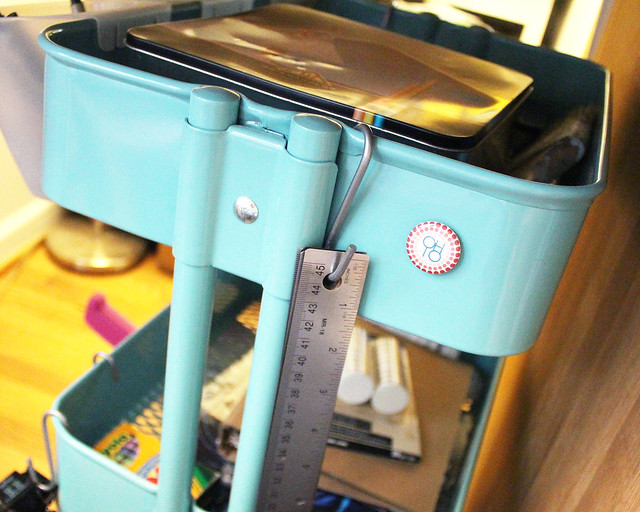
Let's take a quick peek under my desk for a moment. I have one of the ubiquitous Raskog carts from Ikea that I use for extras (like packs of unopened blending sponges) and coloring mediums (watercolors and colored pencils). But I also use S-hooks to hang some other tools that I don't want to have to dig around for should the need arise. My Corner Chomper and Crop-A-Dile come to mind. I have a second ATG handing down here too, but the one I use most often sits on the window sill. This is a back up in case that one ever breaks for good.

LizzieJones_DTTips_MiniStudioTour_HangingRulers

My rulers also hang down here. I have a paper trimmer, but I'm just as likely to use a metal ruler and xacto to cut a card base as I am to walk across the room to the trimmer. It's a big room. And I mentioned that I'm lazy, right?

LizzieJones_DTTips_MiniStudioTour_Tools

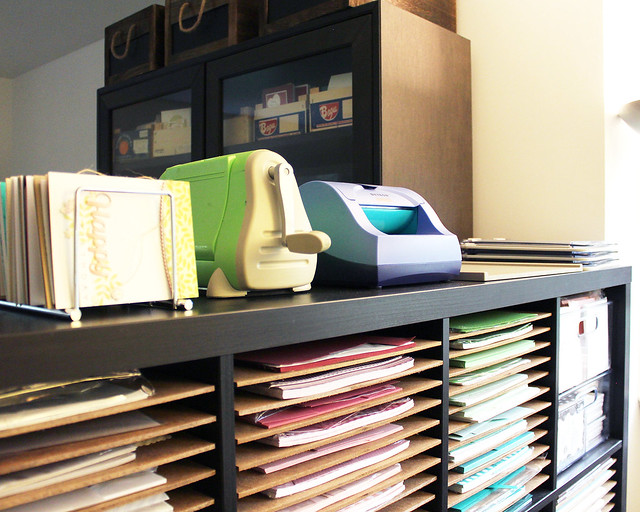
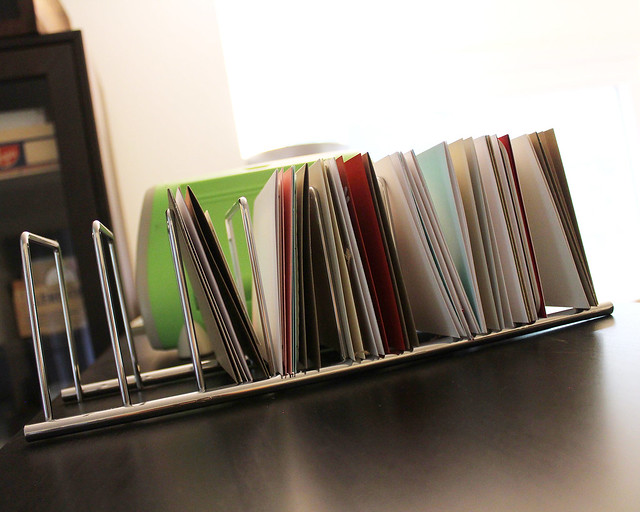
Ok, next up is my paper storage, but let's talk about what lives on top first. There are a handful of tools that I reach for regularly that I want to have within easy reach, but are larger or too cumbersome to keep on my work surface at all times. Those items live here. Namely, my Xyron, Scor-Pal, stamp platforms, and the sorter that I use for my unfiled cards.

LizzieJones_DTTips_MiniStudioTour_UnfiledCards

By sorter, I mean "pot lid rack," but who's counting? This is where finished cards live until I can find the time to mail them or put them into categorized boxes. It keeps them relatively safe and they're easy to find.

LizzieJones_DTTips_MiniStudioTour_PaperStorage

Now the paper storage. This is a basic Kallax from Ikea that I customized with a lot of drilling and a large bag of shelf pins. The shelves themselves are all 3/16" hardboard that I sweet talked my dad into cutting for me. If you choose to do something like this for yourself, I highly suggest getting an actual cabinet shop, sawmill, or trusted individual to cut them to size for you. Home Depot will do it for a price, but I've had inconsistent results with their finish work. Forewarned is forearmed, friends.

LizzieJones_DTTips_MiniStudioTour_FoamTape&HeatTool

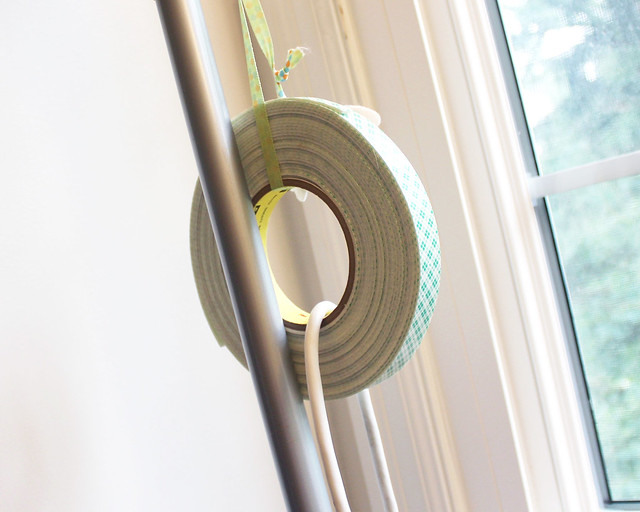
At the end of that shelf stands a lamp with my beloved foam tape hanging from the switch (that cord looped through the center is my heat tool). I've been tying and retying the same piece of ribbon to hang my foam tape for several years. It's a great way to use some of that cheapo ribbon you may have purchased in the $1 bin at Michaels because it was a great deal even though it doesn't match anything and isn't even all that pretty. Not that I would do such a thing...ahem. This isn't much to look at, but it's very nice to have them so close. And there we are, back at the beginning!

LizzieJones_DTTips_MiniStudioTour_StudioAssistant

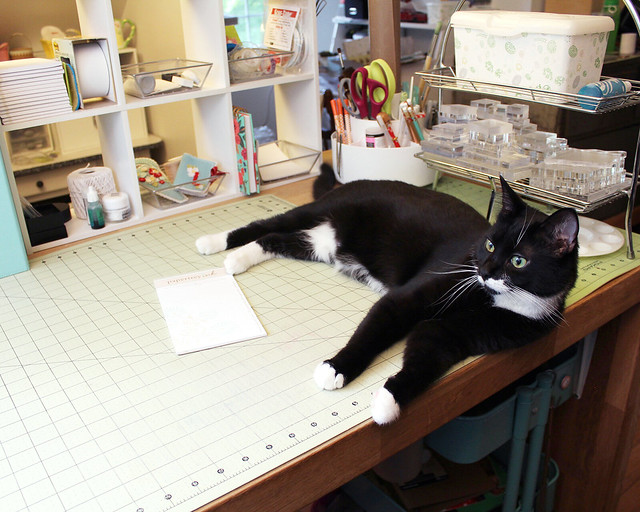
But of course, no studio tour (no matter how mini) would be complete without a peek at my handsome assistant. Always ready to lend a hand paw. There are actually two cat towers in this room, so there are plenty of comfy spaces for my fellas to lounge. Louie just seems to need all the attention he can get lately.

Like I said, this is just the area adjacent to my workbench so I didn't show the full extent of my stamp or die storage. The room is a pretty good size (you've seen maybe 1/4 of it) and it would be a huge time waster if I had to run around to all corners of the space every time I needed something. Having the essentials tucked in around my work surface helps me stay more efficient and focused - and I need all the help I can get! Thank you so much for joining me today. I hope you've picked up some tips and enjoyed this little peek into my studio. Have a wonderful weekend and I'll see you again soon!

Wednesday, August 29, 2018

Simple To Spectacular: Embellished Elegance

Good morning, friends, and welcome to this month's Papertrey Ink Simple To Spectacular feature!

SIMPLE2SPECTACULAR-082918-LIZZIE


I love this challenge because it shows just how different a design can look with even the subtlest of changes. Embellished Elegance is also one of those sets with so many options to build your images as boldly or as simply as you can imagine, which makes it a perfect set for this feature. It was such a fun set to pull out again and now I have a handful of birthday cards ready for the next few celebrations!

LizzieJones_PapertreyInk_SimpleToSpectacular_EmbellishedElegance_HappyBirthdayCardTrio

I've heard several questions about how the designers choose to go from one level to the next with these Simple To Spectacular projects. Sometimes I come up with the more embellished version first and then think of ways to simplify. Other times, the simplest card comes to me easily and then I think up ways to take the others over the top. Today, it was somewhere in the middle. I came up with the Intermediate card first and then thought up ways to add more depth and interest for the Spectacular version while streamlining the design for the Simple card. I really love all three this time around though and I hope you will too!

For the sake of keeping things linear though, I'm going to start today with my Simple card.

LizzieJones_PapertreyInk_SimpleToSpectacular_EmbellishedElegance_HappyBirthdayCardSimple

I began by sponging a Spring Moss band onto a Rustic White card base. I stamped that with a leafy cluster from Embellished Elegance using Simply Chartreuse ink and then removed my masks. Next, I stamped that same leafy cluster and its coordinating branch image onto the card front.

LizzieJones_PapertreyInk_SimpleToSpectacular_EmbellishedElegance_HappyBirthdayCardSimple3

I followed up with flowers from the set in Sweet Blush, Pale Peony, and Harvest Gold inks. Then I added the sentiment in Dark Chocolate. I die cut the "Happy" using the sentiment die that comes with the Bold Borders: Flare die from one piece of Sweet Blush and two pieces of xyroned Rustic White.

LizzieJones_PapertreyInk_SimpleToSpectacular_EmbellishedElegance_HappyBirthdayCardSimple2

I stacked those sentiments and adhered them to the front of the card. Finally, I tied on a Rustic Jute bow to add a little softness to the design.

For the Intermediate card I followed many of the same steps, just adding a little extra dimension here and there.

LizzieJones_PapertreyInk_SimpleToSpectacular_EmbellishedElegance_HappyBirthdayCardIntermediate

I used the same cardstock for the front of my card, but this time I adhered a panel to a Classic Kraft card base. I like that there's a contrast from the front of the card to the inside.

LizzieJones_PapertreyInk_SimpleToSpectacular_EmbellishedElegance_HappyBirthdayCardIntermediate2

I also used the Round Off Edgers to create a leafy, raised panel instead of sponging and stamping directly onto the card base.

LizzieJones_PapertreyInk_SimpleToSpectacular_EmbellishedElegance_HappyBirthdayCardIntermediate3

The die cut sentiment got a bit of an ombre treatment thanks to some blending and the flowers are all touched with a spot or two of glitter to make them sparkle.

For the Spectacular card I amped everything up with additional layers of texture and pattern while keeping the color palette and the supplies largely the same.

LizzieJones_PapertreyInk_SimpleToSpectacular_EmbellishedElegance_HappyBirthdayCardSpectacular

Again, I used the Rustic White card front on a Classic Kraft base. I used the pinked edge border in the Round Off Edgers set to add an extra layer of Sweet Blush cardstock to my leafy layer in order to reintroduce a pink element one more time.

LizzieJones_PapertreyInk_SimpleToSpectacular_EmbellishedElegance_HappyBirthdayCardSpectacular2

I die cut the birthday sentiment using the Direct Messages die to give it a little lift and the "Happy" got a specked appearance thanks to one of the floral elements in the Embellished Elegance set. I also die cut all of the flowers for this card, using the Rock 'N Roll technique to give each bloom a bit more interest.

LizzieJones_PapertreyInk_SimpleToSpectacular_EmbellishedElegance_HappyBirthdayCardSpectacular3

I attached some with flat and others with foam adhesives to mix things up a little. They all got the same sparkly glitter accents, too, for a bit of shine.

I think that's all I have to share with you today. Betsy and Melissa are both sharing Simple To Spectacular: Embellished Elegance projects today too, so be sure to pop in on their blogs and see how they're using this set. Thank you so much for joining me and I'll see you again soon!

Supplies:
Embellished Elegance Card Trio

Saturday, August 25, 2018

Stamp-A-Faire 2018: Building A Felt Flower Wreath

Good morning, friends! It's Papertrey Ink's Stamp-A-Faire 2018!!! I'm kicking off this morning with a tutorial all about creating felt flowers and building a wreath full of garden goodness.

LizzieJones_PapertreyInk_2018StampAFaire_FeltFlowerWreath

You can follow along with my class live from 8am-9:30am ET or check out my tutorial video over on the Papertrey Ink blog.

Felt Wreath Tools

I'm using my brand new Wreath Builder Dies (which are available in the store now) and the Wreath Builder: Fringe and Wreath Builder: Leaves from the exclusive kit, but I would suggest the dies below if you need some ideas to get started (click on the images for an enlarged photo).

Felt Wreath Suggested Flower Dies

Felt Wreath Suggested Leaf Dies

Here is a little diagram and list of each of the flowers I show how to create in my class, so you know how many and what sizes of die cuts you need for each bloom.

Felt Flower Wreath Parts & Pieces

No. 1 - Six medium flowers

No. 2 - One large, one medium, one small flower; small felt ball or pom-pom

No. 3 - Two medium flowers; six individual medium petals; one felt fringe

No. 4 - Six individual medium petals; one small flower; two extra small flowers

No. 5 - Six large flowers

No. 6 - One extra large flower; two small flowers; six small individual petals; one extra small flower

No. 7 - Six small individual petals; one small flower; one extra small flower

No. 8 - Five extra large flowers; one felt fringe; one large felt ball or pom-pom

No. 9 - Three extra large flowers; one medium flower; one felt fringe

No. 10 - Six small individual petals; six medium individual petals; one small flower; two extra small flowers

No. 11 - Two large flowers; one felt fringe; one large felt ball or pom-pom

No. 12 - One extra large flower; one medium flower; one small flower; six individual medium petals; one small felt ball or pom-pom

18 leaves in varying sizes


LizzieJones_PapertreyInk_2018StampAFaire_FeltFlowerWreath2

Join us today and share your projects over on the inlinkz list on the blog for your chance to win a gift certificate. Thank you so much for popping by this morning and I hope you enjoy today's festivities!

Supplies:
Felt Flower Wreath

Friday, August 24, 2018

Introducing The 2018 Stamp-A-Faire Stamp Set: Community Garden

Good morning, friends! I'm popping in today to introduce the free stamp set for this year's Stamp-A-Faire event. The Community Garden stamp set will be available for free during the Stamp-a-faire event (August 24-25th) to all customers who make a qualifying purchase of $100 (after rewards points/discounts are applied, before shipping is added) or more 7:30PM ET, August 24th - 11:59PM ET, August 25th, limit one per customer.

LizzieJones_PapertreyInk_StampAFaire2018_CommunityGarden_BeautifulDayCard

I began by stamping the flowers and flower pots from the set onto a Simply Stitched panel. Then, I stamped a basket and trimmed it out by hand (it will have dies available for purchase in September). I also stamped and trimmed out the gloves and a flower pot and set all of the pieces aside.

LizzieJones_PapertreyInk_StampAFaire2018_CommunityGarden_BeautifulDayCard3

I stamped the greeting from Botanical Bounty Sentiments in Prairie Grass sponged with Olive Twist ink. I mounted the basket over the flowers using dimensional adhesive. Then, I added the gloves and flower pot with flat and foam adhesives.

LizzieJones_PapertreyInk_StampAFaire2018_CommunityGarden_BeautifulDayCard2

That panel was mounted to a card base layered with Bitty Big: Olive Twist patterned paper. This is such a fun set! It's so full of garden goodness! I hope you'll join us for the event. It starts tonight, so we'll see you soon!

Supplies:

Thursday, August 16, 2018

Throwback Thursday: Flipping Out

Hello, friends! Did you see that the new Papertrey Ink release is now live? Make sure to head over to the website to pick up the fabulous Autumn products that the team has been showcasing over the past several days! In the meantime, it's Throwback Thursday and today Dawn, Michelle, and I are featuring the Flipping Out stamp set. This is such a whimsical set, full of playful sentiments and snazzy patterned sandals. It's just right for anyone looking for a bit of cheeky fun in the craft room. And it just so happens to pair perfectly with some of our more recent ocean-themed stamps! I paired it today with Betsy's Text & Texture: Ocean stamp set to create a beachy birthday card.

LizzieJones_ThrowbackThursday_FlippingOut_FlippinGreatBirthdayCard

I began by stamping the Text & Texture: Ocean background onto Aqua Mist cardstock using Aqua Mist and Tropical Teal inks. I heat embossed the Flipping Out sentiment onto the panel and then splattered Copic Opaque White Pigment to add sea spray speckles.

LizzieJones_ThrowbackThursday_FlippingOut_FlippinGreatBirthdayCard2

Next, I xyoned a piece of Fine Linen cardstock and die cut it with the In The Meadow die, adhesive side up. I removed the protective backing and sprinkled the sticky surface with real decorative sand. It sticks about the same as glitter and it adds so much texture! I trimmed the sand dune down a little bit and adhered it to my ocean panel. Then, I adhered that panel to a Classic Kraft card base and used a Pierced Feature Frame to ground the whole scene.

LizzieJones_ThrowbackThursday_FlippingOut_FlippinGreatBirthdayCard3

I stamped my flip flops next. I stamped first in Summer Sunrise and then added a bit of shading using Canyon Clay ink. Then, I die cut the straps from Terra Cotta Tile cardstock and adhered those to the sandals. I layered two die cuts on each to give a bit of depth without too much bulk. Then, I used foam adhesive to adhered the flip flops to the front of the card. These flip flops are so charming and come in a variety of patterns, making them perfect for just about anyone. I definitely should pull this set out more often!

Thank you so much for joining me today! Make sure to pop in on Dawn and Michelle to see their projects using Flipping Out. Have a great day, everyone!

Supplies:

Tuesday, August 14, 2018

Introducing Bold Borders: Foliage And Fence Line: Autumn

Good morning, friends, and welcome to Day 5 of the Papertrey Ink August countdown! I'm back today to share Betsy's new Fence Line: Autumn and my newest Bold Borders die. I love this one to the moon and back, friends (not that I don't love all of them, of course), and I hope you will, too. Let's take a closer look!

LizzieJones_PapertreyInk_August2018_BoldBordersFoliage_FenceLineAutumn_GratefulHeartCard

I began by sponging Autumn Rose ink onto a Rustic White cardstock panel. I splattered it with clean water and Autumn Rose and Scarlet Jewel reinkers to add texture. Once it was dry, I xyroned it and die cut using my new Bold Borders: Foliage die.

LizzieJones_PapertreyInk_August2018_BoldBordersFoliage_FenceLineAutumn_GratefulHeartCard2

I textured a Classic Kraft panel with the Rustic Burlap Impression Plate and adhered it to a Rustic White card base. Then, I adhered the Bold Borders: Foliage die cut to the front. Next, I stamped a Pierced Feature Frames panel with a sentiment from Forest Floor: Autumn and adhered it to the center of the card front. The thin mat that the Bold Borders adds around the edge of the Pierced Feature Frames panel is such a nice, subtle detail.

LizzieJones_PapertreyInk_August2018_BoldBordersFoliage_FenceLineAutumn_GratefulHeartCard3

Then, I stamped and die cut the images from Fence Line: Autumn and arranged them using a mix of flat and foam adhesives to give dimension. This set has so many wonderful accessories that you can use to embellish your fence or stamp independently. As a finishing touch, I added a Rustic Cream Button Twine Bow for a bit of softness.

That's all for me today. Thank you so much for joining me! Make sure to pop in on Amy, Betsy, Dawn, Heather, Kelly, Laurie, Melissa B, Melissa P, Michelle, and Stephanie to see more of Forest Floor: Autumn, Fence Line: Autumn, and Bold Borders: Foliage today. Have a great day and I'll see you again soon!

Supplies:
Gather With A Grateful Heart Card