Tuesday, January 31, 2017

January Release In Review: Part 2

Good morning, friends, and welcome back! Today the Papertrey Ink team is sharing a few more projects using the new products from our January release. There were so many wonderful things to create with this month that they couldn't all fit into one post! Let's get on to the projects!

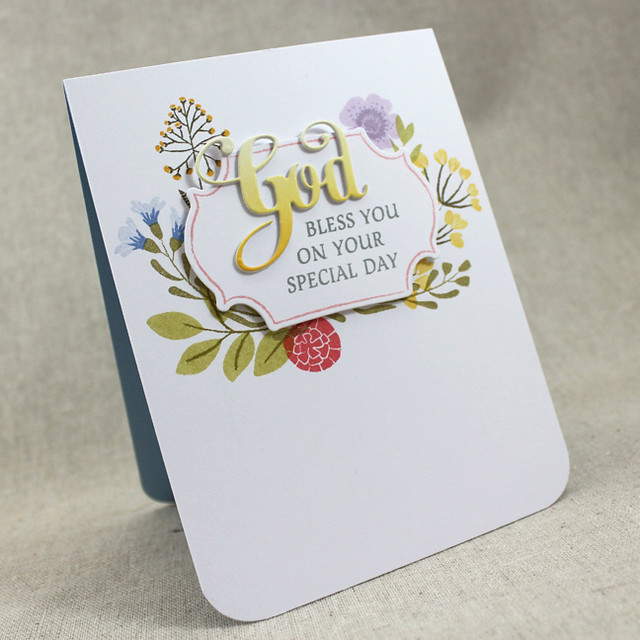
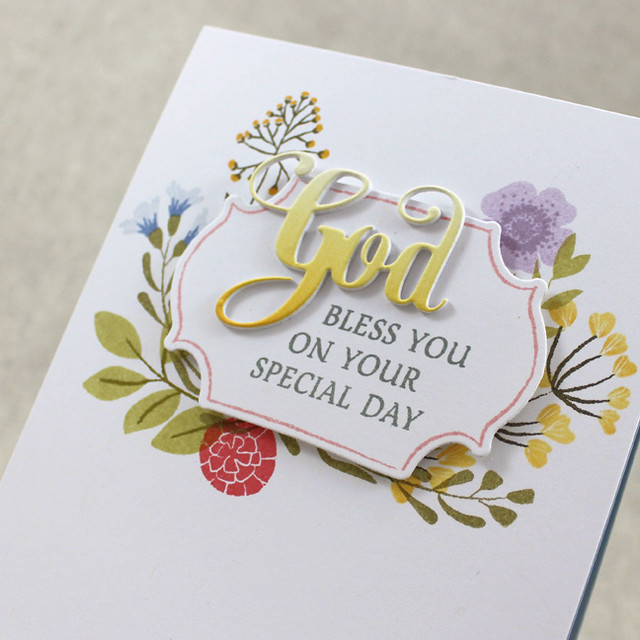
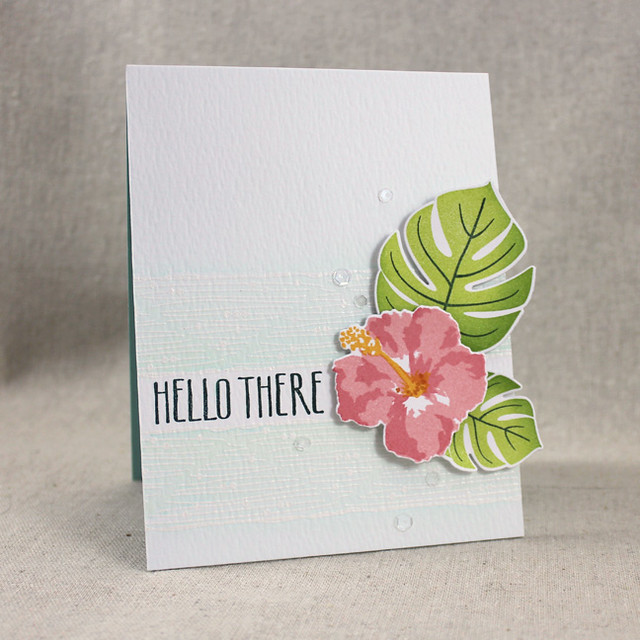
My first card today pairs Nichole's Gathered Garden set with Betsy's Inspired: God set.

God Bless You Card

I used a variety of stems and flowers to create the bed of blooms around the central frame shape. I adhered that panel to a Spring Rain card base and rounded the bottom corners. I die cut the frame, stamped it with the sentiment from Betsy's set, and then adhered it to the card front with foam tape.

God Bless You Close Up

Then I sponged Lemon Tart, Harvest Gold, and Summer Sunrise inks onto a scrap of white cardstock before die cutting it with the Inspired: God Die. I stacked that die cut shape with two others for a bit of depth and then adhered it to the frame. Clean and simple, just the way I like them.

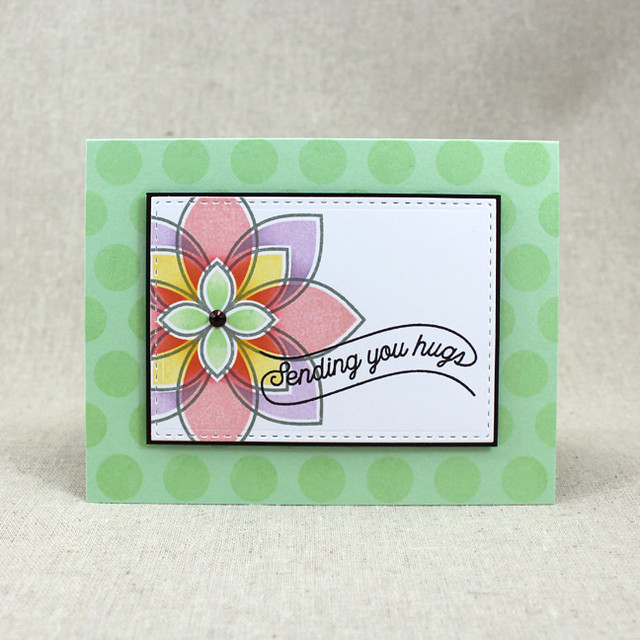
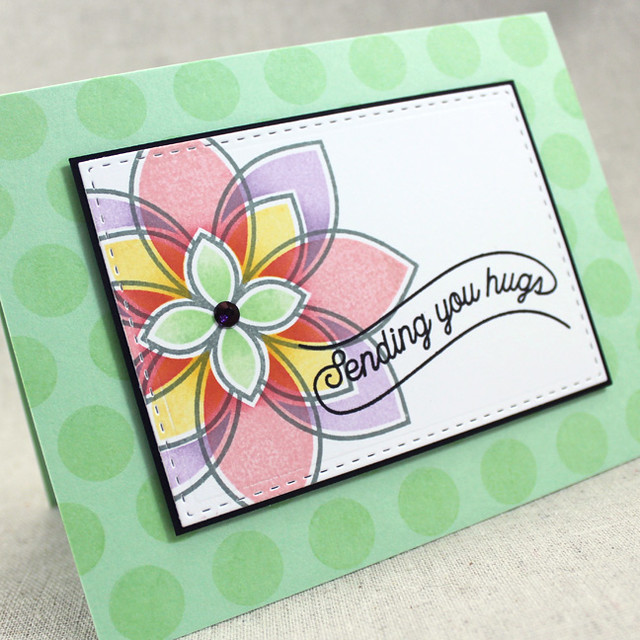
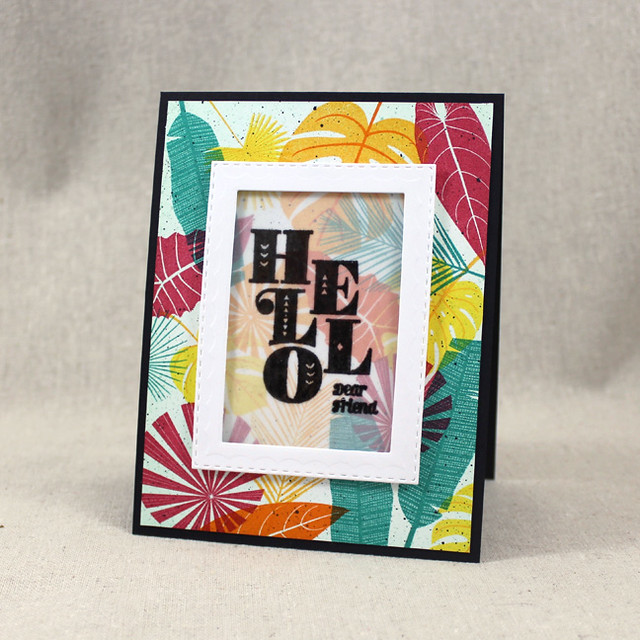
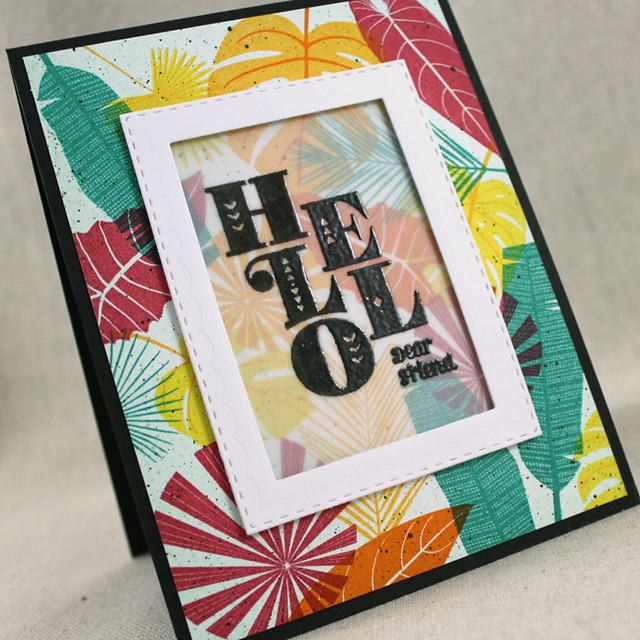
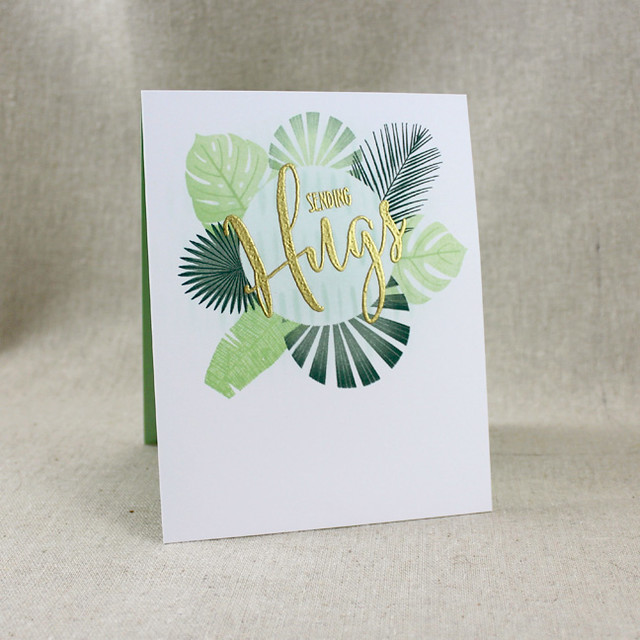
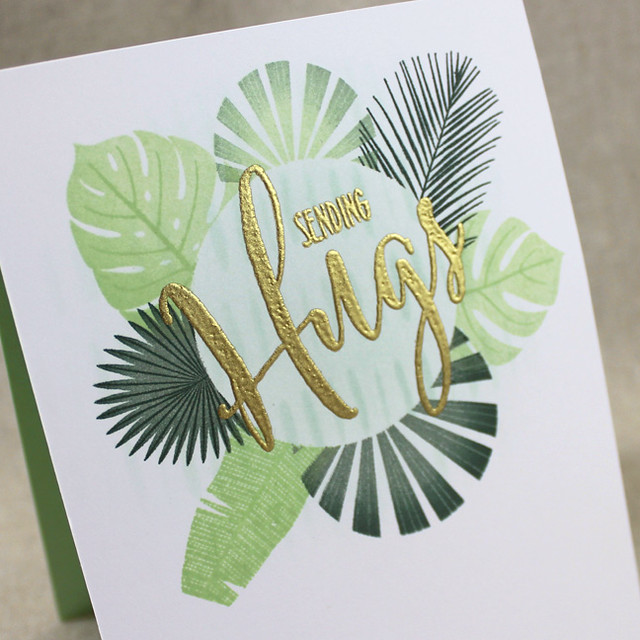
Next, I have a card pairing Nichole's Medallion Trio and Banner Style sets.

Sending You Hugs Card

I began by stamping the largest medallion onto a Noted A1 panel using Stormy Sea ink. I filled it in with the smaller images in the set using Mint Julep, Vintage Jadeite, Harvest Gold, Summer Sunrise, Pale Peony, Berry Sorbet, Lilac Grace, and Winter Wisteria. I used the darker of each pair of colors to sponge a bit of depth onto each section.

Sending You Hugs Close Up

Then I stamped the Banner Style sentiment onto the panel and matted it with a piece of True Black cardstock. I mounted that to a Mint Julep card base that I'd stamped with polka dots using the matching ink. I finished it off with a rhinestone that I'd colored black to coordinate.

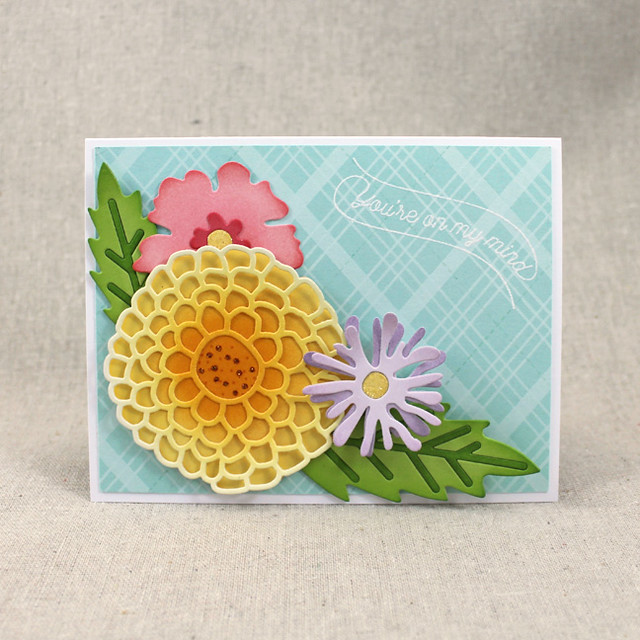
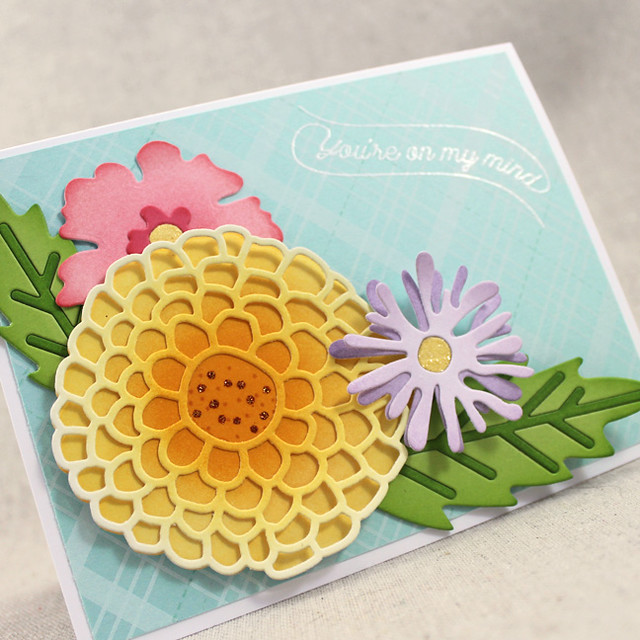
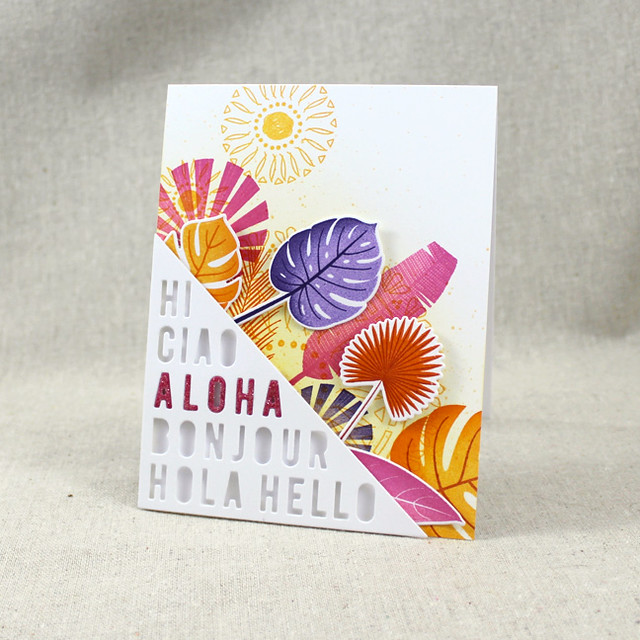
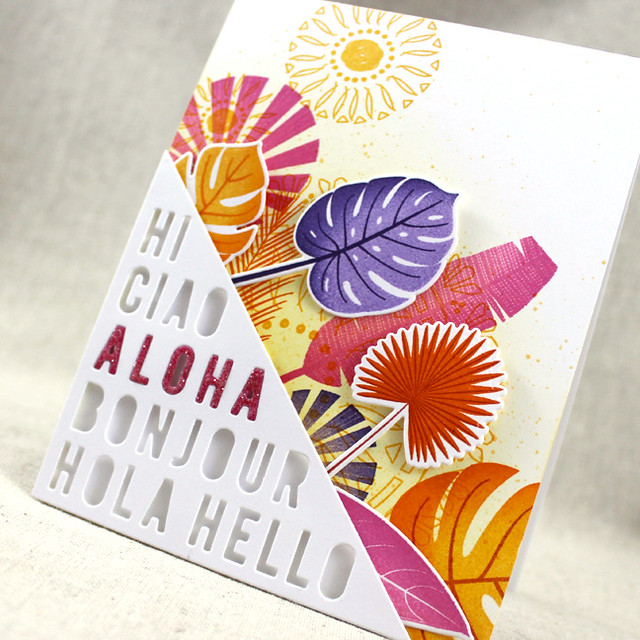
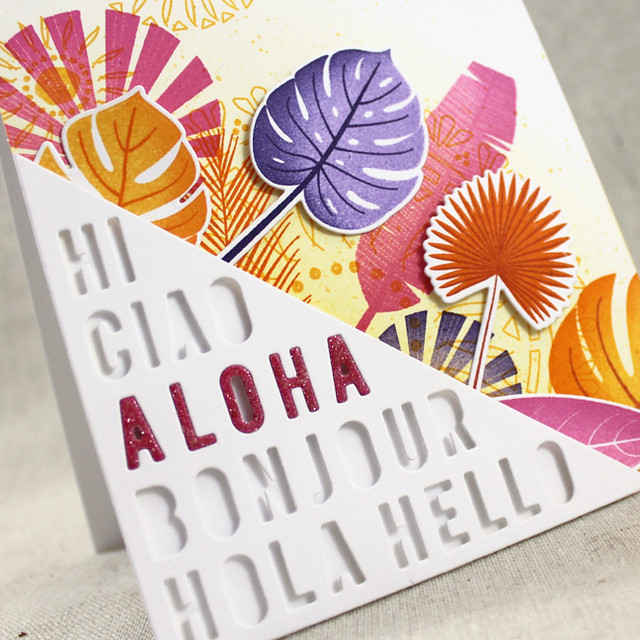
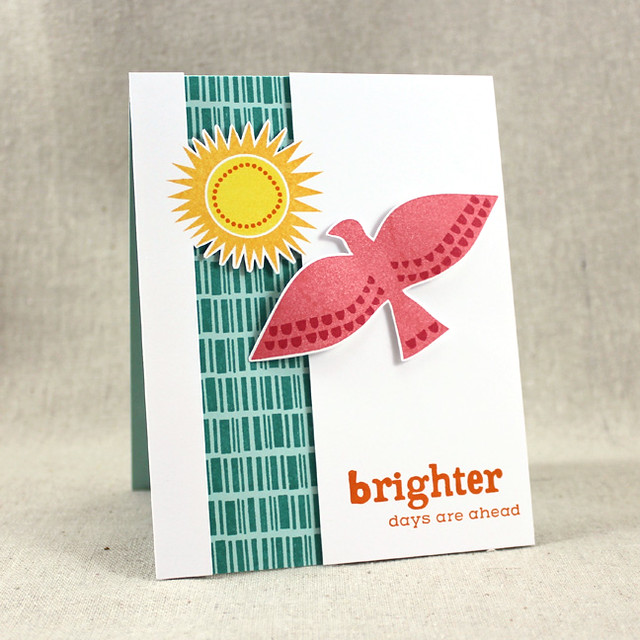
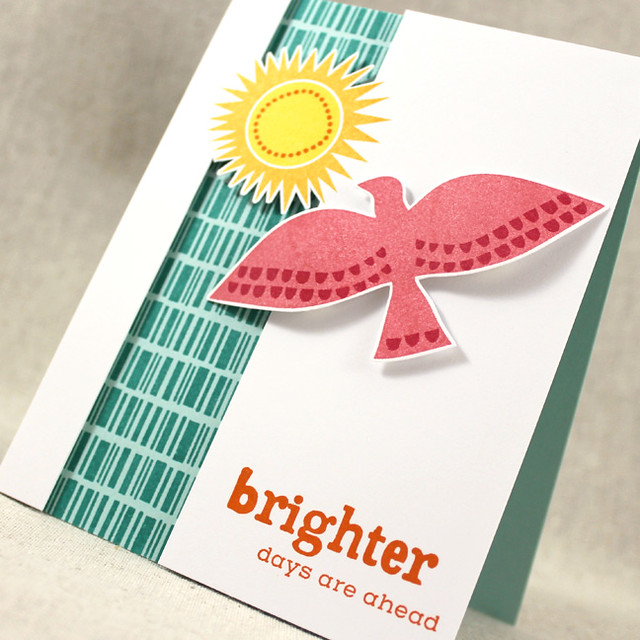
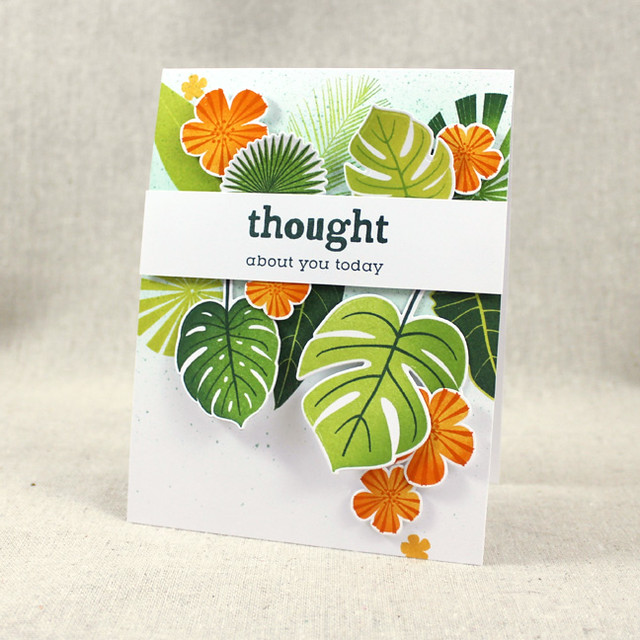
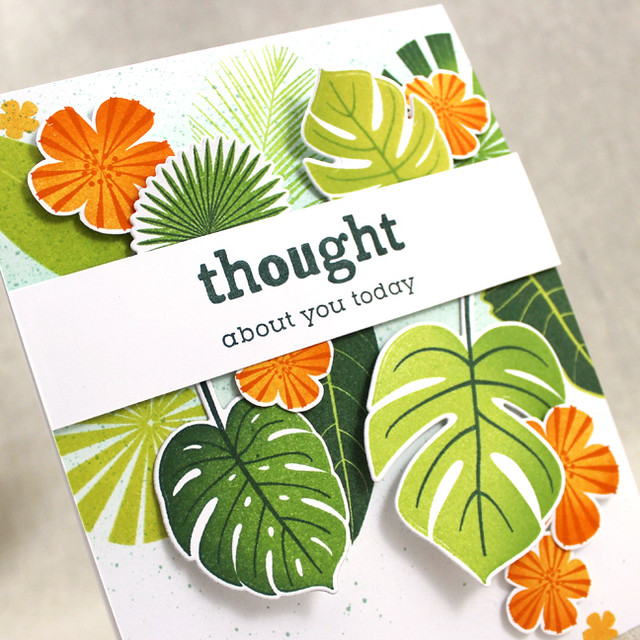
Up next is a card also featuring Banner Style, but this time with the new Grand Botanicals die collection.

Floral You're On My Mind Card

I used sponging to create depth on each of the flowers and leaves. I added speckles from the Gathered Garden set to the center of the largest flower and embellished the bigger dots with glitter. I also embellished the other two flower centers with a bit of glitter to add a touch of sparkle.

Floral You're On My Mind Close Up

Next, I stamped a plaid pattern on to a panel of Aqua Mist cardstock using Fresh Snow and Aqua Mist inks. Then, I heat embossed the Banner Style sentiment onto the plaid panel using white powder and then adhered it to a white card base. I added the leaves and flowers to the front of the card using a mix of flat and foam adhesives. Isn't it cheerful?!

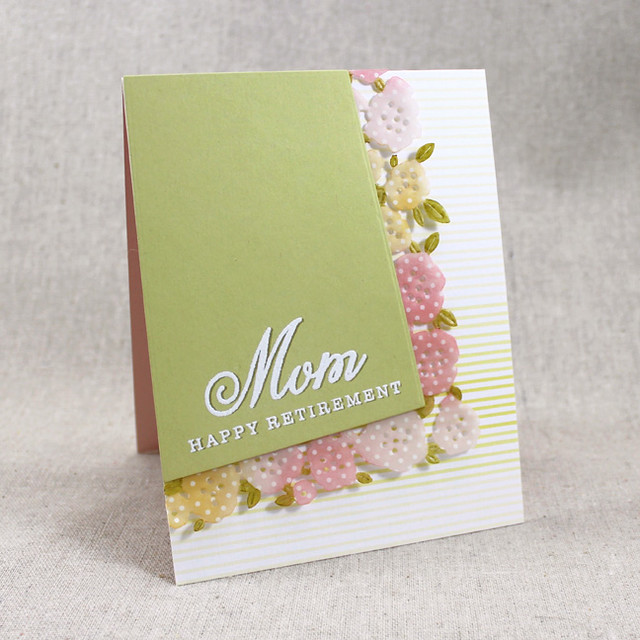
And last but not least, I have a card pairing Nichole's Keep It Simple: Retirement set with the Floribunda Frame die and Dawn's Family Ties set.

Mom's Retirement Card

I began by die cutting the Floribunda frame from swiss dot vellum (from the Sheer Basics paper pack). I sponged the frame with Pale Peony, Berry Sorbet, and Summer Sunrise inks and then used a Copic marker to color the leaves.

Mom's Retirement Close Up

Then, I die cut a Spring Moss panel with the smallest Tipped Tops shape and stamped it first with the sentiment in Prairie Grass and then heat embossed over it with white powder. The effect looks like a shadow. I adhered the vellum floral frame to the back of that panel and then attached both to a Sweet Blush card base that I'd layered with a piece of Ombre Stripes patterned paper.

That's all for me today! Thank you for joining me. Make sure to pop in on Nichole, Amy, Ashley, Betsy, Dawn, Heather, Kay, Laurie S., Laurie W., and Melissa to see more of their projects. Have a great day and I'll see you again soon!

Recipes:
God Bless You Card
Stamps: Gathered Garden, Inspired: God - Papertrey Ink
Cardstock: Spring Rain - Papertrey Ink; white
Ink: Spring Moss, Ripe Avocado, Prairie Grass, Olive Twist, Harvest Gold, Summer Sunrise, Pale Peony, Berry Sorbet, Spring Rain, Blueberry Sky, Lilac Grace, Winter Wisteria, Stormy Sea - Papertrey Ink
Other: Gathered Garden Die, Inspired: God Die - Papertrey Ink; Foam Tape - Scotch; Xyron; Corner Chomper

Sending You Hugs Card
Stamps: Medallion Trio, Banner Style, Polka Dot Basics III - Papertrey Ink
Cardstock: Mint Julep, True Black - Papertrey Ink; white
Ink: Mint Julep, Vintage Jadeite, Harvest Gold, Summer Sunrise, Pale Peony, Berry Sorbet, Lilac Grace, Winter Wisteria, Stormy Sea, True Black - Papertrey Ink
Other: Noted: Scalloped A1 Die Collection - Papertrey Ink; Rhinestone - Kaisercraft; Foam Tape - Scotch; Copic Marker

You're On My Mind Card
Stamps: Plaid Builder, Gathered Garden, Banner Style - Papertrey Ink
Cardstock: Aqua Mist, Green Parakeet - Papertrey Ink
Ink: Fresh Snow, Aqua Mist, Canyon Clay, Lemon Tart, Harvest Gold, Summer Sunrise, New Leaf, Lilac Grace, Winter Wisteria, Pale Peony, Berry Sorbet - Papertrey Ink; VersaMark - Tsukineko
Other: Grand Botanicals Die - Papertrey Ink; Fire Opal, Crystal Glitter - Martha Stewart Crafts; Foam Tape - Scotch; White Embossing Powder - Filigree

Mom's Retirement Card
Stamps: Keep It Simple: Retirement, Family Ties - Papertrey Ink
Cardstock: Spring Moss, Sweet Blush, Ombre Stripes Patterned Paper, Sheer Basics Patterned Vellum - Papertrey Ink
Ink: Berry Sorbet, Pale Peony, Summer Sunrise, Prairie Grass - Papertrey Ink; VersaMark - Tsukineko
Other: Floribunda Frame Die - Papertrey Ink; Foam Tape - Scotch; White Embossing Powder - Filigree; Copic Marker

Sunday, January 15, 2017

January Release In Review

Good morning and welcome to January's Papertrey Ink Release In Review post. I have a couple of projects to share with you today, but I'll have even more for you to see in a couple of weeks so be sure to check back. In the meantime, let's get to a little inspiration, shall we?

For starters I have a birthday card made with Betsy's new Dress Up Dolls: Birthday. Our nephew is turning 6 next month, so I thought this was the opportunity to create a personalized card just for him.

Let's Party Card

I started by sponging Aqua Mist and Tropical Teal inks on a white panel. Once that was ready, I die cut it with the Cover Plate: Balloon Bash Die and adhered it to a white card base that I'd pre-sponged with Harvest Gold ink. Next, I stamped and die cut the little boy from the Dress Up Dolls: Basics set. I used Football Frenzy Additions to add a "6" to his t-shirt and I colored the figure with Copics.

Let's Party Close Up

Next, I die cut the Text Block: Party Time die from both white cardstock and Pure Poppy + White patterned paper. I used the patterned paper die cut to fill in the balloons and then adhered the assembled Text Block to the card front with foam tape. I embellished the cake's frosting with crystal glitter before adding the little boy to the card. I think Charlie is going to be tickled to get a birthday card featuring a little boy that looks so much like him!

Next up I have a card pairing Dawn's new Family Ties stamps and die with Betsy's What The Doodle: Paisley set. From the moment I saw the paisley set I knew I wanted to try and recreate a traditional red bandana look on a card.

The Best Dad Card

I began by sponging a Berry Sorbet cardstock panel with Pure Poppy and Americana inks. That gave me great depth and color variation. I ended up really saturating the cardstock with ink, so I set it aside to dry for a good long time before continuing. Once it was dry, I heat embossed the paisley patterns with white powder. I chose to do it that way (rather than using a resist technique) so the white would be nice and crisp instead of that pinkish tone you sometimes get when doing an emboss resist technique with red ink.

The Best Dad Close Up

Next, I went back in with a black fine-tip pen to add details and fill in select areas. Then, I textured that whole panel with the Linen & Canvas Impression Plate. I love the realism of that detail! I stitched around that panel, adding a sentiment flag that I'd heat embossed with one of the Family Ties sentiments. I adhered that to a white card base and added a die cut "dad" sentiment using the Family Ties For The Boys Die. I love how this turned out so, so much!

Thank you so much for joining me! Make sure to check in with Nichole, Amy, Ashley, Betsy, Dawn, Heather, Kay, Laurie S., Laurie W., and Melissa to see more of this month's release. See you soon!

Recipes:
Let’s Party Card
Stamps: Dress Up Dolls: Basics, Dress Up Dolls: Birthday, Football Frenzy Additions - Papertrey Ink
Cardstock: Pure Poppy + White Patterned Paper - Papertrey Ink; white
Ink: Harvest Gold, Summer Sunrise, Enchanted Evening, Dark Indigo, Tropical Teal, Aqua Mist - Papertrey Ink; Tuxedo Black - Memento; VersaMark - Tsukineko
Other: Dress Up Dolls: Basics Die, Dress Up Dolls: Birthday Die, Cover Plate: Balloon Bash Die, Text Block: Party Time - Papertrey Ink; White Embossing Powder - Filigree; Foam Tape - Scotch; Markers - Copic; Crystal Glitter - Martha Stewart Crafts; glitter pom pom

The Best Dad Card
Stamps: Family Ties, What The Doodle: Paisley - Papertrey Ink
Cardstock: Berry Sorbet, True Black - Papertrey Ink; white
Ink: Pure Poppy, Americana - Papertrey Ink; VersaMark - Tsukineko
Other: Family Ties For The Boys Dies, Tag Sale #10 Die, Linen & Canvas Impression Plate - Papertrey Ink; Black Pen - Micron; White Embossing Powder - Filigree; Thread; Xyron

Saturday, January 14, 2017

Designs To Die For

Good morning and welcome back to Day 5 of the January Papertrey Ink countdown! I have a serious soft spot for clever dies, especially those featuring words or phrases. So the products we're introducing today had me at "hello." You're going to love them too. I just know it!

Aloha Card

To start my card today I began by die cutting the Cornered shape from white cardstock and using it to gauge where I needed to place my mask (since I knew I didn't want any color showing behind the die cut. I used post-it notes to protect that area and then sponged some Harvest Gold ink on the uncovered portion of my white card base. Next, I stamped the Boho Rounds images onto that same area using Summer Sunrise.

Aloha Card Leaves Close Up

Then, I stamped Palm Prints leaves directly on the card base as well as on a handful of die cuts. I layered the die cut leaves over the flat leaves to give a bit of dimension.

Aloha Card Sentiment Close Up

Next, I die cut the Cornered shape a second time, this time from Raspberry Fizz. I nested the "aloha" letters into the white die cut and secured them with a bit of foam adhesive. I added a bit more around the edges before adhering that piece to the card front. I finished up by adding clear glitter to the Raspberry Fizz letters to give them a bit of sparkle!

Thank you so much for joining me today. Make sure to check in with Nichole, Amy, Ashley, Betsy, Dawn, Heather, Kay, Laurie S., Laurie W., and Melissa to see more of this month's release. Have a great day and I'll see you back here tomorrow with a few more projects.

Recipe:
Aloha Card
Stamps: Palm Prints, Boho Rounds - Papertrey Ink
Cardstock: Raspberry Fizz - Papertrey Ink; white
Ink: Raspberry Fizz, Hibiscus Burst, Harvest Gold, Summer Sunrise, Orange Zest, Terra Cotta Tile, Amethyst Allure, Royal Velvet - Papertrey Ink
Other: Cornered Die, Palm Prints Die - Papertrey Ink; Crystal Glitter - Martha Stewart Crafts; Foam Tape - Scotch

Friday, January 13, 2017

Latin Inspiration

Good morning and welcome to Day 4 of the January Papertrey Ink countdown. Today we're featuring a couple of sets with latin flair.

Latin Inspiration Group Photo

I love the bold and graphic look of the stamps we're introducing this morning. They encourage the use of such bright and cheerful colors and who doesn't love that?! This time of year, that flash of vivid color can go a long way to add happiness to a gray day (and we've had plenty of those lately). Let's get on to the details!

My first card just uses Nichole's new Latin Motifs set. These images have a folk-art style that you're going to love!

Brighter Days Card

I began by stamping the sun onto a panel of white cardstock. I trimmed away part of that panel to give a peek at the card base underneath. I stamped the sentiment and then adhered that layer to an Aqua Mist card base that I'd stamped with a line pattern from the set. I used Tropical Teal ink to give a nice, bold contrast.

Brighter Days Close Up

Next, I stamped the bird onto scrap cardstock using Berry Sorbet and Pure Poppy inks. I trimmed around it and played with the wings a little until they had a slight curve. I attached the bird to the card front with foam tape, using two layers under the wings to give that curve some support. Aren't those colors perfect for encouraging someone who needs it?

Next up, I've paired the flowers from Latin Motifs with the leaves in my Palm Prints set.

Thought About You Card

I began by sponging and speckling a white card base with Aqua Mist ink. Then, I stamped the card base with a few leaves and added in some die cuts for a bit of variety. I used both flat and foam adhesives to give plenty of dimension.

Thought About You Close Up

Then I stamped and trimmed out the flowers. I wanted a nice pop of color, so I went with bright oranges. I tucked the flowers in around the leaves and then topped everything off with a simple sentiment strip. I'm really loving that orange!

That's all for me, friends. Thank you so much for stopping by today! Make sure to check in with Nichole, Amy, Ashley, Betsy, Dawn, Heather, Kay, Laurie S., Laurie W., Melissa, and Maile to see more inspiration. Have a great day and I'll see you again soon!

Recipes:
Brighter Days Card
Stamps: Latin Motifs - Papertrey Ink
Cardstock: Aqua Mist - Papertrey Ink; White
Ink: Tropical Teal, Summer Sunrise, Bright Buttercup, Orange Zest, Berry Sorbet, Pure Poppy - Papertrey Ink
Other: Foam Tape - Scotch

Thought About You Card

Stamps: Palm Prints, Latin Motifs - Papertrey Ink
Cardstock: White
Ink: Green Parakeet, New Leaf, Pinefeather, Limeade Ice, Summer Sunrise, Orange Zest, Aqua Mist - Papertrey Ink
Other: Palm Prints Die - Papertrey Ink; Foam Tape - Scotch

Thursday, January 12, 2017

A Little More Palm Prints

Good morning! Welcome to Day 3 of the January Papertrey Ink Countdown! I have another Palm Prints card to share with you today, so let's get to it!

Hello Dear Friend Card

I started by sponging and speckling a panel of white cardstock with Aqua Mist ink. Then I added flecks of black watercolor too. Then I used the Palm Prints leaves to create a background pattern using Bright Buttercup, Summer Sunrise, Orange Zest, Pure Poppy, and Tropical Teal inks. I adhered that panel to a True Black card base and set it aside for a moment.

Hello Dear Friend Close Up

Next, I die cut a frame from white cardstock using the Noted: Scalloped A2 Die Collection. Then, I stamped and heat embossed the sentiment from Stacked Sentiments on vellum cardstock and adhered it to the leafy panel. I added the white frame with foam adhesive for a bit of dimension. I love how bold and bright this one turned out!

Thanks for checking in on this fine Thursday morning! Make sure to head over to Nichole's blog to see what else is new today. See you tomorrow!

Recipe:
Hello Dear Friend Card
Stamps: Palm Prints, Stacked Sentiments - Papertrey Ink
Cardstock: True Black, Vellum - Papertrey Ink; white
Ink: Aqua Mist, Bright Buttercup, Summer Sunrise, Orange Zest, Pure Poppy, Tropical Teal - Papertrey Ink; Onyx Black - Versafine
Other: Noted: Scalloped A2 Die Collection - Papertrey Ink; Watercolor Paints - Gansai Tambi; Clear Embossing Powder - Filigree; Foam Tape - Scotch

Wednesday, January 11, 2017

More Palm Prints

Good morning! Welcome back for Day 2 of the January Papertrey Ink countdown. I'm back again today with another Palm Prints project for you to enjoy, so let's get to it!

I paired my new set with Maile's latest Splits set and Some Like It Hot for this hello card.

Hello There Hibiscus Card

I began by heat embossing the Splits border image onto watercolor paper with white powder. I used Zig pens to wash very subtle color over the embossing, leaving the space between the borders completely white. After that had dried, I stamped the Splits sentiment onto the watercolor paper with Pinefeather ink and adhered that panel to an Aqua Mist card base.

Hello There Hibiscus Close Up

Next, I stamped and die cut the hibiscus from Some Like It Hot using Pale Peony, Berry Sorbet, Summer Sunrise, and Canyon Clay inks. Then, I stamped and die cut the monstera leaves from Palm Prints using Green Parakeet, New Leaf, and Pinefeather inks. I layered the leaves and flower on the card front using flat and foam adhesives and then embellished with a handful of sequins from the Sunshine & Rainbows kit.

Thank you so much for joining me today and for all of your enthusiasm for this set. Make sure to check in with Nichole, Betsy, DawnHeather, Kay, and Maile to see more sneak peeks. Have a great day and I'll see you again bright and early tomorrow morning!

Recipe:
Hello There Hibiscus Card
Stamps: Palm Prints, Splits: Hello There, Some Like It Hot - Papertrey Ink
Cardstock: Aqua Mist - Papertrey Ink; Watercolor Paper - Ranger; White
Ink: Pale Peony, Berry Sorbet, Green Parakeet, New Leaf, Pinefeather, Summer Sunrise, Canyon Clay - Papertrey Ink
Other: Palm Prints Die, Some Like It Hot Die, MIMK: Sunshine & Rainbows Kit (sequins); White Embossing Powder - Filigree; Zig Clean Color Markers; Foam Tape - Scotch

Tuesday, January 10, 2017

Introducing Palm Prints

Good morning, friends, and welcome to Day 1 of the January Papertrey Ink countdown! I still can't believe it's January, but anyway...this month I have the pleasure of introducing my newest set, Palm Prints (just a reminder...all of the new products being introduced over the next several days will be available in the Papertrey Ink store on the 15th at 10pm ET). I've been looking forward to this set coming out since I designed it a year and a half ago. There are so many fun, and versatile ways to use tropical leaves! I can't wait to share this set!

Tropical Sending Hugs Card

I started today's card by sponging Aqua Mist both directly on a white card front and through one of the Modern Background Stencils. Then I masked off a circle in the center with a die cut post-it and stamped a variety of leaves around the edge. I used Mint Julep, Vintage Jadeite, Ocean Tides, and Pinefeather inks.

Tropical Sending Hugs Close Up

Once that was all nice and dry, I removed the mask and heat embossed the Big Hugs sentiment in the center of the masked circle. I used gold powder for a bit of sophisticated flair and for a nice contrast from the greens of the leaves. To finish up, I simply mounted the card front to a Mint Julep card base. I love a nice, easy-to-mail, flat card!

Thank you so much for joining me today! I hope you've enjoyed this first look at Palm Prints. Make sure to pop in with NicholeAshleyBetsyDawnMelissa, and Maile to see more of this month's release. Have a great day and I'll see you again tomorrow!

Recipe:
Tropical Sending Hugs Card
Stamps: Palm Prints, Big Hugs - Papertrey Ink
Cardstock: Mint Julep - Papertrey Ink; white
Ink: Mint Julep, Vintage Jadeite, Ocean Tides, Pinefeather, Aqua Mist - Papertrey Ink; VersaMark - Tsukineko
Other: Modern Backgrounds Stencils - Papertrey Ink; Gold Embossing Powder - Filigree

Monday, January 2, 2017

Moments Inked: Resolving To Read


Good morning, planner people! Today I'm sharing how I'm using my Moments Inked Planner as of late. My husband and I have talked for years about having our own mini book club and we're finally putting those plans into action! I created a little section in the back of my planner to keep track of what we're reading and my thoughts and notes about the books themselves.

Book & Planner

We're starting the year with Marie Kondo's The Life-Changing Magic of Tidying Up. We're not exactly hoarders, but we figured this book might help us recognize and eliminate bad habits before they become problematic. Plus, who doesn't want to start a new year off on a positive note?

Reading Dashboard

I knew I wanted to compile all of my reading notes in one place in my planner, so I went about creating a simple reading section. My dashboard is a bit more complex than I typically would make one, but I wanted this section to feel special since this reading project is something I'm doing with Sean and I intend to see the dashboard regularly throughout the year (it's not a one-month-and-done sort of thing).

Reading Dashboard Close Up

I used Soft Stone patterned paper (adhered to white cardstock for stability) as my base and decorated with books I created using the Bibliophile stamps and dies. I wanted to keep the rainbow style color scheme used throughout the planner, so I used Pure Poppy, Summer Sunrise, Simply Chartreuse, Aqua Mist, and Winter Wisteria as the palette for my books.

To Read Tab Close Up

I also used one of the Tabbed List dies to create a tab for the top of my dashboard. This way I can easily flip to this section when I want to take notes. I used White Self-Adhesive paper for the label and stamped everything with the Moments Inked: Listed set.

Weekly Reading Page

I kept the pages incredibly simple. I used the Lined Refill Binder Pages and stamped them with the "date," "to read," and "notes" all from the Listed set using Smokey Shadow ink. Those prompts should be all I need to keep up with the reading. I like that there's plenty of space for notes because I want to be sure to write down all of my thoughts for the discussions Sean and I will have each week. I also like using the lined refills because if I need more room for any reason, I can just slip in another page. Easy!

Weekly Reading Tabs

I broke down the book into five weeks (I just followed the chapters) so we can work through manageable chunks and really digest what we're reading. I created a simple tab for each week using the Moments Inked: Divided die. I decorated the tabs with a patterned strip from Southwestern Style, "week" from Moments Inked: Remembered, and numerals from Get Lost. I used the same rainbow color scheme as before and I like how it coordinates with the planner pages.

Well, that's how I'm kicking off the new year with my Moments Inked Planner! I hope you've enjoyed today's post. Happy planning and all the best for a fantastic 2017!


Recipes:
Reading Dashboard
Stamps: Bibliophile, Moments Inked: Listed - Papertrey Ink
Cardstock: Fresh Snow Linen, White Adhesive Sheets, Soft Stone Patterned Paper - Papertrey Ink; white
Ink: Pure Poppy, Scarlet Jewel, Summer Sunrise, Simply Chartreuse, Ripe Avocado, Aqua Mist, Tropical Teal, Winter Wisteria, Royal Velvet, Smokey Shadow - Papertrey Ink
Other: Moments Inked: Binder Page Die, Moments Inked: Tabbed List Die, Bibliophile Die - Papertrey Ink

Weekly Reading Pages
Stamps: Moments Inked: Listed, Moments Inked: Remembered, Southwestern Style, Get Lost - Papertrey Ink
Cardstock: Moments Inked: Refill Binder Pages - Lined
Ink: Pure Poppy, Summer Sunrise, Simply Chartreuse, Aqua Mist, Winter Wisteria, Smokey Shadow - Papertrey Ink
Other: Moments Inked: Divided Die - Papertrey Ink