Thursday, February 22, 2018

Throwback Thursday: Winter Penguin

Good morning, friends, and welcome back to this week's Papertrey Ink Throwback Thursday feature! This week Betsy, Michelle, and I are sharing projects with Winter Penguin. This little penguin brings such a smile to my face! He’s adorable and perfect for creating a wintery card for my nephew’s upcoming birthday.

lj stay cool winter penguin card

I began by randomly stamping an Aqua Mist card base with Aqua Mist and Fresh Snow snowflakes. Then, I sponged a white panel with Aqua Mist ink and die cut it with a stitched panel from the Noted: Scalloped A2 Die Collection. Then, I die cut the center with the Mix & Mat: Confetti insert. I backed that panel with white adhesive paper and sprinkled crystal glitter through the holes to create a snowy effect.

lj stay cool winter penguin card 3

I matted that panel with Bitty Big: Pure Poppy patterned paper and added woodgrain textured snow drifts for dimension and texture. I tied a piece of 1/8" grosgrain ribbon around the snowbank before adhering that panel to the card base with foam adhesive.

lj stay cool winter penguin card 2

Next, I stamped and die cut my penguin. I used Copic markers to color his beak and feet as well as give his belly a bit of shading. I die cut his hat and embellished the end with a real pom pom. I adhered both to the card front with foam tape. Finally, I die cut the speech bubble from the Bubble Talk die set and stamped it with the small snowflake from Winter Penguin as well as one of the sentiments in the set. What a cutie pie!

That mini set sure packs a big punch, don't you think? Make sure to pop in on Betsy and Michelle for more with this super cute set. I'll see you again soon! I have more February release projects to share, after all!

Supplies:

Monday, February 12, 2018

Introducing Papertrey Ink's Glorious Globes & Shape Shifter Dies

Good morning, friends! I'm just going to pop in quickly to share a project I have made with my new Glorious Globes: Basics and Glorious Globes: February stamp sets from Papertrey Ink. Globes always catch my eye when I see them online or in quirky junk stores and I decided to design a set with them in mind. I have a Basics set as well as a monthly mini series that will come out over the next year.


And because we're still in the midst of the Papertrey Ink 11th Anniversary countdown, we have a challenge for you today! Each designer has a color palette to share to inspire you in your crafting. Your challenge is to create a project with your favorite combo and link it up on our team blog. There's also a download available there in the event that you want to hold on to the color palettes for future reference. You can see my color card above, but let's take a closer look at the project it's based on, shall we?

Thinking Of You Globes Card

I used a combination of images from the Basics and February Glorious Globes sets to create this card. I impressed the Shape Shifters: Circle 1 outer die into a panel of white cardstock and then stamped it with the stack of travel books from Glorious Globes: Basics.


Thinking Of You Globes Card 2

I stamped the globes in a pretty straightforward manner, aside from the globe stands. I stamped those first with Honey Nut and then overstamped with VersaMark before sprinkling on gold Perfect Pearls pigment powder. The result looks like brass with a nice patina.

Thinking Of You Globes Card 3

The sentiment is from Penned Elegance and I stamped it in Tropical Teal. I added that panel to an Aqua Mist card base that I had stamped with diagonal stripes. Then, I added my globes using a mix of flat and foam adhesives. I'm going to have so much fun with these globes over the next year!

Thank you for stopping by today! Make sure to visit with Amy, Betsy, Heather, Keeway, Laurie, Melissa, Michelle, and Stephanie to see their gorgeous projects and to see the rest of the color palettes for today's challenge. I'll see you again soon with more of this month's anniversary release. Have a great day!

Supplies:

Saturday, February 10, 2018

Introducing Papertrey Ink's Bold Borders: Blooming and Penned Elegance

Good morning and welcome to Papertrey Ink's 11th Anniversary Countdown! That's right, the new product introductions begin today! Today also happens to be our Egg Hunt hidden image contest (you can find the details about the contest over on 
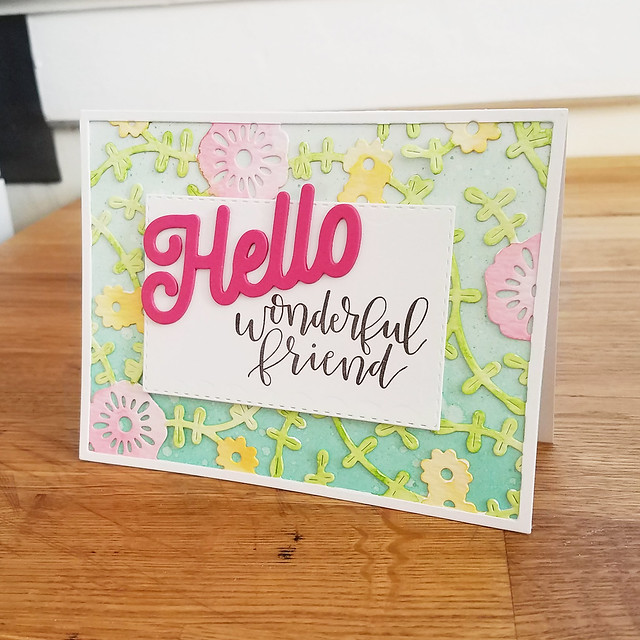
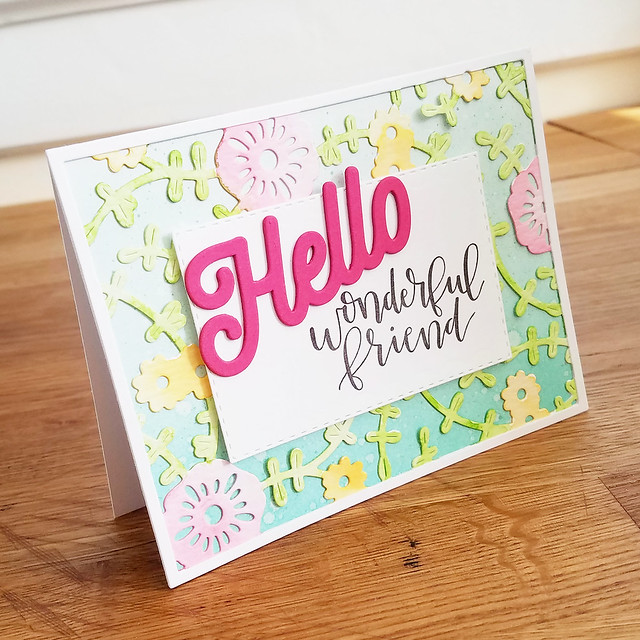
our blog) and here's my official contest photo:


I'm thrilled to be introducing a gorgeous, hand-drawn sentiment set by Jennifer Campbell, the newest Papertrey Ink product designer. Her set is called Penned Elegance and I assure you it truly is elegant, folks. I just know I will turn to this set again and again. I also have the great pleasure of introducing my new Bold Borders: Blooming die. This die kicks off a year-long, monthly series of frame dies that I think you're really going to enjoy. Ok! Enough chit chat. Let's get to the projects!

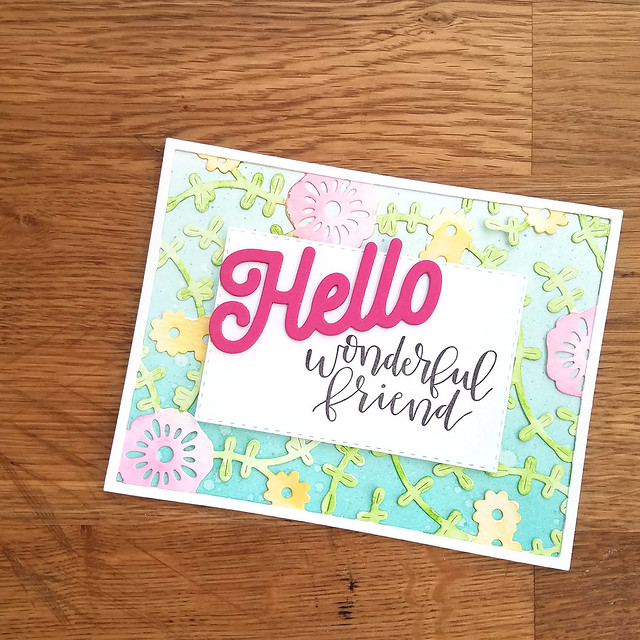
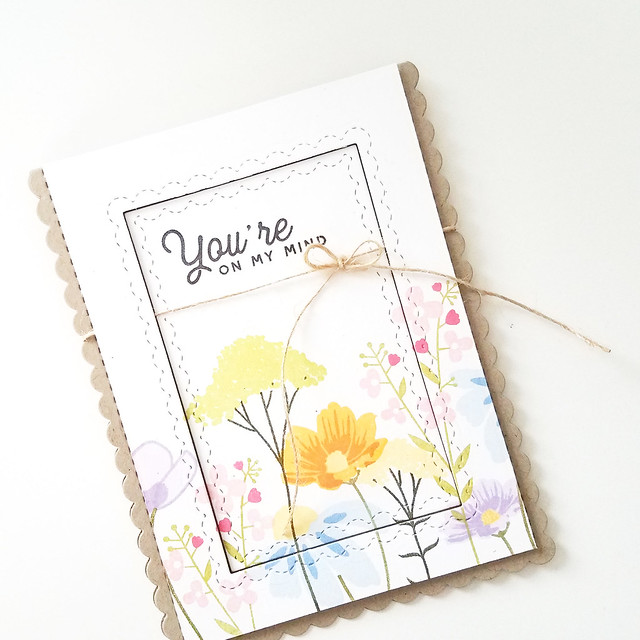
Let's start with that colorful "hello" card from my Egg Hunt photo.

Lizzie Jones - Hello Wonderful Friend Card

I die cut the Bold Borders: Blooming frame from watercolor cardstock and added color using Zig Clean Color Markers.

Hello Wonderful Friend Card 2

I then sponged a white card base with Aqua Mist and Hawaiian Shores inks and splattered it with clean water and Aqua Mist reinker. I adhered the frame to the card front and stamped a Double Ups: Rectangle layer with the sentiment from Penned Elegance.

Hello Wonderful Friend Card 3

I added that layer to the card front with foam tape. Then, I die cut three of the "Hello" sentiments from Raspberry Fizz cardstock and layered them to add stability and depth before adhering them to the center layer.
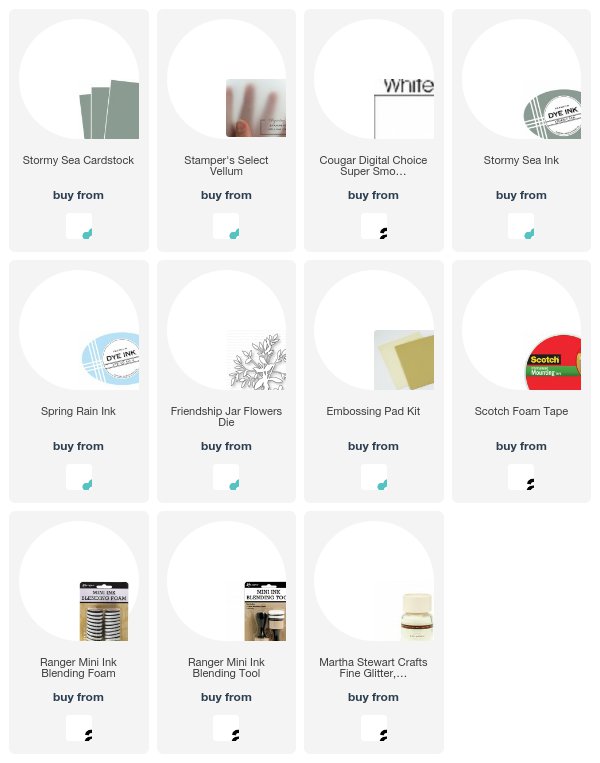
Supplies:


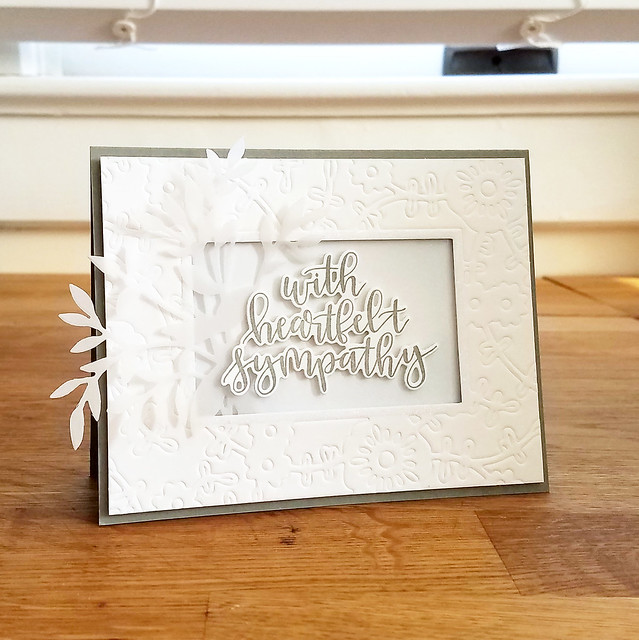
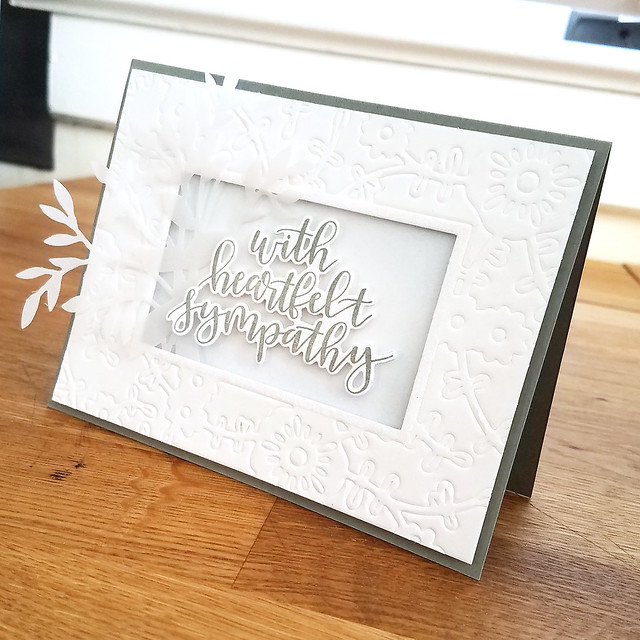
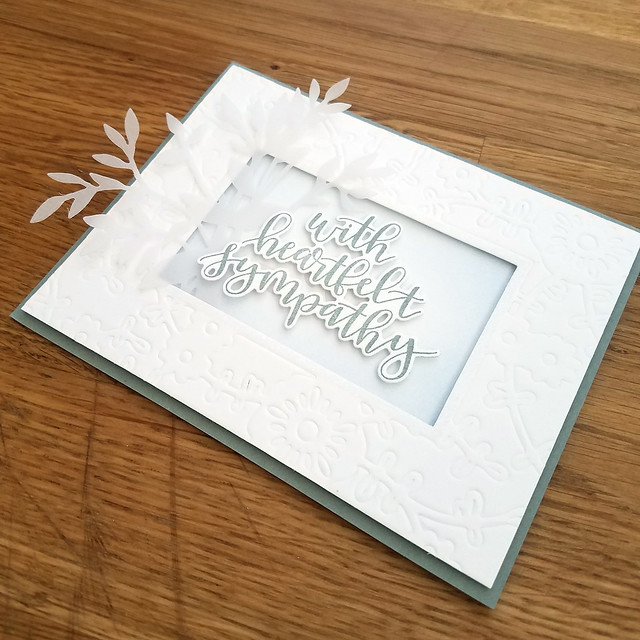
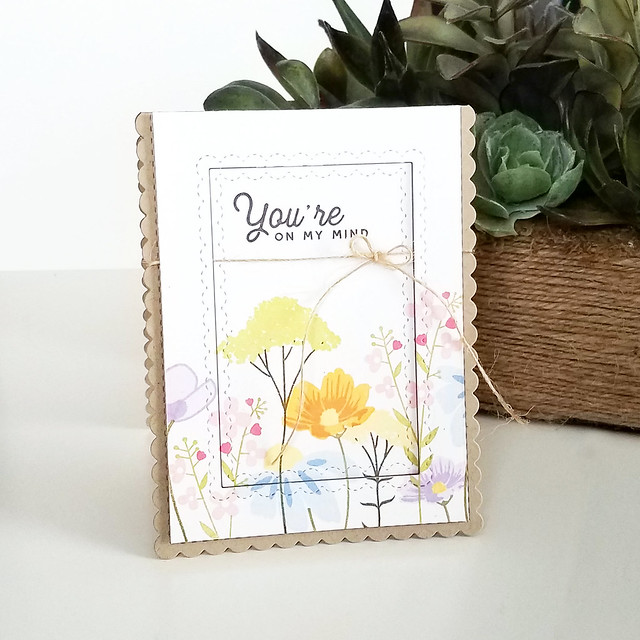
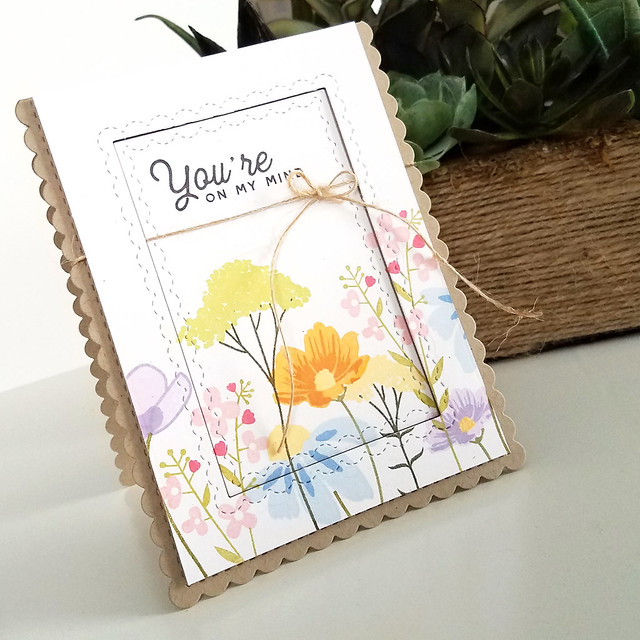
Next up, I have a sympathy card to share. These cards can be really difficult to create in the moment of need, so having a few on hand is never a bad idea.

Lizzie Jones - With Heartfelt Sympathy Card

I chose to use the Bold Borders: Blooming die as an impression plate to give it a softer look. I used a craft knife to trim off the outer edge and remove the inner window. I glittered the innermost frame with fine crystal glitter before adding a vellum die cut Friendship Jar Flowers shape through the window.

With Heartfelt Sympathy Card 2

Then, I sponged a white panel very softly with Spring Rain ink and adhered it behind the Bold Borders opening. That inking created a very delicate contrast which I like a lot. I feel it's best to keep things soft on sympathy cards.

With Heartfelt Sympathy Card 3

I adhered all of that to a Stormy Sea card base and then die cut the Penned Elegance sentiment and adhered it into place with foam tape. The impression from the Bold Borders die gives this card wonderful texture and the glitter adds just a touch of interest. I usually wouldn't use glitter on a sympathy card, but that happens to be what I had on hand and I think the white on white is subtle enough not to be too flashy.

Supplies:


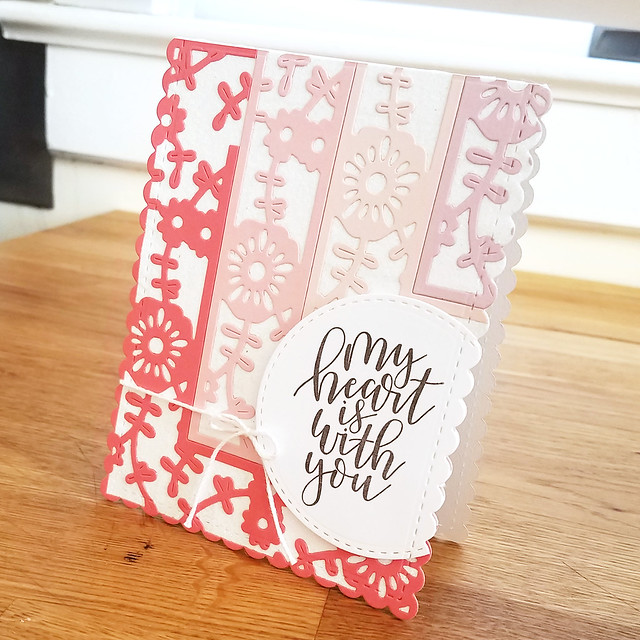
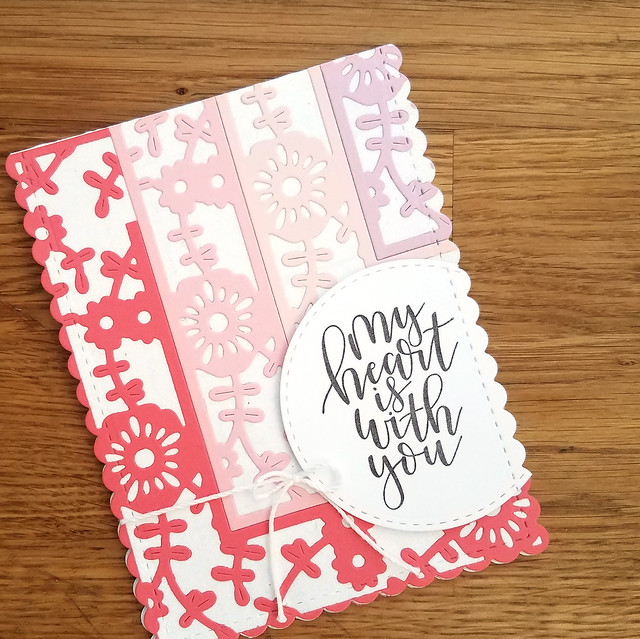
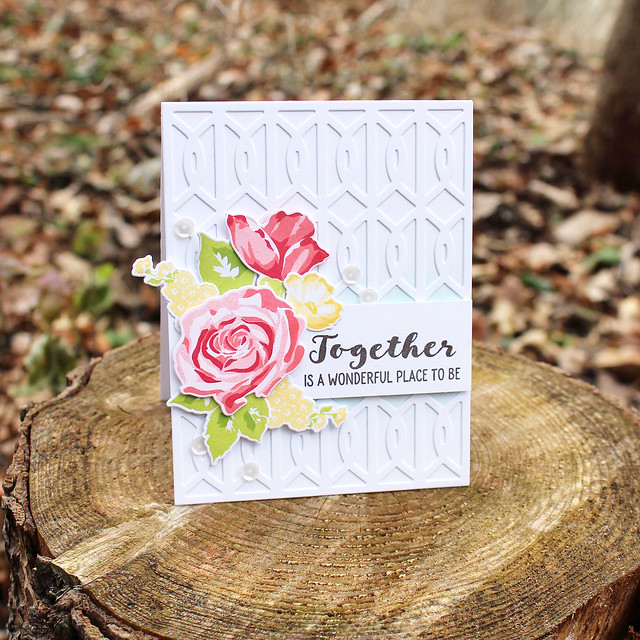
\Lastly, I decided to nest the Bold Borders: Blooming die cuts together to create a unique layout.

Lizzie Jones - My Heart Is Wish You Card

I began by die cutting four frames (one each in Berry Sorbet, Pale Peony, Sweet Blush, and Lavender Moon). I cut off two sides of each and then lay them out on the sticky side of a white adhesive sheet. I trimmed off the excess and then used crystal glitter to fill in all of the negative space in the die cuts. The result is super sparkly and fabulous!

My Heart Is Wish You Card 2

Next, I die cut that panel with the Noted: Scalloped A2 Vertical Die and adhered it to a matching white card base. I tied a crochet thread bow around the card base to add a bit of texture.

My Heart Is Wish You Card 3

I die cut a Noted: Scalloped Square Die Collection circle die and used the same die to trim off the edge. I stamped that with the Penned Elegance sentiment and adhered it to the card front with foam tape. Easy and full of glittery goodness!
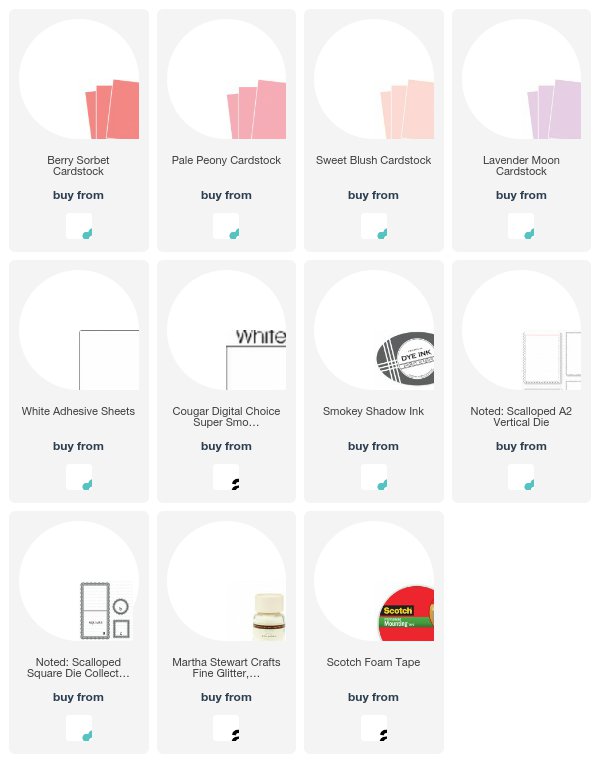
Supplies:


That's all I have for you today. Make sure to check in with Betsy, Heather, Keeway, Laurie, Melissa, Michelle, and Stephanie to see their gorgeous projects and to count up those hidden eggs for today's contest. I'll see you again soon with more of this month's anniversary release. Have a great day!

Thursday, February 8, 2018

Papertrey Ink 2018 Anniversary Set

Good morning, friends! I'm popping in quickly today to share a project made with Papertrey Ink's 2018 Anniversary set, Mixed Bouquet.


This set is a truly special collaborative effort between several of the product designers (including Jennifer Campbell, our newest designer)! We worked together to create a beautiful set of flowers that can be used individually or together to create a unique floral arrangement. I can't wait for you all to see it, so let's go!

Mixed Bouquet On My Mind Card

I began by stamping a variety of flowers onto a Rustic White panel. Then, I die cut the panel using the rectangle dies from the Noted: Scalloped A2 Vertical die to create a frame.

Mixed Bouquet On My Mind Card 2

Next, I stamped the sentiment from the set onto the center panel. I then used the scalloped card base die from the same die collection to cut a Classic Kraft card base. I adhered the central panel flat onto the card base before tying a twine bow around the card base.

Mixed Bouquet On My Mind Card 3

Then, I used foam tape to adhere the frame to the card front. I love that the front of the card has texture and dimension, but the pattern is still seamless thanks to the simple die cutting technique.

Thank you all so much for joining us today! We hope you enjoy this year's anniversary set. It will be available on February 15th at 10pm and can only be purchased with reward points, so I hope you've been saving those bad boys! Enjoy the rest of the anniversary festivities and I'll be back soon with a few more fun things to share. Have a great day!

Supplies:

Tuesday, February 6, 2018

Papertrey Ink 11th Anniversary: Product Designers' Intro Day!


Good morning, friends! It's Day 2 of the Papertrey Ink 11th Anniversary festivities and today we're introducing the Product Designers for the coming year. This is going to be a busy year for yours truly and I couldn't be more delighted! Designing stamps and dies is such a rewarding job, largely because I actually get to encourage other people to find their creative voice. There's no better feeling than seeing someone get joy out of something you've poured your heart into designing. I am so happy to be a part of this team and I can't wait for you to see what everyone has to share with you in the coming year!


And guess what? The Win Your Wishlist contest is back! Head to our team blog for the contest details and comment on today's post to enter. Good luck!

Monday, February 5, 2018

Papertrey Ink 11th Anniversary: Design Team Intro Day!

Good morning, friends! I just wanted to pop in today quickly to share my excitement about joining Papertrey Ink for another year! It's our 11th Anniversary celebration and we're introducing the 2018 team over on our team blog today. We're also sharing the first of this year's anniversary challenges! It's a sketch challenge based on our favorite cards from the last year. Here's the card I'm sharing for the challenge:

Lizzie Jones - Together Card

You can read the original post HERE. I love this card so, so much!

And here's the sketch based on my card. Make a card with your favorite sketch and submit it on the Design Team Intro post for your chance to win one of two $100 gift certificates, good toward anything in the Papertrey Ink store.


Papertrey was my gateway to stamping and it is a dream to continue working for such a wonderful company. I believe whole-heartedly in the amazing products and my colleagues are fabulous, creative women who inspire me every day. Who could ask for more? I'm truly looking forward to this year as we all grow together and find joy in the process of creating and sharing.

I hope to see you back here again soon, friends! Have a wonderful week!