Wednesday, April 24, 2019

The Greetery - Succulent Gardens No Green Thumb Required

Good morning, friends! Boy, oh, boy do I have a treat for you today. I'm back for Day 3 of The Greetery's debut countdown and today's products are so super fun! On the docket this morning are the new BotaniCuts Succulents Dies, Terrarium Dies, and Sentiment Suite: Thinking Of You stamps. You are going to absolutely fall in love with these Succulent Dies! Succulents are great because they can be any color of the rainbow, so your options are truly boundless. I had a blast putting together a birthday ensemble that I can't wait to give to someone very special. Let's take a closer look!

I love that the Terrarium Dies come in two sizes and I knew I wanted to incorporate both sizes somehow. After a little brainstorming, I decided that the small terrarium was the perfect size for a tag and the large one would make a fabulous shaped card, so that's exactly what I did!

SucculentBirthdayEnsemble1_TheGreetery


I started with the tag. I cut the segmented terrarium shape from gold cardstock that I had xyroned and set it aside. Then, I die cut two full shapes, one from clear cardstock and the other from white cardstock. I sponged a bit of minty blue ink onto the white piece and speckled it with water for some subtle interest. Once that had dried, I stamped it with the sentiment from Sentiment Suite: Thinking Of You and set that aside. I used the same set to stamp the birthday greeting and then cut that using the new Sentiment Suite Basics Dies. I adhered that and the gold piece to the front of the clear cardstock piece and also set that whole bit aside.

SucculentBirthdayEnsemble3_TheGreetery

Next, I die cut the small succulent from white cardstock and blended on ink to make it resemble the real thing. A quick Google search will give you so much inspiration! I assembled the succulent and adhered it to the white layer. Then, I added foam tape to the outer edge of the clear piece (hidden under the gold frame) to create a shaker box. I filled it with fine gravel before sealing everything together. Then, I very loosely braided some black twine and threaded it through the top of the terrarium to act as the hang tag.

Next up was the card. I decided that I wanted to create a shaped card that someone could put on display after their birthday had passed. This would be ideal for someone who really loves succulents, whether they actually have houseplants or not. There are people in my life who adore plants, but either don't have the best track record for keeping them alive or can't have them because their pets take it as a personal challenge to eat any living thing in their homes. This way, they get their plants and no harm will come to their furry companions. Win-win!

SucculentBirthdayEnsemble4_TheGreetery

I began by cutting four sticky-backed, segmented gold pieces and two whole clear pieces with the large Terrarium Die. I snipped off the top ring of two of the gold pieces and then adhered all four to the two clear pieces. I used E6000 to adhere the two panels together. The snipped ring gold pieces are on the inside, making the connection a little thinner and tighter together. I set that aside to dry overnight (just to be safe). You could probably get a similar hold with hot glue and it would be ready to handle faster.

SucculentBirthdayEnsemble5_TheGreetery

Then, I die cut one large and one small succulent. I blended on ink colors that would complement each other, but not match. Then, I die cut a terrarium panel from Kraft cardstock. I free hand cut a "ground" and xyroned it to make it sticky. Before sprinkling it with gravel, I set foam tape into the adhesive to make it easier to attach my succulents. I attached that whole piece inside the card, adhering it along the bottom edge so you wouldn't see the adhesive through the back of the terrarium.

SucculentBirthdayEnsemble2_TheGreetery

Next, I stamped the sentiments from the Sentiment Suite: Thinking Of You set onto their coordinating die cuts and attached them to the front of the card with foam tape. Again, with clear cardstock you need to be mindful of how to hide your adhesives. To conceal mine, I simply adhered a second die cut to the inside of the card. Easy! I also used the braided twine to create a hanger for the card. It's not functionally necessary, but I think it adds a nice softness. Plus, it's a nice touch if someone wants to hang their card rather than put it on a shelf or table.

I am thrilled to pieces about how this ensemble turned out! The gravel adds such a wonderful texture and the colorful succulents are so cheerful. I'll definitely be creating with these succulent dies again soon. I can't wait to try more color combinations and techniques (like watercolor!) to make these dies truly sing. Thank you so much for joining me today! I hope you've enjoyed this look at the debut release from The Greetery! Make sure to pop by The Greetery's blog for more information and visit the other designers that are creating with these gorgeous new projects today:

Heather Nichols
Dawn McVey
Kelly Lunceford
Kay Miller
Laura Bassen

Have a wonderful day, everyone!

Supplies:
Succulent Birthday Ensemble

Monday, April 22, 2019

Introducing The Greetery - Hand In Hand And Heart To Heart

I can't begin to tell you how excited I am for today's post! When Betsy told me she was starting her own stamp company I flipped. She is so talented and creative that I just knew she would have gorgeous and innovative designs to share with the world. And wouldn't you know - she absolutely delivers with her debut release! I am thrilled to be able to help introduce Betsy's new Hand In Hand set and Fir & Foliage collections! These new products will be available this Friday, April 26th at 10am ET on The Greetery's website. In the meantime, let's get to my project!

Today happens to be Earth Day, so the Fir & Foliage collection is making a perfectly timed entrance! Not only that, but Betsy's Pathway stencil is incredibly innovative in that there are stencils for the pathway, the cobblestone pattern, and one to cover your path if you want to sponge on a bit of grass or earth or something around it. It makes creating scenery a snap!

SoGladYou'reMine1_TheGreetery

I started by sponging mine very lightly with a gray ink and then added the cobblestone layer in the same color (just a little more heavy handed). While the stencil was still in place, I speckled the surface with water to add a mottled appearance to the stones. Then, I used the pathway covering stencil to protect my path while I added the grass and sky. No masking, no fussing...I'm in love!

SoGladYou'reMine3_TheGreetery

Next, I stamped the smaller tree from the Fir & Foliage stamp set up near the top of the path. Then, I stenciled the large tree at the other end of the path using the Fir & Foliage stencil. I love this stencil, friends. There is so much detail and it is simply gorgeous! I also stamped and die cut the larger tree from the coordinating stamp set and placed it sort of midway in the scene. Having a variety of sizes available makes it easy to give your scene depth and keeps it from feeling too flat. Betsy truly thought of everything! And again, just look at that detail! You have the option to use as many as three layers for the leaves on the larger tree. You can achieve such different looks depending on how many you use (and in what colors - imagine your autumn options)!

SoGladYou'reMine2_TheGreetery

Next up came my coloring. I'm not typically a colorer, but this Hand In Hand set was urging me to bust out my Copics. These images would also be lovely with some paper piecing if you're not one to reach for watercolors or markers. I opted to use the man and woman, but there are several other images in the set that give it fantastic versatility. Children, a puppy companion, even an umbrella! I colored the figures (still rusty, but working on it) to resemble me and my husband and added them to the scene. I doubled up the man die cut to give a slight dimension difference between the two people. I still wanted the hands to stay flush though, so I simply trimmed away the hand on the bottom die cut. Such a small detail, but it makes a big difference!

SoGladYou'reMine4_TheGreetery

To finish the card, I stamped a sweet greeting from the set in the bottom corner and mounted the whole panel to a Kraft card base. The sentiments in this set are heartfelt and beautiful. They celebrate togetherness and love in a way that I find truly wonderful. I hope you enjoy them as much as I do. I imagine this being an anniversary card or even a lovely "just-because-I-love-you" sort of thing. We love people year-round and I am of the firm belief that it's worth telling them, even if it's not a special occasion.

I hope you've enjoyed this look at the debut release from The Greetery! Make sure to pop by The Greetery's blog for more information and visit the other designers that are creating with these gorgeous new projects today:

Heather Nichols
Dawn McVey
Lizzie Jones
Debbie Olson
Wanda Guess
Keeway Tsao

Enjoy your Earth Day! I'll see you again soon!

Supplies:
I'm So Glad You're Mine Card

Thursday, April 4, 2019

New From Heather Nichols and Taylored Expressions

Good morning, friends! I know I've been missing in action for the past several weeks (reno madness...gurl!), but I just couldn't miss the opportunity to pop in and help introduce my good friend Heather's very first stamps with Taylored Expressions. She has a couple of different collections debuting this month and they are both totally wonderful. Her graduation collection is super handy for anyone that has several celebrations to attend in the coming months. Those banners have so many uses for birthdays and other occasions though as well.

But today, I have the pleasure of sharing Heather's Simply Stamped - Feathers collection with you! These feathers are organic and just a little bit rustic which I absolutely love. There are a few different pattern options to dress them up or you could use cool watercolor or blending techniques to give an even more loose and earthy appearance. Ok, I've yammered on plenty. Let's get on to some projects!

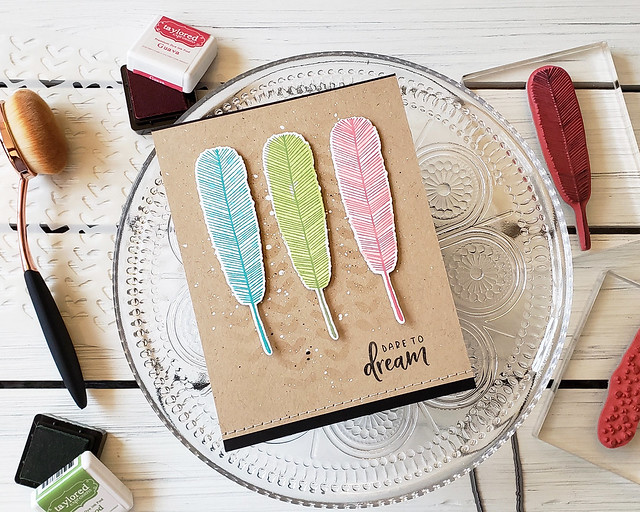
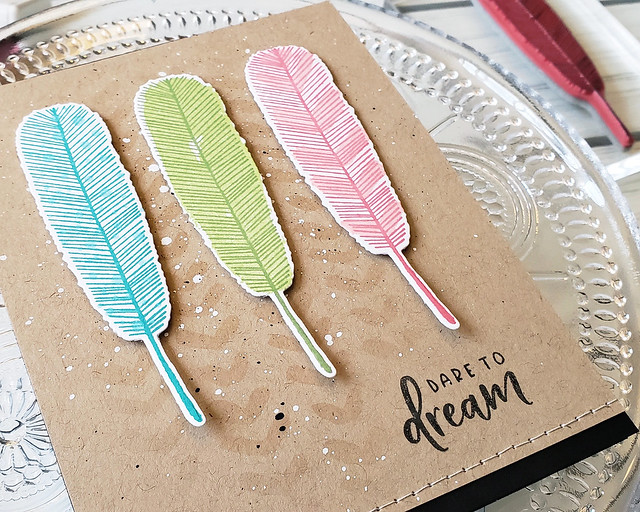
My first card incorporates the Feathered Stencil and some splatters behind a trio of brightly colored feathers.

LizzieJones_TE_DareToDream1

I love the texture the Feathered Stencil gave my Toffee background. The black speckles tie together the card base and sentiment while the white ones bring the stitching and feathers into the fold. The greeting, from Wild & Free (a new sentiment set also coming out today), is stamped in Oreo ink.

LizzieJones_TE_DareToDream3

I used the large feather from Simply Stamped - Feathers along with all of the pattern overlays for this trio. On the left in Blue Raspberry and Sprinkles is the dotted pattern. In the center with Peapod and Lime Zest is the solid overlay. And the feather on the right, stamped with the chevron stripes, is Guava and Pink Champagne.

LizzieJones_TE_DareToDream2

I love how natural and funky this card feels. Coincidentally, this would also make a really nice graduation card if mortar boards and tassels aren't your thing.

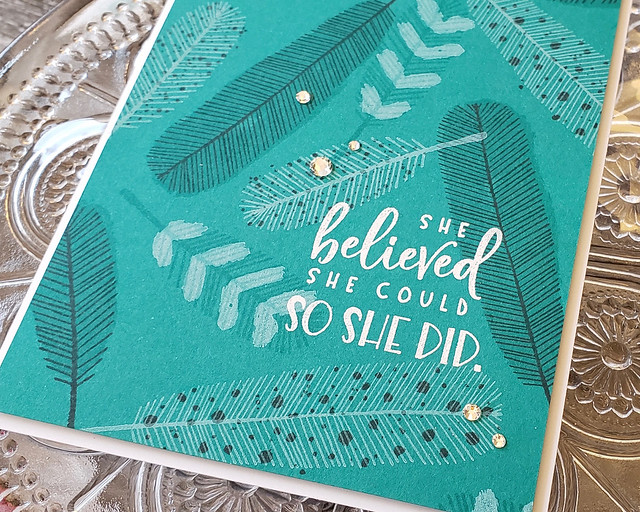
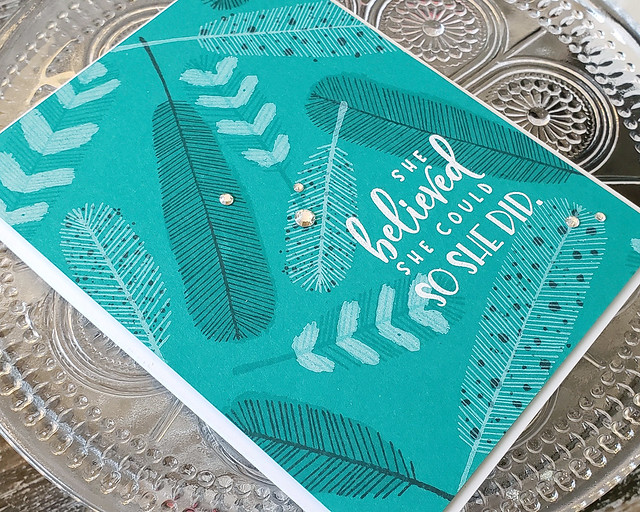
My next card is a stamped background. I know, you're totally surprised. It's not like stamping a background is one of my favorite things or anything. Ha! But seriously, thanks to the many size and style options, the Simply Stamped - Feathers set is really great for creating a unique and interesting background.

LizzieJones_TE_SheBelieved1

I used both sizes of feathers in Oreo, Blue Raspberry, and white inks. I just randomly stamped the feathers until I was happy with the arrangement. Then, I embossed the Wild & Free sentiment using white powder.

LizzieJones_TE_SheBelieved2

I thought mounting that panel onto a white card base really made the greeting pop. I used just a 1/8" border, but it was plenty of border to make a big impact.

LizzieJones_TE_SheBelieved3

Then, I just added a sprinkling of clear rhinestones in a variety of sizes. I love using two or three sizes of stones together so there is more visual interest than using one consistent size. And these stones are so sparkly!

My last card today, I did a bonus project because I just couldn't stop!, incorporates a little bit of a rainbow. Having a stamp platform makes using multiple colors on the same stamp a breeze, but you could use markers to do the same thing in one impression.

LizzieJones_TE_WildAndFree1

I used Guava, Candy Corn, Pineapple, Peapod, Blue Raspberry, and Lavender Glaze for the rainbow on my chevon stripes. The smaller feather is Earl Grey and Oreo together. I thought keeping the smaller feather neutral really made the larger feather stand out and coordinate with the sentiment a bit.

LizzieJones_TE_WildAndFree2

I used one f the circle images from the feathers set to create a partial background on a Sea Salt card base (stamped in the matching ink). I'm a big believer in partial backgrounds. You don't need to cover the whole card base to make a statement.

LizzieJones_TE_WildAndFree3

I also blended a super soft, subtle layer of Sprinkles ink onto my focal panel before stamping the sentiment and adhering my feathers. It isn't much, but it adds to the atmosphere of the panel. The little twine bow is just a great way to soften up the edges a bit and give a natural feel.

Thank you so much for joining me today as we all celebrate Heather Nichols' product debut with Taylored Expressions! Heather's designs have always caught my eye and I'm absolutely positive I'm not alone.

Have a great weekend, friends! And if you want to follow along with our reno antics, feel free to check out my Instagram Stories. I have a highlight there that's full of video snippets throughout the process. Hopefully I'll be able to get back in my studio soon, but in the meantime there is plenty of fun home progress to share.

Supplies:
Dare To Dream Card
She Believed Card

Wild & Free Card