Saturday, September 30, 2017

Introducing The Make It Market Kit: Wonderland

Good morning, friends! I have the great pleasure of getting to help introduce Betsy Veldman's new Make It Market Kit for Papertrey Ink today. I know many of you have been anxiously awaiting this reveal and let me tell you, you're definitely not going to be disappointed!


Creating for the holiday season is one of those things I look forward to all year. Betsy's Make It Market Kit: Wonderland is perfectly designed to make those projects even easier and more magical than ever. She has curated a collection of stamps, papers, stencils and dies, and charming trimmings that I know I will turn to time and again.

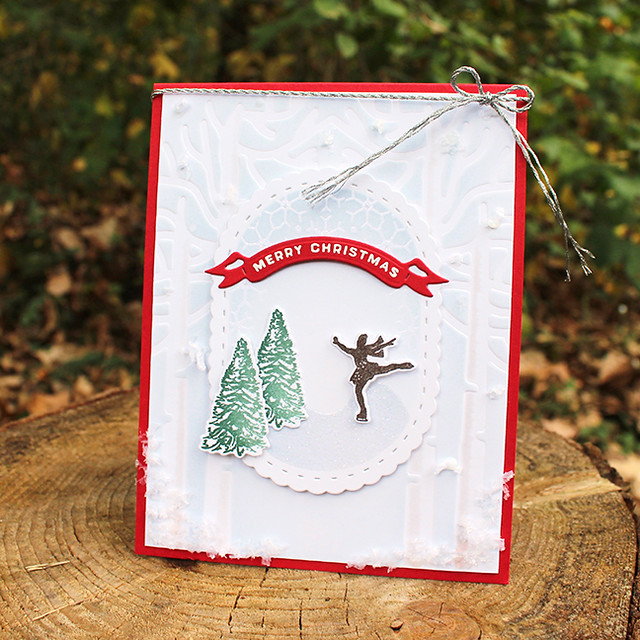
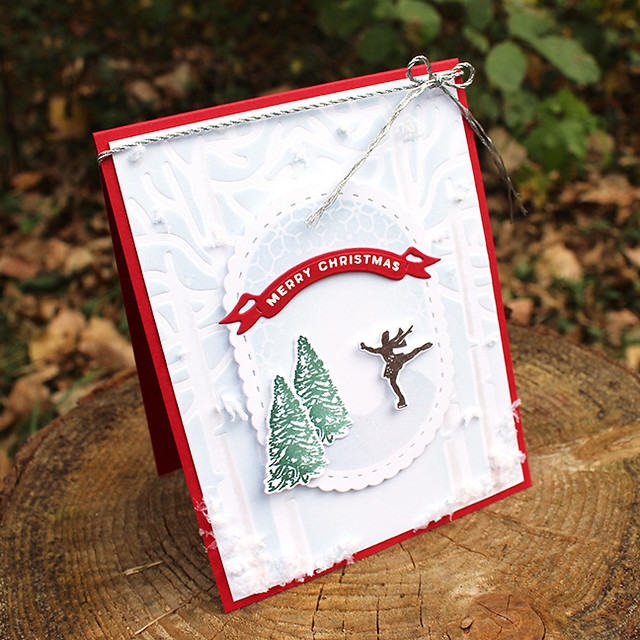
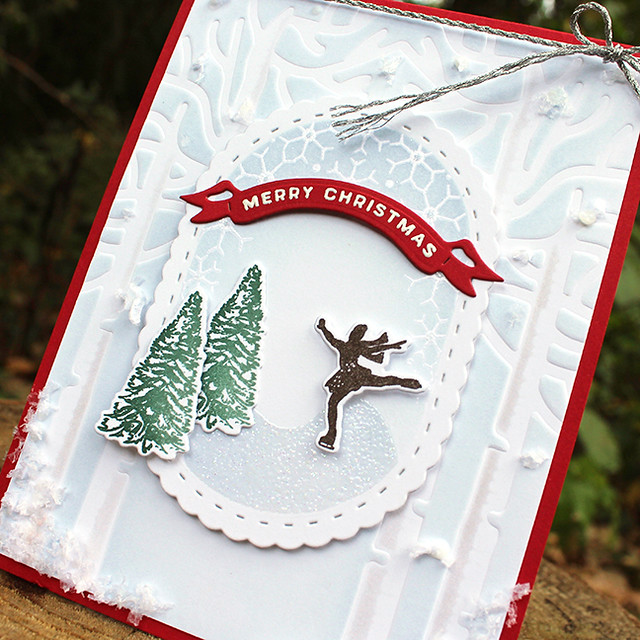
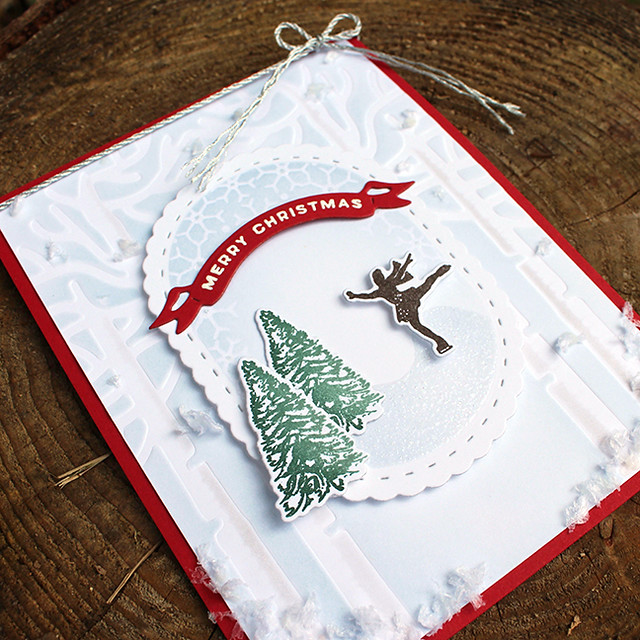
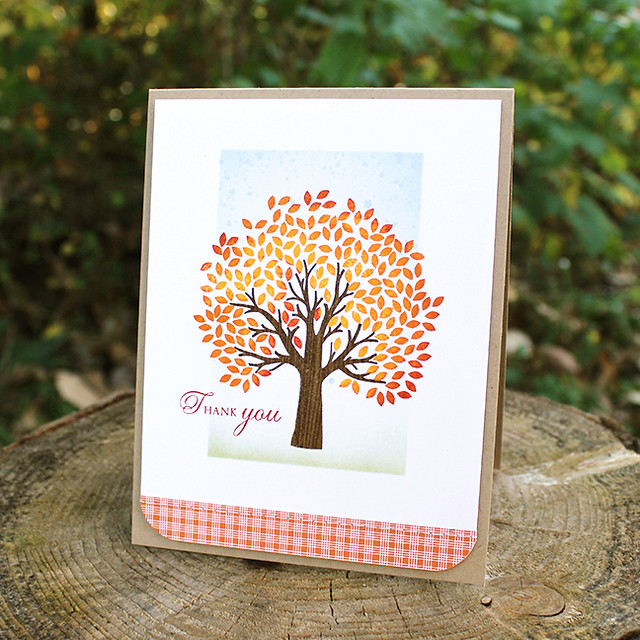
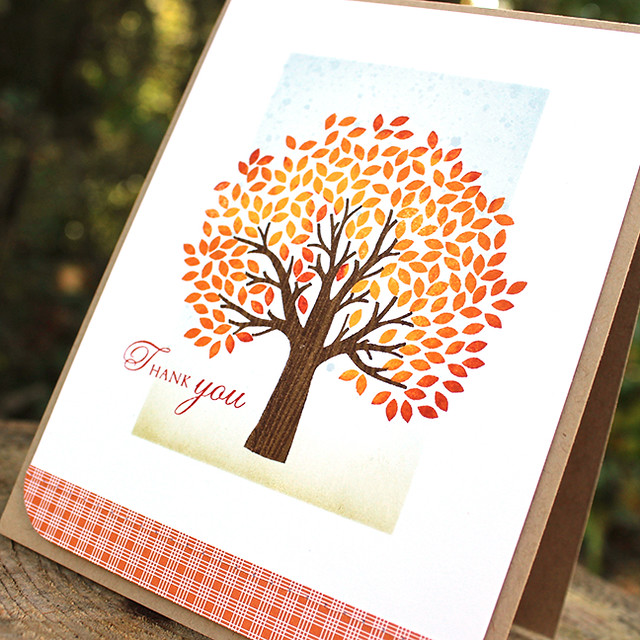
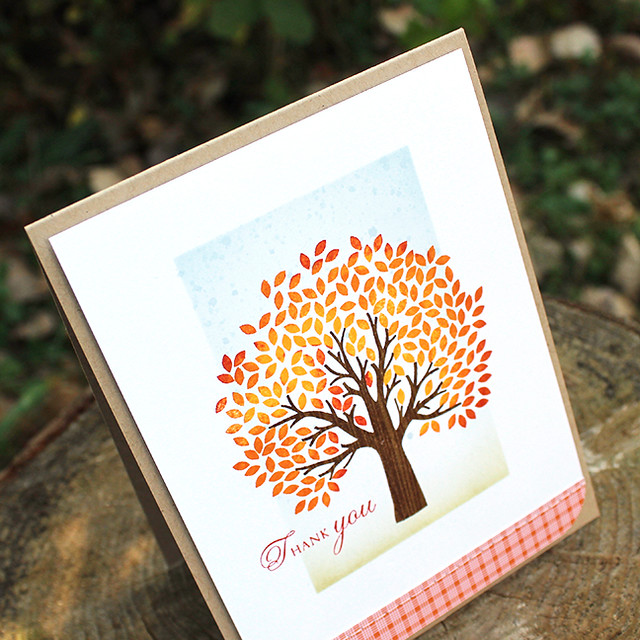
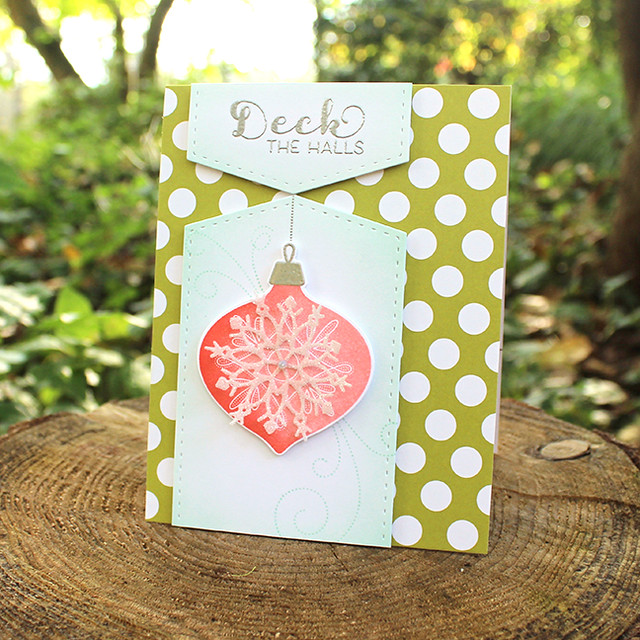
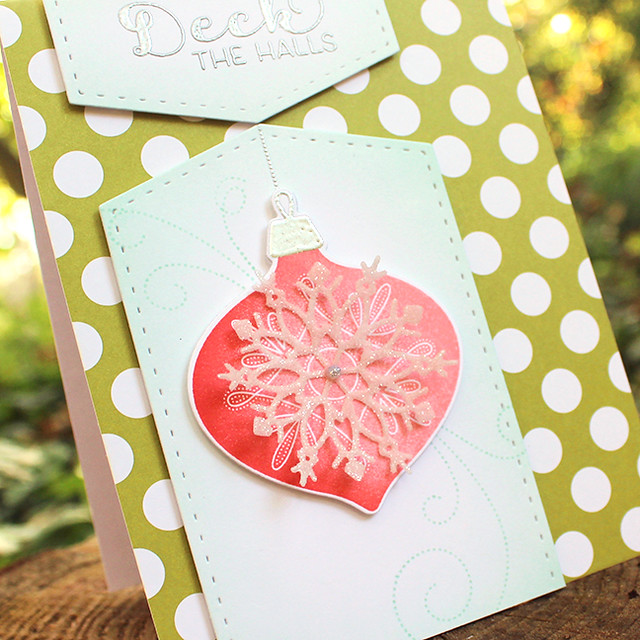
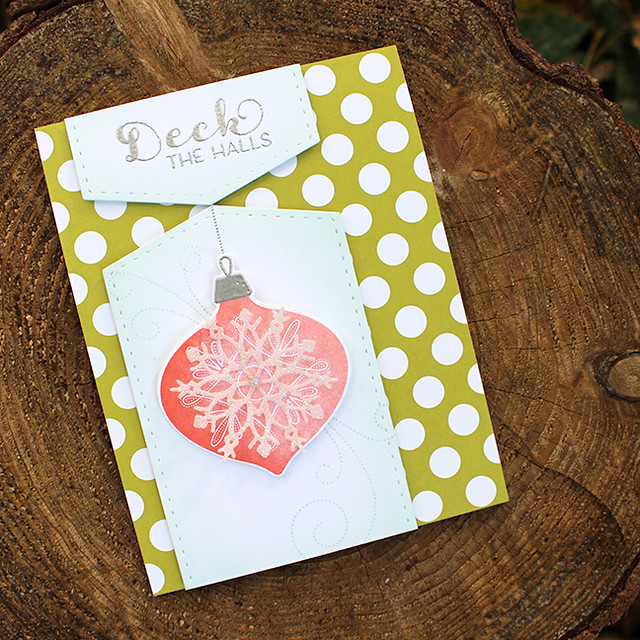
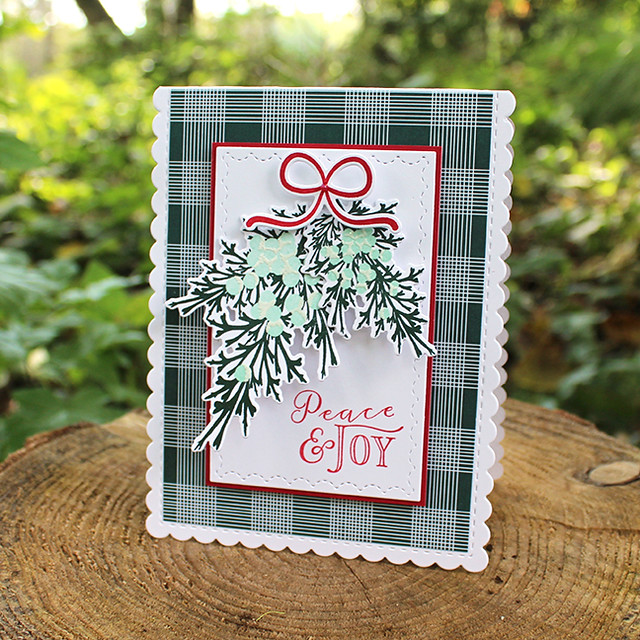
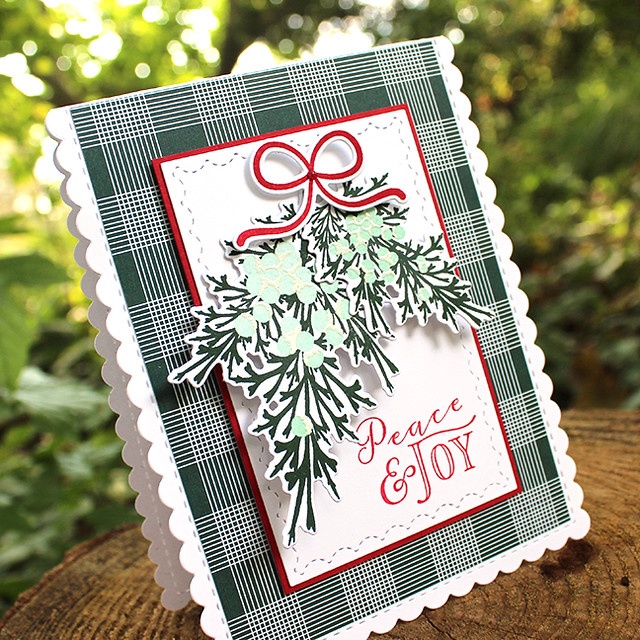
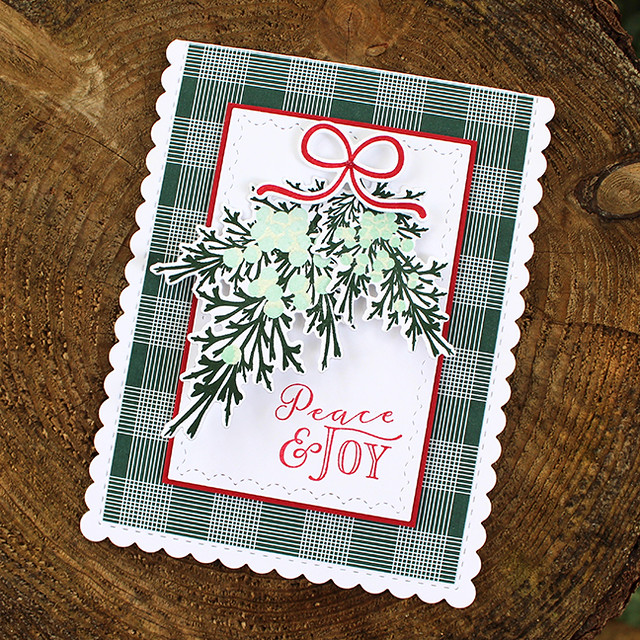
I have several projects to share with you this morning. It's so hard to choose, but let's start with a Christmas card.

Christmas Figure Skater Card

I used the stencils from the kit to give the background both a touch of color and texture. I also added little tufts of snow using the snow in the Trimmings kit.

Christmas Figure Skater Card 3

The center focal point was cut with the scalloped oval tag. I used an emboss resist technique to add the snowflakes to the tag and an oval stencil from the kit to add a bit of color.

Christmas Figure Skater Card 2

I used the frozen pond die to create a mask for sponging. I sponged on Spring Rain and then heat embossed using a shimmery powder to make the surface look like ice.

Christmas Figure Skater Card 4

I added the skater, trees, and sentiment banner with flat and foam adhesives. I used a bit of the silver cord from the kit to tie a bow and embellished the snowflakes on the focal point with a bit of crystal glitter. It's so pretty and shimmery!
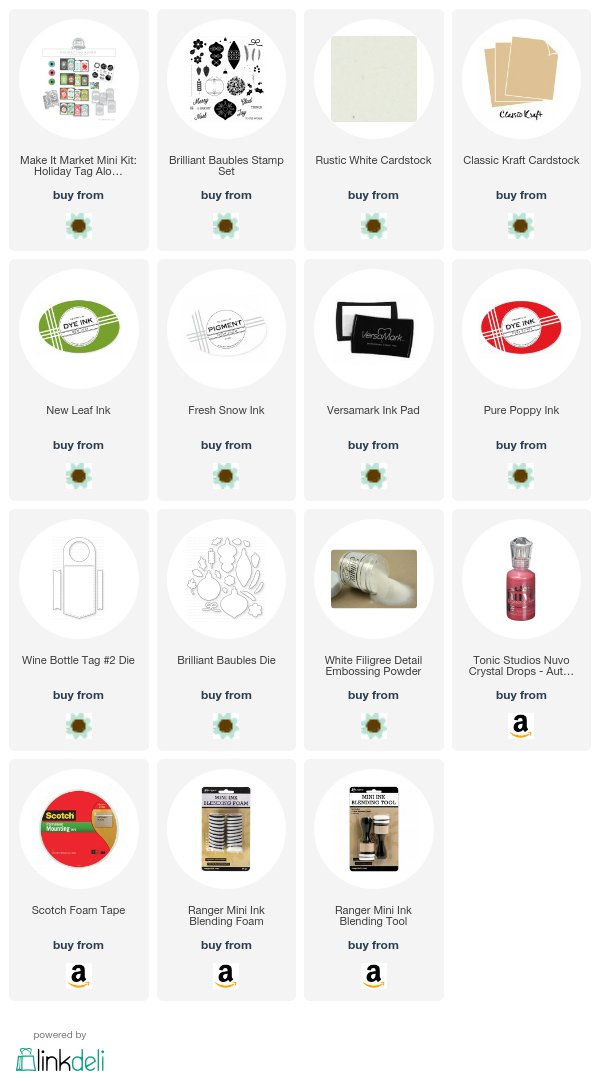
Supplies:


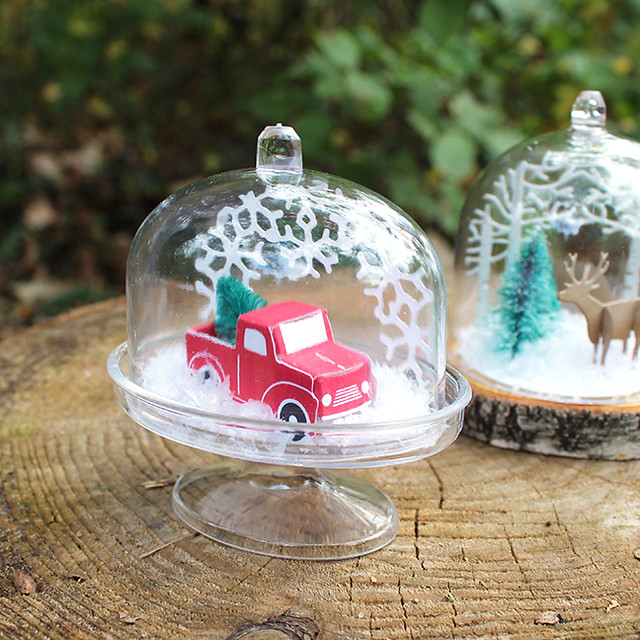
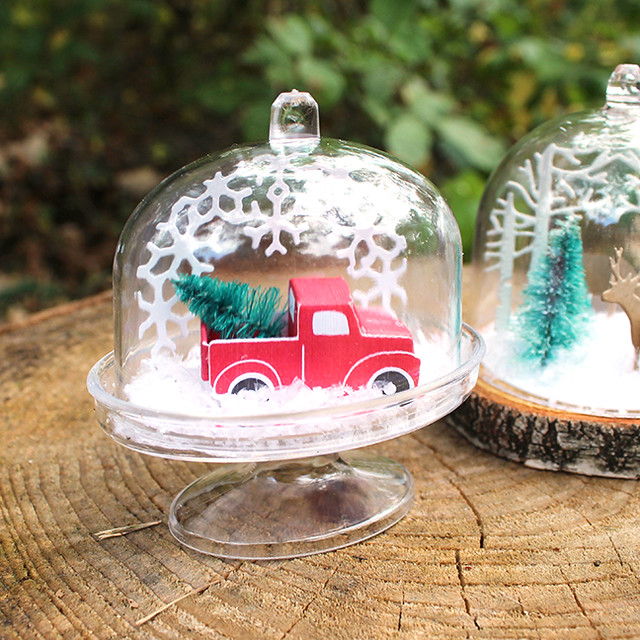
Next up, I have a set of mini cloches to share. The kit has a variety of cloches from which to choose and I can't wait to use every last one!

Mini Truck Cloche

I used the printed papers for the mini truck cloche, so it came together in a snap! I outfitted it with one of the bottle-brush trees in the bed. I simply snipped off the base using wire cutters.

Mini Truck Cloche 2
I also cut the snowflake scene from vellum and trimmed off part of it to make it fit into the oval cloche. I used a bed of fake snow in the bottom of the cloche to complete the scene.

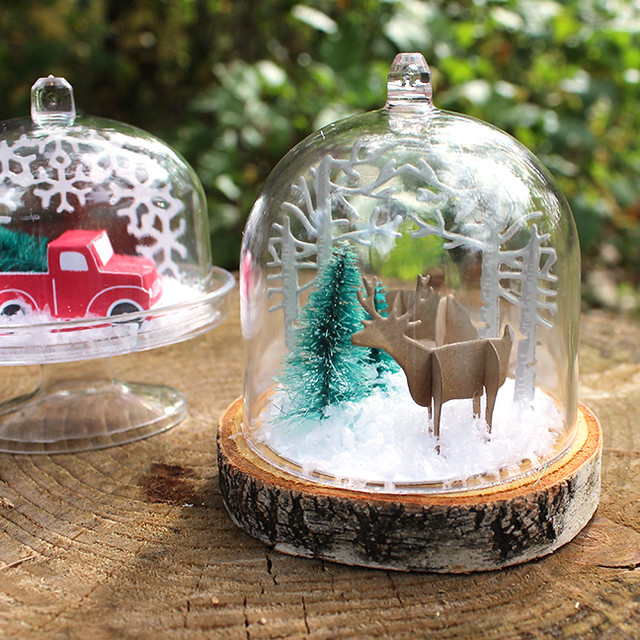
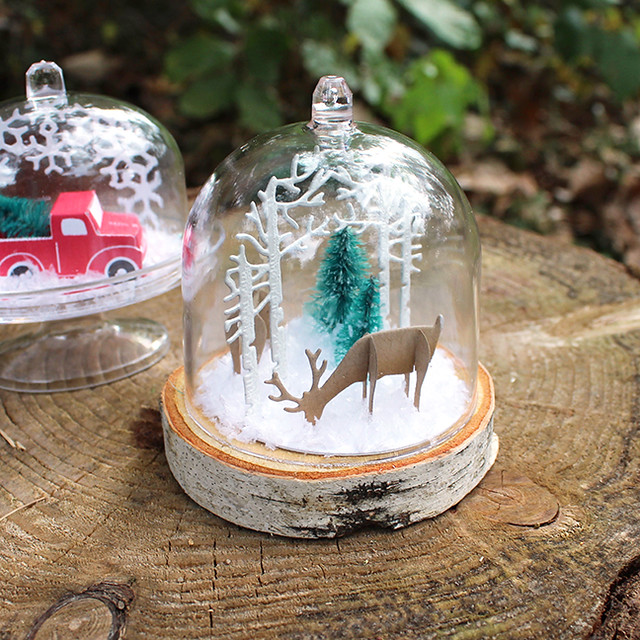
The larger cloche is a woodland scene that I assembled with the little 3D deer and the birch trees die.

Mini Deer Cloche

I cut the trees from Soft Stone cardstock and heat embossed the tree detail with white powder for just a touch of texture and contrast. I covered the base of the scene with white cardstock so it wouldn't be visible under the snow.

Mini Deer Cloche 2

I cut the deer from Classic Kraft and sponged them with the matching ink for a bit of dimension. Then I added white tails with a gel pen. I cut the bases off of two more trees and used E6000 to glue them to the cardstock base. I used the cloche dome with one of the wood slices rather than the cloche bottom for a more rustic feel. I'm in love with this sweet scene!

Supplies:


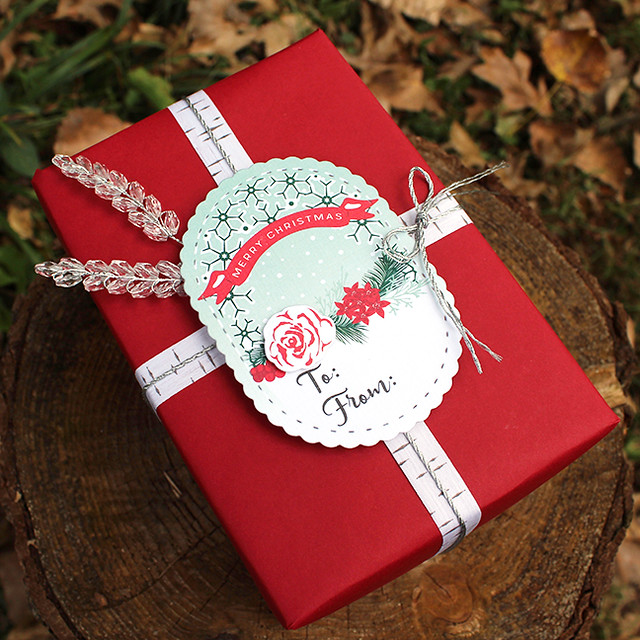
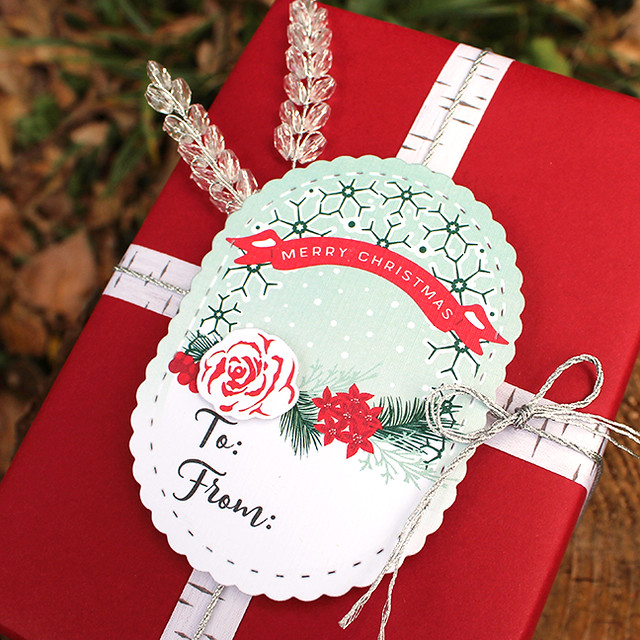
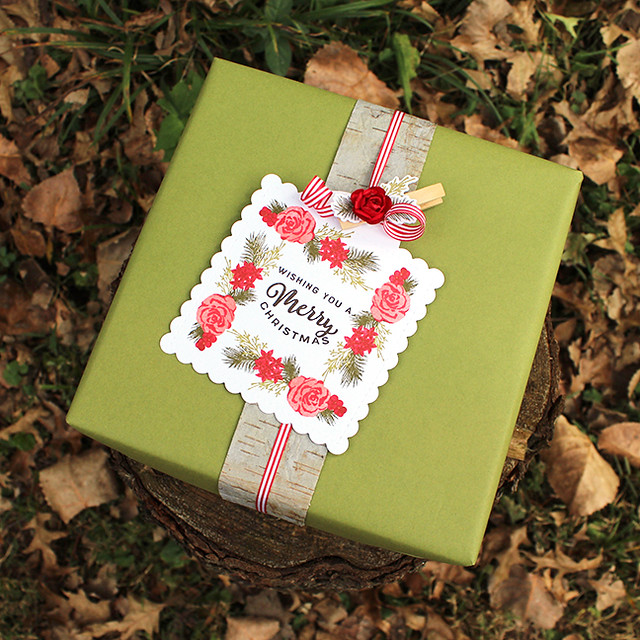
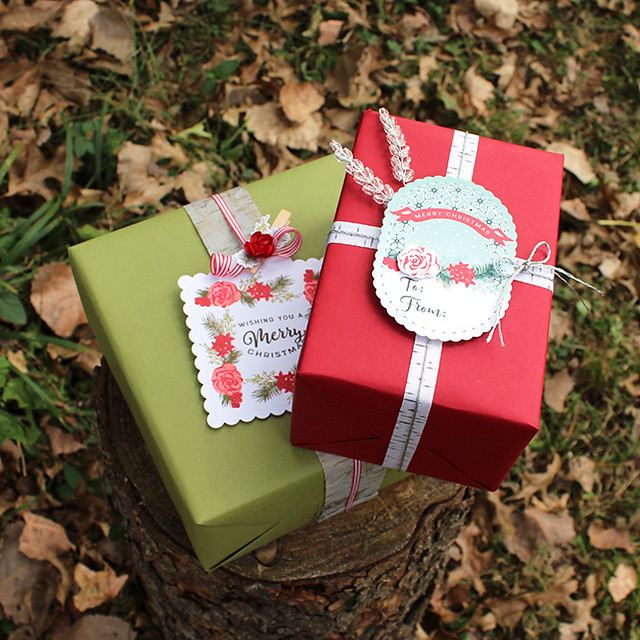
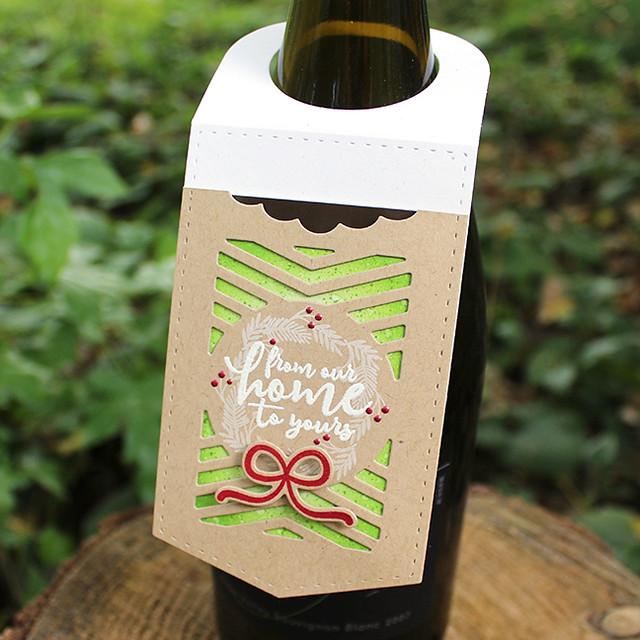
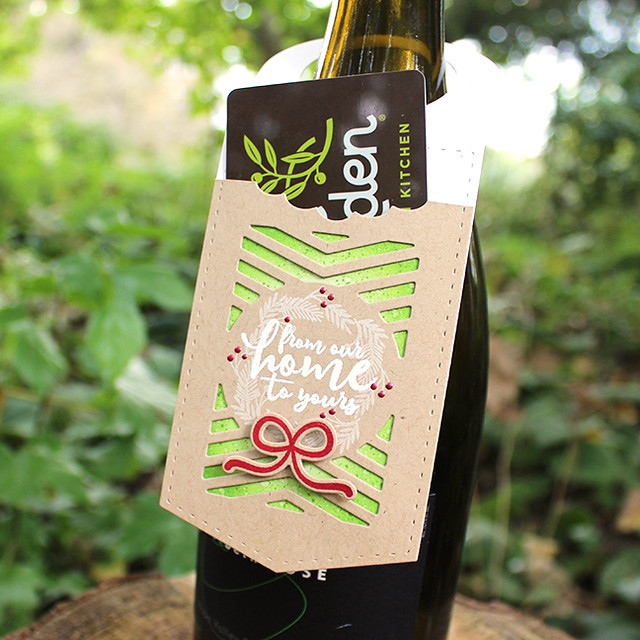
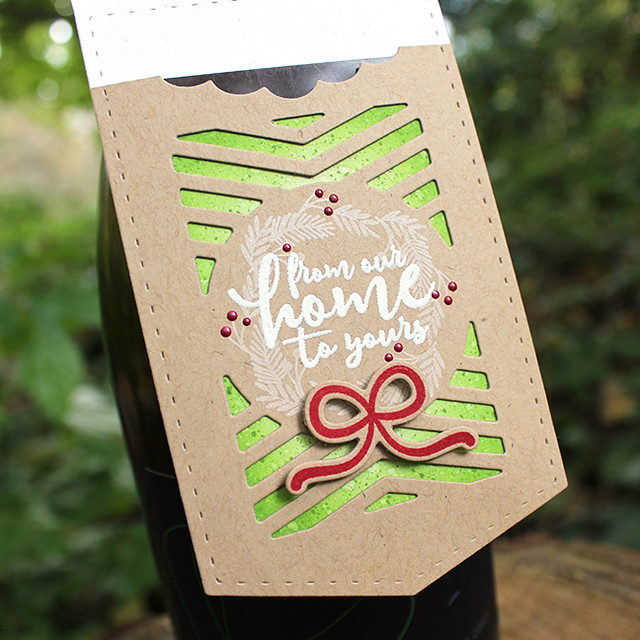
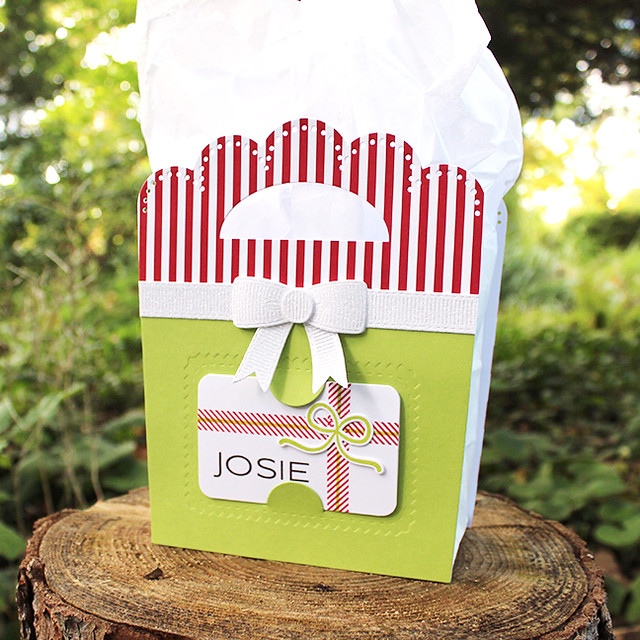
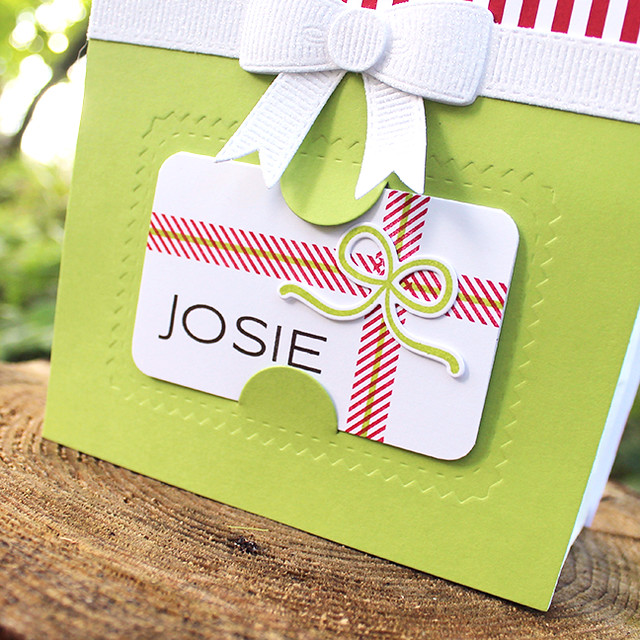
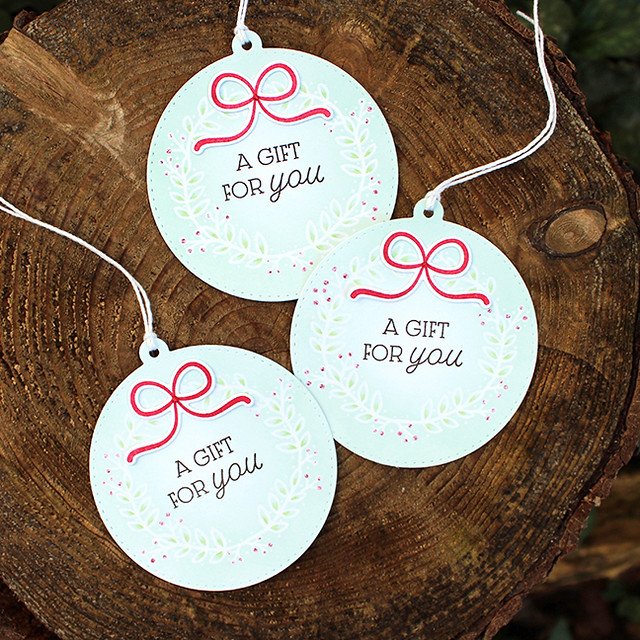
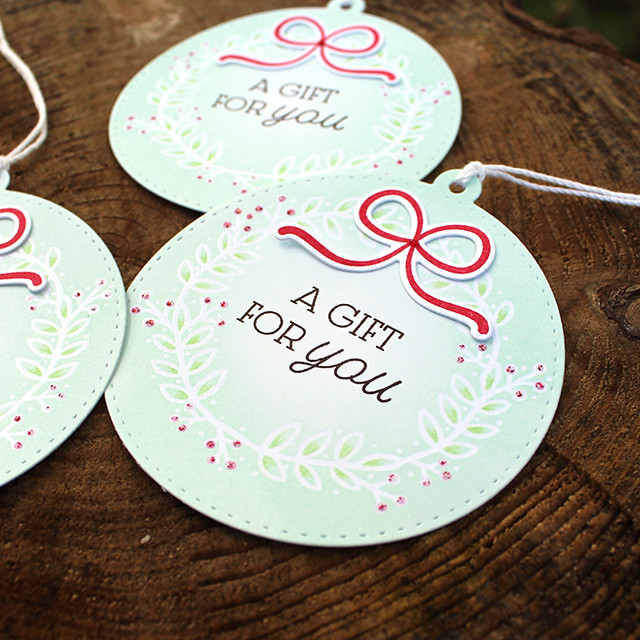
Last but not least, I have a couple of gift boxes that I decorated with elements from the kit.

Christmas Foliage Gift Package

The smaller box features a printed tag. I used a die cut, printed rose to add a bit of texture and two of the crystal picks for sparkle.

Christmas Foliage Gift Package 2

The birch printed ribbon and silver cord from the kit round out the look.

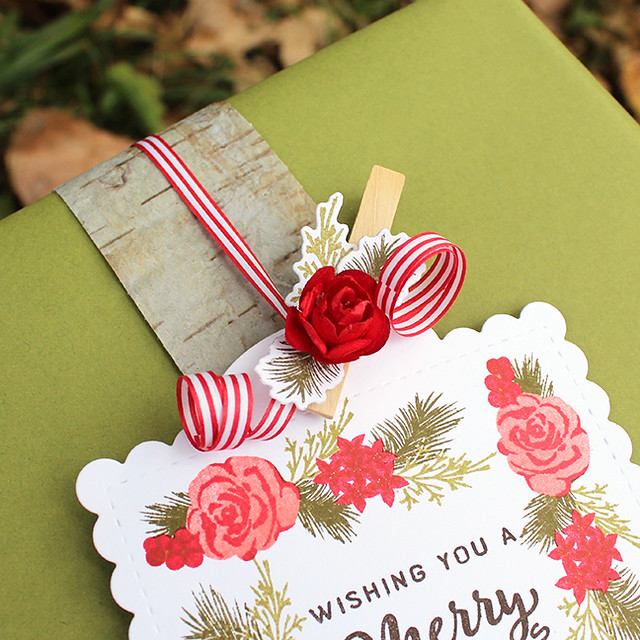
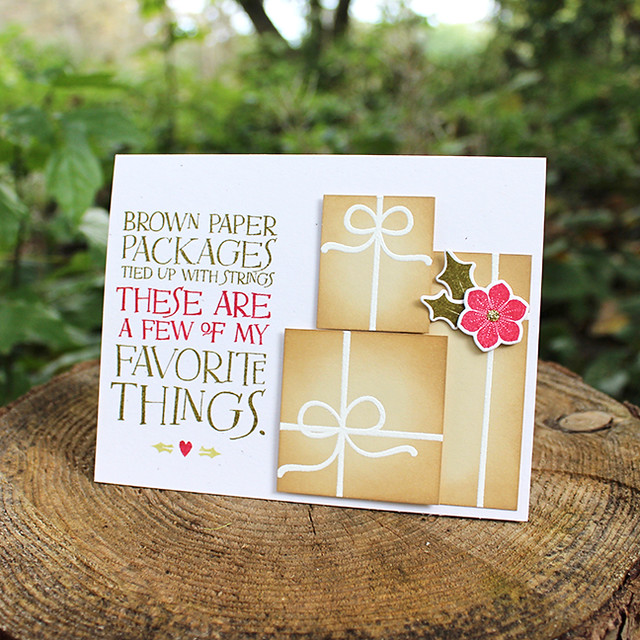
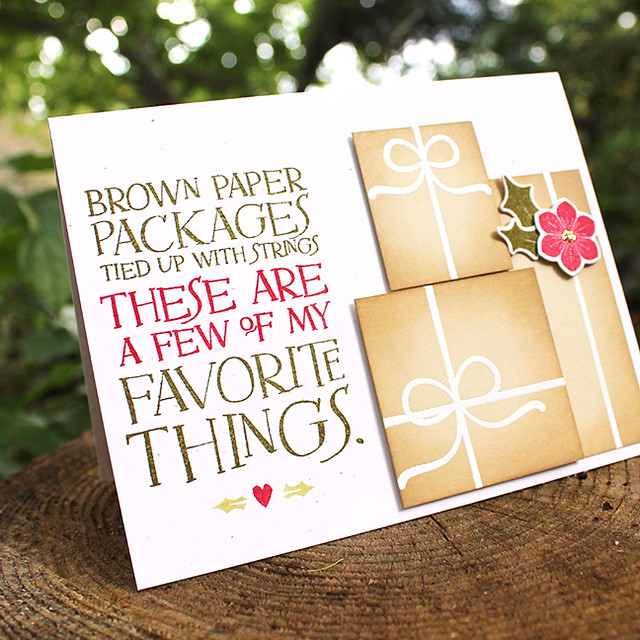
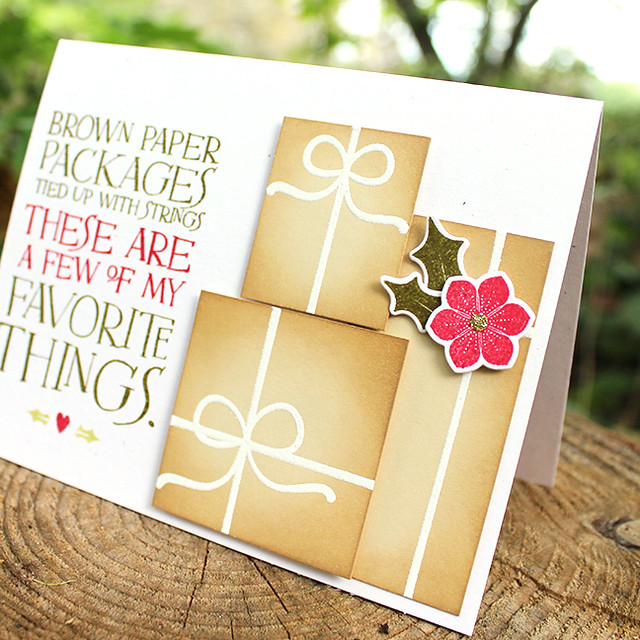
I stamped the tag on the larger package. It turns out that the Tag Sale: Quilted die is the perfect size for stamping the holiday foliage image! The greeting is from the Wonderland Sentiments mini set.

Merry Christmas Gift Package

I cut strips of the birch paper to create a "ribbon" around the box and then used the narrow, striped paper ribbon for a pop of color.

Merry Christmas Gift Package 2

I stamped and die cut a few bits of foliage and cut the wire stem off of one of the paper roses. I adhered all of that to one of the mini clothespins to clip the tag into place. Sweet and simple.

Wonderland Gift Packages

Wouldn't you love waking up to these beautifully decorated packages on Christmas morning?

Supplies:


This kit is definitely the kit to top all kits. Betsy has gone above and beyond with this one! Each and every piece has been thoughtfully designed and selected to give you an endless amount of design options as you prepare for the holidays. From gorgeous gift tags to unforgettable holiday cards, you will have everything you need at your fingertips! One of the best parts of this kit? Well besides the innovative die-cut and stamped mini vintage pick-up truck. The mini cloches! Yes! Real mini cloches! Betsy cleverly designed all of the elements to fit inside these sweet mini cloches that you can use for gifts, holiday table decor, the perfect finishing touch for your tree and SO much more.

Stop by Nichole's blog HERE for all the details, and the kit itself will be available for sale on Sunday, October 1st at 10pm ET, exclusively at Papertrey Ink.


We're also hosting our very first Release Party Live! broadcast on Sunday to celebrate this new kit! I hope you'll join me, Julie, and Stephanie over on our Facebook Page starting at 9pm.

In the meantime, Ashley, Betsy, Dawn, Laurie, Melissa, and Michelle also have projects to share with you today. Have a wonderful day and I'll see you very soon!

Thursday, September 28, 2017

Papertrey Ink Throwback Thursday: Through The Trees

Good morning, friends, and welcome to this week's Papertrey Ink Throwback Thursday! Dawn, Heather, and I are sharing projects using Through The Trees with you today. Over the years, Through The Trees has gotten quite a workout in my studio, but I admit to using it a little less often recently. It was a joy to pull this set out again to create an autumnal thank you card using some of my current favorite techniques. Let's take a closer look!

The large, leafy tree image in this set has long been one of my favorites. It comes together so easily and is wonderful for at least three of the four seasons. So, in the spirit of the turning leaves around our home, I chose to work with that today.

Autumn Thank You Card

I began by cutting a rectangular mask into a piece of copy paper using the Noted: Scalloped A2 Die Collection. I used that to sponged a background onto a panel of white cardstock using Spring Rain and Ripe Avocado inks. While the mask was still in place, I splattered a bit of diluted Spring Rain reinker onto the panel as well to add a bit of interest to the sky.

Autumn Thank You Card 2

Next, I stamped my tree trunk in Cocoa Bean ink. To achieve the woodgrain texture on the bark, I stamped a strip from Background Basics: Woodgrain directly on the image using Dark Chocolate ink before stamping a second time.

Autumn Thank You Card 3

Then, I stamped the leaves using a Summer Sunrise, Canyon Clay, and Terra Cotta Tile combo. I used Terra Cotta Tile again to stamp the sentiment before stitching a Bitty Big: Canyon Clay paper strip to the bottom of my white panel.

Autumn Thank You Card 4

Then, I rounded the bottom corners and adhered that piece to a Classic Kraft card base with foam tape. I love that it's fairly flat and easy to mail, but still has plenty going on to keep things interesting.

Thank you so much for joining me for today's Throwback Thursday feature! Make sure to pop over to Heather and Dawn's blogs to get a peek at their projects too. Have a great day and I'll see you soon!

Supplies:


Wednesday, September 20, 2017

More Papertrey Ink Release: Wine Bottle Tag #2 Die

Good morning, friends, and welcome back for more Papertrey Ink September release inspiration. I'm back today with a couple of additional projects featuring the Wine Bottle Tag #2 Die. I have a wine bottle tag and a card to share, so let's get to it!

Let's start with the tag. I love using die cut negatives and I thought the Brilliant Baubles dies would be perfect for this.

Glad Tidings Wine Bottle Tag

I began by die cutting one tag from white cardstock and one from Bitty Big: Pure Poppy paper. Then, I die cut the round ornament from the patterned paper tag and trimmed it right at the score line.

Glad Tidings Wine Bottle Tag 3

I placed that tag over the white tag and used it as a guide to stamp the ornament cap and sentiment, both from Brilliant Baubles. Then I stamped and die cut the pine boughs and bow from Brilliant Baubles.

Glad Tidings Wine Bottle Tag 2

I adhered the patterned tag to the white tag with dimensional adhesive and then attached the pine boughs and bow with flat and foam adhesives. I added a small dot of Nuvo crystal drops to the bow for a knot detail.

Supplies:


Next up, I have a card using the Wine Bottle Tag #2 as a decorative layer.

Deck The Halls Card

I began by cutting two white tags and sponged them lightly around the edges with Aqua Mist ink. I stamped the swirls from Silver White Winters onto the larger tag using Aqua Mist ink. Then, I heat embossed the ornament hanger onto the tag using silver powder. I also heat embossed the sentiment from Very Merry onto the smaller tag piece.

Deck The Halls Card 3

Next, I covered a white card base with a panel of Bitty Big: Simply Chartreuse polka dot paper. I used foam tape to adhere the tag pieces to the card front and set it aside. Next, I stamped and die cut one of the ornaments from Brilliant Baubles using Pale Peony and Berry Sorbet inks.

Deck The Halls Card 2

Then, I xyroned a piece of vellum and die cut it (covered sticky side up) with one of the Silver White Winters snowflakes. I removed the adhesive backing and sprinkled the sticky surface with Crystal glitter and adhered it to the center of the ornament.

Deck The Halls Card 4

I added the ornament to the card front and used a small dot of Nuvo glitter drops in the center of the snowflake to disguise the adhesive. It's so sparkly!

Supplies:


Thank you so much for joining me today! I hope you've enjoyed the last several days of inspiration. Make sure to visit Betsy, Dawn, Heather, Laurie, Melissa, Michelle, Stephanie, and Wanda for more projects with this month's release. See you soon, everyone!

Tuesday, September 19, 2017

More Papertrey Ink Release: Holiday Tag Along Mini Kit & Quoted

Good morning, friends, and welcome back to another day of Papertrey Ink September release inspiration! I'm back today to showcase Betsy's new Holiday Tag Along Mini Kit and Nichole's latest installation of the Quoted series. Let's get to the projects, shall we?

How about we start with the Holiday Tag Along Mini Kit? Betsy really thought out the details with this kit and it's so much fun to use! I paired it today with my new Wine Bottle Tag #2 Die to create a tag with a pocket for a gift card.

From Our Home To Yours Wine Bottle Tag

I began by die cutting tags from Rustic White and Classic Kraft cardstocks. I trimmed down the Kraft piece to be just a bit taller than a gift card and then die cut it with the tag (along the top) and chevron inserts. The scalloped dip creates a handy finger-hold, making it easy to slide a gift card in and out of the pocket. Next, I stamped the wreath and heat embossed the sentiment from the Tag Along stamp set.

From Our Home To Yours Wine Bottle Tag 2

Then, I sponged New Leaf ink onto a small panel of Rustic White cardstock. I speckled it with clean water and reinker to add texture and then adhered it behind the chevrons. It's not only a pretty background, but it also conceals the gift card so I don't have to worry about a busy pattern peeking out from the pocket.

From Our Home To Yours Wine Bottle Tag 3

I adhered the Kraft piece to the Rustic White tag that I'd already cut using 1/8" ScorTape around the edges. Then, I stamped and die cut a bow (this one is from Brilliant Baubles), added it to the wreath with foam tape, and embellished the berries with Autumn Red Nuvo Crystal Drops.

Supplies:


Next up, I have a card pairing Nichole's Quoted: Favorite Things set with my Brilliant Baubles and Gift Card Cozy Sentiments sets.

Brown Paper Packages Card

As soon as I saw this greeting, all I could think about was creating a pile of "brown paper packages" just waiting to be opened. To do so, I simply cut a few Fine Linen cardstock rectangles and sponged them with Classic Kraft around the edges. When the ink had dried, I heat embossed them with the thin ribbon from Gift Card Cozy Sentiments. I used the bow from Gift Card Cozy Sentiments on the larger, squarish box and the bow from Brilliant Baubles on the smallest box.

Brown Paper Packages Card 2

I stamped the sentiment from Quoted: Favorite Things onto a Rustic White card base using Ripe Avocado and Pure Poppy inks. I added the small heart and holly leaves (also from the set) below in Pure Poppy and Spring Moss. Then, I adhered the boxes to the card base, using different thicknesses of foam adhesive to add dimension.

Brown Paper Packages Card 3

Next, I stamped and die cut the flower and holly leaves from Brilliant Baubles to embellish the tallest box. All I needed to finish up was add a bit of Florentine Gold glitter to the center of the flower for a touch of sparkle. I'm smitten.

Supplies:


Thank you so much for joining me today! I'll be back tomorrow for one last official release post. In the meantime, make sure to pop in and visit Betsy, Dawn, Heather, Laurie, Melissa, Michelle, Stephanie, and Wanda for more projects with this month's release. See you soon, everyone!

Monday, September 18, 2017

More Papertrey Ink Release: Beautiful Berries

Good morning and welcome back for more inspiration featuring the Papertrey Ink September release! I'm sharing a project today showcasing Betsy's new Beautiful Berries: Winter stamp set.

Peace & Joy Card

This berry design is fun because you can go with the traditional bluish green cedar look or opt for brighter holiday colors and either one would look gorgeous. We happen to have a big, beautiful cedar tree right in our backyard, so I was inspired to go that direction.

Peace & Joy Card 2

I began by stamping the berry branches using Pinefeather and Aqua Mist inks. I let those dry awhile and then I went back with Versamark and heat embossed the detail image first with white powder and again with glitter powder. The end result looks like snow is dusting the berries and I absolutely love it!

Peace & Joy Card 4

Next, I die cut a Noted: Scalloped A2 Vertical card base from white cardstock and layered it with a piece of Bitty Big: Pinefeather paper. Then, I cut a decorative panel using the same die collection, also from white, and stamped it with the sentiment from Beautiful Berries: Winter in Pure Poppy ink. I matted that panel with Pure Poppy cardstock and adhered it to the card front with foam tape.

Peace & Joy Card 3

Next, I slightly curved the berry branches in my hands and adhered them to the card front just at the very tops. I stamped and die cut a Gift Card Cozy Sentiments bow and adhered that to the stems with foam tape. A dot of Ruby Slippers Nuvo glitter drops was the perfect finishing touch.

That's all for me today. Thank you so much for joining me! I'll see you again tomorrow with more inspiration. In the meantime, make sure to pop in and visit Betsy, Dawn, Heather, Laurie, Melissa, Michelle, Stephanie, and Wanda for more projects with this month's release. See you soon, everyone!

Supplies:

Sunday, September 17, 2017

More Papertrey Ink Release: Gift Card Cozy Collection & Berry Wreath

Good morning and welcome back to another day of Papertrey Ink September release inspiration! I'm sharing a couple of additional projects with you today featuring my Gift Card Cozy Collection and Heather's Berry Wreath stamp set. Let's get to it!

My first project today is a gift bag with a small, removable folded note tag that slipped into one of the Gift Card Tabs dies.

Josie's Gift Bag

I began by die cutting the Front & Center #2 die four times - twice out of white cardstock, once out of Bitty Big: Pure Poppy Paper, and once out of Green Parakeet cardstock. I cut the patterned paper and Green Parakeet die cuts into two pieces and then die cut the Pinked Gift Card Tabs into the bottom half of the Green Parakeet bag.

Josie's Gift Bag 3

I then adhered all four of the pieces to the white Front & Center shapes in a mix and match arrangement. I adhered those pieces to a white lunch bag and set it aside.

Josie's Gift Bag 2

Next, I xyroned some white cardstock and die cut it with the Simple Gift Bow die. I removed the adhesive backing and applied pieces of tape to select areas that I didn't want to be glittered. Then, I sprinkled the pieces with Crystal glitter to make them super sparkly. I assembled my bow and applied the pieces to the gift bag, covering my seams.

Josie's Gift Bag 4

Next, I made the little note tag. I cut a piece of white cardstock to 3 3/8" x 4 1/4" (about double the size of a standard gift card) and scored it along the center. I stamped it with the ribbons from Gift Card Cozy Sentiments in Pure Poppy and Green Parakeet inks and then added my niece's name in Smokey Shadow using the Fresh Alphabet.

Josie's Gift Bag 5

On the inside, I stamped a sentiment from Very Merry, again in Smokey Shadow. I folded the tag and rounded the corners before sliding it in under the gift card tabs. You could do something similar to dress up a simple, solid-colored gift bag you buy at the craft store, too.

Josie's Gift Bag 6

Just cut a panel the size of the front of your bag, die cut with the Gift Card Tabs die of your choice, and then stamp and decorate to create something totally customized. I'm sure this is a trick I'll be using this holiday season!

Supplies:


Next up, I have a set of tags I created with Heather's Berry Wreath set. I've always loved Heather's wreath stamp sets and this one is no exception.

Wreath Gift Tags

I began by heat embossing the wreaths onto white cardstock using clear embossing powder. Then, I sponged over them with Aqua Mist ink and die cut the tags using the Berry Wreath Tag Die.

Wreath Gift Tags 2

Next, I colored the leaves with a colored pencil, adding the color mostly at the base of each leaf. I stamped the sentiment from Gift Card Cozy Sentiments in the center of the wreaths using Smokey Shadow ink.

Wreath Gift Tags 3

I then die cut and stamped the bows from the Gift Card Cozy Sentiments stamp set and adhered one to the top of each wreath. I tied on white crochet thread and then embellished each berry and the center of the bows with Ruby Slippers Nuvo glitter drops. I really like that the result is light and airy.

Supplies:


That's all for me today. Thank you so much for joining me! Make sure to pop in and visit Betsy, Dawn, Heather, Laurie, Melissa, Michelle, Stephanie, and Wanda for more projects with this month's release. See you soon, everyone!