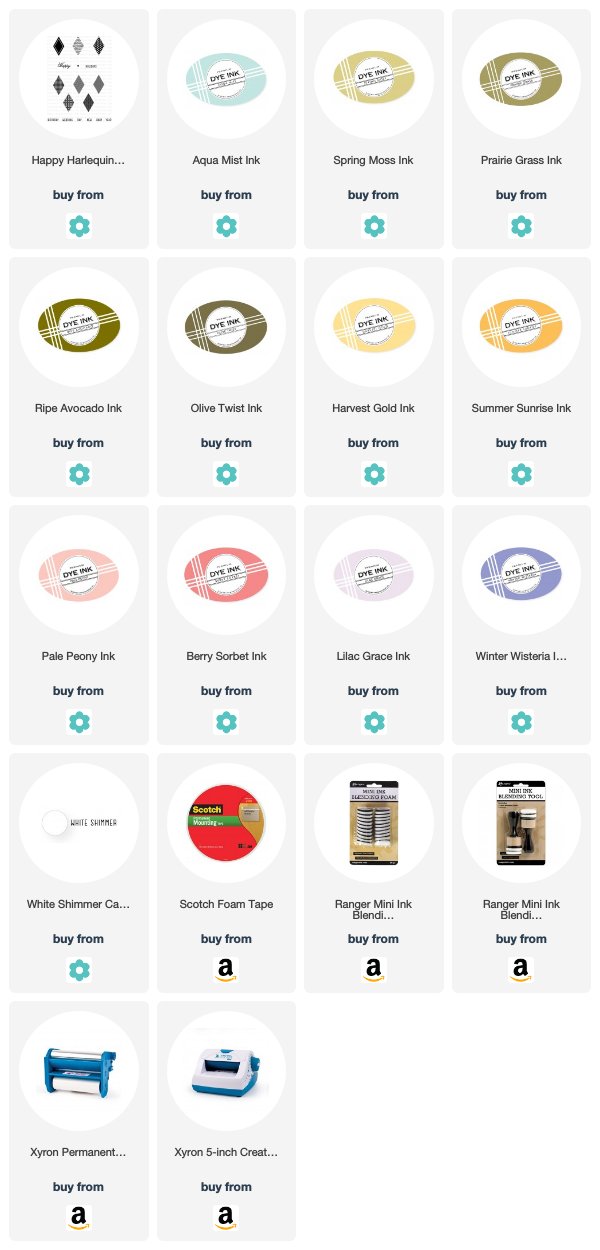
Good morning friends! Welcome to this week's Papertrey Ink Design Team Tips! Since my Perfect Plaid Stencil Collection released a couple of weeks ago, I've had a handful of questions about how to get the most out of the stencils. So today I thought I would share some of my favorite ways to use the stencils to their full potential. I've even put together a video and a downloadable PDF that you can use for reference! Here's the video:
In this video I walk you through all the steps necessary to create four plaid panels. All of the cardstock is cut to 4 1/4" x 5 1/2". I used white to make it easier to see the different colors more easily, but these stencils work beautifully with colorful stock as well.
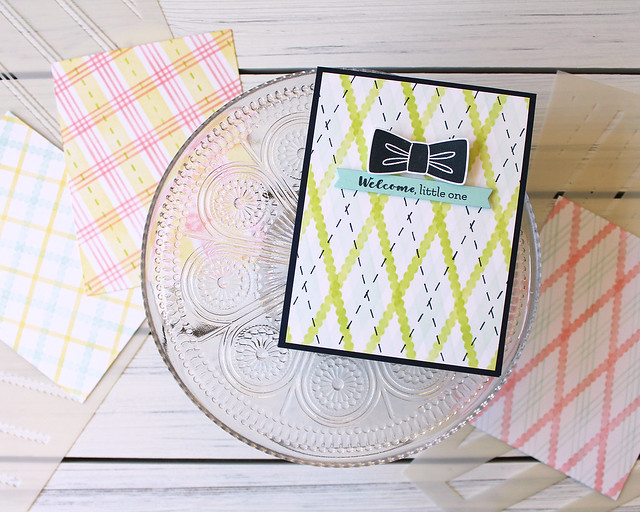
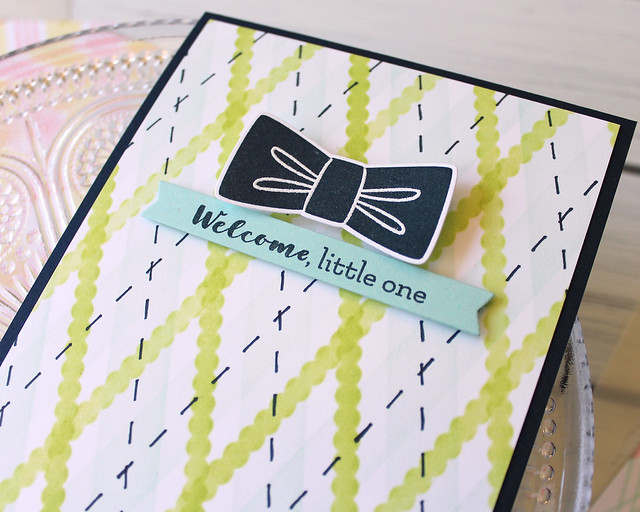
I also took one of the panels from the video and used it to create this quick and easy baby boy card.
I simply trimmed about 1/8" off of each side and adhered the panel to a Dark Indigo card base. Then, I stamped a bow tie from Dapper Chap using Dark Indigo ink and heat embossed the detail image with white powder. I die cut that and adhered it to the card front with foam tape.
Then, I stamped the sentiment from Jungle Buddies Sentiments onto an Aqua Mist banner (I double cut one end to make it a little bit shorter). I adhered that to the card front with foam tape too. See, quick and easy!
Don't forget the free download! You can find that right here:
This four-page pdf includes some of the tips from the video along with a handful of suggested patterns to get you started. If you made your own Stencil Binder you can tuck this in one of the pockets or in its own page protector so it's always right at your fingertips!
ETA: After some feedback that the images weren't dark enough, I boosted the color a bit. I hope that helps anyone that had trouble with the initial download.
Thank you so much for joining me today! I hope you've enjoyed getting better acquainted with the Perfect Plaid Stencil Collection. Have a wonderful weekend and I'll see you again soon!
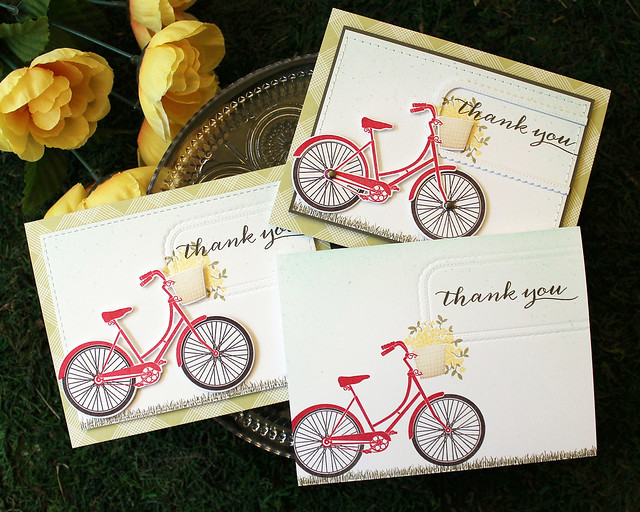
Good morning, everyone, and welcome to this month's Papertrey Ink Simple To Spectacular feature! Melissa, Lexi, and I are going to be sharing Pedal Pusher projects with you today. The Simple To Spectacular challenge has absolutely become one of my favorite new features this year and Pedal Pusher is a perfect set for this process!
The coordinating die collection offers so many creative possibilities. I had so much fun adding unique details on each progressive project and I still can't decide which I like best! Let's take a closer look at my projects!
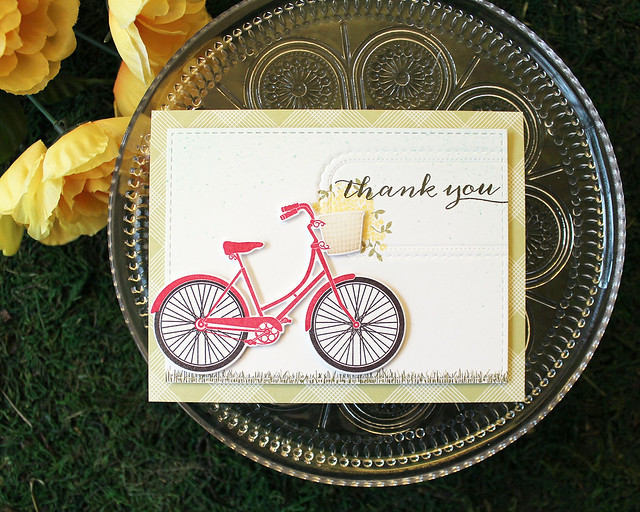
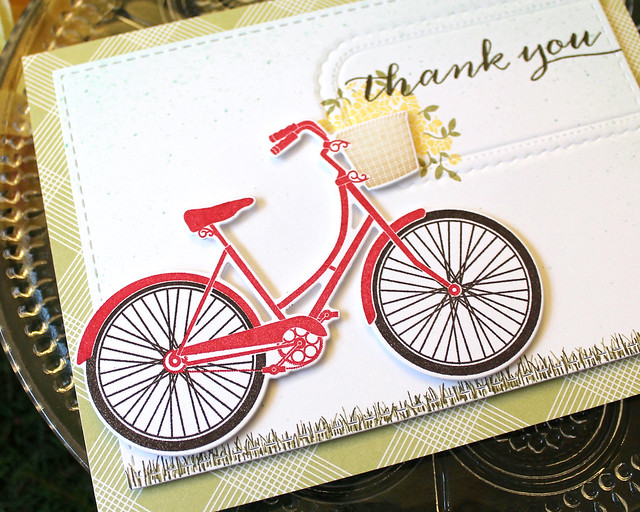
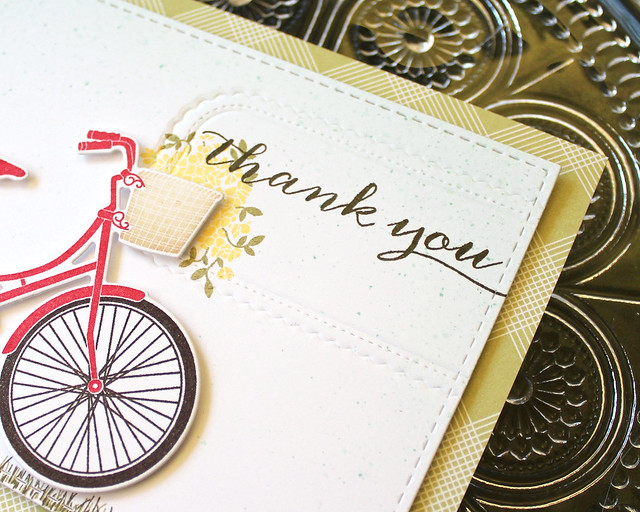
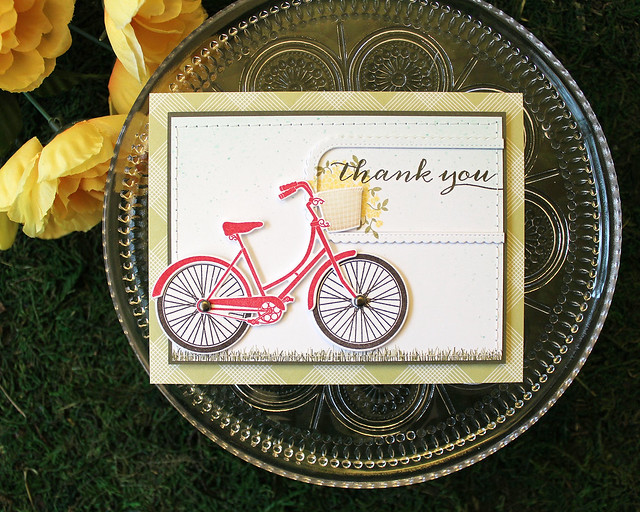
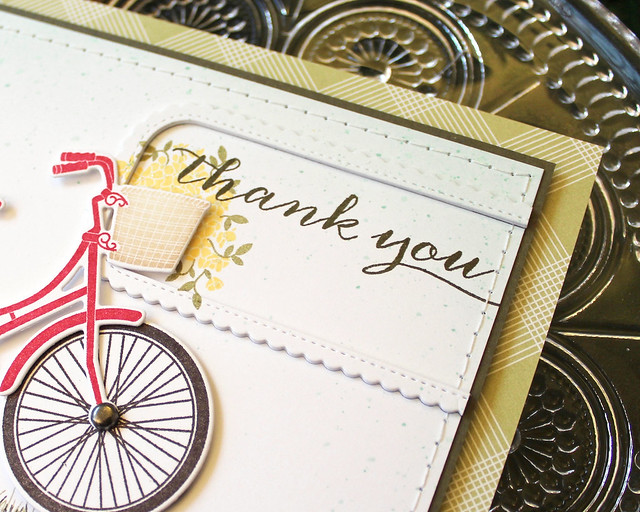
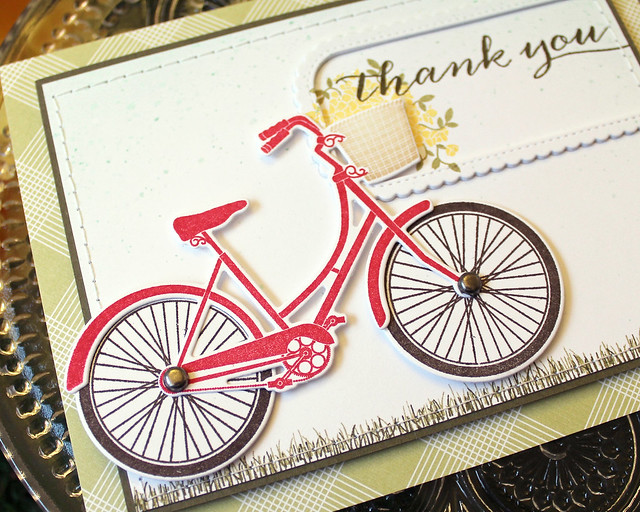
Here's my "simple" project. I began with this one (not always the case) and decided to let it sort of guide the layout and design of the whole series. I liked the idea of the bike bleeding ever so slightly over the edge and of having the sentiment framed a bit.
I began by sponging and speckling the Aqua Mist ink on the card front before stamping the rest of my scene. I used Simply Spring Borders to add the grass, double stamping (once in Prairie Grass and once in Olive Twist) to add a bit of depth. I chose Pure Poppy for the bike itself and Smokey Shadow for the tires. The basket is a mix of Fine Linen and Classic Kraft and the flowers are Harvest Gold.
Once my scene was finished, I impressed one of the Keep It Simple Frames into my card front using an impression plate sandwich. Then, I stamped my sentiment using Olive Twist. I like that the green is a bit softer than using Smokey Shadow or Black, but still strong enough that it doesn't get lost.
Next up I have my "intermediate" project. I followed the same basic layout, but added a stitched layer and some Bitty Big paper to add interest.
I used a Noted: Simply Stitched layer as the base for my scene. Rather than stamp my bicycle directly on the focal layer, I chose to die cut it and pop it up with foam adhesive, giving dimension. The stitches add a charming, homespun detail.
I used the same embossed frame on this version, but let the sentiment bleed off the edge a bit. The Bitty Big: Spring Moss is nice and light, yet coordinates well with the yellow-greens that I used in my stamping. Sometimes I really like to use products that complement each other rather than exactly match. It keeps the design from feeling too flat.
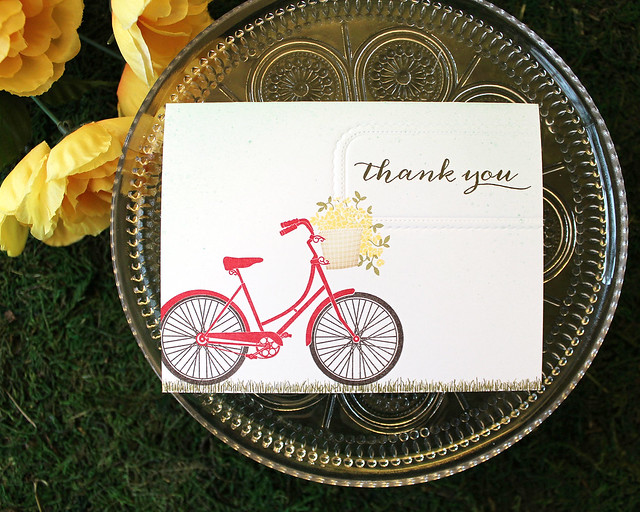
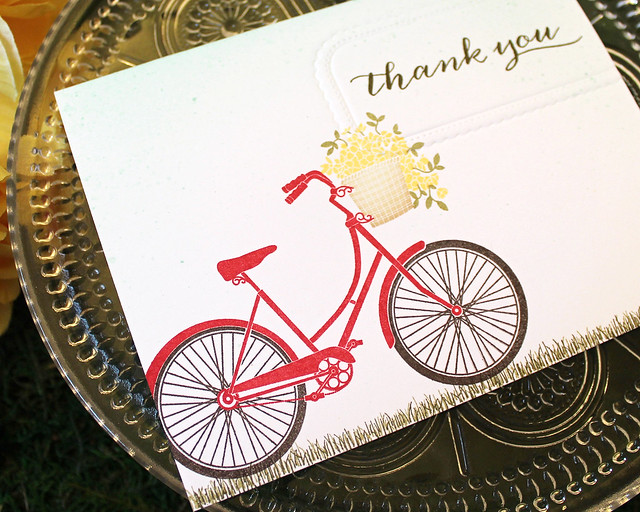
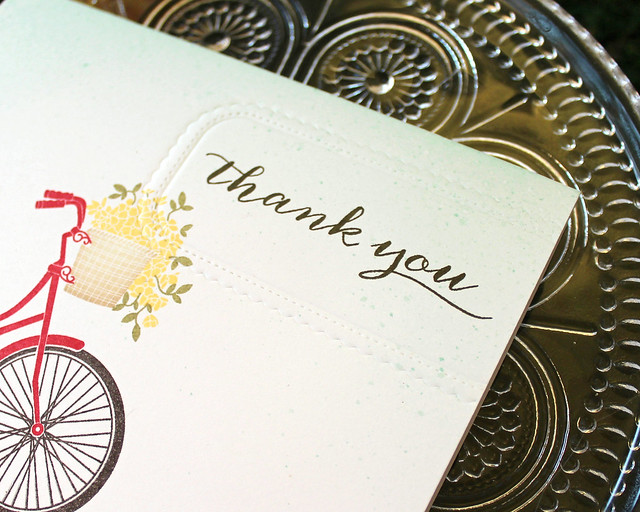
Last but not least is my "spectacular" card. I added a contrasting mat and real stitching to amp up the texture of this version. I also went with the more involved die set that allows for real, spinning tires on the bicycle. That interactive detail is so much fun!
On the recent Release Party Live broadcast, I mentioned that I love Betsy's Noted: Simply Stitched die collection because my real stitching sometimes comes out a little caddywhompus. While that's still very much the case (don't look too closely - ha!), I do love the texture it can give to a project and that's why I decided to whip out the ol' needle and thread here.
I also wanted to give the sentiment a little more visual weight, so rather than emboss the frame, I decided to actually die cut it from the scene after my background was complete. Then I added die cut layers beneath it and inlaid it back into place to give it some heft.
In addition to the interactive bicycle tires, I also embellished the flowers with a few spots of crystal glitter. The sparkle is subtle, but it gives a nice touch of shimmer in the light. I also love that the strong contrast of the Olive Twist mat. It has a distinct grounding effect on the focal layer.
Well, that's all I have for you today. Make sure to pop in on Melissa and Lexi to see how they've tackled this month's challenge and I'll see you again soon. Have a great day!
Good morning and welcome back for Day 5 of the Papertrey Ink April countdown! The team is back today introducing a super fun new Make It Market Mini Kit from Betsy Veldman called Simple Impressions: Celebrations. This kit includes everything you need to get a beginner hooked on excited about stamping! I have a couple of projects to share, so let's get to them!
My first card today uses just the kit (and a couple of extra inks because I'm a dweeb and I didn't read the contents carefully enough). You could easily get a very, very similar look with the items in the kit.
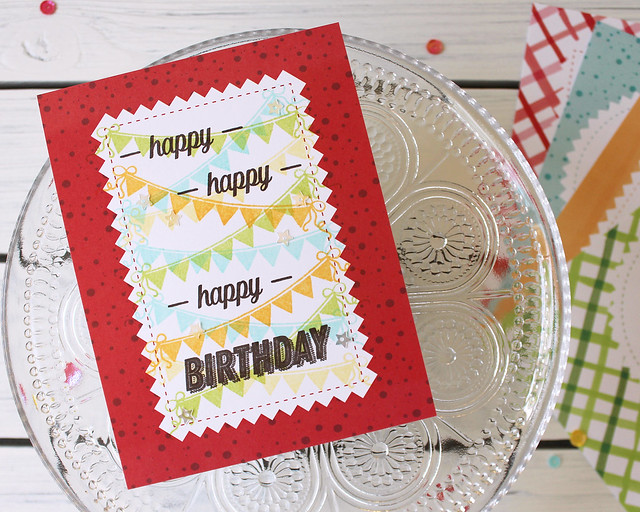
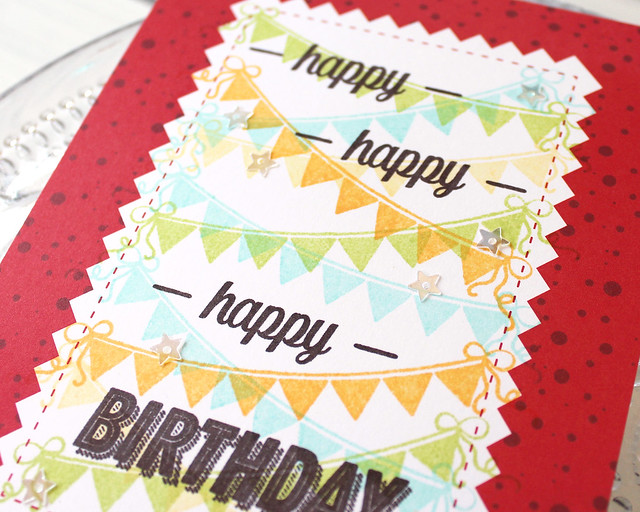
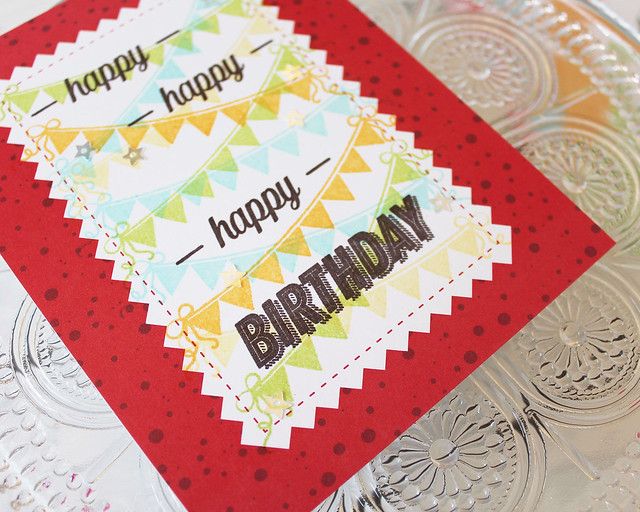
I love that this kit makes quick and easy cards a breeze. The printed card fronts are perfect for placing your focal image and sentiment with no fuss. I chose one of the Pure Poppy papers to create this birthday card.
I repeatedly stamped the banners down the length of the opening, angling them differently to keep thing interesting. The kit doesn't include the die collection (because how many novice stampers run out and buy a die cut machine immediately), but I actually love how the banners look layered like this. You get extra pops of color where they overlap.
Then I stamped the "happy" sentiments and "Birthday" atop the banners and embellished with star sequins. I adhered it to a white card base and that's really all there is to it. It's bright and fun, but it came together in minutes and it wasn't challenging (but your recipient doesn't need to know that, am I right?!).
Next up, I created a card using the stamp set and die collection which are available separately from the kit. You heard that right! You can buy this stamp set separately if you're not interested in the papers and sequins and other bits and bobs (though the papers are totally worth it).
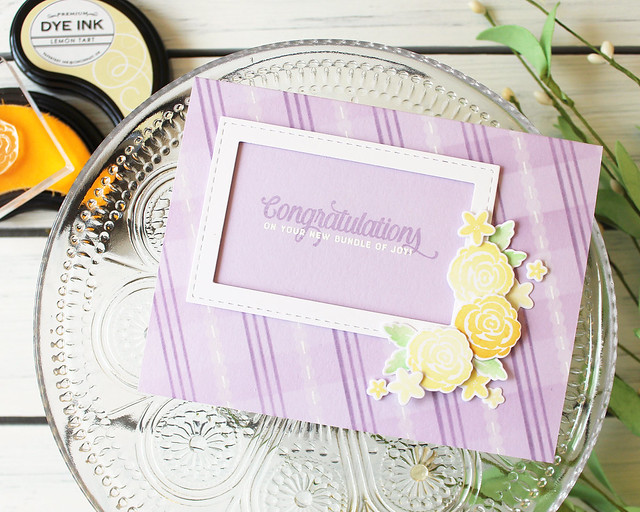
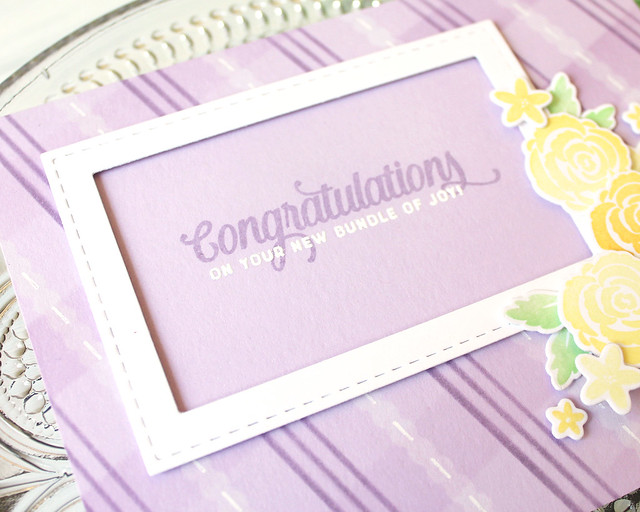
I began by stenciling a plaid pattern onto my Lilac Grace card base, but first I masked off the area where I knew I would be stamping my sentiment using post it paper. Once my stenciling was done, I stamped my greeting and heat embossed the companion sentiment using white powder.
Next, I die cut a frame using the new Noted: Simply Stitched A2 Vertical die. I adhered that to the card front with dimensional adhesive and set the card base aside.
Then, I stamped a whole bunch of flowers and leaves. I die cut them and arranged them on the corner of the frame, using both flat and dimensional adhesives to get different levels of depth. I love how soft and pretty this card turned out! Now someone just needs to have a baby so I can give it to them. Ha!
Thank you so much for stopping by today! I'm heading down to Cincinnati for our Release Party Live broadcast on Sunday (4/15), so I hope you'll join us for that at 9pm EDT. In the meantime, Betsy, Dawn, Heather, Keeway, Laurie, Melissa B, Melissa P, Michelle, and Stephanie have more to share with you. Have a great weekend and I'll see you soon!
Good morning, friends, and welcome back for Day 4 of the Papertrey Ink April countdown! Today I have the very great pleasure of introducing my new Dapper Chap stamp set, Perfect Plaid Stencil Collection, and Shape Up Series: Tuxedo Gift Card Holder Die. So much fun, dudely stuff to share! Why don't we just get to it and I'll spare you the yammering.
So Dapper Chap came about because my fella loves his bow tie collection (which weirdly went missing and we can't figure out where on Earth they could be - we've looked everywhere and can only find two of them).
Anyway...he loves bow ties and for years I've wanted a set that would work really well for him. Most of the tie sets on the stamp market are regular neckties and while those are quite nice, they aren't really a thing around here. So I got to sketching and came up with this selection of patterned bow ties (there's a solid one for those of you who prefer that sort of thing, too) and a very simple second step that adds a perfectly minimal detail. Happy sigh, friends.
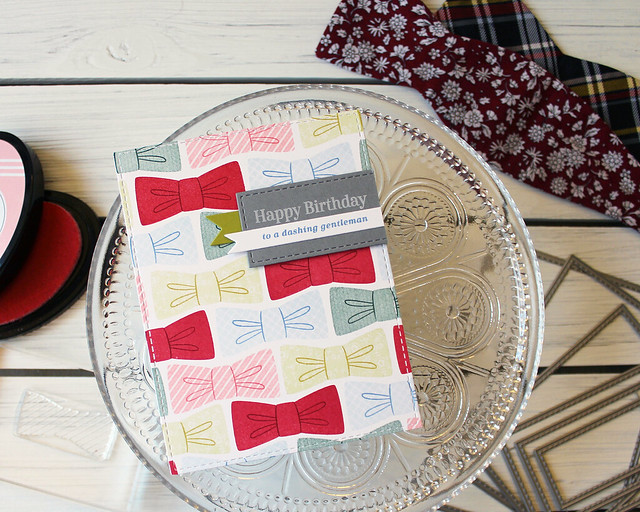
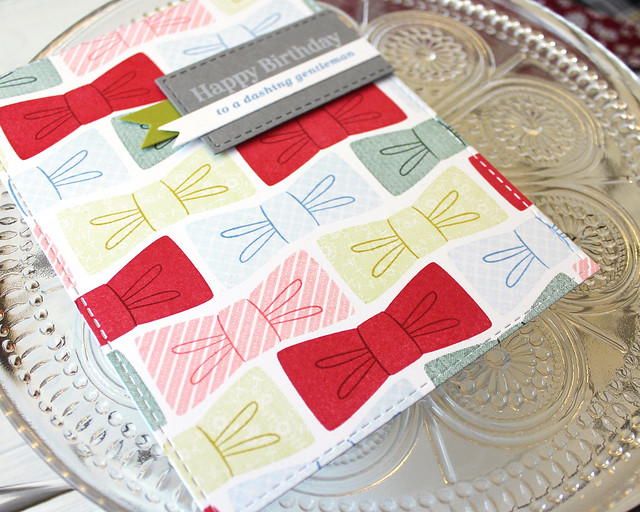
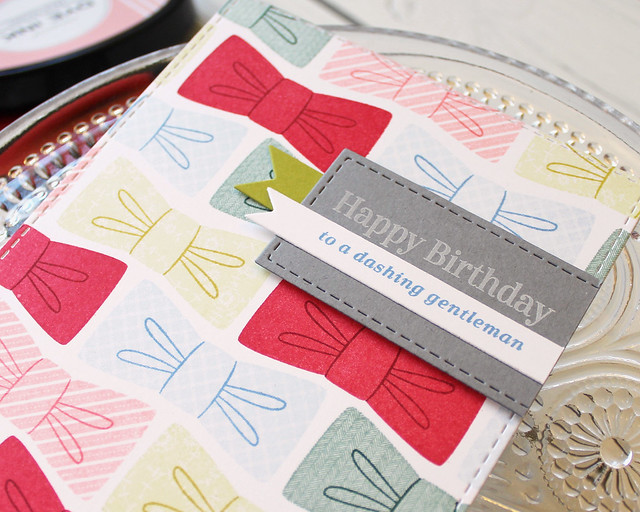
I stamped this background tie pattern with Sean's (missing) tie collection in mind. One of his favorites is a reversible pink tie with polka dots on one side and stripes on the other, so I knew from the outset that pink was going to be a part of the pattern. I stamped the ties onto a Noted: Simply Stitched A2 Vertical card front in offset rows.
Then, I die cut the smallest stitched rectangle in that same die collection from the new gray cardstock and stamped it with Fresh Snow ink. I die cut a small banner and stamped it with the companion sentiment in Blueberry Sky ink. I also die cut a Simply Chartreuse banner and layered all three pieces on the card front using a mix of flat and foam adhesives. The pattern really does the heavy lifting here and I really love that.
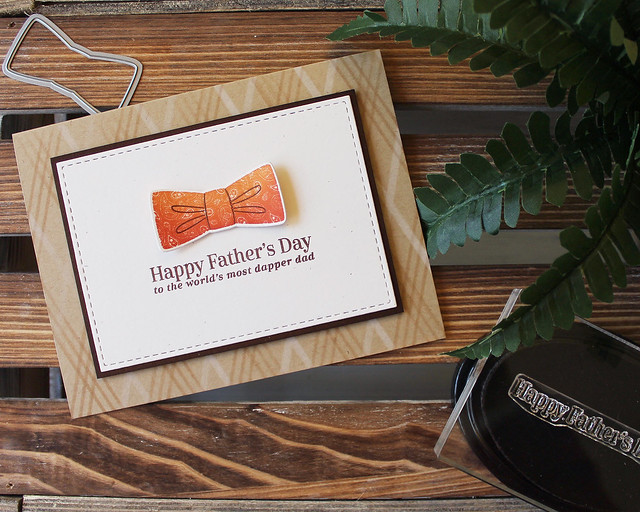
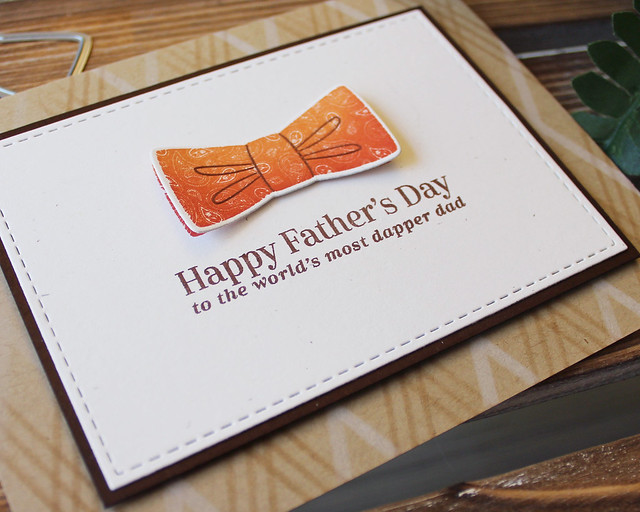
Next up, I have a simple Father's Day card that pairs Dapper Chap with the new Perfect Plaid Stencil Collection. This stencil collection makes plaid backgrounds a snap! You simply sponge, clean your stencil, and then flip it over to sponge the opposite stripes. Mix and match the stencils to create truly customized looks!
I began by stenciling my plaid pattern onto Classic Kraft cardstock. Then, I stamped and die cut my bow tie using Canyon Clay, Terra Cotta Tile, and Dark Chocolate inks.
I stamped a second bow tie and my sentiment on a Rustic White panel that I'd die cut with one of the stitched rectangles from the Noted collection. I matted the Rustic White panel with Dark Chocolate cardstock and mounted it to the card front with foam adhesive.
Then, I curved the loose bow tie a bit and adhered it over the stamped bow tie with dimensional adhesive. I wanted it to look like a real bow tie, and I think I pulled off the layered look that an actual bow tie gets once tied. So fun!
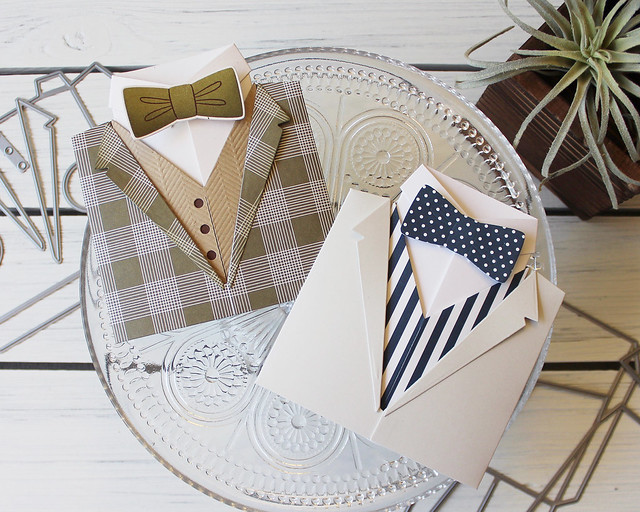
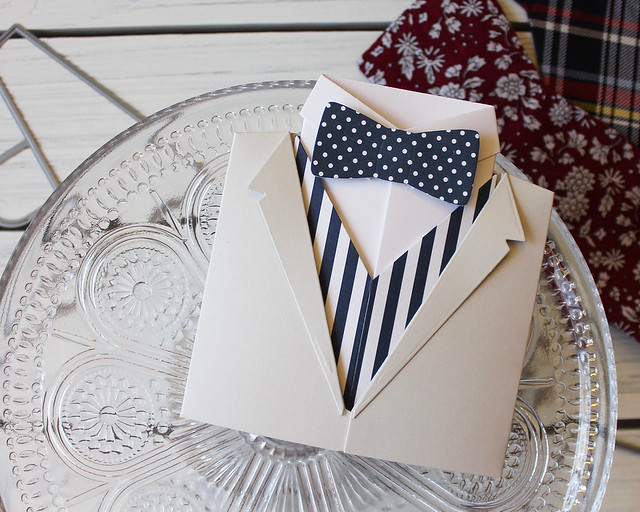
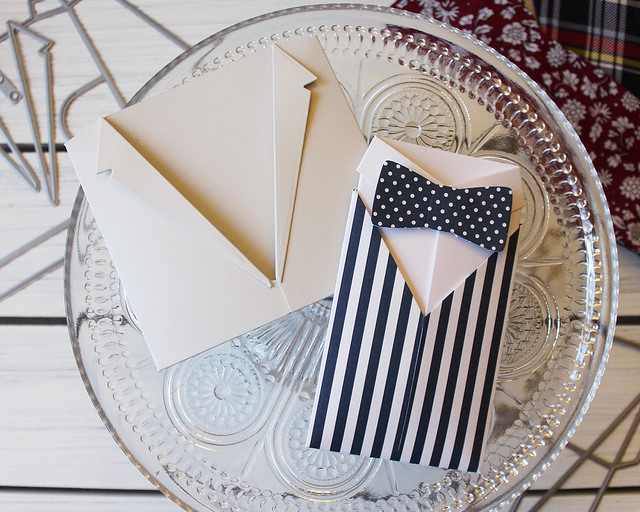
Last up, I have a couple of projects to share using the Shape Up Series: Tuxedo Gift Card Holder Die. Now, don't let the name fool you - this die does so much more than tuxedos (or even gift cards really)!
I put together a quick assembly video to show you just how easy it is to put one of these bad boys together. It's really not hard, but I will say that your adhesive is important. If you're not using a super strong adhesive (like ScorTape) you're not doing yourself any favors. I'm just being honest.
Here's the tutorial:
See! So easy!
For this tuxedo I used Soft Stone cardstock and Dark Indigo Bitty Big paper. I chose to leave off the optional buttons, but you could always add them if you wanted an extra detail.
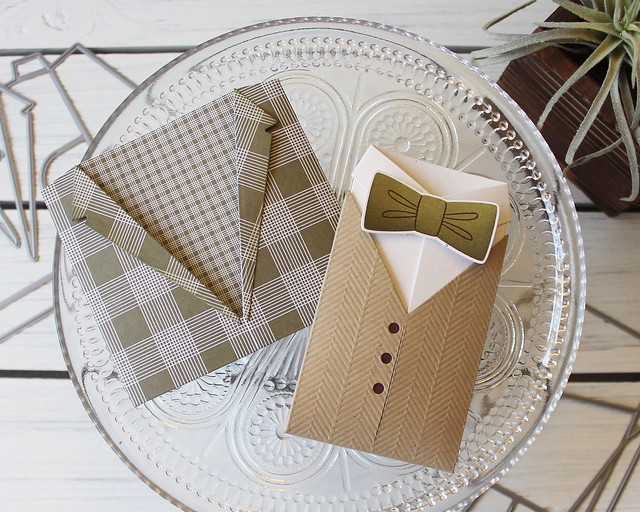
A gift card tucks into the shirt and the shirt tucks into the vest and the vest tucks into the jacket (with little semi-circular tabs to keep things secure). You could leave the whole package loose or you could adhere it to a card front if you so desired. Either way, it will fit nicely into a standard A2 envelope.
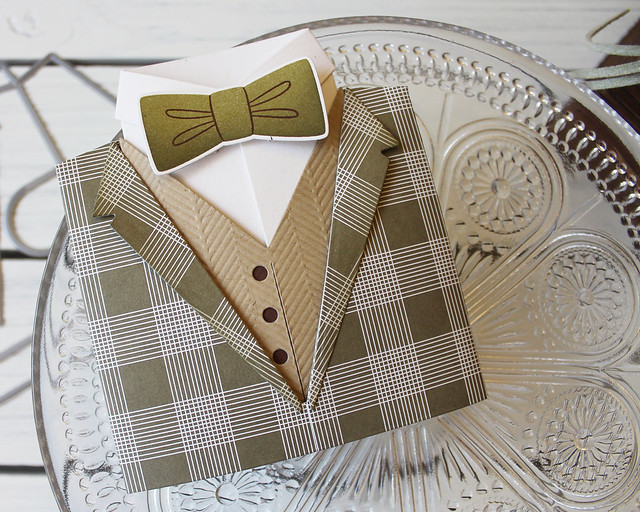
I've wanted to create a tweed suit since I designed this die, so that's what I had in mind with this project.
I used the new Bitty Big: Olive Twist patterned paper to create the jacket. I die cut the vest from Classic Kraft cardstock, also cutting the reverse of the buttons. Then, I used the Herringbone Impression Plate to give the vest a bit of texture (positioning the plate over just the front of the die cut) and backed the button area with Dark Chocolate cardstock.
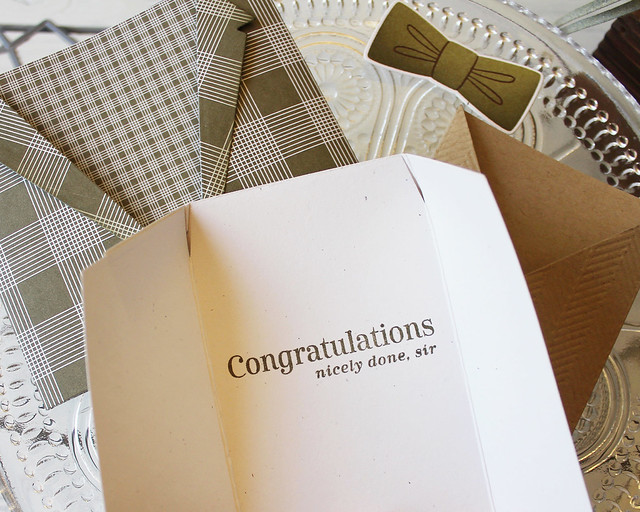
I cut the shirt from Rustic White cardstock and stamped the Congratulations sentiment inside before adding the collar. Then, I stamped and die cut the solid bow tie from Dapper Chap. I used Prairie Grass, Olive Twist, and Dark Chocolate inks for that and then attached it to the shirt with foam tape.
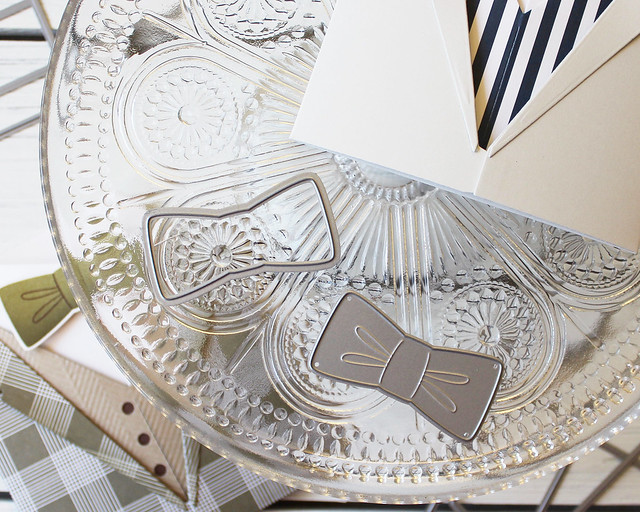
And just because I know someone will ask, yes, there are two bow tie dies. One comes by itself to coordinate with Dapper Chap. The other is part of the Tuxedo die collection. That one has embossed lines on the inside. They have the same outline, but the embossed line thing is different. Here's a photo so you can see them side by side.
I will say that the embossing shows up best when you use a metal shim to make sure you're getting enough pressure for the texture to transfer. Just an FYI.
Well, that's all I have for you today, friends. I truly hope you've enjoyed today's post. I love creating product that makes cards for fellas a little bit easier. Make sure to pop over to see whatBetsy, Dawn, Heather, Keeway, Laurie, Melissa B, Melissa P, Michelle, and Stephanie have in store for you today. Have a wonderful Friday! See you soon!
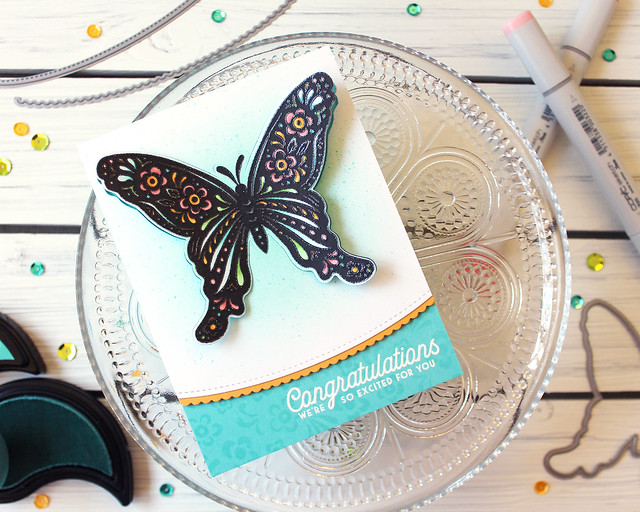
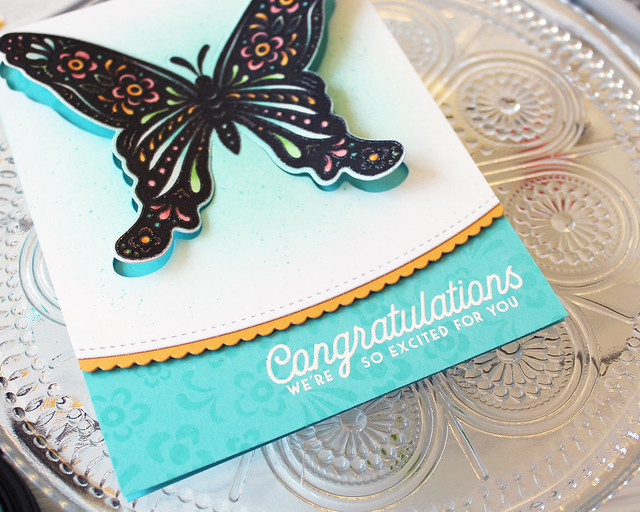
Good morning, friends, and welcome back for Day 3 of the Papertrey Ink countdown! I'm back today showcasing sets from Betsy Veldman, Jennifer Campbell, and a die from yours truly (my latest Bold Borders). I'm in love with Betsy's Butterfly Folk sets and Jennifer's Botanical Bounty. If you loved Jennifer's contribution to this year's anniversary set (Mixed Bouquet) you're absolutely going to be giddy over her newest set. Well, enough yammering...let's see these sets in action!
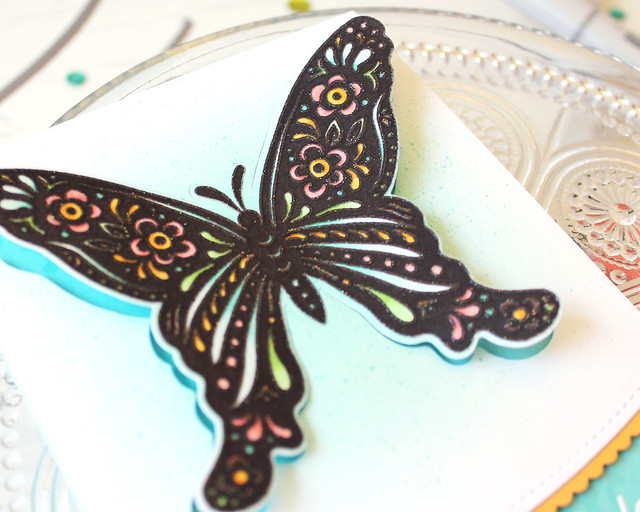
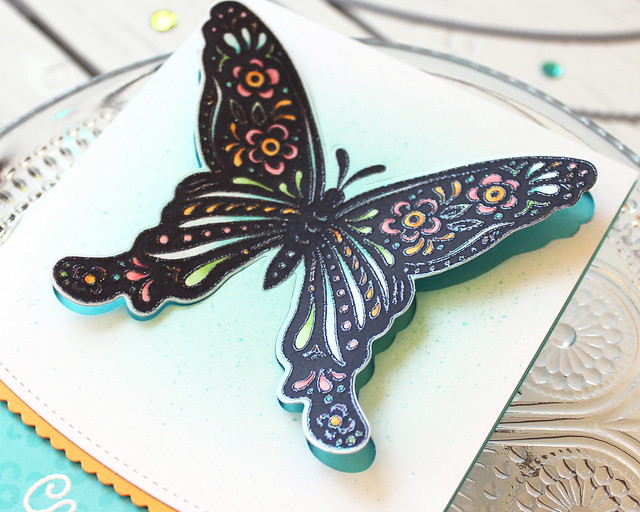
Let's kick things off today with Betsy's Butterfly Folk sets. These sets can be used independently or you can layer them to create more detailed designs. I chose to layer the two together today, using Copic coloring and glitter embossing powder to give the large butterfly a bit of interest.
I started by stamping the biggest butterfly from the set in black ink onto white cardstock. I went back in with Copic markers to add color to the detailed design. I set that aside to let it dry completely (the completely part is key) while I stamped the small florals and flourishes onto a Hawaiian Shores card base using the matching ink.
Then, I heat embossed the sentiment from Sentiment Staples: Congratulations onto the card base using white powder. Once my butterfly was completely dry, I heat embossed the Butterfly Folk Outline image over top of the stamped and colored butterfly. I used glitter embossing powder to give the design a subtle touch of sparkle.
Next, I masked the entire butterfly and sponged Hawaiian Shores ink over the surface. I added some matching splatters before removing the mask and then die cut the panel with a Round Off Edgers die. Then, I partially die cut the butterfly's wings, leaving the body in tact, so I could lift the wings.
I embellished the bottom edge of the butterfly panel with a scalloped Summer Sunrise layer and then attached that panel to the front of the card. I gently lifted the wings and curled them a bit so they would add dimension and texture to the card front. I love the way the outlined image sparkles!
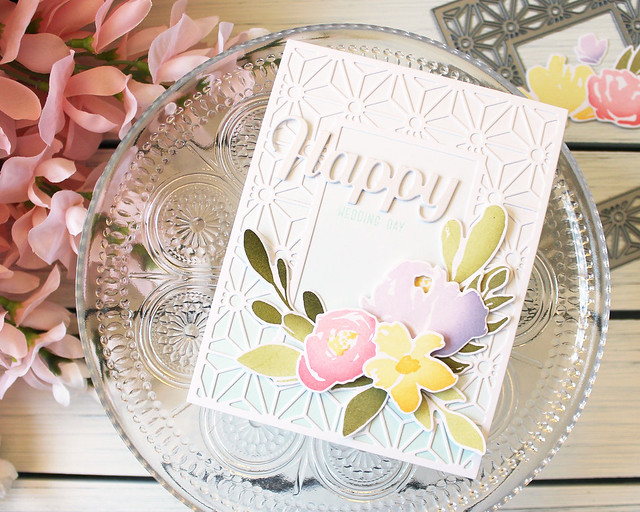
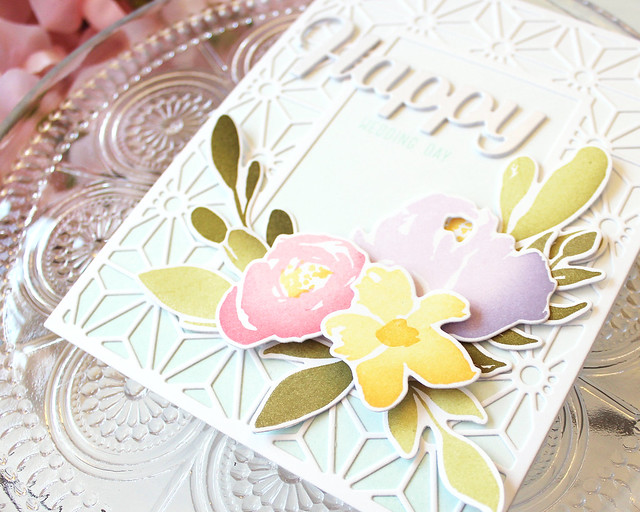
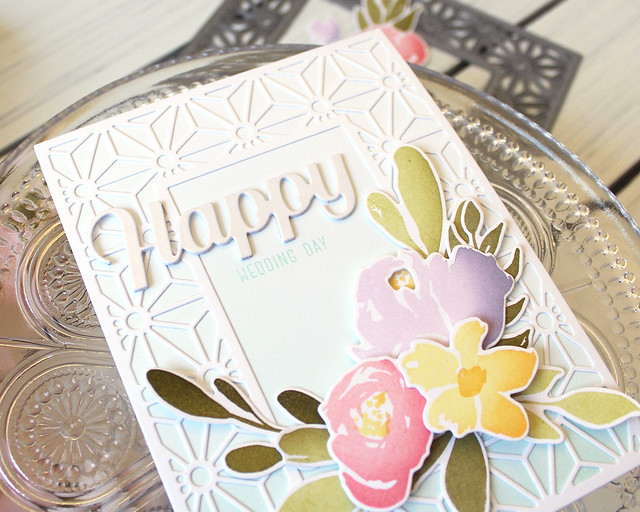
Lastly today, I've paired Jennifer Campbell's Botanical Bounty set with my Bold Borders: Flare die. I love how the soft, watercolored edges of the florals complement the straight, geometrical style of the border die!
I began by sponging Aqua Mist ink lightly onto a white card base. I layered that with a Bold Borders: Flare die cut so the light blending peeked through the openings in the frame. The sponging creates a very subtle contrast that I absolutely love!
Next, I stamped and die cut several of the flora from the Botanical Bounty set and played around with the blooms until I settled on my final arrangement, finally affixing them to the card front with a mix of flat and foam adhesives.
I also die cut the word "happy" (which comes nested inside the Bold Borders die) and layered three of those die cuts together for dimension. The top shape was die cut from White Shimmer paper to give the card a hint of elegance. I also stamped the phrase "Wedding Day" onto the card front using Aqua Mist ink. The Happy die is perfect for starting a wide array of phrases for your cards. Birthdays, anniversaries, weddings...the list goes on!