Monday, January 22, 2018

Make It Monday

Good morning, friends! I just wanted to pop in and mention that it's my turn to host this week's Make It Monday challenge over on the Papertrey Ink blog. I'm throwing it back to a fairly simple technique, Shadowed Sentiments, because I think it can be so much fun to revisit the basics! Check out my video over on the blog and I'll see you again soon!

Heartfelt Gratitude Card 3


Supplies:

Thursday, January 18, 2018

Throwback Thursday: Mini Blooms

Good morning, friends, and welcome to this week's Throwback Thursday feature from Papertrey Ink! Today, Heather, Stephanie, and I are sharing projects showcasing Mini Blooms - a super fun floral set. Mini Blooms has long been a favorite set of mine. The array of flowers and leaves in the clusters makes even the simplest card unique and interesting. And you can achieve so many styles with these images! Stamp them in one color for a monochromatic look or use individual die cut blossoms to add more variety and texture. You have to love a set that can do double (or triple) duty!

On my card today, I used a simple technique to make the bright colors pop agains the Green Parakeet cardstock background.

Mini Blooms Thanks Card

I began by stamping the flower clusters in Fresh Snow ink on a Green Parakeet panel. I let that sit for a few minutes to dry a bit and then restamped each of the flowers using a different color of dye ink. I just eyeballed it, but you could use a stamp positioner or stamp press to make this step even easier.

Mini Blooms Thanks Card 2

In keeping with my resolution to use more of the colors that I typically ignore (or straight up avoid), I used Raspberry Fizz, Hibiscus Burst, and Amethyst Allure in addition to Hawaiian Shores and Summer Sunrise to stamp my flowers. Once that was done, I adhered the panel to a white card base and embellished each of the dots in the clusters with clear glitter. I love the sparkles!

Mini Blooms Thanks Card 3

To finish off the card, I stamped one of the sentiments from the set onto a cardstock strip using True Black ink. I matted that with Bitty Big: Hawaiian Shores paper and added it to the card front with foam tape. I love how stamping in white first allows you to add so much color while still keeping a project flat and mail friendly.

Thank you so much for joining me today! Enjoy your day and I'll see you again soon!

Supplies:

Monday, January 15, 2018

Tonight's The Night!

Hi, everyone! I'm just popping in here today to share a bonus project using a few product from this month's Papertrey Ink release. The release goes live tonight at 10pm ET on the Papertrey Ink website. We'll get to the project in a second, but first a reminder - tonight is our Release Party Live broadcast!


Join me, Stephanie, and Julie for answers to your January release questions and a closer look at this month's new products. We're also going to be drawing the winners for our countdown prizes on air! We go live at 9pm ET on the Papertrey Ink Facebook page and we'll be there to chat with you up until the release. I hope you'll join us!

But before all that I have a project to share. Today I'm pairing Warm Regards with Lucky Scratch: Wedding and the Lucky Scratch and Mix & Mat: Confetti dies.

Lucky In Love Card

I began by stamping the dogwoods from Warm Regards onto Kraft cardstock using Fresh Snow ink. We have a couple of dogwoods on our property that bloom a creamy white in the spring, so I wanted to recreate those on my card. I used a yellow colored pencil to softly shade the center of each bloom and I'm so happy with how they came out. Next, I stamped the flower centers in Fresh Snow, let that dry for a minute, and then stamped over the white with Limeade Ice ink. The result looks like a softened version of the bright green that is very close to the actual dogwoods near our home.

Lucky In Love Card 2

I followed up with leaves in Ripe Avocado and a branch in Dark Chocolate. I wanted to mention that it's easiest to line up the branch if you stamp your blooms first, position your uninked stamp around the flowers, and then press your branch onto a block. The branch is all one piece, but the connecting base is thin and (as is the nature of clear stamps) flexible so you have to position it a little bit to make everything line up properly. 

Lucky In Love Card 3

Then, I used the frame from Mix & Mat: Confetti to add in the die cut frame. I stamped the sentiment from Lucky Scratch: Wedding in Fresh Snow and added a "Lucky" die cut from the Lucky Scratch die collection. I had sponged the top die cut with Spring Moss ink before layering it with two more shapes and adding them to the card. Lastly, I tied on some Rustic Cream Button Twine. I think this would make a wonderful spring wedding card.

Supplies:

Sunday, January 14, 2018

Papertrey Ink January Countdown - Day 5

Good morning, friends, and welcome back for Day 5 of the Papertrey Ink New Release Countdown! Today we're sharing a couple of really cute sets by Betsy Veldman, Life Is What You Bake It and Confetti Sentiments. Let's get on to today's projects!

My first project features Life Is What You Bake It paired with Thanks All Ways.

Lizzie Jones Wonderful Treats Card

I began by using the dotted border from the Lucky Scratch die collection to create an area for my sentiment. I stamped the "Thanks" in Dark Indigo and heat embossed the companion sentiment with white powder. Then, I created a pink gingham border at the top of the card with the Edgers II and Background Basics: Super Gingham. The gingham makes me think of the aprons my great aunt used to wear.

Wonderful Treats Card 2

Next, I stamped and die cut the mixer. To get the chrome effect on the accents and whisk, I stamped off Stormy Sea ink and then stamped a second time with VersaMark before sprinkling on pigment powder. I stamped a couple of "flour" sprinkles using the small clusters from Confetti Sentiments. I don't know about you, but I always have flour on the counter after I've used my mixer. I added the mixer to the card front with foam tape and then added navy baker's twine to finish things off.

Supplies:


Next up, I have another cheerful birthday card.

Lizzie Jones Hooray Birthday Card

I used the Confetti Sentiments to create a background and then layered a vellum Mix & Mat: Confetti shape to build my focal point. I used 1/8" Scor Tape to create a glittered frame on the vellum, hiding additional adhesive on the back side to adhere it to the card base.

Hooray Birthday Card 2

Then, I stamped a cake from the Fiesta Flags Birthday set and glittered a few of the details before adhering it to the center of the frame. I stamped the banner from the same set and added a sentiment from Never Enough: Birthday. I adhered that to the card front with foam tape. I love how much this card sparkles!

Supplies:


Thank you so much for joining me today! Betsy, Heather, Keeway, Laurie, Melissa, Michelle, Stephanie, and Wanda all have projects to share too, so make sure to pop over and give them a peek. You'll find some inspiration over on Lexi's blog too, so be sure to visit her while you're hopping around. Enjoy your day, everyone!

Saturday, January 13, 2018

Papertrey Ink January Countdown - Day 4

Good morning, friends, and welcome back for Day 4 of the Papertrey Ink January new release countdown! We're back today with some fantastic birthday goodies designed by Heather Nichols and Dawn McVey. Let's get to it!

Time To Celebrate Balloon Ensemble

I decided to create a bright and cheerful ensemble with the products we're introducing today. Let's look at the card first.

Lizzie Jones Time To Celebrate Balloons Card

I began by stamping a cluster of Birthday Balloons and strings onto a curved white panel. I used a Hibiscus Burst and Raspberry Fizz balloon as the focal point, using one of the Balloon Strings sentiments for my greeting. I stamped it with the confetti detail and embellished the dots with clear glitter to make it sparkle. Then, I added it to the panel with foam tape.

Time To Celebrate Balloons Card 3

Next, I die cut a piece of label paper (sticky side still covered, but face up) with another one of the Edgers dies. I peeled off the adhesive backing and adhered it to the back of the balloon panel, leaving just a bit of an edge overhanging. Then, I sprinkled that exposed surface with clear glitter to make the mat sparkle.

Time To Celebrate Balloons Card 2

I adhered a piece of Bitty Big: Green Parakeet patterned paper to an Aqua Mist card base and then mounted the balloon panel with foam tape.

Lizzie Jones Live It Up Box

Next up, I created a coordinating gift card box. I began by sponging a panel of white cardstock with balloons using the new Birthday Balloons Stencil Collection. I die cut that panel with the Hinged Gift Card Box Die and stamped the lid with sentiments from Never Enough: Birthday.

Live It Up Box 2

On the inside of the lid, I adhered an "Enjoy" die shape that I'd die cut from Bitty Big: Green Parakeet paper. I used the flip side of the pattern that I had used on the card so they would coordinate without being too matchy-matchy. Once that was secure, I assembled the box as normal.

Isn't that a fun ensemble? Thank you so much for joining me today! I'll be back tomorrow with a few more projects to share. In the meantime, AmyBetsy, Heather, Keeway, Laurie, Melissa, Michelle, Stephanie, and Wanda to see how they're using these great birthday essentials today. You'll find some inspiration over on Lexi's blog too, so be sure to visit her while you're hopping around. Have a great weekend, everyone!

Supplies:
Time To Celebrate Card


Live It Up Box

Friday, January 12, 2018

Papertrey Ink Feature: Lucky Scratch

Good morning, friends! Welcome back for Day 3 of the Papertrey Ink January New Release Countdown. Today, I have the pleasure of introducing a few of the sets in my new Lucky Scratch series (just a reminder: all the new products will be available on the 15th at 10pm on the Papertrey Ink website). This series is designed to make creating hidden message and scratch-off cards a breeze. There are five sets in the series - Lucky Scratch, Lucky Scratch: Prize Pack, Lucky Scratch: Love, Lucky Scratch: Baby, and Lucky Scratch: Wedding. I'm sharing projects with the first three of those.

My samples all incorporate scratch-off sticker paper today, but several of the team members have projects showing other ways of using these sentiments. You can also create your own scratch off stickers using a mixture of paint and dish soap on contact paper or clear packing tape. HERE's a tutorial you might find useful or you can search Pinterest for one that will work better for you. There are several out there. Ok. Now let's get on to the projects!

Lizzie Jones Do You Feel Lucky Card

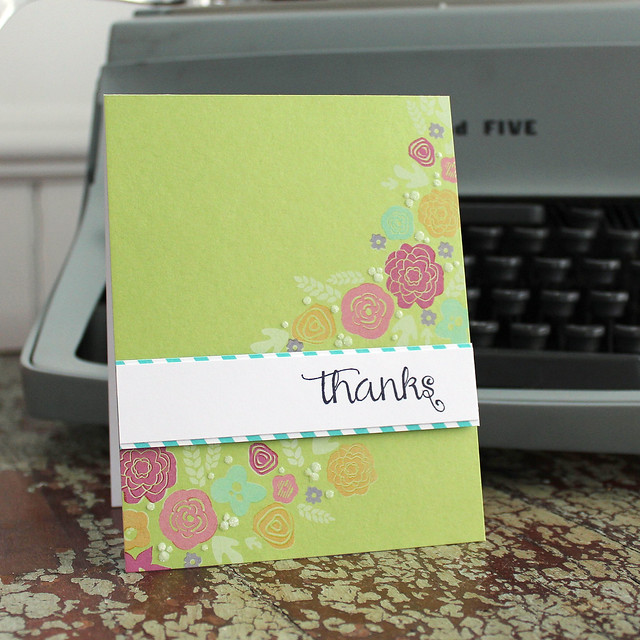
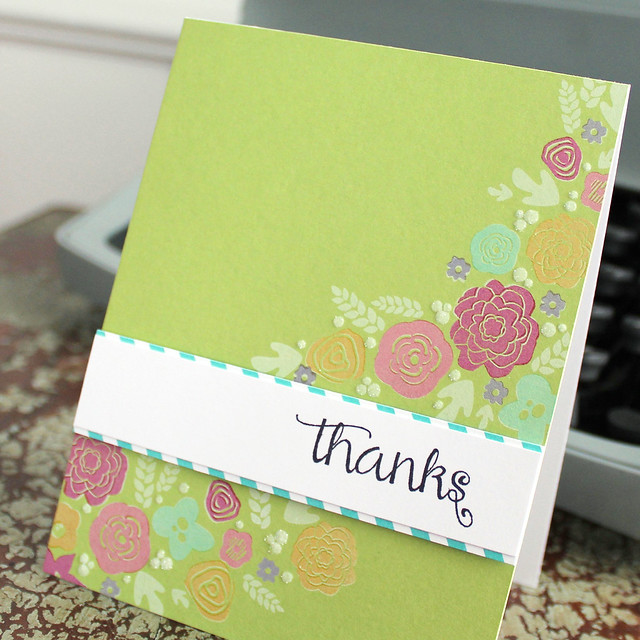
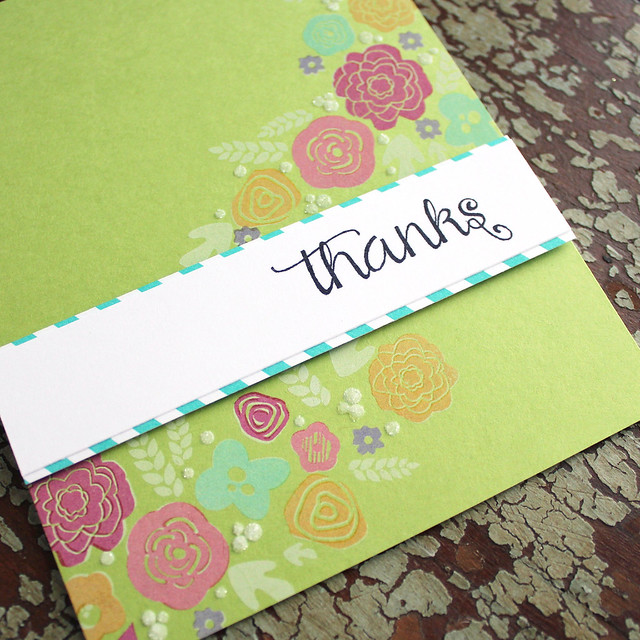
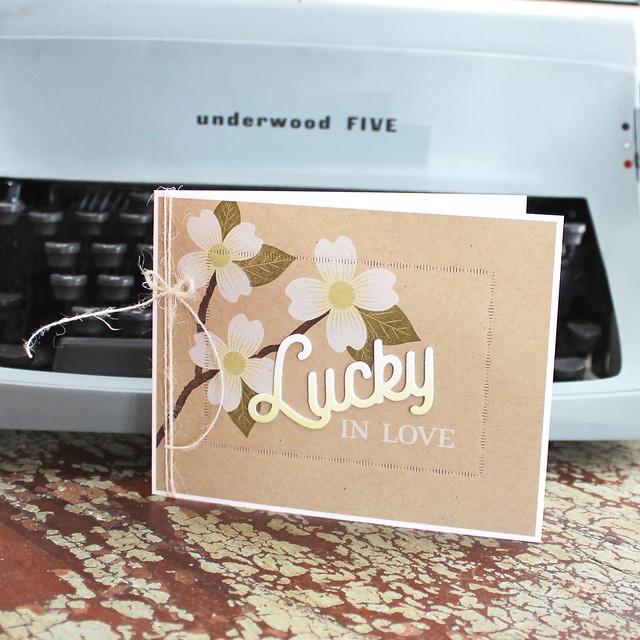
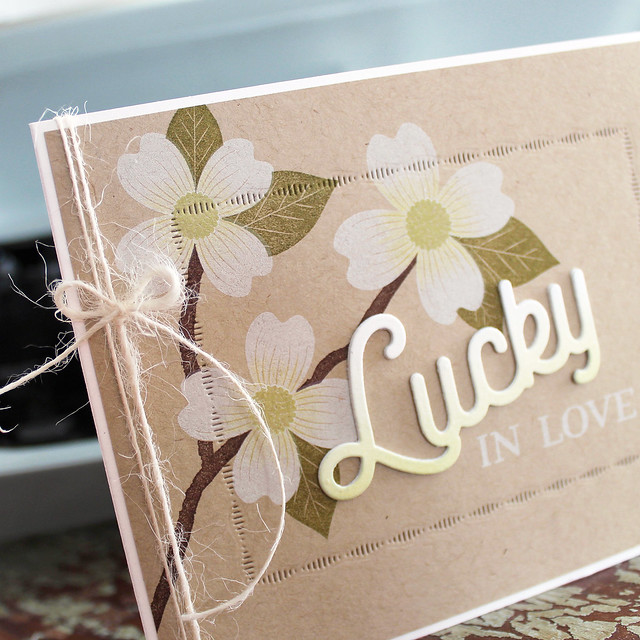
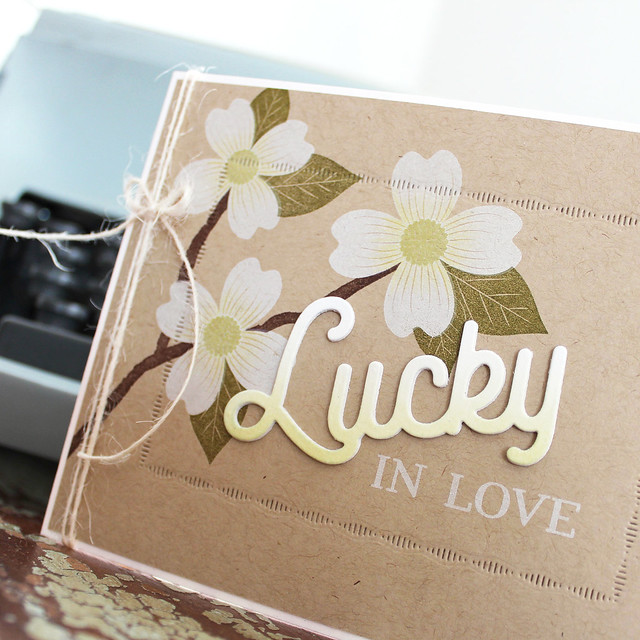
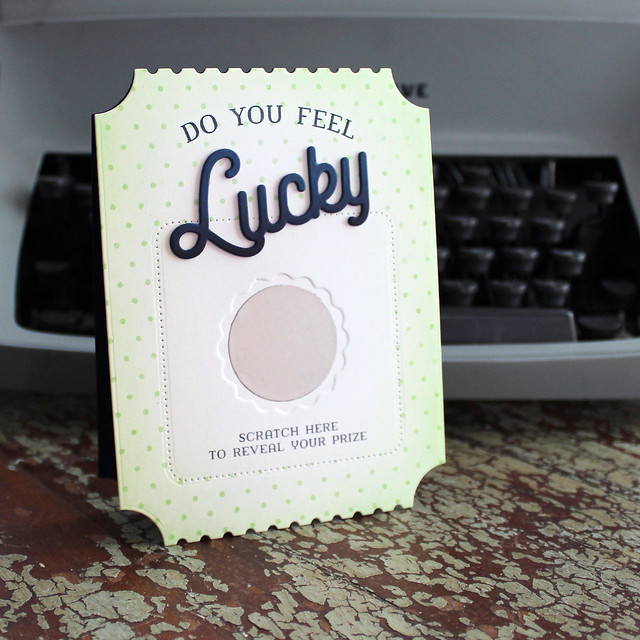
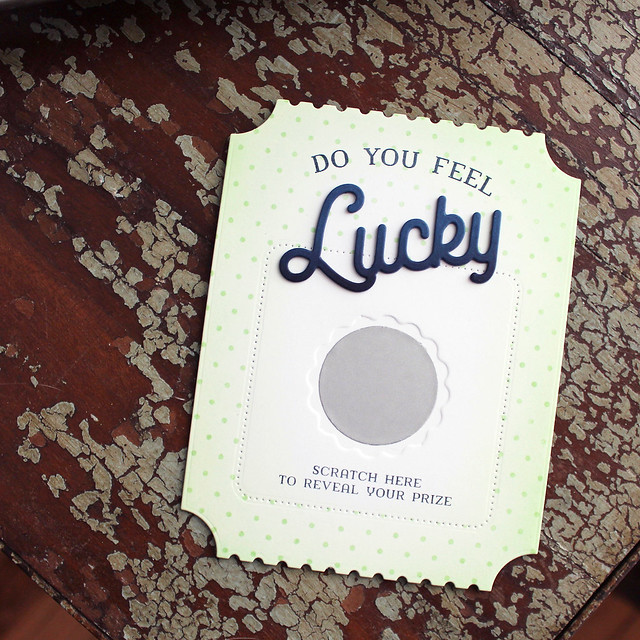
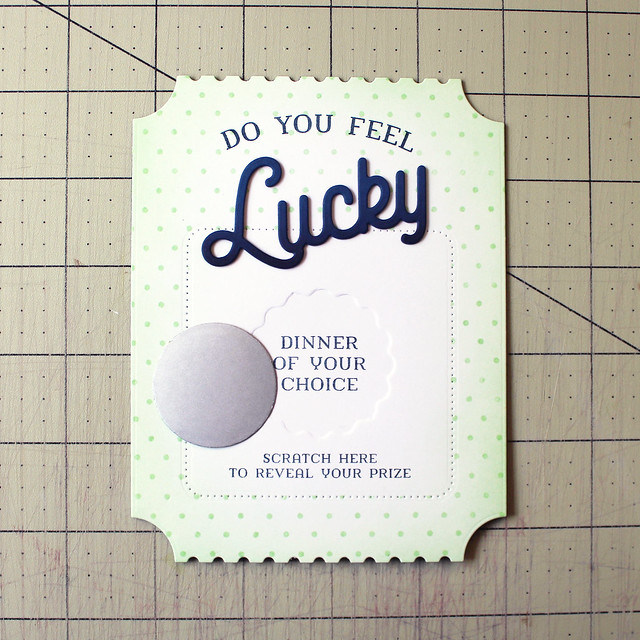
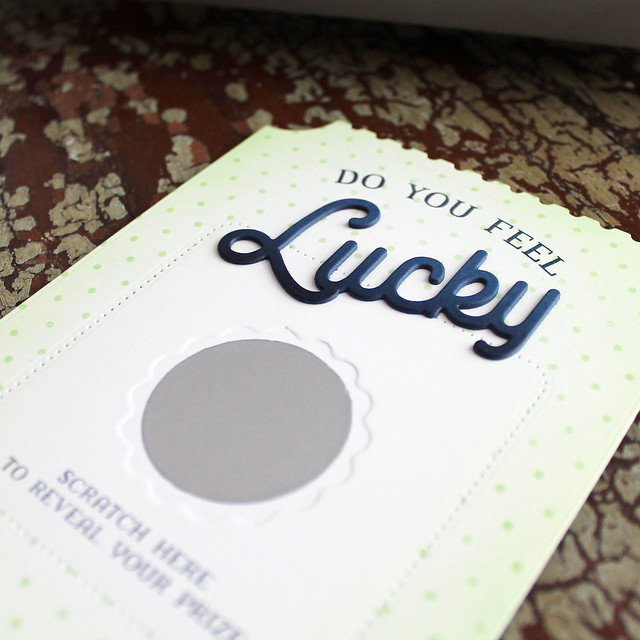
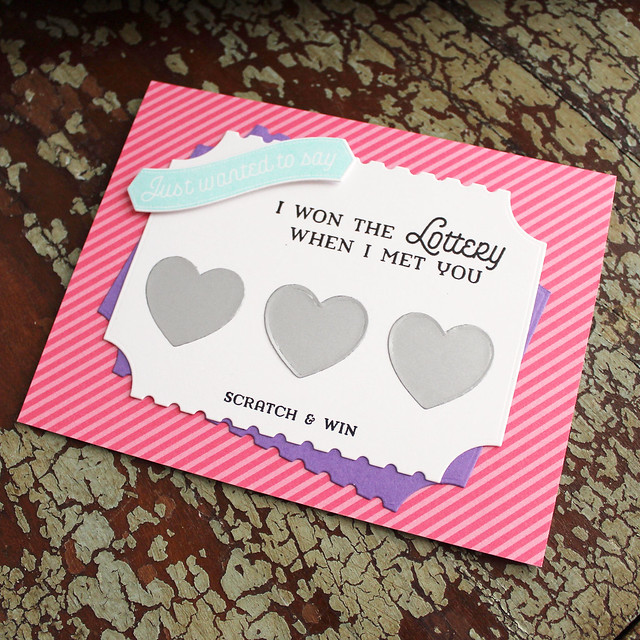
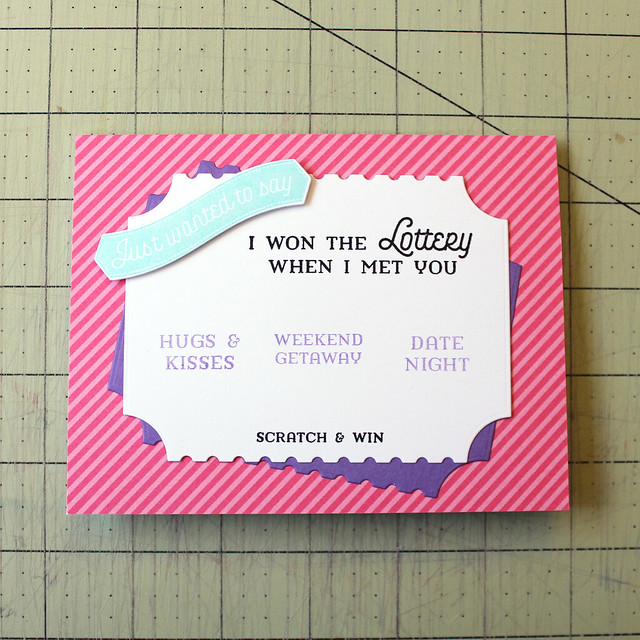
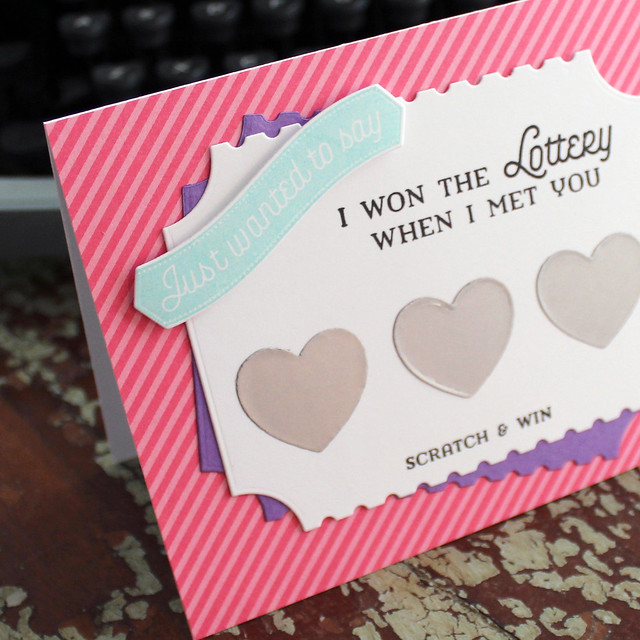
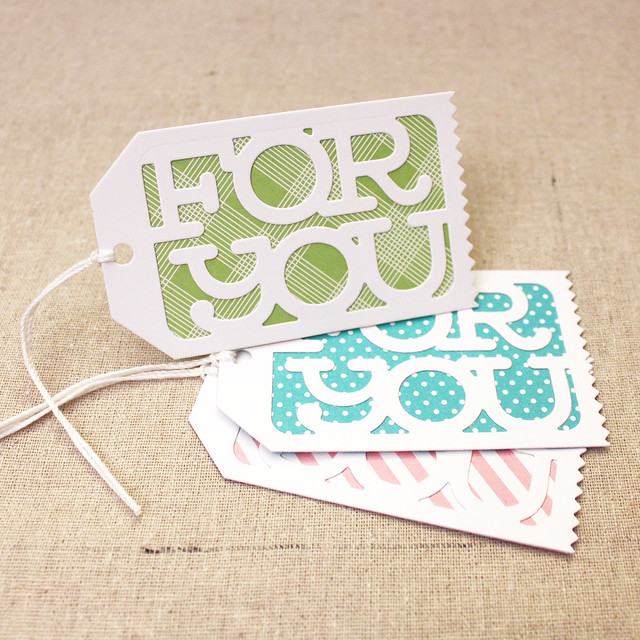
My first project today is a shaped card. I used the large ticket die in the die collection to create the shaped card base and card front. I cut and folded a card base like I normally would. Then, I ran the card base through my die cut machine with the die, making sure that the top fold was inside the cutting edge (so it wouldn't cut through).

Lizzie Jones Do You Feel Lucky Card 2

I sponged a white panel with Vintage Jadeite ink and die cut it with the ticket die again. I added the dotted border and debossed the medallion shape before masking off the inside of the square. You get a subtle (though still totally visible) impression if you just use a die cut sandwich. You can get a deeper impression, like I did here, by using the impression plate sandwich. Once that was done, I stamped the polka dots and sentiments.

Lizzie Jones Do You Feel Lucky Card 5

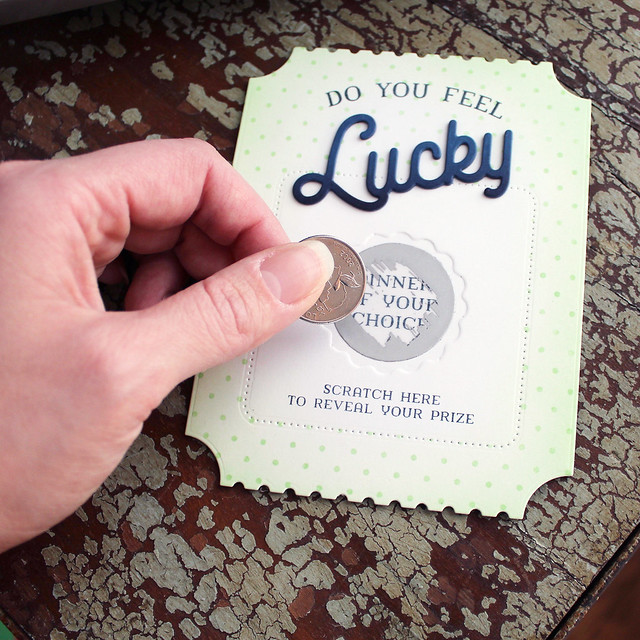
I adhered the ticket panel to the card base and used the circle die in the Lucky Scratch die collection to cut a scratch-off sticker. I covered the prize sentiment with the scratch off sticker.

Lizzie Jones Do You Feel Lucky Card 3

Next, I die cut three of the "Lucky" shapes from Enchanted Evening cardstock and sponged one with Dark Indigo ink to give an ombre effect. I stacked the three die cuts together and adhered them to the card front. This added a nice dimension to an otherwise fairly flat card.

Lizzie Jones Do You Feel Lucky Card 4

As much as I love foam tape (I'm sure that comes as no surprise), this is one instance when I'm going to suggest forgoing the foam. The scratch-off stickers are best left flat so your recipient can get enough pressure to scratch off the sticker coating and reveal the message or prize.
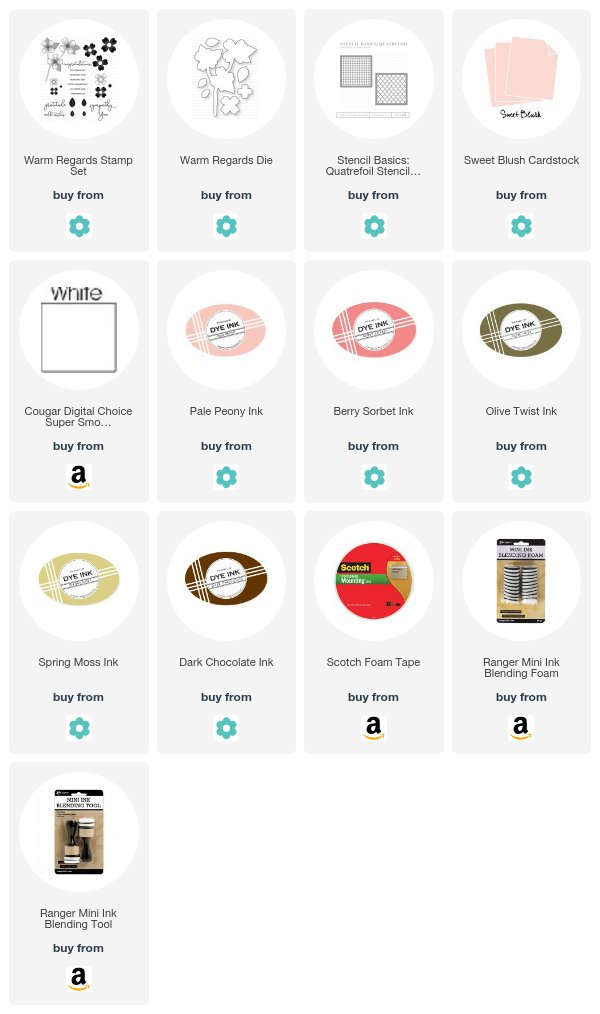
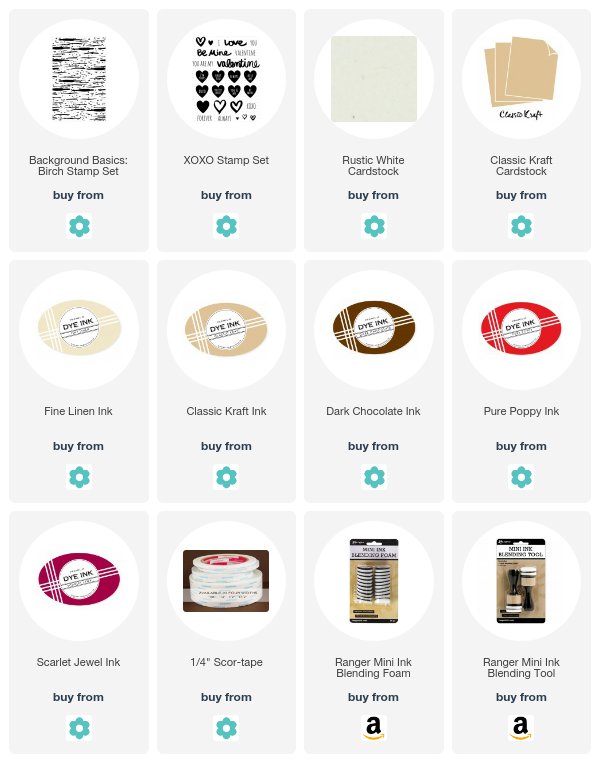
Supplies:


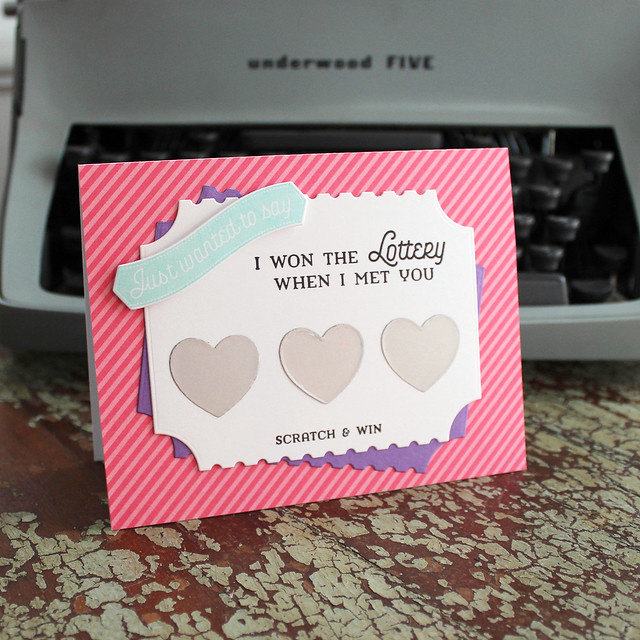
Next up, I have a Valentine to share.

Lizzie Jones Won The Lottery Card

I'm loving using scratch-off paper because you can die cut it into any shape you happen to have in your collection. I used the hearts from the Winter Woolens die collection to cover my messages on this card.

Lizzie Jones Won The Lottery Card 2

I began by covering a white card base with Hibiscus Burst patterned paper before setting it aside. Next, I used the ticket die to cut a white panel for the front of the card. I double cut one end to adjust the size to fit on the front of the card. I did the same with an Amethyst Allure panel.

Lizzie Jones Won The Lottery Card 4

I stamped my greeting and prizes on the white panel. The prizes were covered with the aforementioned heart stickers before I layered the white and Amethyst panels and adhered them to the card front.

Lizzie Jones Won The Lottery Card 3

Then, I die cut and stamped the banner sentiment from Lucky Scratch: Love in Hawaiian Shores ink. I used foam tape to adhere it to the front of the card. I can't wait to give this to my fella!

Supplies:


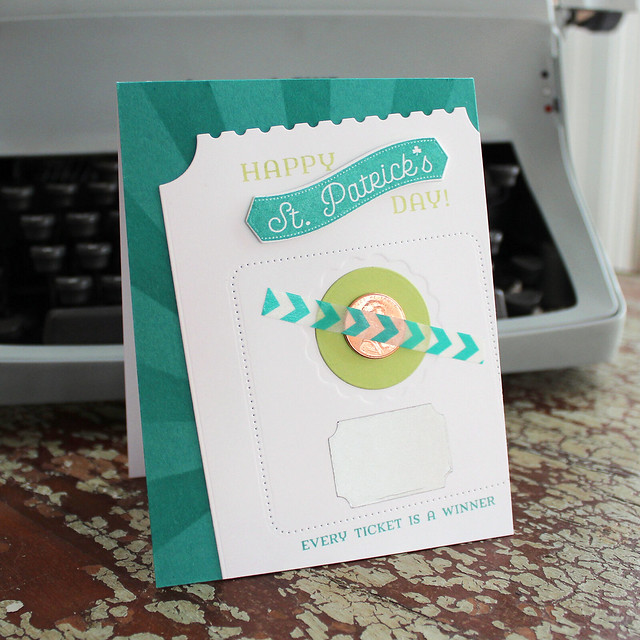
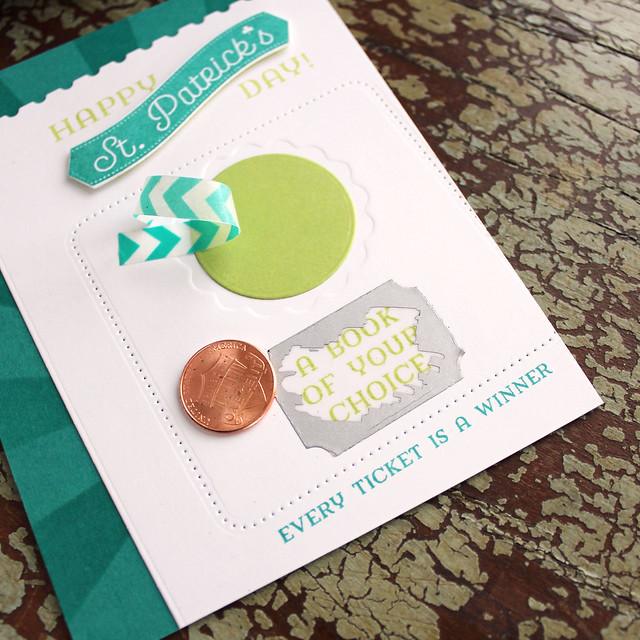
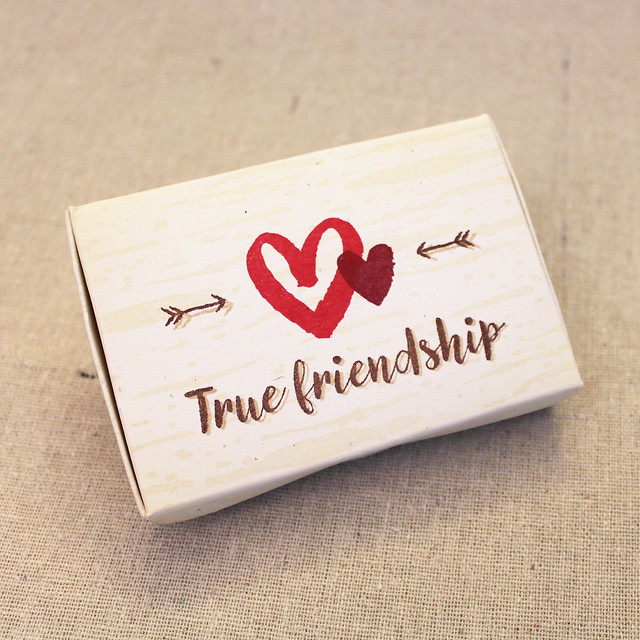
Lastly today, I have a St. Patrick's Day card. You could use this same layout for any day of the year though. It would be great for lifting the spirits of a kid having a rough week or a friend who could use an unexpected pick-me-up.

Lizzie Jones Lucky Penny St. Patrick's Day Card

I began by sponging the starburst pattern onto Tropical Teal cardstock using the matching ink. I adhered that to a white card base and set it aside. Then, I die cut the ticket and added the dotted frame and debossed medallion.

Lizzie Jones Lucky Penny St. Patrick's Day Card 2

I stamped the St. Patrick's Day sentiment onto the card in Green Parakeet and on a scrap piece of white cardstock in Tropical Teal. I layered the Tropical Teal die cut over the Green Parakeet banner and adhered it with foam tape. I also stamped the prize and the "every ticket" sentiments before adhering the ticket to the card front and trimming off the overhang.

Lizzie Jones Lucky Penny St. Patrick's Day Card 3

Next, I die cut the circle from Green Parakeet cardstock and adhered it to the center of the medallion. I also die cut a sticker shape using the Jar Labels 2 Die and adhere that into place too. The last step was to use a bit of washi tape to secure a lucky penny to the center of the die cut circle. No need for your recipient to search for their own lucky coin when one is attached!
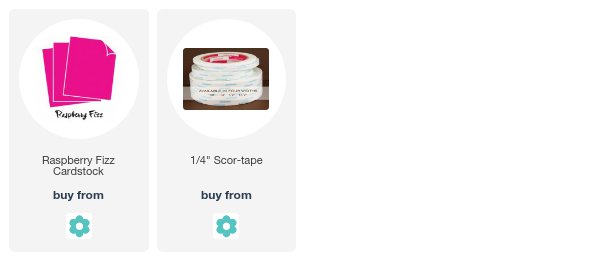
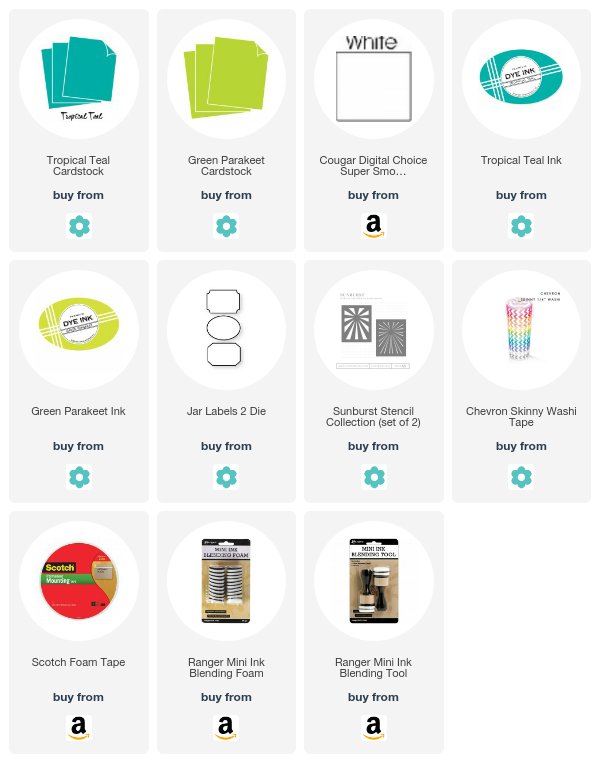
Supplies:


Thank you so much for joining me today! Make sure to pop in on Betsy, Heather, Keeway, Laurie, Melissa, Michelle, Stephanie, and Wanda to see how they're using these clever new products today. You'll find some inspiration over on Lexi's blog too, so be sure to visit her while you're hopping around. Have a great day, everyone!

Thursday, January 11, 2018

Papertrey Ink January Countdown - Day 2

Good morning and welcome back to Day 2 of the Papertrey Ink January New Release Countdown! I'm back today to showcase two sets by the very talented Betsy Veldman. Year Of Psalms: January and Brushed Birds will both be available on the 15th at 10pm ET. I also snuck one of my new sets in there too! Warm Regards is a dogwood set that I have debuting on the 15th. Fun fact: this is my very first ever dedicated flower set! Yay!

Lizzie Jones Fearfully & Wonderfully Made Card

To start today's card, I stamped the outlined dogwood blooms onto a white panel in Stormy Sea ink. Then, I used the solid blooms to add color. I sponged the flowers (mostly the centers) with Pale Peony ink and to keep things nice and soft. I added the flower centers with Harvest Gold ink and masked the flowers with full-sticky Post it notes. I sponged over the panel with Spring Rain ink and splattered the background with clean water and reinker to add texture.

Fearfully & Wonderfully Made Card 2

Once that had dried, I stamped the branches in Stormy Sea and the leaves in Green Parakeet. I adhered that panel to a Sweet Blush card base and rounded the bottom corners. Next, I die cut a stitched panel using one of the Noted rectangles. I double cut one end to trim the panel down a bit and then stamped the sentiment from Year Of Psalms: January in Stormy Sea ink before adhering it to my card front with foam tape.

Fearfully & Wonderfully Made Card 3

Then, I stamped and die cut the bird from Brushed Birds using Pale Peony, Berry Sorbet, and Stormy Sea inks. I tied a crochet thread bow around the card and then I added the little bird to one of the dogwood branches using foam tape. I love how soft this card is. I don't usually think to use gray in place of Kraft or Dark Chocolate on branches, but it worked beautifully.

Thank you so much for joining me today! Make sure to pop in on Betsy, Heather, Keeway, Laurie, Melissa, Michelle, Stephanie, and Wanda to see how they're using these gorgeous new products today. You may even find some inspiration over on Lexi's blog too, so be sure to visit her while you're hopping around. Have a great day, everyone!

Supplies:

Wednesday, January 10, 2018

Papertrey Ink January Countdown - Day 1

Good morning and welcome to the first day of this month's Papertrey Ink new release countdown! All of the new products you'll see over the coming days will be available on January 15th at 10pm ET. In the meantime, how about some inspiration?!

First up, I have a really fun birthday card made with Lexi Daly's Fiesta Flag Birthday set. My nephew has an upcoming birthday, so I thought it might be fun to create a card for his big day.

Lizzie Jones Time To Celebrate Card

I started by sponging and splattering a Harvest Gold background on white cardstock. I added a grounding shadow and set it aside.

Time To Celebrate Card 2

Then, I stenciled the diamond pattern onto an Aqua Mist card base using Tropical Teal ink. I matted the edge of the white panel with Terra Cotta Tile cardstock before mounting that to the card front with foam tape.

Time To Celebrate Card 3

I stamped and die cut the cake, banner, and candle from white cardstock. The cake plate I cut from vellum to give it a little bit of a frosted glass appearance. I adhered those elements to the card front with a mix of flat and foam adhesives to give the card plenty of texture. I even added a tiny spot of glitter to the flake of the candle to make it shimmer.

Supplies:


Next up, I have a couple of boxes and a set of tags made with my new Hinged Gift Card Box Die.

Lizzie Jones True Friendship Jewelry Box

This box is perfectly sized to fit a gift card, but it's also wonderful for other small gifts like handmade jewelry or felt hair barrettes.

True Friendship Jewelry Box 2

Let's start with the basic box first. I began by sponging a Rustic White die cut with Fine Linen ink. I used the Background Basics: Birch to add a pattern and then stamped the arrows and sentiment from the new Quoted: Friendship. I stamped first in Dark Chocolate and then added an offset shadow with Classic Kraft. Then, I stamped two hearts from XOXO in Pure Poppy and Scarlet Jewel and assembled the box.

Gift Card Box Assembly Step 1

I added adhesive on the tabs on one side of the die cut...

Gift Card Box Assembly Step 2

...and the fold-over flaps on the other side. Be sure not to put adhesive in the center of the long, front flap or you'll have difficulty with the closure later.

Gift Card Box Assembly Step 3

Then, I removed the adhesive backing and folded in the tabs.

Gift Card Box Assembly Step 4

The side flaps came next.

Gift Card Box Assembly Step 5

The front flap was last.

Gift Card Box Assembly Finished

And then the top folds down, the sides tuck in, and the front slips into the slot closure. Nice and easy.

True Friendship Jewelry Box 3

On the inside, I created a little insert to hold a pair of earrings. I just cut a rectangle and scored and folded the edges. I added a couple of holes with a pin to allow for the ear wires. Quick and easy!

Supplies:


My second box uses one of the optional window cut-outs to give the top of the box a bit of interest.

Enjoy Gift Card Box

I die cut the box from Raspberry Fizz cardstock and then ran it through a second time with the "Enjoy" window nested in the lid area. Next, I cut a panel of patterned paper and adhered it to the underside of the lid. Then, I just assembled as normal.

Enjoy Gift Card Box 2

On the inside, I tucked a gift card. You could always write or stamp a message on the back side of the patterned paper panel. How fun is that?!

Supplies:


And one last project with these dies that's so quick and easy I sort of feel like I'm cheating.

Lizzie Jones Layered For You Tags

These tags are so cute and came together in a snap! I began by die cutting three white tags and three patterned paper tags using the Tag Sale #7 die. Next, I used the "For You" window die to cut a window into the white tags. Then, I adhered the patterned paper tags to the back of the white tags and added white crochet thread. That's all. So fast! You could whip up a batch (or taggle - right, Gina?) of these for a gift in no time!

Supplies:


That's all for me today, friends! Make sure to pop in on Betsy, Heather, Keeway, Laurie, Melissa, Michelle, Stephanie, and Wanda to see how they're using this month's new products. I think you might find some inspiration over on Lexi's blog too, so be sure to visit her while you're hopping around. Have a great day, everyone!