Saturday, February 15, 2014

Text Block Tips


The Text Block: Birthday die releases tonight (10pm Eastern) on Papertrey Ink's website and I thought y'all might find it helpful if I shared a few tips I learned while working with the die this week:


  • Apply your adhesive (and burnish it to make sure it's nice and secure) before you die cut. You see those tiny, narrow letters? Yes, you could use a glue pen...and then you could curse my name for years to come.
  • I use a Cuttlebug and I had the best results when I die cut up instead of down. My sandwich was: A Plate, Metal Shim, C Plate, Die facing up, Paper, B Plate. Everyone's machine is different, but that's what worked best for me.
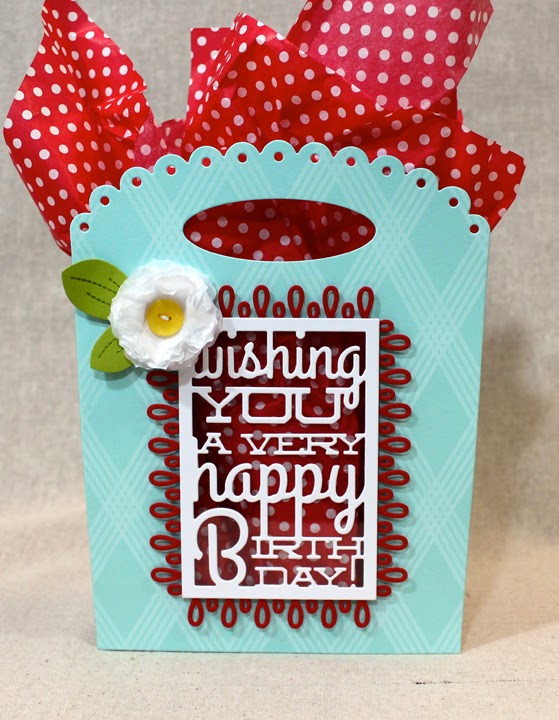
  • If you're planning to use the die in some sort of window application make sure to invest in some clear cardstock. You'll still get the see-through effect and you'll stabilize the letters in the process (I'm looking at you "very").
  • The same goes if you want to pop your shape up on foam tape. Just make sure there's something behind your words to act as a stabilizer. Vellum would be another great option.
  • Be gentle when removing your shape from your die. You don't have to use kid gloves, but there are a few spots (the "a very" line primarily) where the connections to the frame are narrow and it would be a shame to tear them. I never did so it's not like you have to be crazy vigilant, but I thought it was worth mentioning.
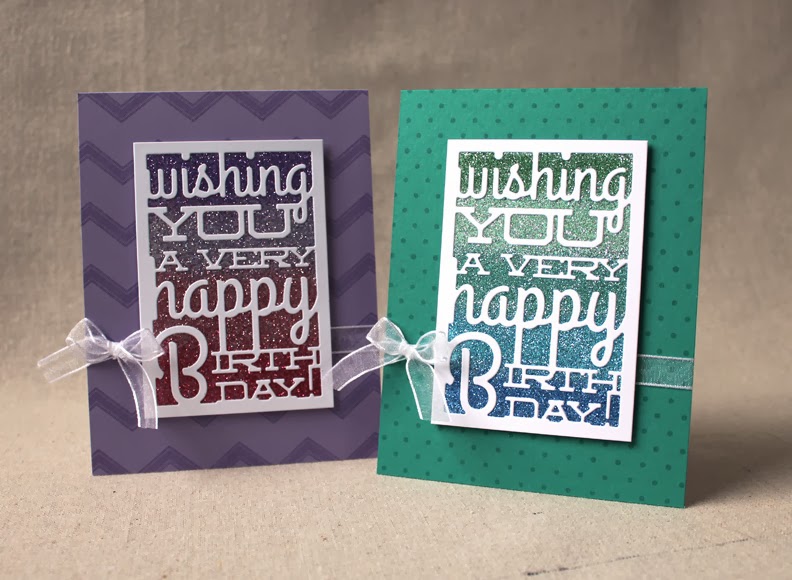
  • Try different materials! I showed cork, but fun foam, super thin wood veneer (1/64"), stabilized fabric...use your imagination!


Most importantly, HAVE FUN! Enjoy your weekends, friends! See you soon!

Friday, February 14, 2014

Text Block: Birthday Die - Day 6 (Yay! Bonus!)

Hello! Welcome back to Day 6 of the Papertrey Ink 7th Anniversary Release countdown. We started a day early, so this is actually a bonus! Who doesn't love a bonus? I have one more project to share featuring the Text Block: Birthday Die. Shall we?

I wanted to create a card that might appeal to younger folk (and I mean much younger, like children younger), but with a few variations in color this card could really work for just about anybody.


I began by Xyroning and die cutting a Text Block from both Hawaiian Shores and Tropical Teal cardstock. I then stamped the Tropical Teal shape with the stars pattern from Bitty Background Blocks II using Pinefeather ink. I layered the two shapes using the Drop Shadow Die Cuts technique that Betsy Veldman did for a recent Make It Monday video. I also used the same technique for the star embellishment. I didn't have a darker red cardstock that complemented Pure Poppy, so I just colored a scrap of Pure Poppy with a W4 Copic to create a darker shade of cardstock. I set both layered pieces aside while I worked on my card base.


I had a lot of fun with my February Color Play card, so I decided to employ the same technique for today's card. I traced a very light pencil line around the shape of the die to make sure my dots would be visible both inside and outside the frame and then went to town stamping dots (and a few tiny stars) from several sets in a rainbow of colors (Pure Poppy, Summer Sunrise, Harvest Gold, Simply Chartreuse, and Hawaiian Shores). When my dots were finished and the pencil line was erased, I adhered my Text Block shape directly to my card base and then added the star with foam tape. A handful of the dots were embellished with Glossy Accents for added texture and shine.

Well, that's all I have for you this countdown. Thank you so much for joining me all week and I can't wait to see how you all use the Text Block: Birthday Die for yourselves. Make sure to check in with NicholeAshleyBetsyCristinaDanielleDawnErinHeatherLauraMelissa Phillips, and Melissa Bickford for even more inspiration using this month's new releases. See you soon!

Recipe:
Stamps: Bitty Background Blocks II, Birthday Style, It's A Celebration (this set is heading to The Vault after today), Foodie Fun, Holiday Cheer - Papertrey Ink
Cardstock: Pure Poppy, Hawaiian Shores, Tropical Teal - Papertrey Ink
Ink: Pinefeather, Scarlet Jewel, Pure Poppy, Summer Sunrise, Harvest Gold, Simply Chartreuse, Hawaiian Shores - Papertrey Ink
Other: Text Block: Birthday Die (available February 15th), Tremendous Treats Halloween Die Collection - Papertrey Ink; W2 Marker - Copic; Xyron Machine; Glossy Accents - Ranger; Foam Tape - Scotch

Thursday, February 13, 2014

Text Block: Birthday Die - Day 5

Hello, friends! Good morning and welcome back to Day 5 of the Papertrey Ink 7th Anniversary Release countdown. I have another project to share with you featuring the new Text Block: Birthday Die, so let's get to it!

I wanted to branch out a little bit and try something that wasn't a card for today's project. What else goes with birthday gifting better than an adorable window bag? Not much!


I began by die cutting two of the Front & Center #1 shapes from Aqua Mist cardstock. Then, I stamped them with Background Basics: Super Stripes using Fresh Snow ink and set them aside for a moment. Next, I die cut my sentiment frame from a piece of white cardstock that I had run through my Xyron. That piece was adhered to a panel of Clearly Creative cardstock. Then, I traced lightly around the die cut onto the front panel of my gift bag. I used a craft knife to cut inside that line (by about 3/16" or so) to create the window in the front panel. Then, I adhered that panel to a white lunch sack.


To get the window in the bag, I placed a piece of chipboard inside the bag and used the cuts in my Front & Center piece as a guide to trim the gift bag. The chipboard keeps you from inadvertently cutting through both sides of the bag. I removed the chipboard and adhered my back bag panel into place. I adhered my sentiment window into place with thin strips of foam tape. The hole in the bag should be small enough that your window has plenty of area to attach.


The bag still felt a little unfinished, so I created a little flower embellishment using layers of scrunched tissue paper, the middle Beautiful Blooms II #1 die, and a Lemon Tart button stitched through the center. The flower needed a leaf and the new Leave It Be dies were the perfect solution! I stamped my leaf shape with the coordinating detail image and heat embossed it with clear powder. The flower was adhered to the bag front with a bit of foam tape. I finished off my little gift bag by stuffing it with a bit of red and white polka dotty tissue paper.

I'm so glad you joined me today! I have one more day of countdown to share a project with you, so I hope you'll stop by tomorrow to see what I have up my sleeve. Until then, NicholeAshleyBetsyCristinaDanielleDawnErinHeatherLauraMelissa Phillips, and Melissa Bickford all have projects to share with you! Have a wonderful day and I'll see you tomorrow morning!

Recipe:
Stamps: Leave It Be (available February 15th), Background Basics: Super Stripes - Papertrey Ink
Cardstock: Aqua Mist, Simply Chartreuse, Pure Poppy, Clearly Creative Cardstock - Papertrey Ink; white
Ink: Fresh Snow - Papertrey Ink; VersaMark - Tsukineko
Other: Text Block: Birthday Die (available February 15th), Leave It Be Die Collection (available February 15th), Front & Center #1 Die, Loop De Loop II Border Die, Beautiful Blooms II #1 Die Collection, Lemon Tart Button - Papertrey Ink; Foam Tape - Scotch; Clear Embossing Powder - Filigree; White Tissue Paper, Polka Dot Tissue Paper - Target; White Crochet Thread; Xyron; Scor Tape

Wednesday, February 12, 2014

Text Block: Birthday Die - Day 4

Good morning, stampy friends! Welcome back to Day 4 of the Papertrey Ink 7th Anniversary Release countdown. I'm so glad to hear that you've been enjoying my projects this week! The Text Block: Birthday die truly makes this whole "quick and easy" thing totally come together. I've really been enjoying making samples for all of you and I can't wait until you folks start using it for yourselves. I have another project to share with you, so let's get to it!

I wanted to play with watercolor today. I've never really experimented with watercolor, but I'm so glad I decided to jump on the bandwagon! It's super fun (never mind the fact that my hand looks a little like a slasher film prop).


I began by using Berry Sorbet reinker to color wash a scrap of letterpress stock. You could absolutely use watercolor paper, but I didn't have any on hand. I have plenty of scraps of letterpress stock laying around though, so I figured it was worth a shot. I set the watercolored panel aside to dry, but eventually got impatient and started drying it with my heat gun (keeping it real here, folks). Once it was fully dried, I ran it through my Xyron and die cut it with the Text Block: Birthday die. Next, I created a card base from Clearly Creative Cardstock and adhered my block in the center.


Then, I went about creating the inside portion of the card. I stamped the floral sprays from Mini Blooms in Simply Chartreuse ink onto a white card base. Next, I die cut the flower shapes from white stock and stamped them with a trio of Lemon Tart, Sweet Blush, and Berry Sorbet inks. I adhered the flowers overtop their green counterparts, leaving everything flat. Then, I adhered the white base inside the clear base with a strip of Scor Tape (the adhesive is on the back, right up near the fold). I finished the card with a white crochet thread bow. The card itself is nice and simple, but it's colorful enough not to be boring. I also love how the sentiment seems to float over the floral sprays.

Hopefully you've enjoyed today's card! I'll have even more to share with you tomorrow, but in the meantime, Nichole, Ashley, Betsy, Cristina, Danielle, Dawn, Erin, Heather, Laura, Melissa Phillips, and Melissa Bickford all have projects to share with you! Have a wonderful day and I'll see you tomorrow morning!

Recipe:
Stamps: Mini Blooms - Papertrey Ink
Cardstock: Clearly Creative Cardstock - Papertrey Ink; Letterpress Stock - Crane; white
Ink: Berry Sorbet (pad and reinker), Lemon Tart, Sweet Blush, Simply Chartreuse - Papertrey Ink
Other: Text Block: Birthday Die (available February 15th), Mini Blooms Die Collection - Papertrey Ink; Xyron; Glue Pen; White Crochet Thread

Tuesday, February 11, 2014

Text Block: Birthday - Day 3

Good morning, friends, and welcome back to Day 3 of Papertrey Ink's 7th Anniversary release countdown! I have another project to share with you featuring the new Text Block: Birthday Die and, as promised, it's a more traditionally masculine design. Shall we get to it?


I began by die cutting my framed sentiment from self-adhesive cork. This stuff cuts beautifully and it gives your projects a wonderful, earthy texture. The backing also helps stabilize the shape while you're removing the negative parts. Next, I trimmed a piece of Rustic White cardstock to 4 1/4" x 3" and masked off the outer edge, leaving a window in the center. In that space, I stamped two of the leaves from Dawn's new Leave It Be set using Spring Moss and Ripe Avocado inks. By the way, I'm absolutely smitten with this set, folks. It has so many options and the second step images add fantastic detail.


I removed the mask from the outer edge of the Rustic White panel and adhered my cork die cut overtop the leaves. Next, I used the Woodgrain Impression Plate to texture a Ripe Avocado card front and adhered that to a Rustic White card base. I wrapped the base with Rustic Jute Twine and mounted my cork/leaf panel with foam tape. It's nice and simple, but with loads of natural texture.

Thank you so much for joining me today! I'll have more to share with you tomorrow, so be sure to check back. In the meantime, Nichole, Danielle, Dawn, Erin, Heather, Melissa Phillips, and Melissa Bickford all have more to share with you today. See you soon!

Recipe:
Stamps: Leave It Be (available February 15th) - Papertrey Ink
Cardstock: Rustic White, Ripe Avocado - Papertrey Ink
Ink: Spring Moss, Ripe Avocado - Papertrey Ink
Other: Text Block: Birthday Die (available February 15th), Woodgrain Impression Plate, Cork Sheets, Rustic Jute Twine - Papertrey Ink; Foam Tape - Scotch

Monday, February 10, 2014

Text Block: Birthday Die - Day 2

Good morning, friends! Welcome back for Day 2 of Papertrey Ink's 7th Anniversary Release countdown. For starters, thank you so much for your enthusiasm for the Text Block: Birthday die! One of my favorite parts of the countdowns is seeing how the new goodies are received. You've all blown me out of the water with your response this month! I can't even begin to tell you how thrilled I am to hear that you're all so excited about this new die. It makes me so happy when something I've designed gets people excited! How about we get on to another project?

Yesterday, Laura shared her beautiful shaker card. I have another, slightly different, shaker to share with you today. One of the great things about this die is that it makes this type of element a breeze! The borders are just wide enough to hide strips of foam tape and there is enough space between the words that you can really see what's going on in there.


I began by backing a piece of Berry Sorbet Striped Patterned Paper with a piece of white cardstock that I had xyroned on both sides (I left the protective backing on one side for this step). I die cut that whole piece using the new die. I peeled off the remaining protective backing and adhered it to a piece of Clearly Creative Cardstock. I fashioned the word frame with a foam tape border before setting it aside. Next, I used the By The Numbers Impression Plate to texture the front of a white card base. Then, I sprinkled a handful of random sequins and some glitter onto the card base, making sure to flatten them a bit, and then mounted my word frame with the pre-attached foam tape.


Next, I die cut a balloon from Birthday Style and stamped it with the coordinating image. I then heat embossed the balloon with clear powder to get a realistic, shiny finish. I colored a piece of white crochet thread with a T1 Copic and attached it to the balloon before mounting the whole thing to the card front with foam tape. I played with the string a bit and anchored it to my card front in just a couple of places. Leaving it largely unattached helps keep it from appearing too stiff. I finished it off with a tiny crochet thread bow on the balloon. A fun, playful card perfect for celebrants of all ages!

Thank you for joining me today! I hope you've enjoyed today's card. The first two days' posts have been a little girly, so tomorrow I'm planning something a little more masculine. Make sure to check back! In the meantime, Nichole, Betsy, Cristina, Dawn, Erin, Heather, and Melissa all have projects to share with you today. Have a fun time hopping around and I'll see you tomorrow!

Recipe:
Stamps: Birthday Style - Papertrey Ink
Cardstock: Berry Sorbet Stripe Pattered Paper, Clearly Creative Cardstock - Papertrey Ink; white
Ink: Hawaiian Shores - Papertrey Ink; VersaMark - Tsukineko
Other: Text Block: Birthday Die (available February 15th), By The Numbers Impression Plate, Birthday Style Die Collection - Papertrey Ink; T1 Marker - Copic; White Crochet Thread; Coarse Crystal Glitter, Hexagonal Glitter in Turquoise and Olivine - Martha Stewart Crafts; Aqua & Lime Sequins; Foam Tape - Scotch; Clear Detail Embossing Powder - Filigree

Sunday, February 9, 2014

Introducing The Text Block Birthday Die

Well, hello there, Papertrey Ink friends! Fancy seeing you here. I bet you thought you weren't going to be seeing anything from me this month because there were no stamp peeks to be found, eh? Not so fast! I'm sneaking in this 7th Anniversary month with a brand new die that I am very excited to share! This die is similar to the Cover Plate series or the Framed Words series. It features framed typography that you can use to make very quick and easy cards that pack a lot of punch. Ready to see some samples?

I've made two cards to share with you today. I used a glitter treatment for both cards and just changed up a few of the components to give them a little variety. These seriously came together in mere minutes and they were a lot of fun to do (who doesn't love playing with glitter once in a while - though I may have looked like a fairy after making several of these).


I started by die cutting my Text Block shapes out of white cardstock. Then I adhered them to the sticky side of a piece of cardstock that I had xyroned. Next, I sprinkled on stripes of colored glitter and used a stiff-bristle paintbrush to blend the glitters together.


I've seen videos in which this is done with one's fingers, but I like that the paintbrush doesn't flatten the glitter too much. This way it retains a bit of subtle texture. I finish by using a brayer over the whole thing to make sure the glitter is as secure as possible.


I stamped my each card front with a background in watermark ink and adhered them to white card bases. Then I tied bows around the cards with sheer white ribbon and mounted my sentiment panel in place with foam tape. Super easy, but look how pretty! And they're so sparkly!

Thank you so much for joining me today! I hope you've enjoyed today's cards. I have SO many more fun things to show you using this die, so come back and join me again tomorrow. In the meantime, Nichole, Dawn, Erin, Heather, and Laura have inspiration to share with you. Make sure to visit them. You never know what sort of wonderful surprises will be revealed this week! See you soon!

Recipes:
Stamps: Polka Dot Basics, Background Basics: Chevron Stripes - Papertrey Ink
Cardstock: Tropical Teal, Winter Wisteria - Papertrey Ink; white
Ink: VersaMark - Tsukineko
Other: Text Block: Birthday Die (available February 15th) - Papertrey Ink; Assortment of Fine Glitters (Tropical Teal - Verdalite, Aquamarine Crystal, Feldspar, Turquoise, Lapis Lazuli; Winter Wisteria - Chariote, Purple Sapphire, Kunzite, Tourmaline) - Martha Stewart Crafts; Foam Tape - Scotch; Xyron; Sheer white ribbon

Thursday, February 6, 2014

Designing With Papertrey

Good morning, everyone! Today is Stamp Designer Intro Day in the Papertrey Ink 7th Anniversary festivities. You'll definitely want to check out Nichole's blog post introducing the stamp design team for this year. You may even see a new face. Go ahead. I'll wait...


Anyhow, I am so excited to be continuing with the team this yearI'm still a little bit astounded that I get to do this job (and by "a little" I mean I'm completely gobsmacked). It's an absolute joy to get to illustrate for Papertrey Ink and I am so grateful every day. I feel like I've really come into my own as a stamp designer and this year's sets hopefully reflect that growth. I have a deep appreciation for clean, versatile imagery that is truly timeless. It's so important to me that the things I design are not only cute, but also practical and fun to use. I can't wait to share my newest designs with all of you! It's going to be a great year!

While I'm on my bloggy soapbox, I'd also like to thank Nichole, Julie, and Jane for giving me this opportunity. Their support and confidence in me is more than I could have ever imagined. These are three truly smart, kind, and classy ladies, folks. I also wouldn't be where I am without all of you. The Papertrey Ink community has been so encouraging and enthusiastic and I can't thank you enough. I'd better share my card before I get all gooey.


So, all of the stamp designers have contributed to a free download that you can find on Nichole's blog post today. My contribution for this year is a circular birthday image.


To create my card today, I started by printing my image onto white cardstock and die cut it with a 1 3/4" circle die. Next I die cut a Wine Bottle Tag from both Limeade Ice striped paper and white cardstock. I trimmed the Limeade ice a smidgen and layered the two before die cutting a circle from the center. I adhered that to a Classic Kraft card base that I had stamped with polka dots using Fresh Snow ink.


Next, I die cut a handful of Balloon Bash balloons from white cardstock and stamped them with a coordinating image in Berry Sorbet ink. Next, I stamped the strings with VersaMark and heat embossed them with clear powder. Then, I adhered by balloons into place and embellished them with a bit of fine crystal glitter (on the dots and swirls). Finally, I mounted my freebie image into place with a couple layers of foam tape.

Thank you for joining me today and thank you again for celebrating the Papertrey anniversary with all of us. I hope you'll play along with today's contest! Create your own project with the download images for a chance to win a one of seven $70 gift certificates to the Papertrey Ink store. Enjoy the rest of the festivities and I'll see you again soon!

Recipe:
Stamps: Balloon Bash, Polka Dot Basics - Papertrey Ink
Cardstock: Classic Kraft, Limeade Ice Pattern Pack - Papertrey Ink

Ink: Berry Sorbet, Fresh Snow - Papertrey Ink; VersaMark - Tsukineko
Other: 2014 Anniversary Freebie Download (see Nichole's blog), Balloon Bash Die, Wine Bottle Tag Die - Papertrey Ink; Nesting Circles Dies - Quickutz; Clear Detail Embossing Powder - Filigree; Fine Crystal Glitter - Martha Stewart Crafts; Foam Tape - Scotch; Glue Pen

Saturday, February 1, 2014

February Color Play

Good morning and welcome to February's Papertrey Ink Color Play feature! This month I'm drawing my inspiration from a photo on the Sweet Style Blog of these incredible sprinkle-embellished milk bottles.


I was absolutely smitten with this photo from the moment I saw it. Just look at those playful, bubble gum colors! And the sprinkles, oooh, the sprinkles! How could I resist? I just knew that this color combo would lend itself to an adorable card, perfectly befitting Valentine’s Day.


I began by die cutting my speech bubble and stamping it with the coordinating image using Sweet Blush ink. I followed up with an Aqua Mist ampersand and the "always" and "forever" in Raspberry Fizz ink. I then stamped the sentiments on my card base, again in Raspberry Fizz. Leaving them on the block allowed me to ensure that the words would match up perfectly when I went to adhere my speech bubble onto the base.


In addition to the color scheme, I found the sprinkles in the photo particularly inspiring. To replicate the look I stamped a variety of dots (from several different sets, listed below) in a circle surrounding my sentiments using all of the colors in the palette.


I also added a handful of tiny hearts that I coated in fine tourmaline glitter for a little extra Valentiney sparkle. I finished by mounting my speech bubble to my card base with foam tape.

Thank you so much for joining me today! Make sure to check in with Betsy, Cristina, Dawn, Heather, and Melissa as they share their Revisited projects this morning. I hope you've enjoyed my post and are planning to play along with the challenge this month. If you do, I hope you'll stop by our Challenge Forum and share a photo or link to your project. Take care and I'll see you again soon!

Recipe:
Stamps: Bubble Talk, Grand Ampersand, Birthday Style (dot cluster), It's A Celebration (open dot cluster), Holiday Cheer (dots), Foodie Fun (tiny dot), Pedal Pusher (tiny heart) - Papertrey Ink
Cardstock: white
Ink: Raspberry Fizz, Hibiscus Burst, Sweet Blush, Harvest Gold, Aqua Mist - Papertrey Ink
Other: Bubble Talk Die Collection - Papertrey Ink; Fine Tourmaline Glitter - Martha Stewart Crafts; Foam Tape - Scotch