

Good morning and welcome to this month’s Stitching Feature! I’m Lizzie Jones your Stitching Ambassador and this moth I’m sharing…wait…do you hear that?
And you know what that means, don’t you? It’s Christmas in July! That’s right, I have a brand new set of ornament dies called the Heirloom Ornaments 1 Die Collection to share today. This collection will be available for purchase on July 15th. We can all use a little extra time to prepare handmade items for the holidays, so hopefully this early release will give you the time you need to make them useful for the upcoming season. Are you ready?!
Here’s your first look at several of the ornaments put together.
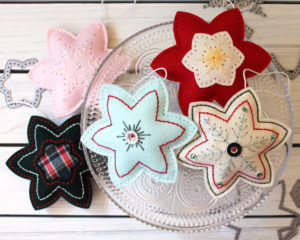
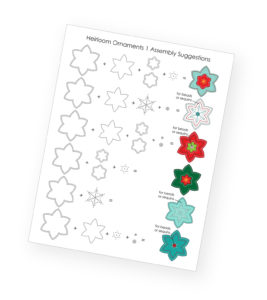
This collection was such a joy to design and it turns out to be even more fun to actually use! The pieces mix and match to create so many design options that no two ornaments will ever have to be exactly alike. I’ve put together a suggestion chart, but it only just scratches the surface of the possibilities.
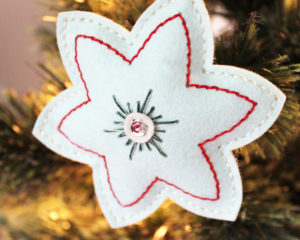
Let’s take a closer look at the ornaments I’ve made to share today! I made all of these double sided (which is to say, they’re identical on both sides). You could always create an embellished side and a plain side to save time or simply stitch your initials and a date on one side to simplify things a bit. This first one keeps things nice and simple with the basic ornament shape and the snowflake design on the inside.

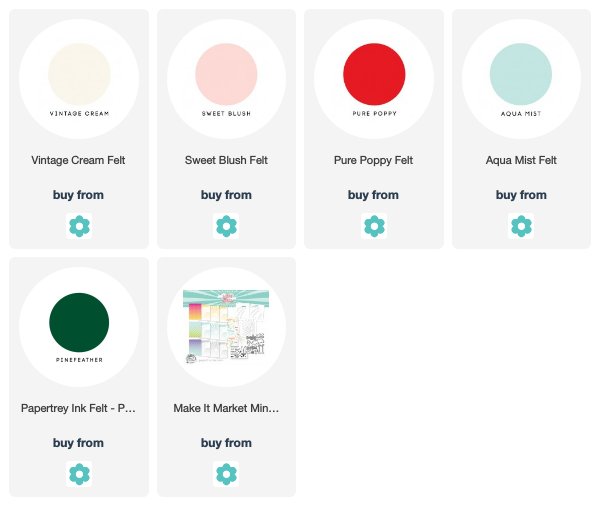
I cut the basic shape from Sweet Blush felt and then used the snowflake insert to add the stitching holes. I designed the snowflake to have a single hole at the end of each branch for a bead, sequin, or both. I used a clear sequin and silver bead threaded together on this ornament.
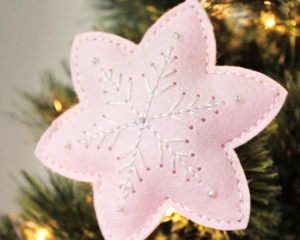
I also used a single silver thread and two white threads to do the stitching on both the snowflake and the outer edge. The silver thread ties in nicely to the silver beads and makes the whole thing sparkle. I used a loop of white crochet thread to create a hanger (simply sewing it in between the layers of felt to secure it) and stuffed it with polyfil to finish it up.
Next up, I have a slightly more stepped up version. On this ornament I used the basic shape and snowflake again, but this time I also incorporated the outline and small circle layer to add in some extra color.
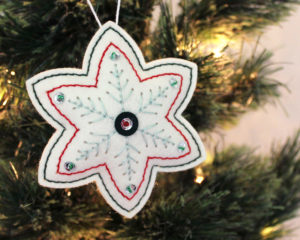
I began by die cutting the primary shape from Vintage Cream felt. I used the outline and snowflake designs to add stitching holes to the basic shape. Those two dies can be used at the same time, making the process quicker! I cut the small circle from Pinefeather felt and set it aside.

I stitched the snowflake with two strands of aqua thread and one strand of silver thread and embellished the ends with silver sequins threaded with green beads. The outline was done in red thread (three strands) and the Pinefeather circle was stitched into place in the center of the snowflake. That was embellished with another silver sequin and a red bead before stuffing with polyfil and stitching up the outside.
Not only can you create snowflakes with this die collection, but you can make poinsettia ornaments, too! This next ornament shows you the basic poinsettia design.
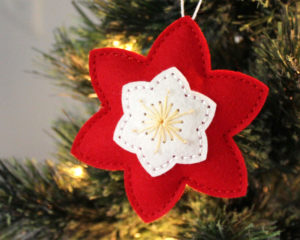
I began by die cutting the basic shape from Pure Poppy felt. I also die cut the smaller shape from Vintage Cream felt and used the poinsettia center die to create stitching holes. Then, I cut the holes for the Vintage Cream layer with the window die included in the collection (it makes sort of a frame). That die is designed to do double duty. You can stitch your layer in front or behind for two different looks. I’ll show another one here in just a minute.
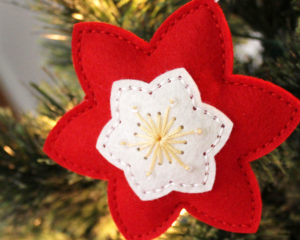
I used yellow thread to complete the stitching and embellished each of the long stitches with a clear sequin and clear bead to give a bit of sparkle to my flower center. I stitched that to the Pure Poppy layer with white thread and then stitched up the outer edge after stuffing with polyfil.
I mentioned that you can use the window in a couple of different ways. Here’s an example of how you can use it to add a peek-a-boo layer. I chose a festive plaid, but you could use it for a monogram, a photo printed on canvas, or even as an opening (if you’re creating flat ornaments rather than stuffed).

I began by die cutting the basic shape from Pinefeather felt, using the window die in the center and the outline around the edge. Then, I die cut the small layer from plaid fabric that I had reinforced with interfacing.
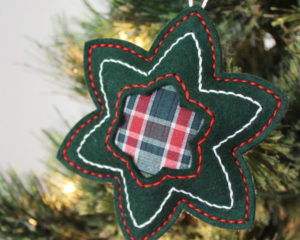
I stitched the plaid piece to the back side of the Pinefeather layer with red thread and then completed the outline with white. I stitched up the outside with red thread and stuffed with polyfil. This one came together quickly and the plaid is such a fun addition!
My last ornament of the day uses the flower center and the outline together. I also used the small circle to dress up the flower center and add in another color.
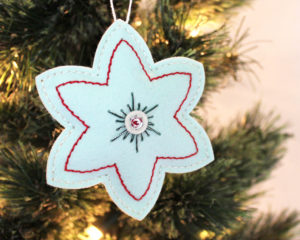
I began by die cutting the basic shape from Aqua Mist felt. I used the outline and flower center dies to add a design to the die cut (again, both can be cut at the same time which makes the process even quicker). I stitched up the center with two threads of dark green and one of silver. Then, I added the small circle and embellished with a silver sequin and red bead.
I stitched the outline with red thread and the outer edge with two strands of white with one strand of silver. Metallic thread can be a bear to use, so incorporating a single thread with other solids makes it far more manageable. Plus, the twinkle you get in the Christmas lights is lovely.
I hope you’re as excited about the Heirloom Ornaments 1 Die Collection as I am! I didn’t expect to have as much fun as I did creating Christmas ornaments when the mercury is topping 90º, but here we are. I plan to make little kits of these to take along on road trips and to appointments so I can get a jump on my holiday decorating. I should be well ahead by December!
Do you have questions about this die collection? Join me at noon today on my Instagram stories to watch a live story about this new collection. Thank you so much for joining me today and I hope to see you soon. Have a great day!
Supplies:
4 comments:
these are beautiful Lizzie! i have been so hoping for some more pti stitching dies and here they are. happy, happy day!
Finally had time to watch the live post on IG! I had a couple ideas...Jennifer McGuire has a video of a shaker type card with tulle. I think that would be great in the window in the center, with some beads, glitter, sequins between 2 layers of tulle.
I also thought of using floss to "suspend" some little item in the hole... Difficult to explain what I am visualizing... Sandwich thread between 2 layers, with something on the thread.
Such a wonderful set! I especially love the pink one with the white and silver stitching 💖
So glad to see another ornament stitching die set! Thanks for creating this Lizzie, I really love what you do!
Post a Comment