Good morning, friends, and welcome back to Day 2 of the
Papertrey Ink July countdown! Thank you all so much for your kind words on yesterday's post. I'm excited to be back sharing Rebecca's
Yellow Sunshine set, my newest
Bold Borders die, and Heather's
Banners & Pennants stamps with you today. Let's get going!
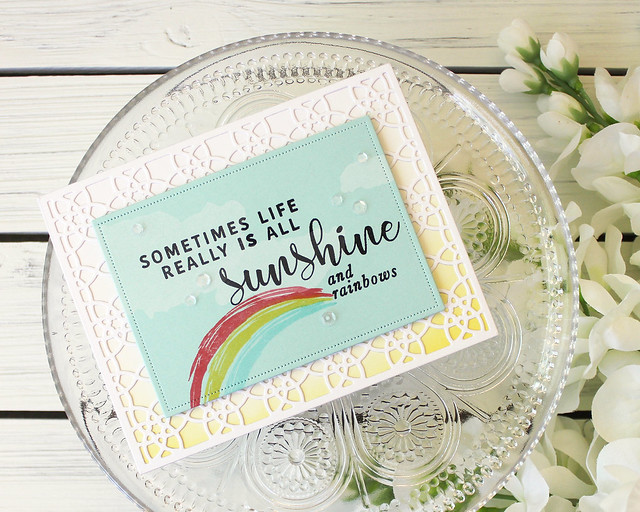
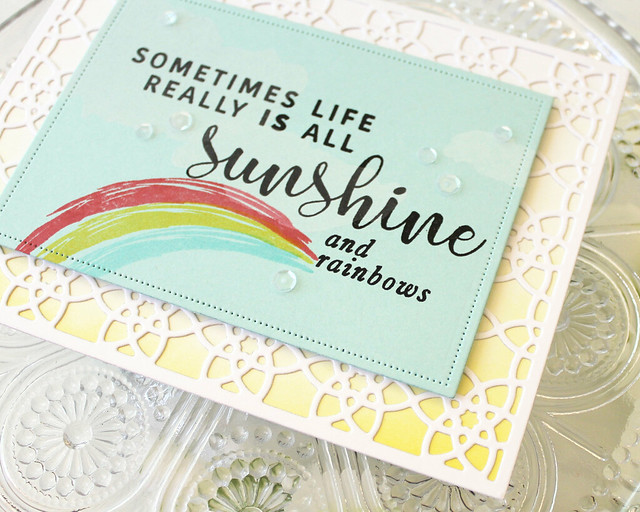
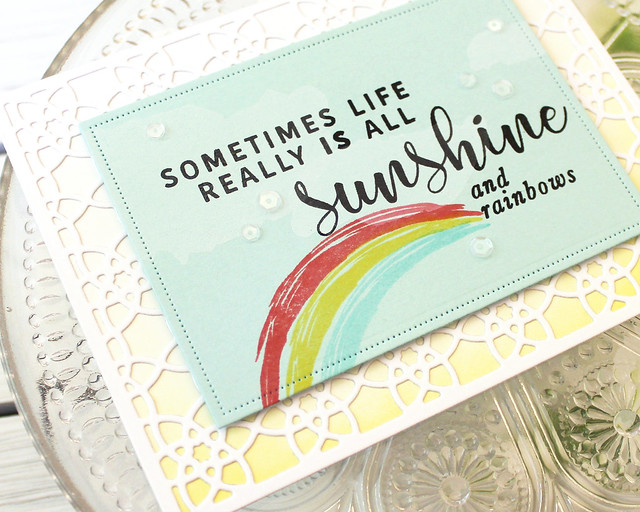
My first card pairs Rebecca's
Yellow Sunshine with my
Bold Borders: Prism die. I love the cheerful messages in Rebecca's set and I'm sure you will, too!
I began by die cutting a panel using the new Pierced Feature Frames from Aqua Mist cardstock. I stamped the clouds from Rebecca's set onto the panel with Fresh Snow ink and then followed up with the greeting in Versafine Onyx Black. The pigment in the Onyx Black holds up better against the Fresh Snow than a similar colored dye ink. I stamped the arched line three times to create a mini rainbow with Berry Sorbet, Bright Buttercup, and Hawaiian Shores inks.
I set that panel aside while I sponged Bright Buttercup ink onto a white card base. Then, I xyroned a panel of white cardstock before die cutting it with the Bold Borders: Prism Die. By adding the adhesive first and die cutting second I was able to avoid excess adhesive along the edges. I adhered the Bold Borders panel over top of the blending to give the background interest and make the details of the frame pop against the yellow.
Then, I adhered the sentiment panel to the front of the card with foam adhesive and embellished with a sprinkling of sequins from the Sunshine & Rainbows kit. You could also use rainstones or another clear embellishment to get a similar look.
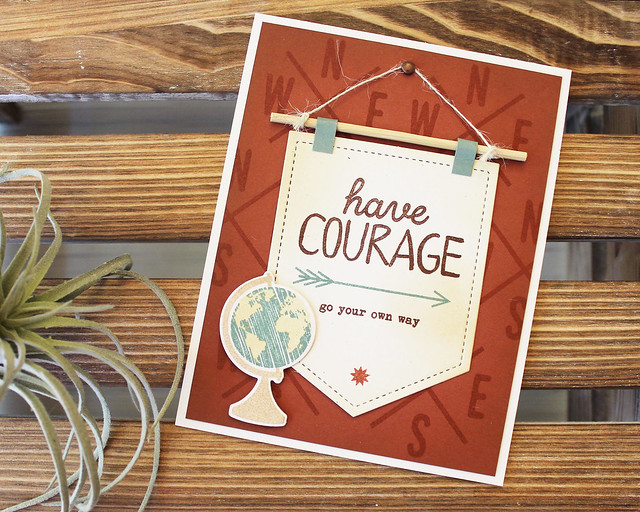
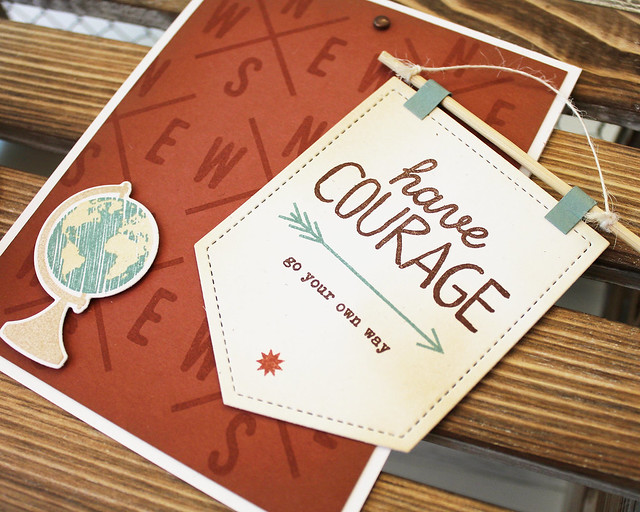
Next up, I have a card made pairing Heather's new
Banners & Pennants set with a couple of my previously released Glorious Globes sets. It's even interactive!
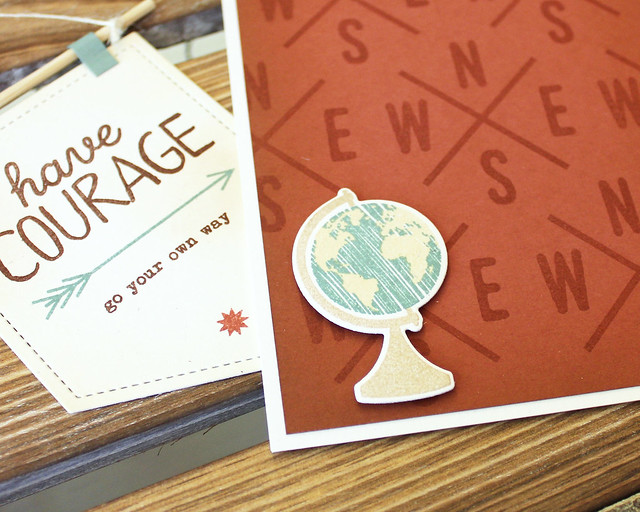
I began by creating the mini banner. I die cut a Rustic White banner using the new Banner Die and sponged it with Fine Linen and Classic Kraft inks to age it a bit. I stamped it with the sentiment, arrow, and star from the Banners & Pennants set and then used narrow strips of Ocean Tides cardstock to add loops to the top edge. I used piece of a bamboo skewer to act as the dowel and tied it with Rustic Cream Button Twine to make it hangable.
Next, I created the card itself. I began by creating the background by sponging Classic Kraft ink around the edges of an Americana panel. Then, I repeatedly stamped the directional image using Americana ink to add monochromatic pattern. I used a copper brad to create a hanger and adhered that panel to a Rustic White Card base.
I stamped and die cut a globe using Glorious Globes: Basics and Glorious Globes: April. I hung the banner on the front of the card and then used the globe to secure it without adhering anything down (I used foam tape along the bottom and left edge of the globe where it wouldn't interfere with the banner). I love that the little banner can be removed and hung after the card is opened!
That's all I have to share with you today, but I'll be back with a few more projects showcasing this month's new releases. In the meantime,
Betsy,
Dawn,
Heather,
Laurie,
Melissa B,
Melissa P,
Michelle, and
Stephanie have projects to share highlighting these great new stamps. Have a great day and I'll see you tomorrow!
Supplies:
Sunshine & Rainbows Card
Have Courage Card

6 comments:
Love this Lizzie! Great masculine feel, men in our lives need encouragement too!
I just love your designs and the new sentiments are great!
Goodness Lizzie, you put alot of great ideas and work into your designs. Have I ever thanked you for your step by step process, including lots of helpful tips. Thank you! I'm in love with your banner card, it's PERFECT with your glorious globes. And your sunshine card is pretty & cheerful!! (PS. I've tried the Xyron for my die cut words, and it's clear I need more practice. I ended up with a mess, but won't give up. Any tips?) Thx again. :)
You're so kind! Thank you! I always xyron first and die cut second. It really cuts down on the excess adhesive around the edges. I hated my xyron until I worked out that tip! I hope it helps!
Love how the banner can be removed! You are always so great at showing samples that are appropriate for guy cards. I also appreciate that you give step-by-step instructions. I'm a fan!
This is my favorite of the Bold Borders dies; the 'smile' die broke the tie. And I love everything about the banner card. Everything.
Post a Comment