Monday, June 15, 2015

Moments Inked: Fitness Planning


Good morning, friends! It's my week to share my recent adventures in planning, so I'm going to show you how I've been using my Papertrey Ink Moments Inked planner to track my fitness progress as of late.

Last summer, I followed a 5k training program that I really liked, but I fell off the wagon once the program was finished. I realize now that was due to a handful of reasons that, honestly, I shouldn't have let hold me back. So this summer I decided to go ahead and follow the same program again, this time with the intention of continuing after it's complete. I thought I might be able to summon a bit more enthusiasm if I could see my progress in black and white right there in my planner. Fingers crossed!

Weekly Tabs

The program I'm following spans eight weeks, so I die cut a Tabbed List for each week and stamped them with the lines from the Moments Inked: Listed stamp set. The labels were color coded for the months in which they fall and then stamped with the Moments Inked: Remembered and Get Lost stamp sets.

Week 3 Tab

I stamped the date and notes sentiments on each tab, breaking the lines down into three or four days as the week required.

Week 5 Close Up

That gave me space to take notes about each run including distances, weather, pace, and any relevant details. I had originally planned to write in weight fluctuations as well, but I'll be darned if I'm broadcasting my weight all over the internet. You're already getting to see that I'm as slow as a heard of turtles wading through peanut butter. No need to give away all of my secrets at once. That said, you could certainly add that information should you find it helpful.

Week 6 Tab

I filled out the basics for each day when I made the tabs so now it's a cinch to go back and write in the additional information after each run.

Coming Races Insert

My end goal is to be speedy enough to participate in our town's annual Turkey Trot in November. Thanks to the hilly terrain, Granville is full of cross country phenoms, so it's going to take a lot of practice on my part. I thought it might be a good idea to make a list of upcoming 5k races in the area to give me some additional opportunities to challenge myself. I used one of the Basic Pages dies along with the Fresh Alphabet, Journal Accessories stamps, and Moments Inked: Listed stamps to create this insert of upcoming races. This way I can jot down the pertinent information about races I'm interested in running in the future.

Fitness Pocket

I also created a "Fitness" pocket to corral any registration paperwork, race promos, or results I pick up along the way. I thought this sentiment from Pedal Pusher was a particularly inspiring embellishment for the pocket. It's a nice reminder that while the work might be hard, it's also taking me where I want to go. Sometimes a girl needs that sort of encouragement.

That's my Moments Inked contribution for this week. I hope you've found something useful in today's post. Have a wonderful week and I'll see you again soon!


Recipes:
Weekly Tabs
Stamps: Moments Inked: Listed, Moments Inked: Remembered, Get Lost - Papertrey Ink
Cardstock: Fresh Snow Linen, White Adhesive Sheets - Papertrey Ink
Ink: Orange Zest, Simply Chartreuse, Ocean Tides, Hawaiian Shores, Summer Sunrise, Aqua Mist, Winter Wisteria, Ripe Avocado, Smokey Shadow - Papertrey Ink
Other: Tabbed List Die - Papertrey Ink

Coming Races Insert
Stamps: Fresh Alphabet, Moments Inked: Listed, Journal Accessories - Papertrey Ink
Cardstock: Fresh Snow Linen
Ink: Orange Zest, Aqua Mist, Berry Sorbet - Papertrey Ink
Other: Moments Inked: Basic Pages Die - Papertrey Ink

Fitness Pocket
Stamps: Moments Inked: Divided, Pedal Pusher - Papertrey Ink
Cardstock: Berry Sorbet Polka Dot Paper, Fresh Snow Linen, Aqua Mist, White Adhesive Sheets - Papertrey Ink
Ink: Orange Zest, Smokey Shadow - Papertrey Ink
Other: Moments Inked: Divided Die, Moments Inked: Pocket Page Die - Papertrey Ink; Scortape

Sunday, June 14, 2015

Papertrey Ink June Countdown - Day 5

Good morning, friends! Welcome back for Day 5 of the Papertrey Ink new release countdown. It's been a fun ride this month, hasn't it? Thank you all so much for your enthusiasm for these new products the past few days. I truly hope you'll love creating with them. Well, I have a couple of final projects to share with you featuring the Text Block: Horizontal Birthday die, Balloon Strings die, and Hooray stamps and papers, so let's get to it!

My first project is a birthday card bursting with glittery gold accents.

Birthday Balloon Bouquet Card

I love pinks paired with gold, so I began by die cutting a trio of balloons from Berry Sorbet, Sweet Blush, and Melon Berry cardstocks. I'm also quite fond of the balloons you often see filled with confetti, so I heat embossed my little cardstock version with the confetti from Good Times using gold powder and set them aside for a moment. Next, I embossed my sentiment onto a Cover Plate: Blue Skies panel that I'd die cut from Linen Vellum. Then, I adhered that panel to a Spring Rain patterned paper card front using vellum tape.

Birthday Balloon Bouquet Close Up

The balloon strings die includes three individual strings as well as the bundle shown here and a bow. I adhered my balloon string bundle to the card front and then attached my balloons into place using foam tape. I opted for a crochet thread bow tying my balloons together on this card for a bit of added texture. I finished the card off with a handful of the glittery gold enamel dots from last month's Garden Gild Make It Market Mini Kit. Cute!

My final card today pairs my new Text Block: Horizontal Birthday die with one of my favorite older birthday sets, Wishes Come True.

Birthday Candle Wish Card
I began by stamping a row of overlapping outline candles onto a Berry Sorbet card base using the matching ink. Then, I wrapped the card in some white crochet thread and tied it in a simple bow. Next, I die cut and stamped one single candle using Summer Sunrise and Lemon Tart inks and set it aside.

Birthday Candle Wish Close Up

Then, I xyroned three pieces of white cardstock (one on both sides) and die cut them with the new Text Block die. I layered the three pieces, making sure that the double sided piece was on top. I removed the adhesive backing and placed the candle before sprinkling the whole thing with glitter. Next, I trimmed a bit of Hooray patterned paper and adhered it to the back of the Text Block piece. I adhered that panel to the card front using foam adhesive and then added rhinestones for the dots of my "i"s for good measure. It's such a cheerful card, don't you think?

Alrighty then, friends. That's all for me this month. Thank you so much for following along these past few days. Make sure to check in with Nichole, Amy, Ashley, BetsyDawn, Heather, Laura, Laurie, Maile, Melissa, Erin, and Lexi for another fabulous day full of inspiration. I'll see you again very soon!

Recipes:
Birthday Balloon Bundle Card
Stamps: Hooray (available June 15th), Good Times (available June 15th) - Papertrey Ink
Cardstock: Berry Sorbet, Sweet Blush, Melon Berry, Spring Rain Bitty Dot, Linen Vellum - Papertrey Ink; white
Ink: VersaMark - Tsukineko
Other: Balloon Strings Die (available June 15th), Cover Plate: Blue Skies, Balloon Bash Die, Garden Gild Enamel Dots - Papertrey Ink; Gold Embossing Powder - Filigree; Foam Tape, Vellum Tape - Scotch; White Crochet Thread

Birthday Wish Candle Card
Stamps: Wishes Come True - Papertrey Ink
Cardstock: Hooray Paper Collection (available June 15th), Berry Sorbet - Papertrey Ink; white
Ink: Berry Sorbet, Summer Sunrise, Lemon Tart - Papertrey Ink
Other: Text Block: Horizontal Birthday Die (available June 15th), Wishes Come True Die - Papertrey Ink; Foam Tape - Scotch; Crystal Glitter - Martha Stewart Crafts; White Crochet Thread; Xyron; Rhinestones (colored to match with a Copic)

Saturday, June 13, 2015

Papertrey Ink June Countdown - Day 4

Good morning, friends! Welcome back for Day 4 of the Papertrey Ink June countdown. Today is all about birthday celebrations and Nichole and the team have some fabulous inspiration for you today. I'm sharing more of my new Hooray stamp set, the Cover Plate: Balloon Bash, and the Favor It: Cupcake Box die, so let's get to it!

Here is the first of two ensembles I have to share with you today.

Hooray Ensemble

I started with the card. I wanted to try my hand at using the Cover Plate: Balloon Bash as a stencil, so that's exactly what I did here.

Hooray Card

I mixed a tiny, tiny bit of Perfect Pearls into translucent embossing paste to give it a very slight pearly finish and applied it to a piece of Hooray patterned paper through the stencil. I love that it looks like confetti and the texture is fantastic.

Hooray Close Up

Once that was dry, I stamped the sentiment below the pre-printed "Hooray!" and trimmed down the panel a smidge. I matted that piece with New Leaf patterned paper and added Small Sketched Stars shapes that I'd cut from Summer Sunrise shimmer cardstock. That whole piece was mounted to a white card base with foam tape.

Next, I created the coordinating cupcake box.

Hooray Cupcake Box

I used the Enchanted Evening box that I'd assembled in yesterday's video (waste not, want not). I wrapped a length of New Leaf Saddle Stitched ribbon around the box and secured the seam with ScorTape. I then die cut a medallion from white cardstock and stamped it with the Hooray sentiment. I added more star die cuts and adhered it to the ribbon around the box. So simple, but so cute!

My next ensemble would be perfect for a small group birthday (like at an office, for example).

Group Birthday Ensemble

I began this time with the festive cupcake box.

Streamers & Confetti Cupcake Box

I die cut the box from white cardstock and stamped the top "petals" with the confetti from Heather's new Good Times stamp set. I inked with Lemon Tart, Harvest Gold, and Summer Sunrise to give the confetti tons of dimension. Then, I stamped my streamers on the bottom portion of the box using Tropical Teal, Aqua Mist, and Limeade Ice inks. Isn't it fun?!

Here's the coordinating card. It's a petite size (4 7/8" x 3 1/2") that looks totally charming alongside the cupcake box.

Group Birthday Card

I used the same inks to add the confetti to the top of the card. Then, I added my streamers, making sure to keep them even across the width of the card. I stamped my primary sentiment in Aqua Mist and then added the companion sentiment in Tropical Teal, allowing the two to overlap a bit.

Group Birthday Close Up

I punched small half circles in the sides of the card front and wrapped it with a few rounds of white crochet thread, tied in a bow. The cut-outs keep the thread secure while also serving as a sweet little detail. It's certainly a cheerful ensemble, wouldn't you say?

Ok, friends. That's all for me today. Check in with Nichole, AmyAshley, Betsy, Dawn, Heather, Laura, Laurie, Maile, Melissa, Erin, and Lexi to see how they're celebrating with the new birthday products. See you tomorrow!

Recipes:
Hooray Ensemble
Stamps: Hooray (available June 15th) - Papertrey Ink
Cardstock: Hooray Patterned Paper Collection (available June 15th), New Leaf Stripe Patterned Paper, Enchanted Evening Bitty Dot Patterned Paper, Summer Sunrise Shimmer - Papertrey Ink; white
Ink: Enchanted Evening - Papertrey Ink
Other: Favor It: Cupcake Box Die (available June 15th), Cover Plate: Balloon Bash (available June 15th), Small Sketched Stars Die, First Place Die Collection, New Leaf Saddle Stitched Ribbon - Papertrey Ink

Group Birthday Ensemble
Stamps: Hooray (available June 15th), Good Times (available June 15th) - Papertrey Ink
Cardstock: white
Ink: Lemon Tart, Harvest Gold, Summer Sunrise, Limeade Ice, Tropical Teal, Aqua Mist - Papertrey Ink
Other: Favor It: Cupcake Box Die (available June 15th) - Papertrey Ink; Hole Punch; White Crochet Thread

Friday, June 12, 2015

Papertrey Ink June Countdown - Day 3

Good morning, friends, and welcome back for Day 3 of this month's Papertrey Ink countdown! I have more to share with you today featuring the new Hooray stamp set, Cover Plate: Balloon Bash, and one more thing I've been keeping under my hat. I mentioned on Day 1 that I was holding out on you for a couple of days and here's the surprise...the Favor It: Cupcake Box Die! I have a sample to share along with a very simple assembly tutorial for all of you visual learners. Let's get started!

I wanted to play around with the Cover Plate: Balloon Bash and see what occasions, aside from birthday, would be well suited for this die. I thought it might be fun to give the 4th of July a spin.

Celebrate Card

I began by die cutting the Cover Plate from Spring Rain cardstock and polka dot vellum. I adhered the blue panel to a white card base and stamped the fireworks and sentiment directly onto the vellum. I used vellum tape in a few choice places to adhere the vellum to the Spring Rain panel.

Celebrate Card Close Up

Next, I stamped and fussy cut the rockets and adhered them to the card front with foam tape. I adhered small stars to the fireworks and embellished those with glitter. The rocket fuses were also embellished with tiny glittered pearls. A bit of baker's twine finished the card off nicely.

Next came the cupcake box! You can see the assembly tutorial below.


Who doesn't love a sweet treat on a celebratory day? This box is perfectly sized for your typical homemade cupcake, but it is also fantastic for other goodies as well. I've filled today's box with patriotic candies.

Celebrate Box

I die cut the box from the same polka dot vellum I had used on the card front. I went over the score lines to make sure it would fold nicely and then assembled as normal.

Celebrate Box Side

I didn't worry about the adhesive showing too much, though you could use washi tape on the outside if the visible adhesive makes you twitch.

Celebrate Box Top

I created a little tag using one of the Keep It Simple Frames. I stamped it with the sentiment from Hooray and one of the fireworks from Red, White & Blue. Then, I embellished the tag with a Bitty Button Stacks button cut from Soft Stone patterned paper and a star button from the Design-A-Softie kit. I used navy blue baker's twine to secure the tag to the box. It's simple, but oh-so-cute!

Alrighty, all! That's it for me today. Make sure to check in with Nichole, Amy, Ashley, Betsy, Dawn, Heather, Laura, Laurie, Maile, Melissa, Erin, and Lexi to see what they have up their sleeves today. I'll see you again soon!

Recipes:
Celebrate Card
Stamps: Hooray (available June 15th), Red, White & Blue - Papertrey Ink
Cardstock: Spring Rain, Sheer Basics Vellum, Pure Poppy, Enchanted Evening - Papertrey Ink; white
Ink: Pure Poppy, Enchanted Evening, Blueberry Sky - Papertrey Ink
Other: Cover Plate: Balloon Bash (available June 15th) - Papertrey Ink; Vellum Tape, Foam Tape - Scotch; Sugar Cube Glitter - Martha Stewart Crafts; Cherry Baker's Twine - Divine Twine; Clear Embossing Powder - Filigree; Glittered Pearls - Mark Richards

Celebrate Treat Box
Stamps: Hooray (available June 15th), Red, White & Blue - Papertrey Ink
Cardstock: Sheer Basics Vellum, Soft Stone Patterned Paper - Papertrey Ink; white
Ink: Spring Rain, Enchanted Evening - Papertrey Ink
Other: Favor It: Cupcake Box (available June 15th), Bitty Button Stacks Die, Keep It Simple Frames Die, Star Button - Papertrey Ink; Blueberry Baker's Twine - Divine Twine; ScorTape

Thursday, June 11, 2015

Papertrey Ink June Countdown - Day 2

Good morning, friends! Welcome back for Day 2 of the Papertrey Ink new release countdown. I'm so happy to hear that you're all as excited as I am about these new stamps and dies. They really are a treat to use. I have a couple of additional projects to share with you today, so let's get to it!

My first card is a little more on the masculine side. Manly cards can be on the tricky side for so many of us, so I thought I'd challenge myself to come up with something for the fellas. I paired the new Text Block: Horizontal Birthday Die with the Hooray stamp set and it couldn't have been easier.

A Year Better Card

I began by stamping the streamers in a diagonal pattern onto Rustic White cardstock with Terra Cotta Tile, Blueberry Sky, Simply Chartreuse, and Harvest Gold inks (I masked off the edges to keep them clean). Next, I stamped a panel of Terra Cotta Tile cardstock with the tiny star background from Bitty Background Blocks II. I xyroned that panel and then die cut it with the Text Block: Horizontal Birthday Die, making sure to keep track of all of the pieces. I heat embossed the sentiment, also from Hooray, onto the outer frame of the panel and then added a piece of clear cardstock to the back.

A Year Better Close Up

From there, I used the Text Block as a template to adhere all of the negatives into the window in the cardstock frame. When I was done adhering all of the inner bits, I removed the Text Block shape. From there, I simply adhered that panel to the card front with foam tape. It's a fun feature to be able to see the streamers coming through where the words from the Text Block would have been! You could make this same design in girly colors for a clean and simple take on a more feminine project, too.

My next card today is a birthday card for a one year old using the Cover Plate: Balloon Bash die. You can make just about any simple shape into a balloon using this Cover Plate. So fun!

Hip, Hip, Hooray Card

I began by very lightly impressing the Cover Plate into a white card base. I did this by using just one embossing mat in my sandwich instead of the two together. I used an assortment of Copics to color in the dot and star impressions. Next, I die cut a Cover Plate: Balloon Bash shape from Aqua Mist cardstock and adhered it to the card front with foam tape. I stamped my sentiment onto a Get A Handle On It banner shape and gave it a little wave before adhering it to the Aqua Mist layer.

Hip, Hip, Hooray Close Up

Then, I die cut three stars from Hawaiian Shores, Winter Wisteria, and Berry Sorbet patterned papers. I used the Polka Dot Alphabet dies to cut a "1" from the Hawaiian Shores star and topped all three with custom epoxy embellishments that I made using Heather's awesome tutorial (I seriously love this technique and use it all the time). Finally, I added the stars to the stitched balloon strings using flat and foam adhesives. Isn't it cute?!

Well, that's all for me today. Thank you so much for popping by to see what I'd created with this month's new releases! I'll have more for you tomorrow, but in the meantime make sure to check in with Nichole, Betsy, Dawn, Heather, Maile, Erin and Lexi for more of this month's release. See you soon!

Recipes:
A Year Better Card
Stamps: Hooray (available June 15th), Bitty Background Blocks II - Papertrey Ink
Cardstock: Terra Cotta Tile, Rustic White, Clear - Papertrey Ink
Ink: Terra Cotta Tile, Blueberry Sky, Simply Chartreuse, Harvest Gold - Papertrey Ink; VersaMark - Tsukineko
Other: Text Block: Horizontal Birthday (available June 15th) - Papertrey Ink; Foam Tape - Scotch; White Detail Embossing Powder - Filigree; xyron

Hip, Hip, Hooray Card
Stamps: Hooray (available June 15th) - Papertrey Ink
Cardstock: Aqua Mist, Hawaiian Shores, Winter Wisteria, Berry Sorbet Patterned Paper, Clear - Papertrey Ink; white
Ink: Hawaiian Shores - Papertrey Ink
Other: Cover Plate: Balloon Bash (available June 15th), Tremendous Treats Halloween Die Collection (the star), Get A Handle On It Die Collection, Polka Dot Alphabet Die - Papertrey Ink; Markers - Copic; Foam Tape - Scotch; Glossy Accents - Ranger; xyron

Wednesday, June 10, 2015

Introducing The Hooray Stamp Set & Paper Collection, Text Block: Horizontal Birthday Die, Cover Plate: Balloon Bash, and Balloon Strings Die

Welcome to the first day of the Papertrey Ink June new release countdown (these new products will be available starting June 15th). Oh, boy! You all are in for a treat this month! I have so much to share with all of you over the coming days. I'm introducing most of it this morning, but it wouldn't be any fun to give away everything on Day 1, so I'm going to keep a surprise up my sleeve for later. Today though I'm introducing you to the Hooray Stamp Set & Paper Collection, Text Block: Horizontal Birthday Die, Cover Plate: Balloon Bash, and Balloon Strings Die. What?! I know! Let's get to some projects so you can see all of these new goodies in action.

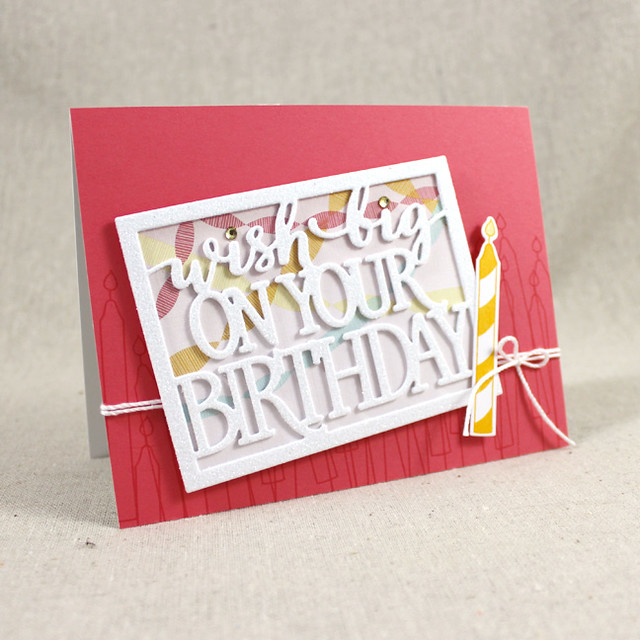
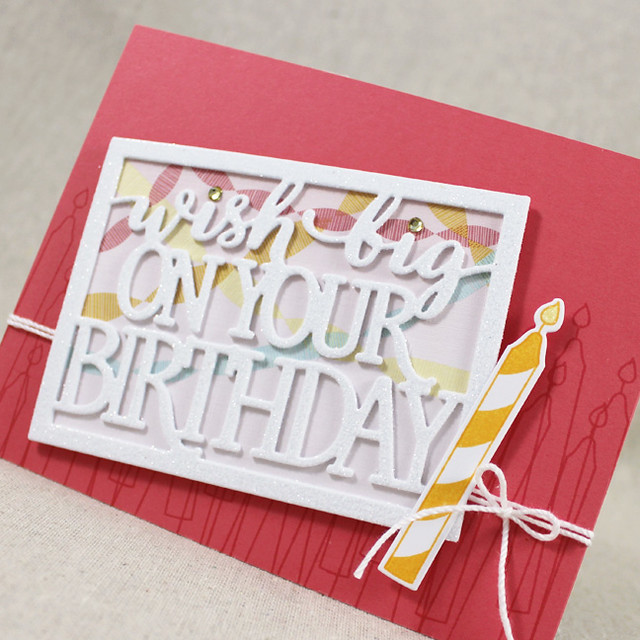
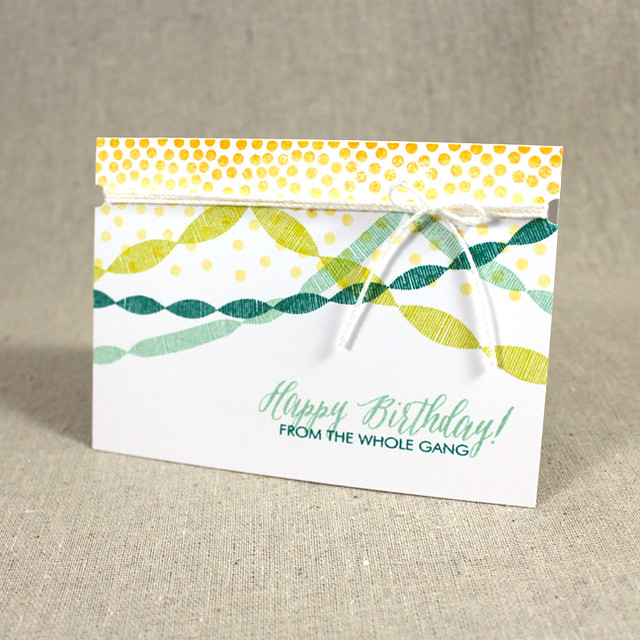
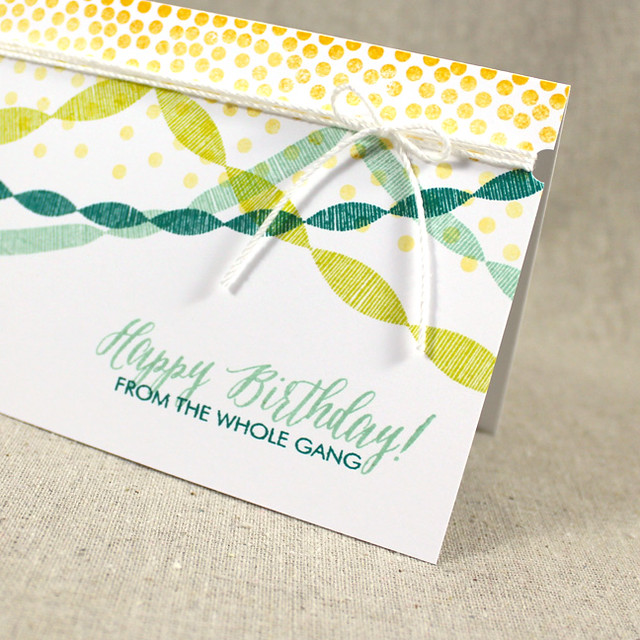
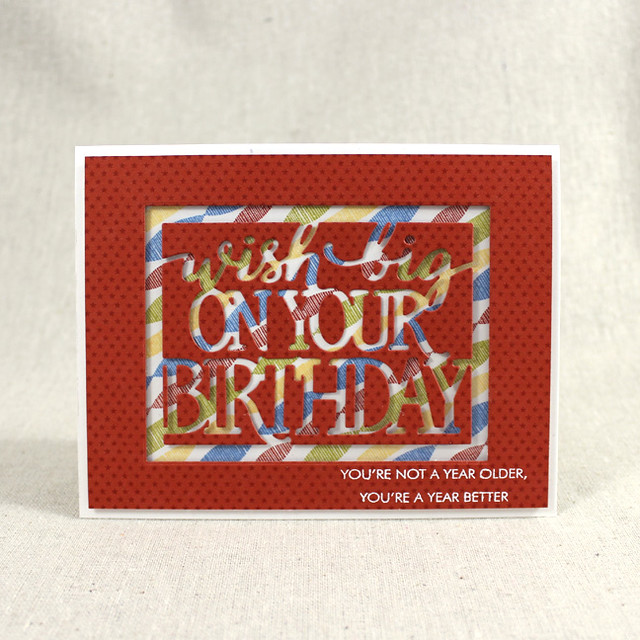
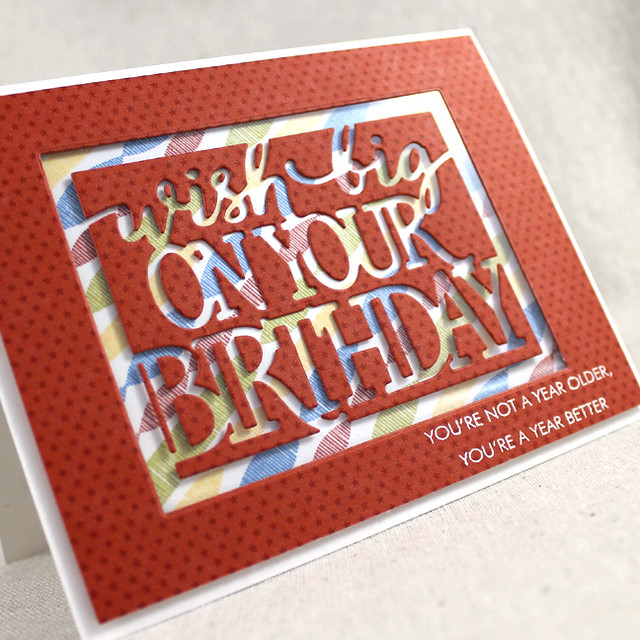
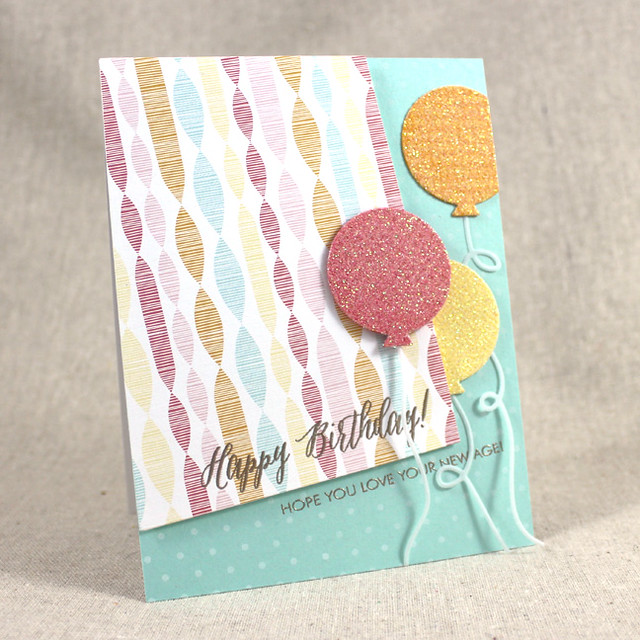
I'm starting today with a bright and cheerful birthday card that features the new Text Block: Horizontal Birthday Die, Hooray Stamp Set, and Balloon Strings Die.

Wish Big Card

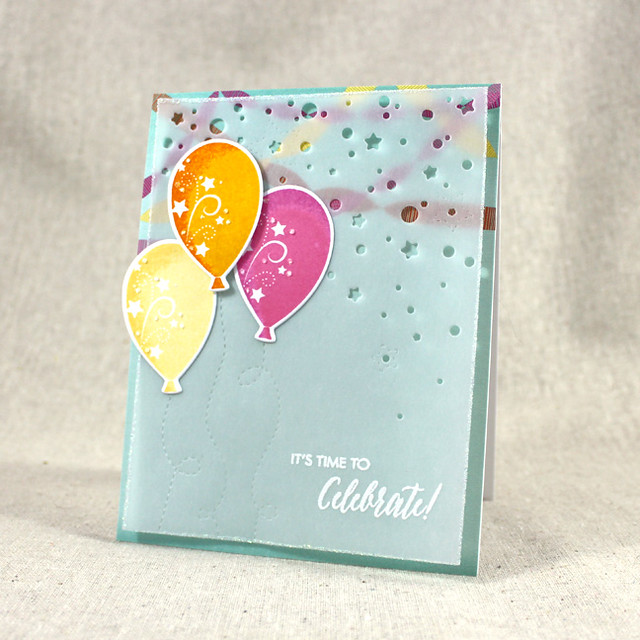
I began by stamping the streamers from Hooray onto a Fresh Snow linen card base using Pure Poppy, Hawaiian Shores, Simply Chartreuse, Harvest Gold, and Orange Zest inks. Then, I xyroned a piece of Hawaiian Shores cardstock and die cut that with the new Text Block die. I adhered that shape to a piece of Clear Cardstock and mounted it to the card front with foam tape.

Wish Big Close Up

Next, I die cut and stamped one of the balloons from Balloon Bash using Orange Zest ink. I die cut one of the new Balloon Strings shapes from Linen Vellum and adhered it to the back of the balloon. Then, I used foam tape to mount the balloon to the card front, leaving the string largely unattached. I added a vellum bow to the balloon (also from the Balloon Strings Die) along with a self adhesive pearl. A simple sprinkling of clear sequins was the perfect finishing touch.

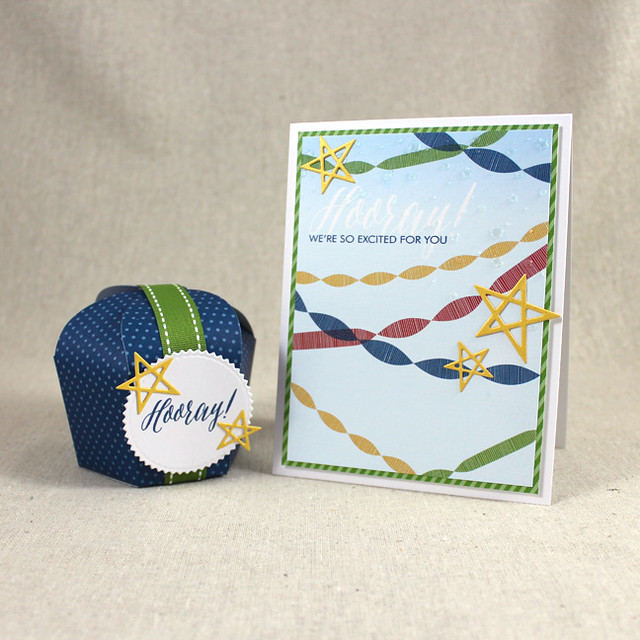
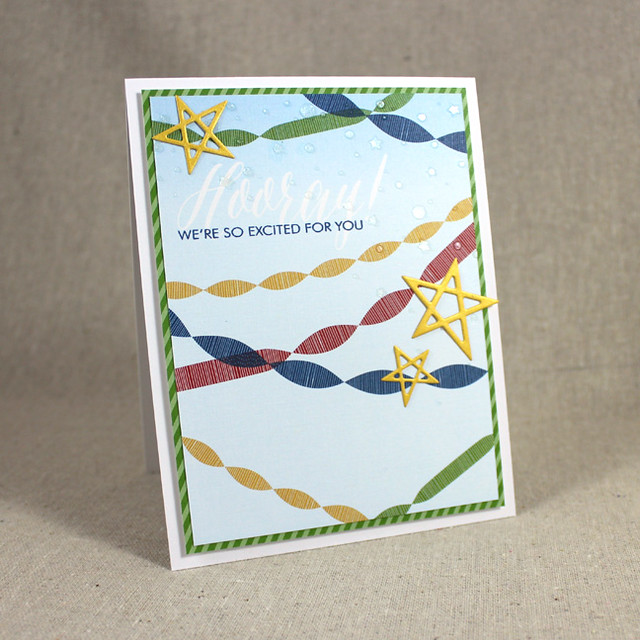
Now, let's get a peek at that new Hooray Paper Collection. Better yet, let's pair it with the Cover Plate: Balloon Bash and the Hooray Stamp Set!

Time To Celebrate

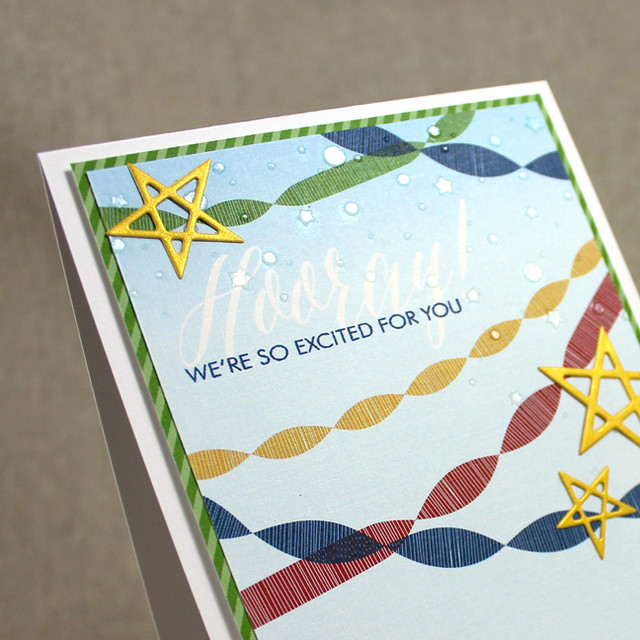
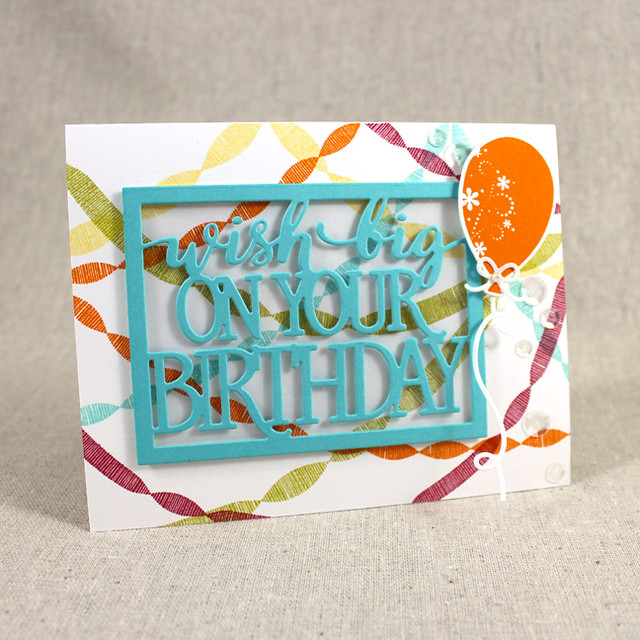
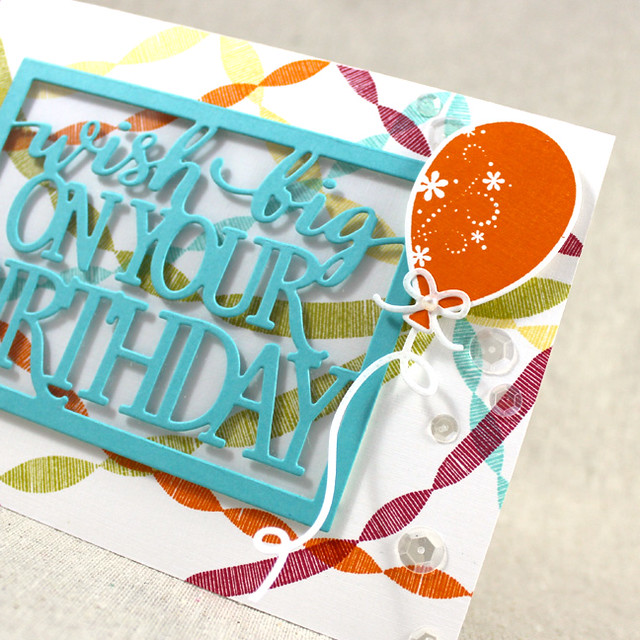
I started this card by adhering one of the sheets of patterned paper to a white card base. There are three color variations in this paper collection, so you'll have an option for just about anyone! Next, I die cut the Cover Plate: Balloon Bash from vellum and heat embossed it with one of the sentiments from Hooray. I wanted to add a touch of sparkle, so I dragged the edges of my vellum panel through a little glue and then sprinkled on iridescent glitter. The result is absolutely fabulous!

Time To Celebrate Close Up

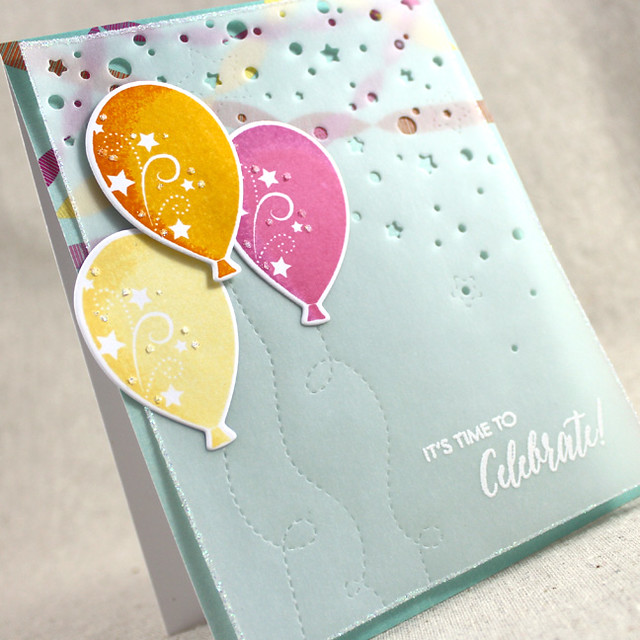
Next, I die cut a few of the Balloon Bash balloons and rock 'n roll stamped them with colors that coordinate with the patterned paper (Harvest Gold/Lemon Tart, Raspberry Fizz/Hibiscus Burst, Orange Zest/Summer Sunrise). This Cover Plate has star details that coordinate with the stars from Balloon Bash, so I used the star balloons here, but any of the designs would pair beautifully. I adhered the balloons to the vellum using flat and foam adhesives and then used the covered areas to hide the adhesive attaching it to the card front. I like how the vellum layer flutters a bit around the edges. I finished the card with a few glitter embellishments on the balloons to tie the whole thing together. It's certainly celebratory, no?

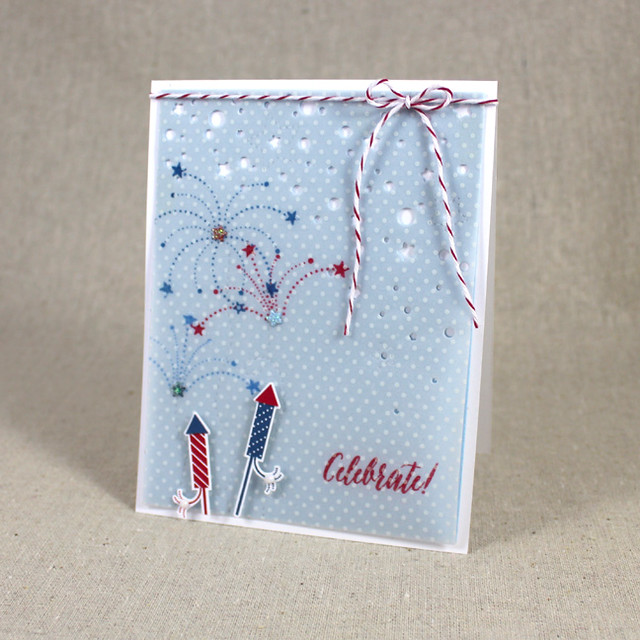
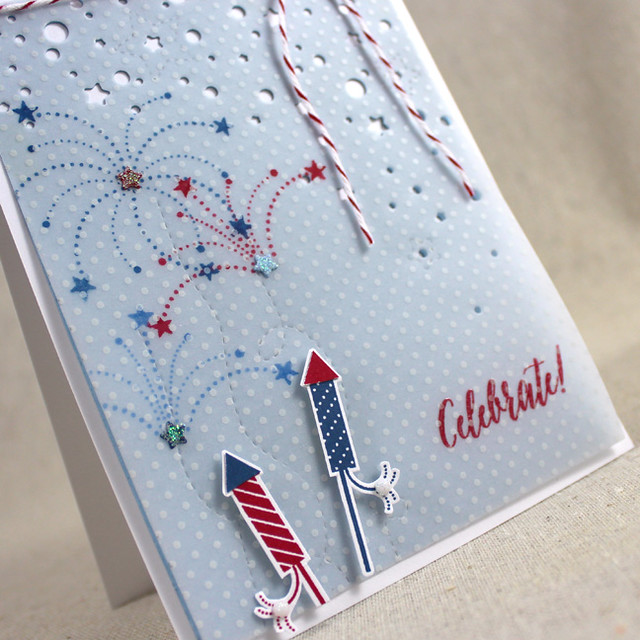
I have one last card for you today. This one uses one of the other papers along with Hooray Stamp Set and the Balloon Strings Die.

New Age Card

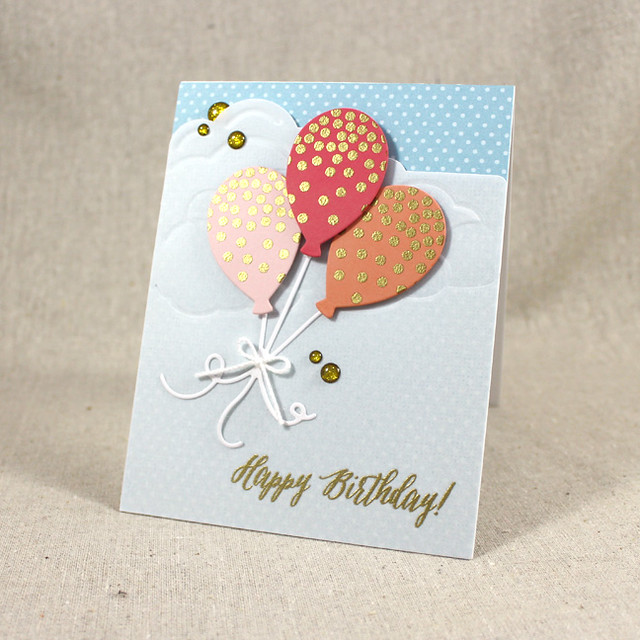
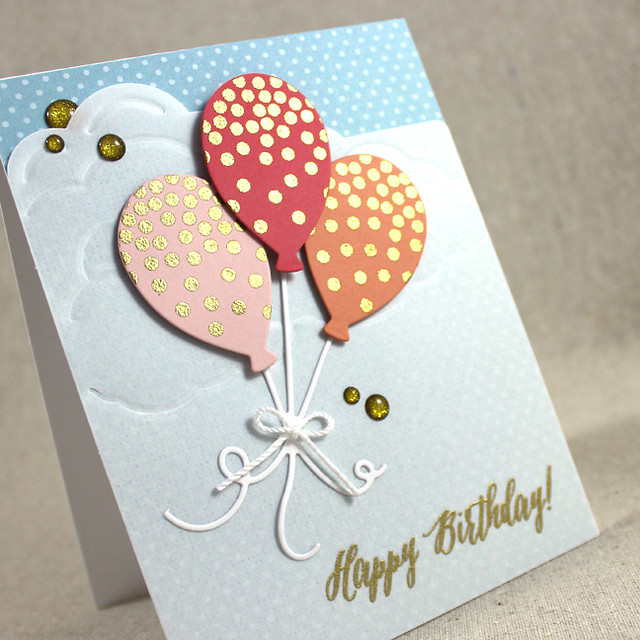
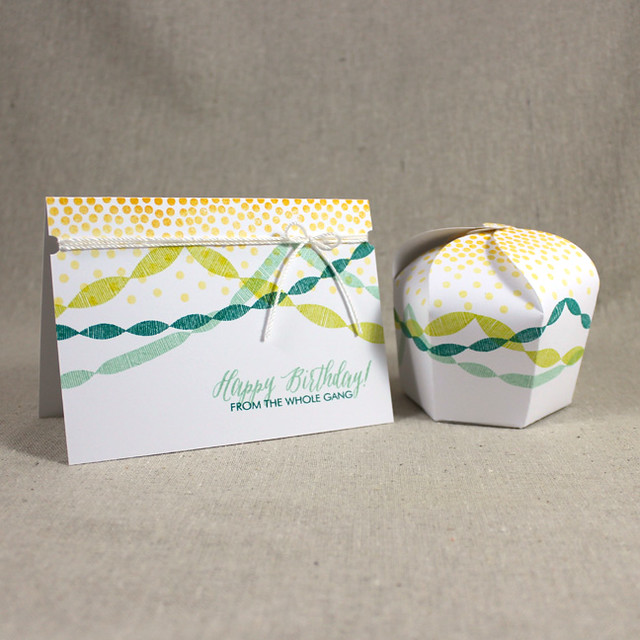
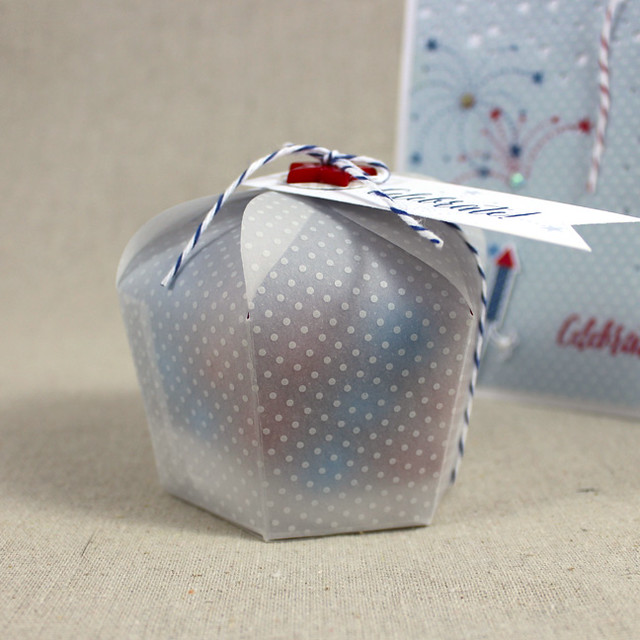
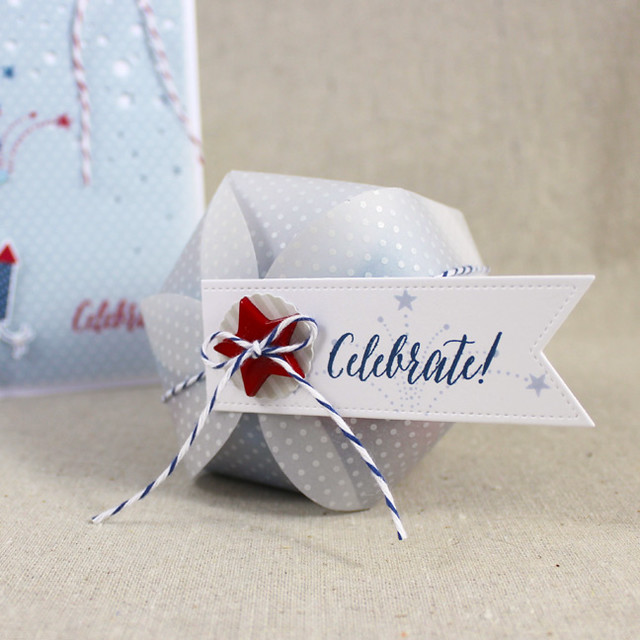
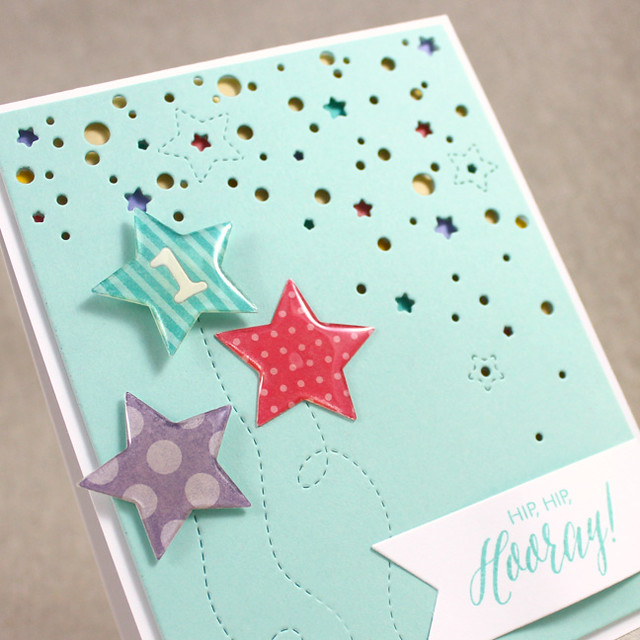
I began by stamping an Aqua Mist card front with Polka Dot Basics in Fresh Snow ink. Then, I die cut the patterned paper using the Tipped Tops die. I heat embossed my sentiment onto those two pieces and adhered the streamer panel to the card front with foam tape. Next, I stamped a few colored cardstocks with patterns from Bitty Background Blocks II and xyroned them, patterned side down. I die cut those pieces of cardstock using the Birthday Style die and then exposed the adhesive to glitter the entire face of each balloon. That toned down the patterns and made them much more subtle (if something completely covered in glitter can be considered subtle).

New Age Close Up

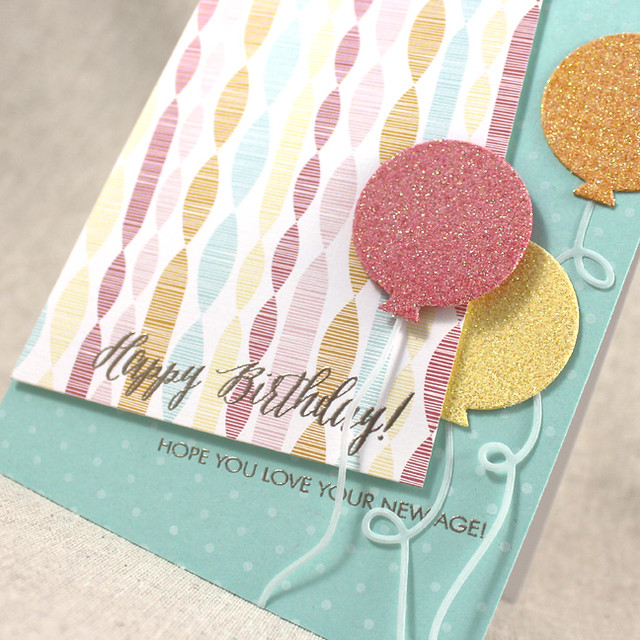
I arranged the balloons on the card front, tucking one of them under the patterned paper panel. I adhered the vellum balloon strings just to the underside of the balloons, so they're light and loose on the card front. It's a very girly card with a fun message. Every time I hear someone my age or younger complain about their age, it makes me roll my eyes. Let's all embrace our ages!

That's all for me today, friends! Check back in tomorrow to see more of this month's new products. In the meantime, Nichole, Betsy, Dawn, Heather, Maile, Melissa, Erin and Lexi all have projects to share with you today. See you soon!

Recipes:
Wish Big Card
Stamps: Hooray (available June 15th), Balloon Bash - Papertrey Ink
Cardstock: Fresh Snow Linen, Hawaiian Shores, Clear Cardstock, Linen Vellum - Papertrey Ink
Ink: Pure Poppy, Hawaiian Shores, Simply Chartreuse, Harvest Gold, Orange Zest - Papertrey Ink
Other: Text Block: Horizontal Birthday (available June 15th), Balloon Strings Die (available June 15th), Balloon Bash Die - Papertrey Ink; Foam Tape - Scotch; Self-adhesive Pearl - Mark Richards; Clear Sequins; Xyron

Time To Celebrate Card
Stamps: Hooray (available June 15th), Balloon Bash - Papertrey Ink
Cardstock: Vellum, Hooray Patterned Paper Collection (available June 15th) - Papertrey Ink; white
Ink: Harvest Gold, Lemon Tart, Raspberry Fizz, Hibiscus Burst, Orange Zest, Summer Sunrise - Papertrey Ink; VesaMark - Tsukineko
Other: Cover Plate: Balloon Bash (available June 15th), Balloon Bash Die - Papertrey Ink; White Detail Embossing Powder - Filigree; Sugar Cube Fine Glitter - Martha Stewart Crafts; Foam Tape - Scotch; Glue Pen

New Age Card
Stamps: Hooray (available June 15th), Bitty Background Blocks II, Polka Dot Basics - Papertrey Ink
Cardstock: Hooray Patterned Paper Collection (available June 15th), Aqua Mist, Vellum, Berry Sorbet, Lemon Tart, Summer Sunrise - Papertrey Ink; white
Ink: Fresh Snow, Berry Sorbet, Lemon Tart, Summer Sunrise - Papertrey Ink; VersaMark - Tsukineko
Other: Balloon Strings Die (available June 15th), Birthday Style Die, Tipped Tops Die - Papertrey Ink; Sugar Cube Fine Glitter - Martha Stewart Crafts; Foam Tape - Scotch; Liquid Platinum Embossing Powder - Ranger; xyron

Monday, June 8, 2015

June Sneak Peek

Good morning, friends! I'm just popping in here quickly to share a sneak peek of a set I have coming out this month. If you love party streamers, you're sure to get a kick out of this set!


Just a couple of days and I'll get to share. See you then!

Monday, June 1, 2015

June Color Play

Good morning, friends! Welcome to this month's Papertrey Ink Color Play feature. This month we're gathering our inspiration from The Hungry Australian in the form of this fruit decorated sponge cake:


Can you believe those gorgeous berries? I can't be the only one inspired to bake right now, right? I don’t know about you, but I get such inspiration from fresh produce. When I saw this beautiful cake, with its glorious, fruity decoration, I knew immediately that it would make a wonderful Color Play prompt. Those berries and tiny flowers had me in the mood for summertime creating. I decided to embrace that feeling.

Fun In The Sun Card 2


I began today's card by making my "beach towel." I die cut a piece of Fresh Snow linen cardstock with one of the Stitched Rectangles dies and stamped it with variable line images from Background Basics: Super Stripes and the Plaid Builder stamp sets. I trimmed off the holes on the sides and added embroidery floss fringe on one end before setting that piece aside.

Next, I stamped a Classic Kraft card base with sentiment images from Get Lost. I began with the Scarlet Jewel focal sentiment and then filled in around it with the other sentiments in watermark ink. Then, I textured my card front with the Linen & Canvas impression plate to make it look a bit sandy. I adhered my towel to the card base and trimmed off the overhang.

Fun In The Sun Card


Next, I die cut the sandals from Flipping Out and stamped them with the heart print flip flops in Scarlet Jewel ink. I die cut the straps from Enchanted Evening and adhered them to the sandals. I adhered the sandals to the card front with a mix of flat and foam adhesives to give them a bit of dimension. Such a fun, summertime card.

Thank you so much for joining me today! I hope you'll give this month's Color Play palette a spin for yourself. Have a great week and I'll see you again soon!

Recipe:
Stamps: Flipping Out, Get Lost, Plaid Builder, Background Basics: Super Stripes - Papertrey Ink
Cardstock: Fresh Snow Linen, Classic Kraft, Enchanted Evening - Papertrey Ink
Ink: Scarlet Jewel, Enchanted Evening, Pure Poppy, New Leaf - Papertrey Ink; VersaMark - Tsukineko
Other: Flipping Out Die, Stitched Rectangles Die, Linen & Canvas Impression Plate - Papertrey Ink; Foam Tape - Scotch; Embroidery Floss - DMC