Thursday, July 14, 2016

Wanderlust Inspirations

Good morning, friends! It's Day 5 of the Papertrey Ink July Countdown and today we're sharing new products from Heather and Betsy that you can use for all of your memory keeping needs. I love to travel and at the end of my journeys I always have little odds and ends to complement my memories. This new travel collection that Heather has designed is perfect for creating mini books to keep both safely in one place. And the super cute map mini set that Betsy has created is such a charming complement! Let's get on to some projects, shall we?

Wanderlust Inspirations Projects

Let's begin by taking a look at Heather's Travelers' Journal collection.

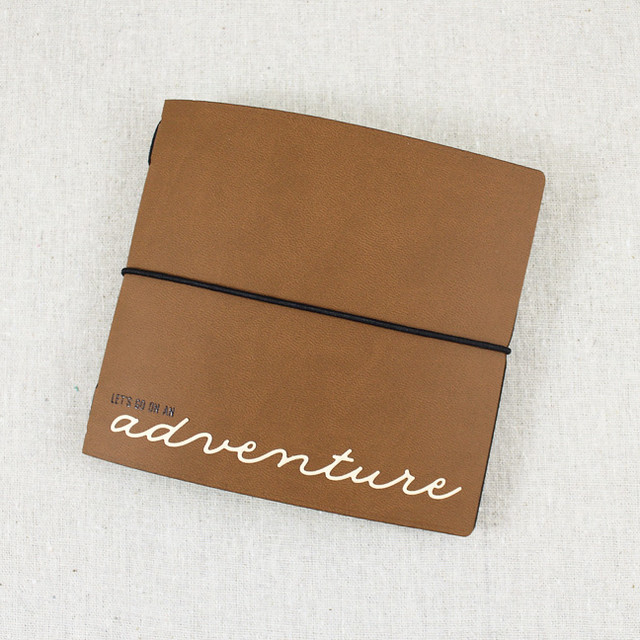
Adventure Journal Outer Cover

I created the outer cover for my little book with faux leather designer paper. The paper is a little on the thin side, so I lined the inside with cardstock and it looks like a mini journal you might pick up in a boutique. I love it!

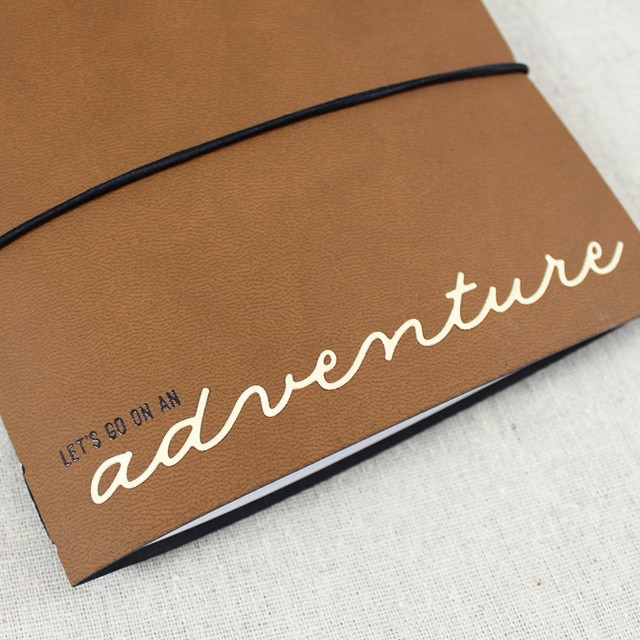
Adventure Journal Outer Cover Close Up

I embellished the cover with a bit of heat embossing and wood veneer paper. The sentiment is from the new Traveler's Journal: Adventure and the die cut word is part of the Traveler's Journal: Outer Cover Die. I used black Traveler's Journal Elastic Cord to bind the cover and create a closure.

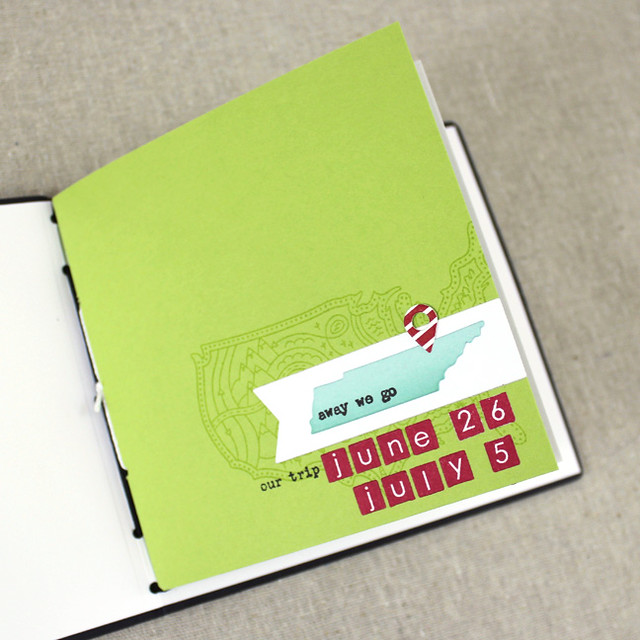
Tennessee Vacation Mini Book Cover

Inside the cover is a mini book I put together about a recent trip to Tennessee. I created a cover for the mini book from Green Parakeet cardstock. I stamped the cover with the What The Doodle: Map image and layered on a Number The Stars Banner shape as a base for a die cut Tennessee. I added the dates of the trip with Type Strips letters and numbers. The sentiments are from Traveler's Journal: Typed Notes set. I filled the cover with handy, pre-cut Traveler's Journal Pages. I'm still working on the book, but I have a few spreads to share with you.

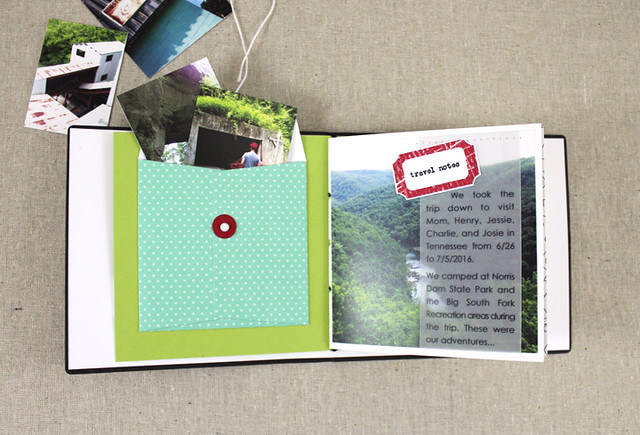
Opening Spread

Inside the front cover I have a Traveler's Journal Envelope. It's the perfect size for hanging onto small, flat trinkets from trips (like ticket stubs) or photos yet-to-be added to the book. The first page features a single large photo and some journaling I printed onto vellum. The ticket embellishment is from Traveler's Journal: Adventure and the sentiment is from Traveler's Journal: Typed Notes.

Museum & Gristmill Spread

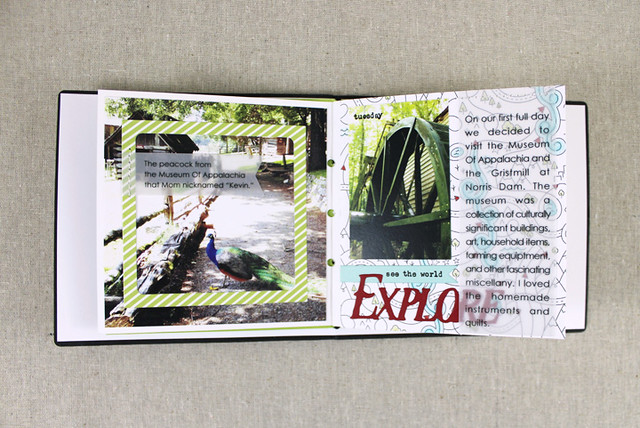
On the next spread I have a photo that I've framed with the square from the Traveler's Journal: Outer Cover Die. I printed, die cut, and stitched on the caption before adhering the frame into place. On the next page I colored a piece of What The Doodle: Map patterned paper and used it for my background. I added more journaling on vellum along with a photo and die cut sentiment. I chose to keep my coloring spare so it wouldn't compete with the photos too much.

Scenic Railway Spread

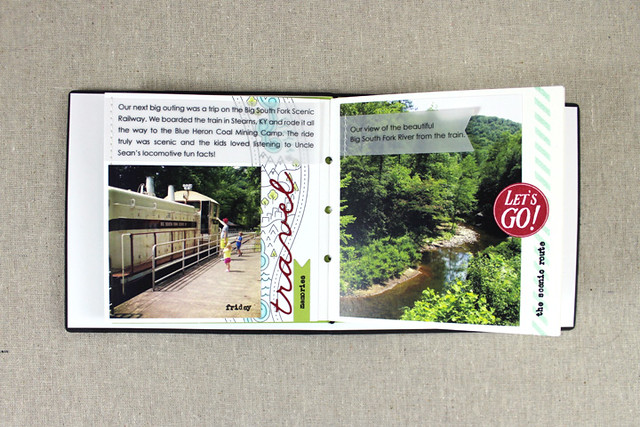
The next spread has more colored What The Doodle paper and another die cut sentiment from the Traveler's Journal: Outer Cover Die. The small, typed sentiments on the first page are from the Traveler's Journal: Typed Notes set. On the next page I used images from Traveler's Journal: Adventure to embellish my photo. I have stitched vellum journaling on both pages.

I'm not much of a scrapbooker, so my layouts are fairly simple. But that's what's so great about this collection that Heather has designed. Even if you don't do much scrapbooking, she makes it a snap!

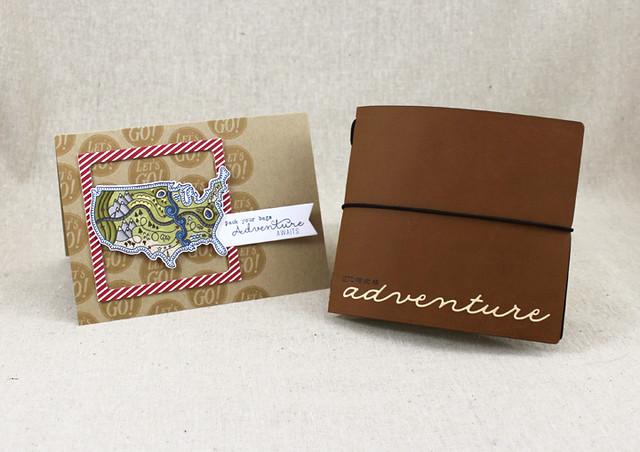
Next up, I have a card using What The Doodle: Map and Traveler's Journal: Adventure.

Adventure Awaits Card

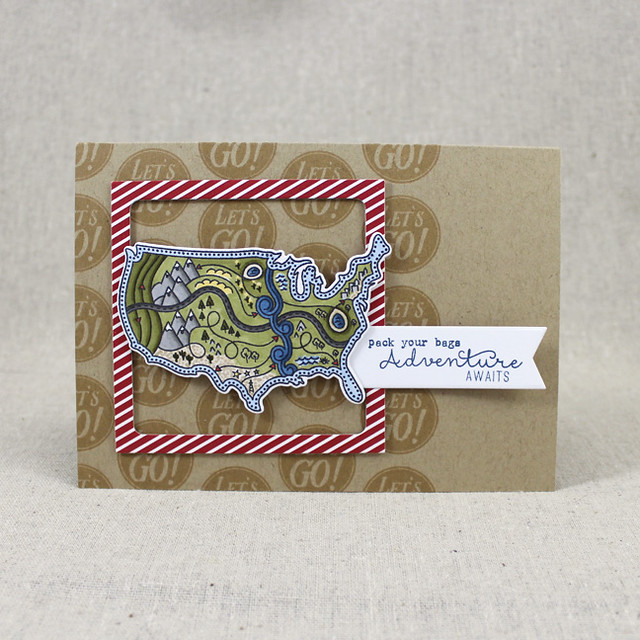
I started by stamping the What The Doodle: Map image and coloring it with Copic markers. I love all of the little details in this image! I die cut the map and embellished with a bit of Clear Spica pen on the waterways and snowcaps. Next, I die cut a frame from Pure Poppy + White patterned paper and adhered it to a Classic Kraft card base that I stamped with one of the circular sentiment images from Traveler's Journal: Adventure.

Adventure Awaits Close Up

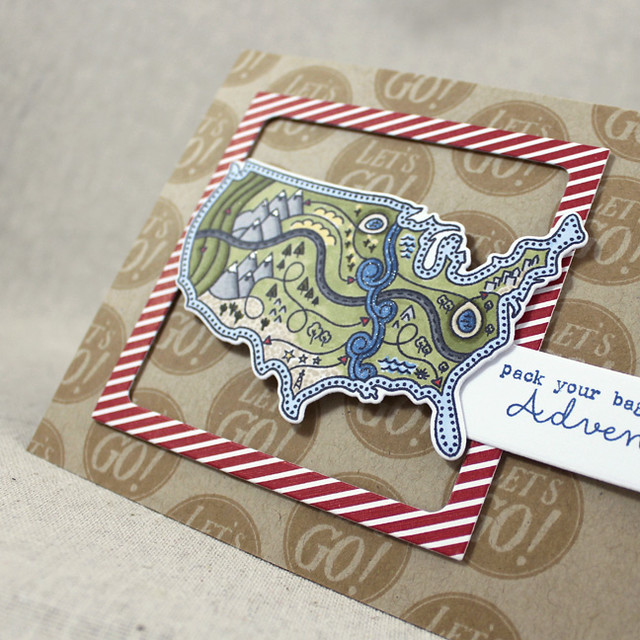
I added my map to the center of the frame with foam tape. I die cut a white banner using the new Number The Stars Banner Die and stamped it with sentiments from Traveler's Journal: Adventure and What The Doodle: Map before tucking it in there next to Florida. Cute! I can't wait to use this card to invite my husband on an adventure.

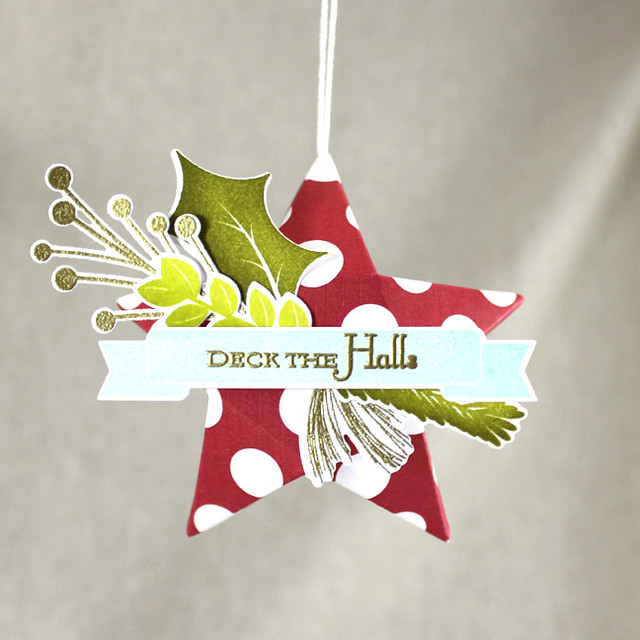
Finally this morning, I have one more Favor It: Star Box project to share. I thought this box would make a great holiday ornament and I'm happy to report that it works beautifully.

Star Christmas Ornament

I began by die cutting the box from Pure Poppy + White patterned paper and assembling largely as normal. The only difference is that I pulled a loop of white crochet thread through the top point before sealing it up tight.

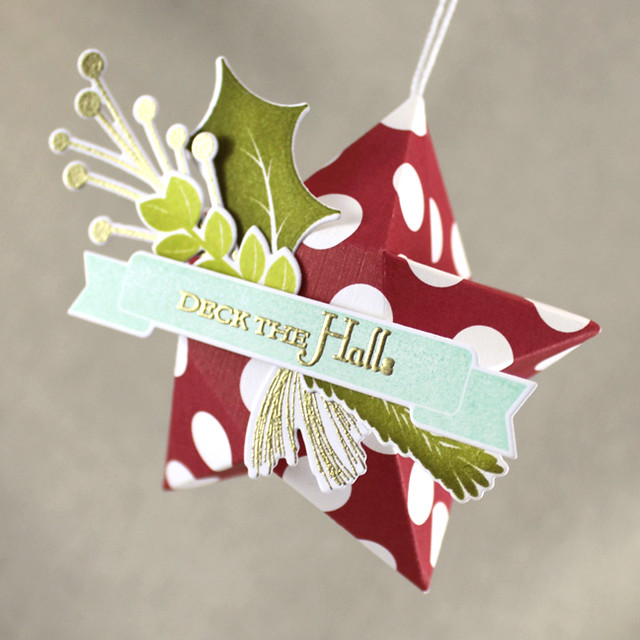
Star Christmas Ornament Side

I embellished the box with greenery from Spruce & Sprigs, a banner from Bountiful Banners, and a sentiment from Holiday Lights. I used sponging to give the greenery depth and gold embossing to add a bit of shine.

Well, that's all for me today. Thank you so much for joining me! Make sure to pop over and visit Nichole, Amy, Ashley, Betsy, Danielle, Dawn, Heather, Kay, Laurie, and Melissa to see more of this month's release. Erin and Maile are also sharing a few more peeks, so make sure to visit them, too! See you tomorrow for this month's release wrap-up!

Recipes:
Let's Go On An Adventure Mini Book
Stamps: Traveler's Journal: Typed Notes, Traveler's Journal: Adventure, What The Doodle: Map, Type Strips - Papertrey Ink
Cardstock: Green Parakeet, Pure Poppy, Aqua Mist, Green Parakeet + White Patterned Paper, Pure Poppy + White Patterned Paper, Aqua Mist Bitty Dot Patterned Paper, What The Doodle: Map Coloring Sheets, Vellum Cardstock, Traveler's Journal Pages - Papertrey Ink; white; Wood Veneer Paper - Creative Imaginations; Faux Leather Paper - Recollections
Ink: Pure Poppy, Aqua Mist, Green Parakeet, True Black - Papertrey Ink
Other: Traveler's Journal: Outer Cover Die, Traveler's Journal Envelope Die, Traveler's Journal Elastic Cord, Type Strips Die, Number The Stars Banner Die, Tag Sale #10 - Papertrey Ink; White Brads - American Crafts; Xyron

Adventure Awaits Card
Stamps: What The Doodle: Map, Traveler's Journal: Adventure - Papertrey Ink
Cardstock: Classic Kraft, Pure Poppy + White Patterned Paper - Papertrey Ink; white
Ink: Classic Kraft, Enchanted Evening - Papertrey Ink; Tuxedo Black - Memento
Other: Traveler's Journal: Outer Cover Die, Number The Stars Banner Die, What The Doodle: Map Die - Papertrey Ink; Clear Spica Pen - Zig; Foam Tape - Scotch; Copic Markers

Star Holiday Ornament
Stamps: Spruce & Sprigs, Bountiful Banners, Holiday Lights - Papertrey Ink
Cardstock: Pure Poppy + White Patterned Paper - Papertrey Ink; white
Ink: Ripe Avocado, Simply Chartreuse, Limeade Ice, Aqua Mist - Papertrey Ink; VersaMark - Tsukineko
Other: Favor It: Star Box Die, Spruce & Sprigs Die, Bountiful Banners Die - Papertrey Ink; Gold Embossing Powder - Filigree; Foam Tape - Scotch; Crochet Thread; Scor Tape

Wednesday, July 13, 2016

Summertime Inspirations

Good morning, everyone, and welcome back to Day 4 of the Papertrey Ink July Countdown! Today is group post number two and today is all about the tropics.

Summertime Inspirations Cards

The tropics are totally on trend right now so the new sets we're introducing today couldn't be more in vogue! But in customary Papertrey style, these images are classic and clever and sure to be fresh for many years to come. Let's look at these projects in a little more detail, shall we?

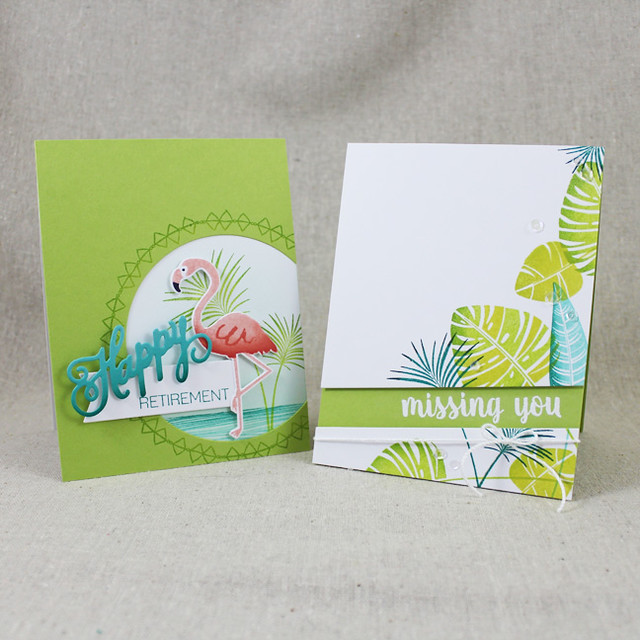
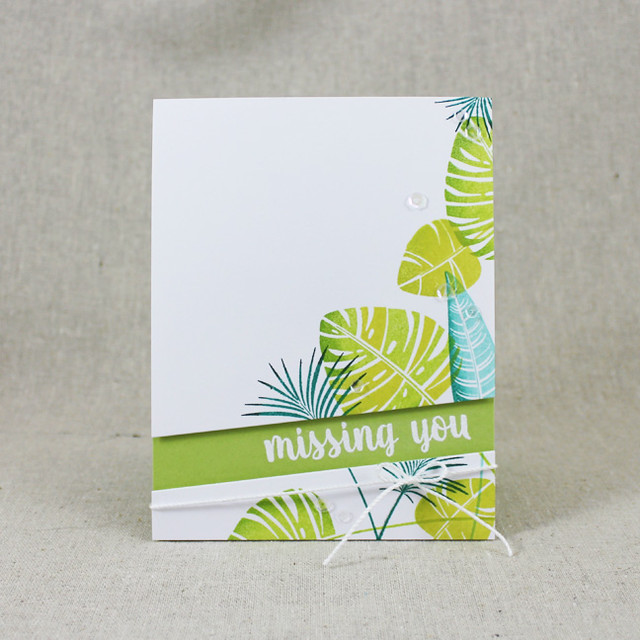
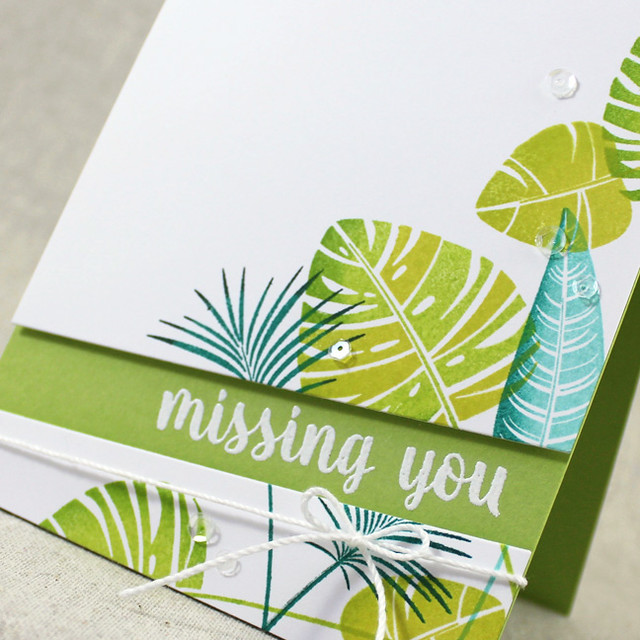
I began with this Missing You card using Maile's new Tropics set. I couldn't wait to try some sponging techniques on those leaves!

Missing You Card

I started by stamping the leaves onto a white cardstock panel using Green Parakeet, New Leaf, Limeade Ice, Hawaiian Shores, Tropical Teal, and Pinefeather inks. I blended the colors on the stamps before making my impression in order to get varying levels of depth. Then I used the Sentiment Splits: Angle Vertical die to cut the panel into two pieces.

Missing You Close Up

I heat embossed a sentiment from Keep It Simple: Missing You onto a Green Parakeet card base in the void between the two pieces. Then I attached the leafy pieces to the card base with foam tape and embellished with a crochet thread bow and some sequins from the Rainbows & Sprinkles Make It Market Kit. Nice and simple!

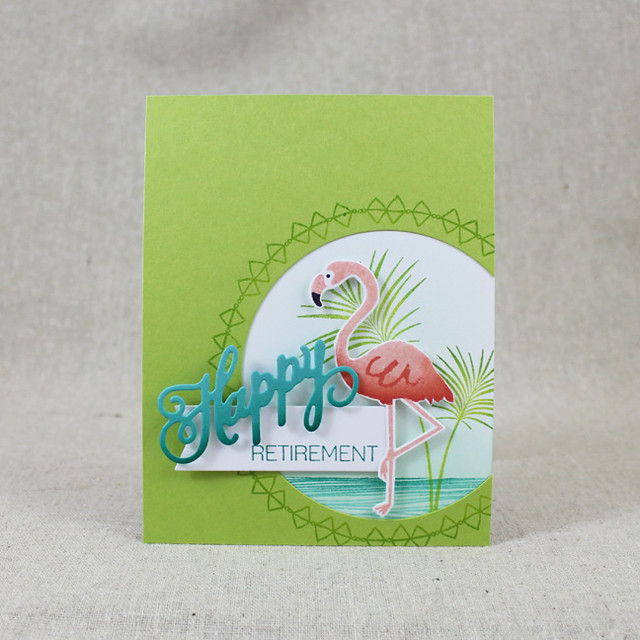
Next up is the retirement card that I created by pairing Tropics with Nichole's Some Like It Hot set.

Happy Retirement Card

I began by stamping and die cutting the flamingo. I used Pale Peony, Berry Sorbet, and just a touch of Pure Poppy to achieve his color. I set him aside while I worked on the card base. First, I die cut a circle from Green Parakeet cardstock and used that as a template. Then, I created the little ocean scene by sponging some Aqua Mist ink onto a white card base before stamping my palms into place. The water was created by sponging Hawaiian Shores and Tropical Teal inks onto a Background Basics: Woodgrain strip.

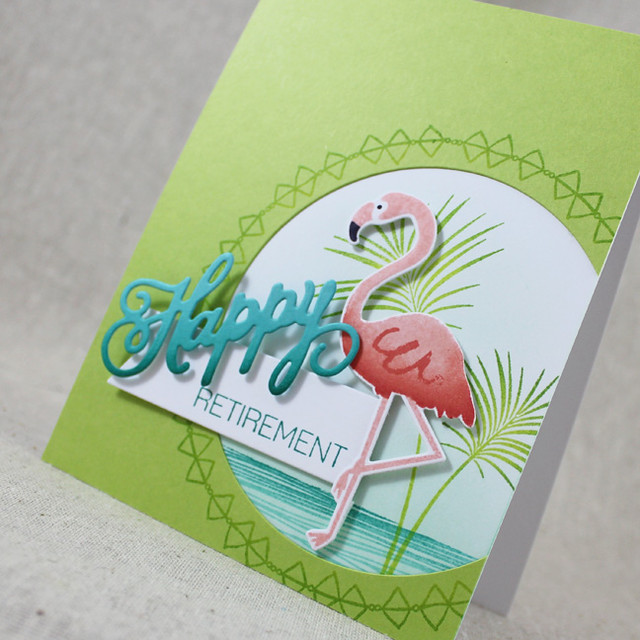
Happy Retirement Close Up

I stamped the tribal sketch image around the circumference of the die cut circle before adhering that panel into place. I mounted my flamingo into place with foam tape before tucking in a Number The Stars Banner shape that I'd stamped with a sentiment from Just A Number. I also attached a "happy" that I'd die cut from Hawaiian Shores cardstock sponged with Tropical Teal ink. I love how this one came together!

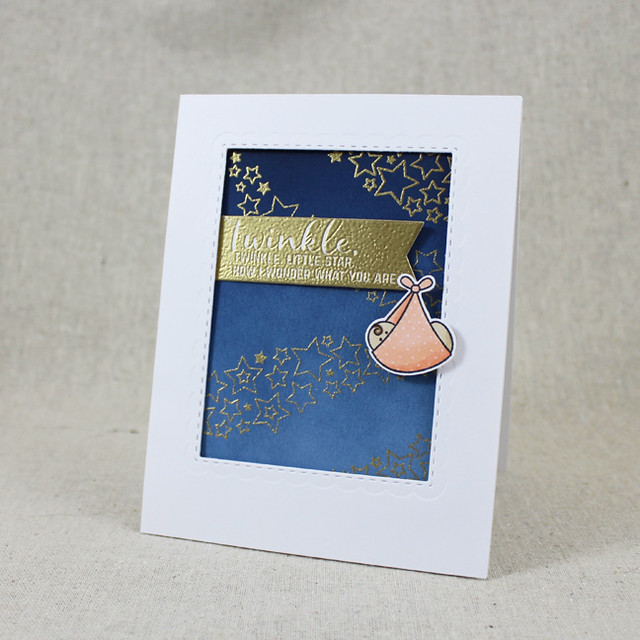
Finally today I have one more card for you featuring Number The Stars and Background Basics: Galaxy.

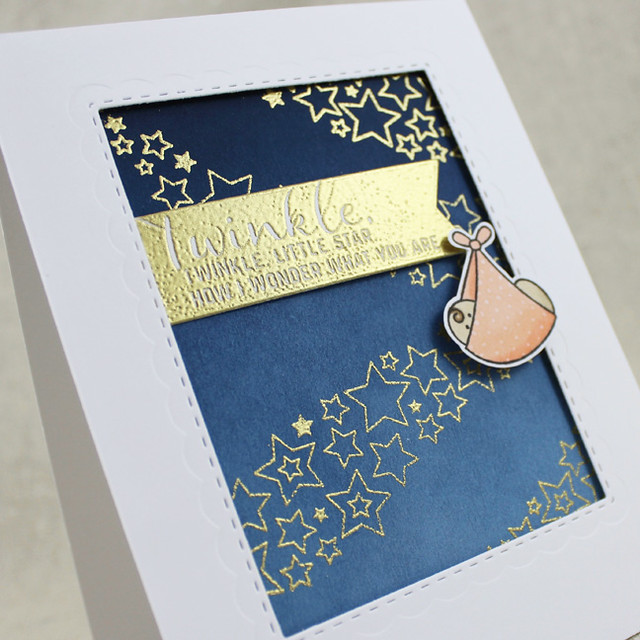
Twinkle, Twinkle Card

I started by sponging Enchanted Evening ink onto a piece of Spring Rain cardstock. Once that was completely dry, I heat embossed the outline stars from Background Basics: Galaxy using gold powder. Next, I cut a slightly offset frame of white cardstock using one of the Double Ups: Rectangle dies.

Twinkle, Twinkle Close Up

I adhered both to a white card base, tucking a gold embossed sentiment banner in there, too. Next, I stamped the baby from Bundle Of Love onto a scrap of white cardstock and colored her with Copic markers. I trimmed her out and added her to the tip of the sentiment banner with foam adhesive. Nice and simple!

Well, that's all for me today, friends. Thank you for joining me! I'll be back tomorrow with a few more projects, but in the meantime, make sure to check in with  Nichole, Amy, Ashley, Betsy, Danielle, Dawn, Heather, Kay, Laurie, and Melissa to see more of this month's release. Erin and Maile are also sharing a few more peeks, so make sure to visit them, too! See you tomorrow!

Recipes:
Missing You Card
Stamps: Tropics, Keep It Simple: Missing You - Papertrey Ink
Cardstock: Green Parakeet - Papertrey Ink; white
Ink: Green Parakeet, New Leaf, Limeade Ice, Hawaiian Shores, Tropical Teal, Pinefeather - Papertrey Ink; VersaMark - Tsukineko
Other: Sentiment Splits: Angle Vertical Die, Rainbows & Sunshine Kit Sequins - Papertrey Ink; White Embossing Powder - Filigree; Foam Tape - Scotch; Crochet Thread

Happy Retirement Card
Stamps: Some Like It Hot, Tropics, Background Basics: Woodgrain, Just A Number - Papertrey Ink
Cardstock: Green Parakeet, Hawaiian Shores - Papertrey Ink; white
Ink: Pale Peony, Berry Sorbet, Pure Poppy, Green Parakeet, New Leaf, Hawaiian Shores, Tropical Teal, True Black - Papertrey Ink
Other: Some Like It Hot Die, Number The Stars Banner Die, Just A Number Die - Papertrey Ink; Foam Tape - Scotch

Twinkle, Twinkle Card
Stamps: Number The Stars, Background Basics: Galaxy, Bundle Of Love - Papertrey Ink
Cardstock: Spring Rain - Papertrey Ink; white
Ink: Enchanted Evening - Papertrey Ink; Tuxedo Black - Memento; VersaMark - Tsukineko
Other: Number The Stars Banner Die, Double Ups: Rectangle Die - Papertrey Ink; Gold Embossing Powder - Filigree; Foam Tape - Scotch

Tuesday, July 12, 2016

Sweet Inspirations

Good morning, friends, and welcome back for Day 3 of the Papertrey Ink July countdown! Today is a group post and, boy!, do we have a treat for you! Do you have a sweet tooth? I sure do! And it doesn't get much sweeter than these new products! Betsy and Erin have truly outdone themselves creating stamps and dies that you're simply going to crave! Let's get to it!

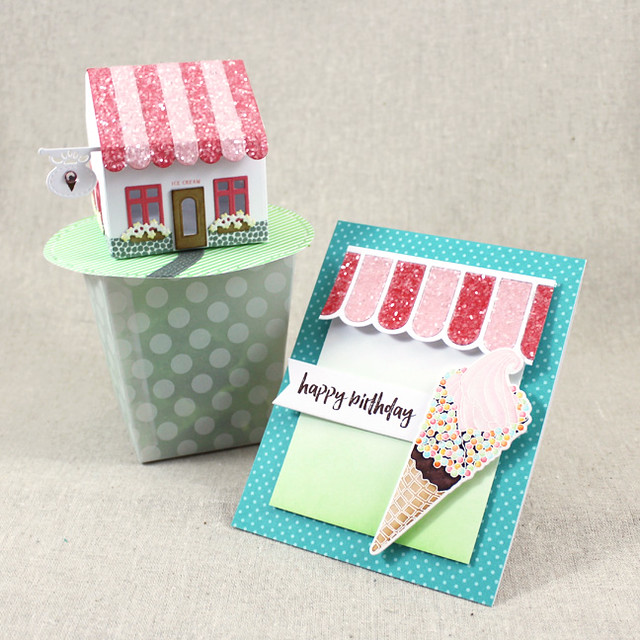
Ice Cream Birthday Ensemble

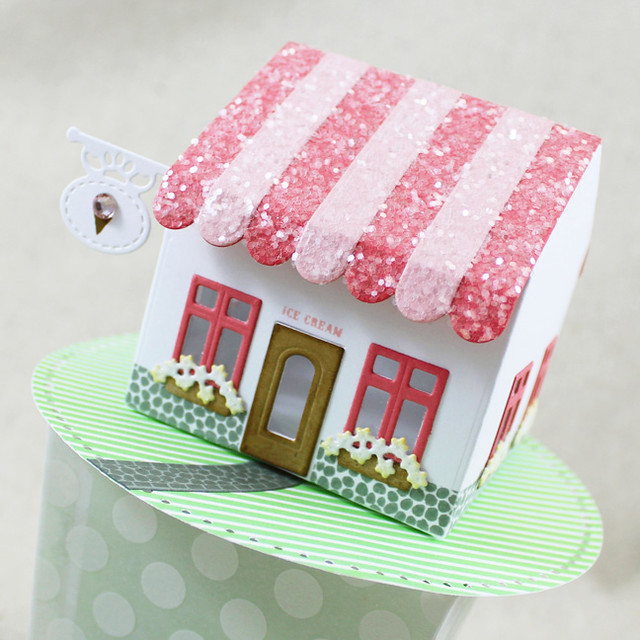
I wanted to create a birthday ensemble for an ice cream lover. Not everyone goes crazy for cake (it's hard for me to believe, but it's true), so I used the new Tiny Town: Sweet Shoppe and Colorful Treats set to make this coordinating card and gift box. Isn't that little ice cream parlor just the cutest?!

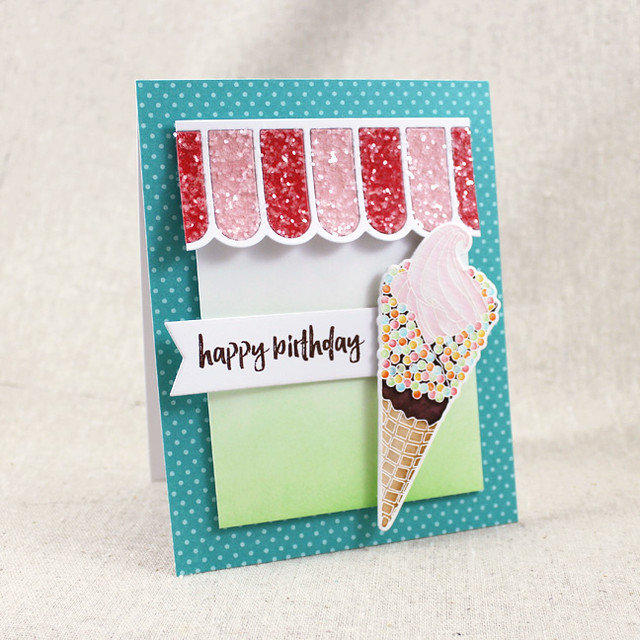
Ice Cream Birthday Card

I began with the card. I heat embossed the ice cream cone onto watercolor paper with white powder and colored it with Zig Clean Color pens. I embellished the sprinkles with a Clear Spica pen to give them a bit of sparkle before setting the cone aside. Next, I trimmed a panel of white cardstock and sponged it with Vintage Jadeite ink. I then added a glittery, die cut awning that I created using the new Cover Plate: Awning. I mounted that panel with foam tape to a card front that I'd already covered with Hawaiian Shores Bitty Dot paper.

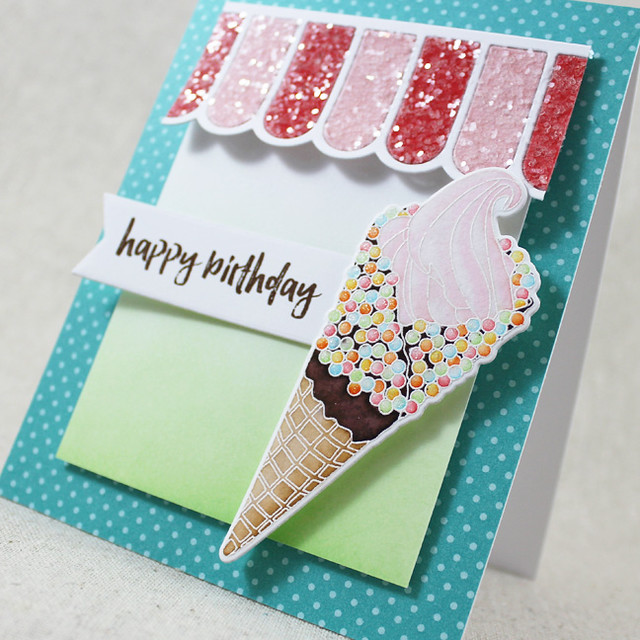
Ice Cream Birthday Close Up

Next, I die cut a Number The Stars banner and stamped it with the birthday sentiment from Colorful Treats. I then added the ice cream cone and the sentiment banner to the card front with a mix of flat and foam adhesives.

Ice Cream Birthday Card Interior

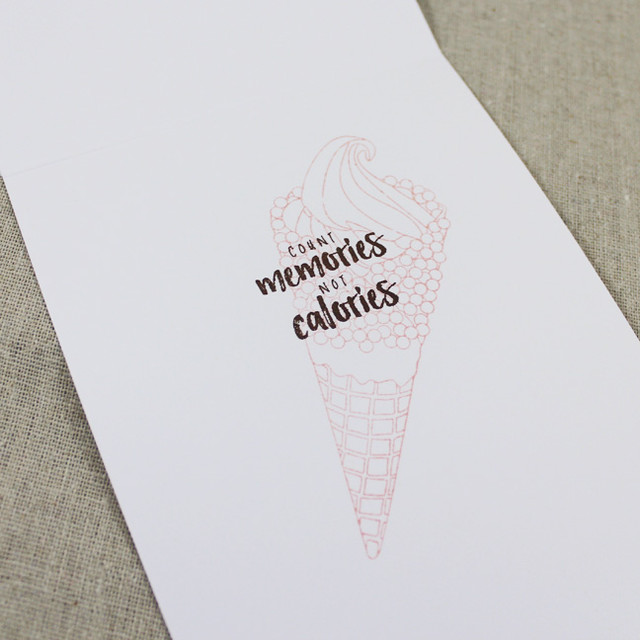
As a final touch, I stamped a cone and sentiment inside the card to dress things up a little.

Next, I created a gift box to coordinate with the birthday card.

Ice Cream Parlor Close Up

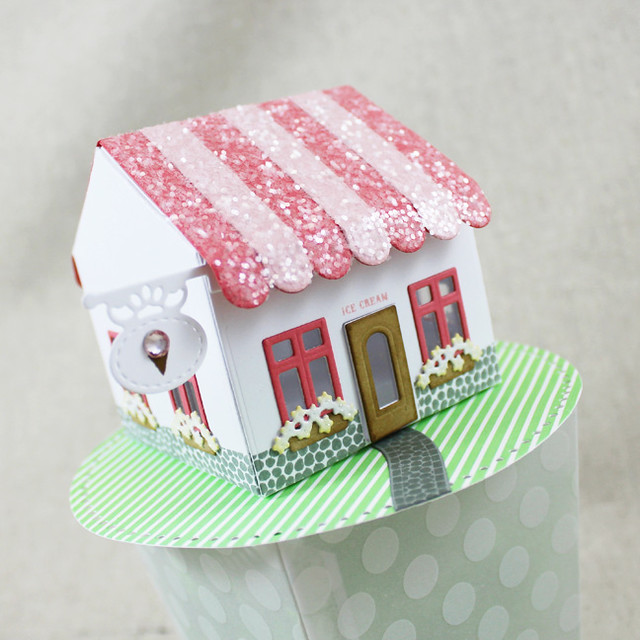
I began by die cutting the Popcorn Bucket die panels from Sheer Basics Polka Dot vellum. I trimmed about an inch from the top of each piece and assembled as normal before setting that aside. Next, I die cut the base of my ice cream parlor from white cardstock. I stamped a stone foundation around the bottom edge using the Petite Places: Walk In The Park mini set and added window frames, flower boxes, and a front door. The window boxes and front door are Kraft cardstock sponged with the new Cocoa Bean ink. The flowers are die cut from white and sponged with Harvest Gold and coated in fine glitter.

Ice Cream Parlor Side

I backed the windows with clear cardstock for a realistic appearance and stamped "ice cream" (from Petite Places: Sweet Shoppe) above the front door before folding up my little building. Next, I added glittered, striped awnings using Pale Peony and Berry Sorbet cardstocks. I created the sign by masking off and stamping the tip of a star in Cocoa Bean and topping it with a colored-to-match rhinestone.

Ice Cream Parlor Box Interior

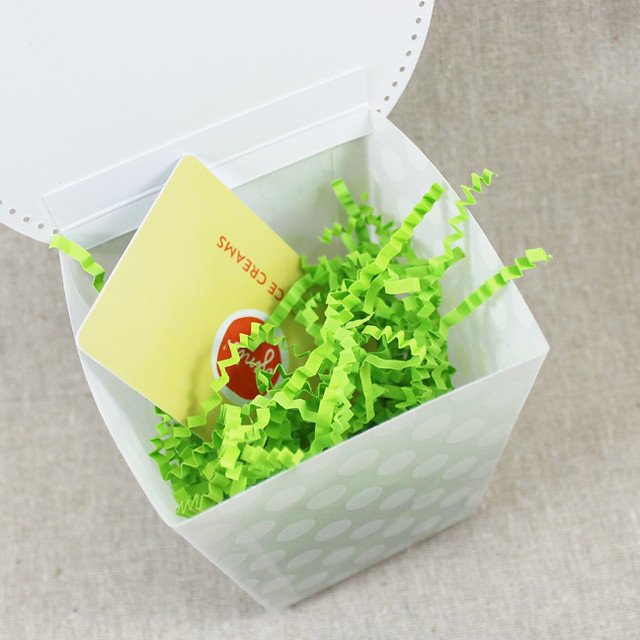
I die cut a circle base from Vintage Jadeite + White patterned paper and added it to the vellum box using a cardstock hinge. I added a stone walkway using Petite Places: Walk In The Park before adhering my ice cream parlor into place. I filled my little box with crinkle shred and tucked in a gift card to one of our favorite ice cream places. It just so happens that July is National Ice Cream Month, so this is a perfect gift for any July celebrant!

Speaking of birthdays, I also have a birthday card to share that I made by pairing Number The Stars with Wishes Come True.

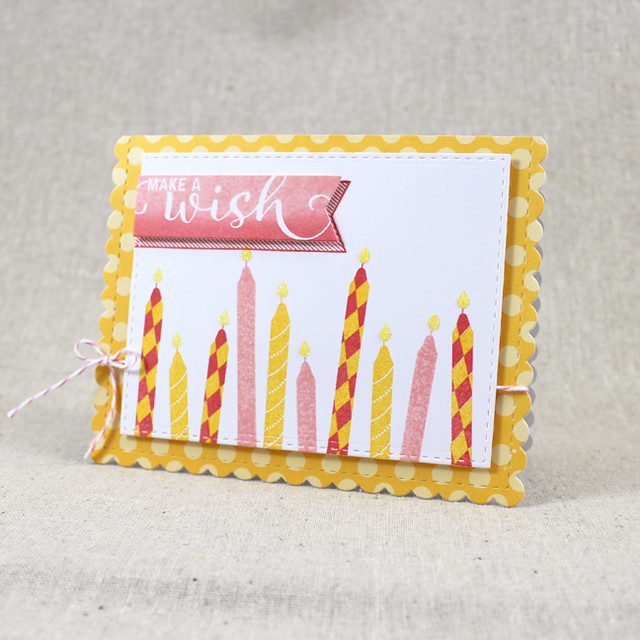
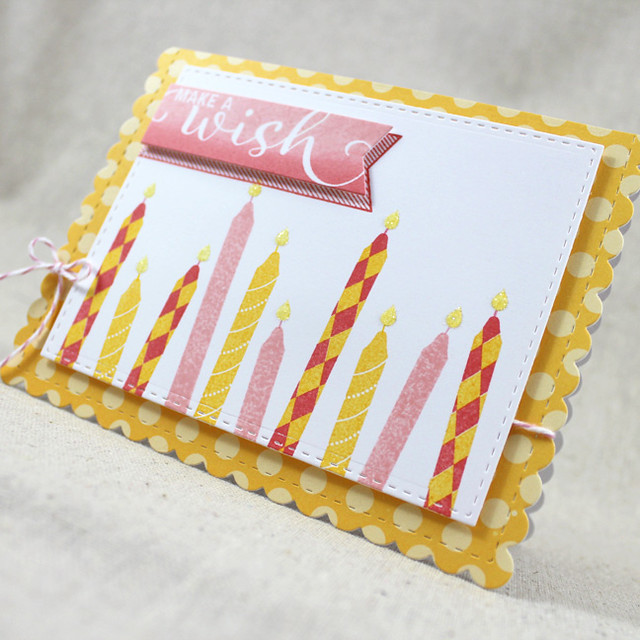
Make A Wish Card

I began by die cutting a panel from the Noted: Scalloped A2 Die Collection from white cardstock. I stamped it with candles and the striped banner image from Background Basics: Galaxy using a Berry Sorbet, Pale Peony, Summer Sunrise, and Harvest Gold combo. I stamped and die cut the sentiment banner from Number The Stars and added that atop the striped banner with foam tape.

Make A Wish Close Up

I then die cut a white card base using that same die collection. I also die cut a card front from Summer Sunrise polka dot paper and attached that to the white card front. I tied a baker's twine bow around the card base before mounting the candle panel with foam tape. As a final touch, I embellished the flames with fine crystal glitter. I love that sparkle!

Thank you so much for joining me today! I'll be back tomorrow with more of this month's release, but in the meantime make sure to  Nichole, Amy, Ashley, Betsy, Danielle, Dawn,Heather, Kay, Laurie, and Melissa to see more of these fabulous new products. Erin and Maile are also sharing a few more peeks, so make sure to visit them, too! See you tomorrow!

Recipes:
Ice Cream Birthday Card
Stamps: Colorful Treats - Papertrey Ink
Cardstock: Berry Sorbet, Pale Peony, Hawaiian Shores Bitty Dot Paper - Papertrey Ink; Watercolor Paper - Ranger; white
Ink: Vintage Jadeite, Dark Chocolate, Pale Peony - Papertrey Ink; VersaMark - Tsukineko
Other: Colorful Treats Die, Cover Plate: Awning - Papertrey Ink; Foam Tape - Scotch; Chunky Crystal Glitter - Martha Stewart Crafts; Clean Color Pens, Clear Spica Pen - Zig; White Embossing Powder - Filigree - Papertrey Ink

Ice Cream Parlor Gift Box
Stamps: Petite Places: Sweet Shoppe, Petite Places: Walk In The Park; Background Basics: Galaxy (ice cream cone) - Papertrey Ink
Cardstock: Berry Sorbet, Pale Peony, Vintage Jadeite + White Patterned Paper, Sheer Basics Vellum, Classic Kraft, Stormy Sea, Clear Cardstock - Papertrey Ink; white
Ink: Stormy Sea, Pale Peony, Cocoa Bean, Harvest Gold - Papertrey Ink
Other: Tiny Town: Sweet Shoppe Die Collection, Popcorn Bucket Die, Stitched Circles Die - Papertrey Ink; Rhinestone - KaiserCraft; Chunky Crystal Glitter, Fine Crystal Glitter - Martha Stewart Crafts; Scor Tape; Xyron; Copic; Crinkle Shred

Make A Wish Card
Stamps: Number The Stars, Background Basics: Galaxy, Wishes Come True - Papertrey Ink
Cardstock: Summer Sunrise Polka Dot Patterned Paper - Papertrey Ink; white
Ink: Pale Peony, Summer Sunrise, Berry Sorbet - Papertrey Ink
Other: Noted: Scalloped A2 Die Collection, Number The Stars Banner Die - Papertrey Ink; Baker's Twine - Divine Twine; Fine Crystal Glitter - Martha Stewart Crafts; Foam Tape - Scotch

Monday, July 11, 2016

Papertrey Ink July Countdown - Day 2

Good morning, all! Welcome back to Day 2 of the Papertrey Ink July Countdown! I'm so glad to hear that you're enjoying the starry goodness I have coming out this month. I can't wait to show you more so let's get to it!

Reaching For The Stars Ensemble

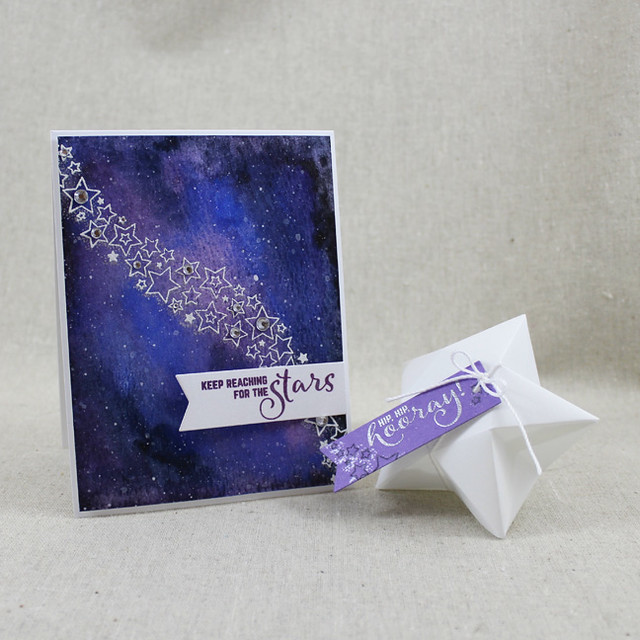
The open stars in the Background Basics: Galaxy set are ideal places for popping rhinestones or other sparkly embellishments. And who doesn't love a little watercolor now and again, eh?

Reaching For The Stars Card

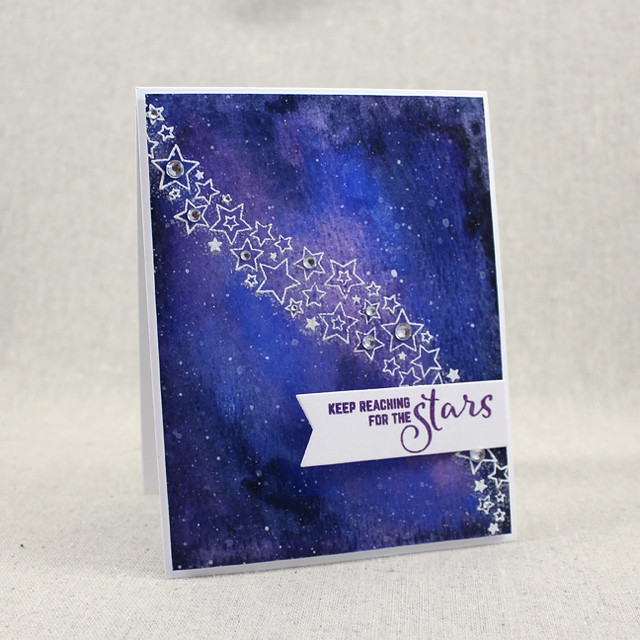
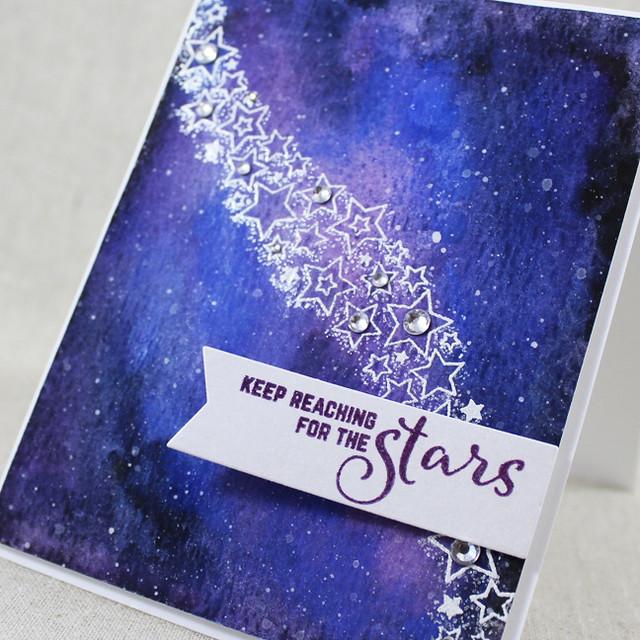
I began by watercoloring the night sky panel for my card. I layered blues, purple, pink, and black until I was satisfied with the result. I let it dry a couple of times and went back with more color to get the depth and tones that I wanted. Once that was completely dry, I went back and added speckles of white in varying concentrations. Once that was completely dry, I heat embossed my stars using white embossing powder. Then I added the stardust with watermark ink and embellished with Perfect Pearls. I love how it shimmers!

Reaching For The Stars Close Up

I mounted that panel to a white card base with plenty of foam tape and dropped in a sprinkling of clear rhinestones. I like the ones that Papertrey sells because you get three different sizes in one package and the variety is nice. Next, I stamped my sentiment (this one from Number The Stars) using Royal Velvet ink onto a banner that I'd cut from White Shimmer cardstock. The coating on the cardstock keeps the ink from soaking in, so I was able to heat emboss my message with clear powder. I attached the banner to the card front and curved it up a teensy bit before I called it complete.

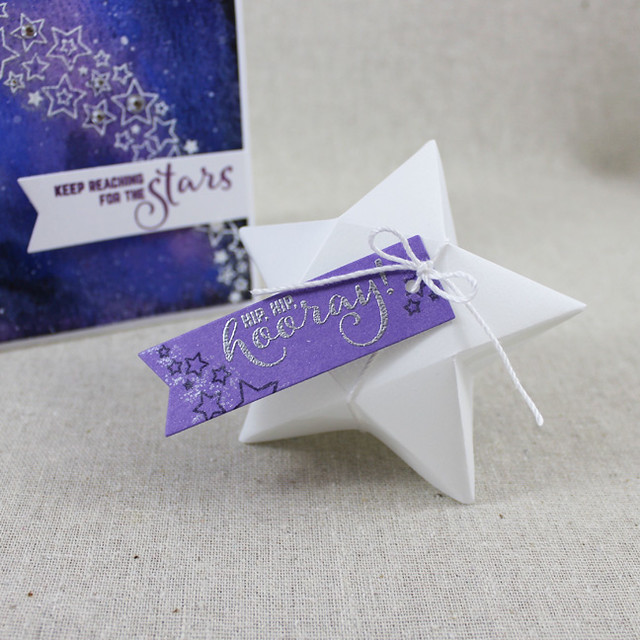
Hip, Hip, Hooray Box

The I created the coordinating box from Linen Vellum. It's sturdy, but also has a slightly transparent quality that I love. You can see step-by-step instructional photos on assembling this box on yesterday's post. I created the tag by heat embossing the sentiment (included in the background set) in silver onto an Amethyst Allure banner. I added BB: Galaxy stars in Royal Velvet and stardust with the same Perfect Pearls powder. Then, I punched a hole in the end of the banner and tied it to my star box with crochet thread. Easy and cute!

Thank you so much for joining me today. Make sure to check in with Nichole, Betsy, Danielle, Dawn, Heather, Melissa, Erin, and Maile for more of this month's release. Have a wonderful day, everyone!

Recipe:
Reaching For The Stars Ensemble
Stamps: Number The Stars, Background Basics: Galaxy - Papertrey Ink
Cardstock: White Shimmer, Linen Vellum, Amethyst Allure - Papertrey Ink; Watercolor Paper - Ranger; white
Ink: Royal Velvet - Papertrey Ink; VersaMark - Tsukineko
Other: Number The Stars Banner Die, Favor It: Star Box Die - Papertrey Ink; Rhinestones - KaiserCraft/Mark Richards; Watercolor Paints - Gansai Tambi; White Embossing Powder, Silver Embossing Powder, Clear Embossing Powder - Filigree; Shimmer Powder - Perfect Pearls; Foam Tape - Scotch; Matte White Acrylic Paint - Martha Stewart Crafts; Crochet Thread; Scor Tape

Sunday, July 10, 2016

Introducing Number The Stars, Background Basics: Galaxy, and Favor It: Star Box

Good morning, Papertrey Ink fans! It's the first day of the July countdown and I have a whole, starry collection to share with you over the next several days. Today I'm introducing a sentiment set inspired by stars, a background set that coordinates, and a treat box that can also be used as an ornament or a super cute way to dress up string lights. Let's get to it!

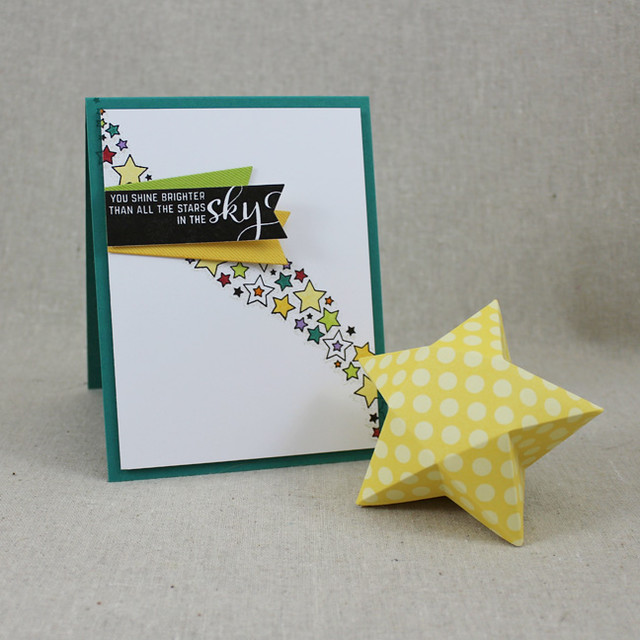
Rainbow Star Ensemble

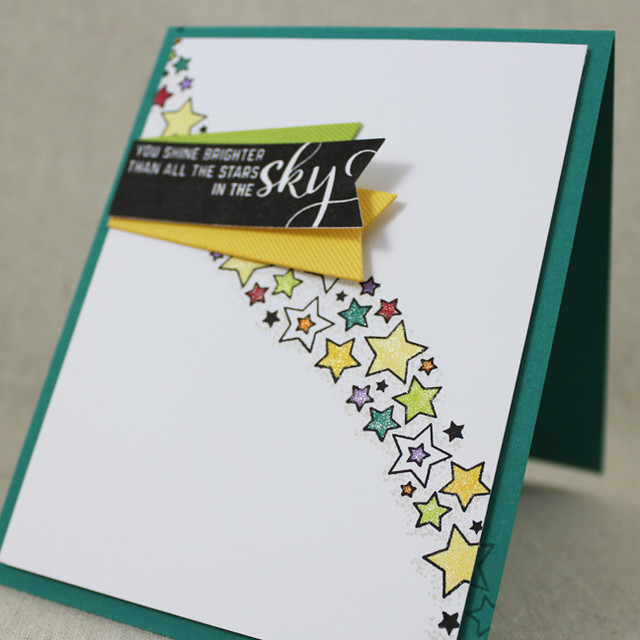
I began my first card by stamping outline stars from Background Basics: Galaxy onto white cardstock using True Black ink. I followed up with the star dust strip in Soft Stone. Then, I filled in the star background with individual solid star stamps also included in the set using a rainbow of colors.

Shine Brighter Stars Close Up

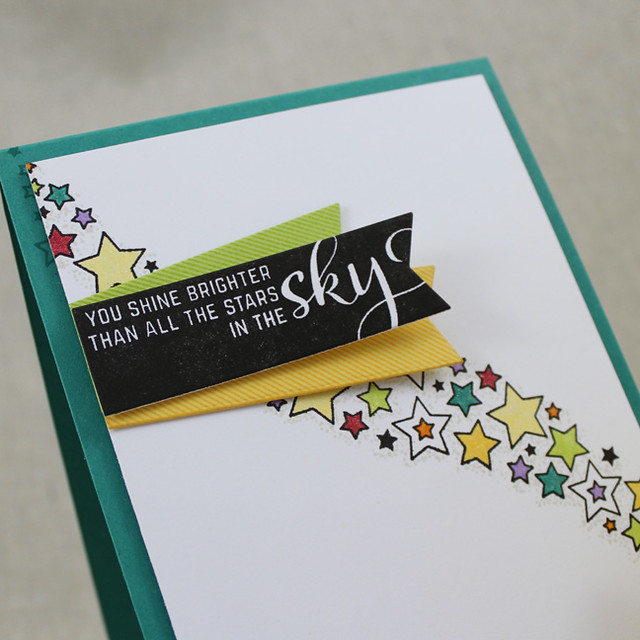
I mounted that panel to a Tropical Teal card base that I'd stamped with the outline stars strip using the corresponding ink. I used a clear Spica pen to add shimmer to each star before attaching a trio of banners to the card front.

Shine Brighter Sentiment Close Up

The striped banner image is in the background set and the sentiment banner is from Number The Stars.

Spilling Star Box

The coordinating treat box came together just as easily. I know not everyone loves taking the time to watch videos, so I thought I'd try a photo tutorial this time instead (because how many times can you watch me apply adhesive to tabs, am I right?). So here are the steps:

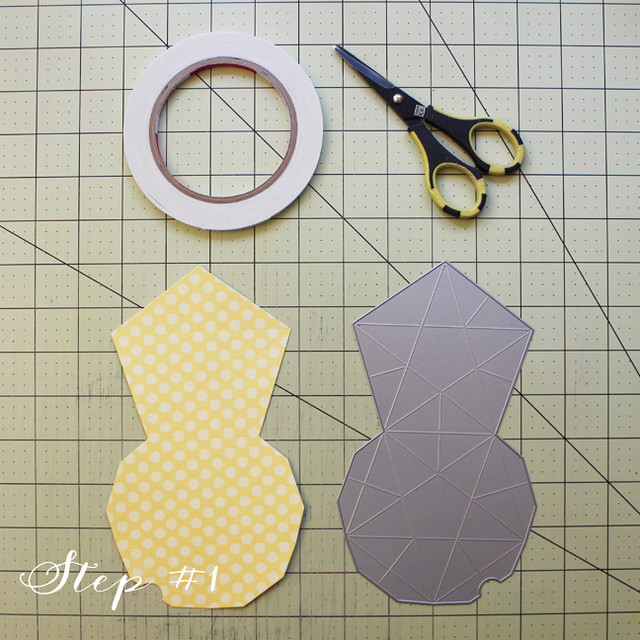
Star Box Step 1

Step #1: Die cut your box from patterned paper, cardstock, vellum, etc. using the Favor It: Star Box Die. Collect your adhesive and appropriate scissors.

Star Box Step 2

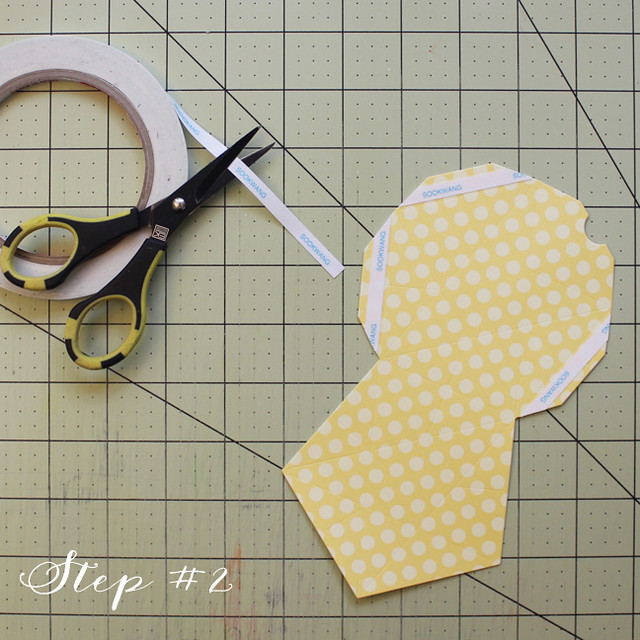
Step #2: Apply adhesive to tabs. This die includes score lines, so the tabs are easy to see. There are three tabs that need adhesive.

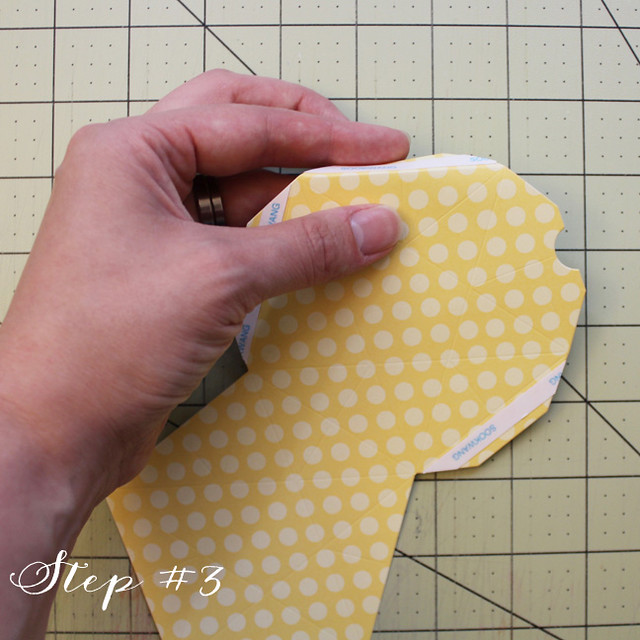
Star Box Step 3

Step #3: Pre-fold the score lines. This will make assembly so much easier (especially if you're using something like vellum that can be tougher to fold).

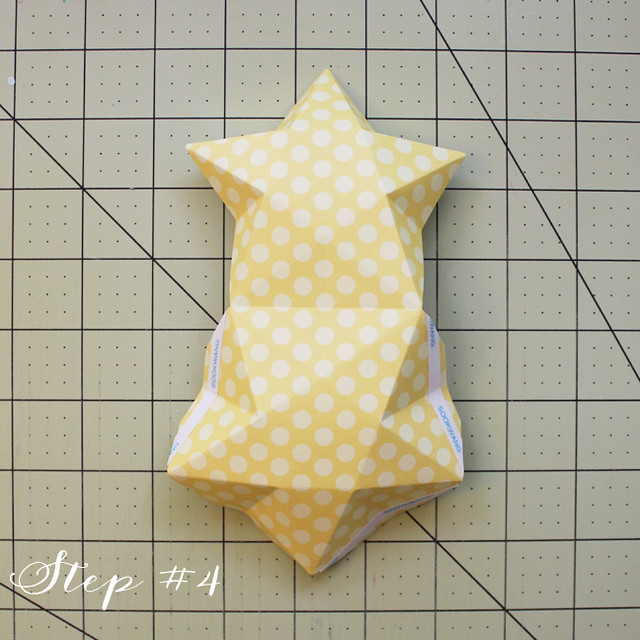
Star Box Step 4

Step #4: Technically not a step. This is just what the box will look like when you're finished pre-folding.

Star Box Step 5

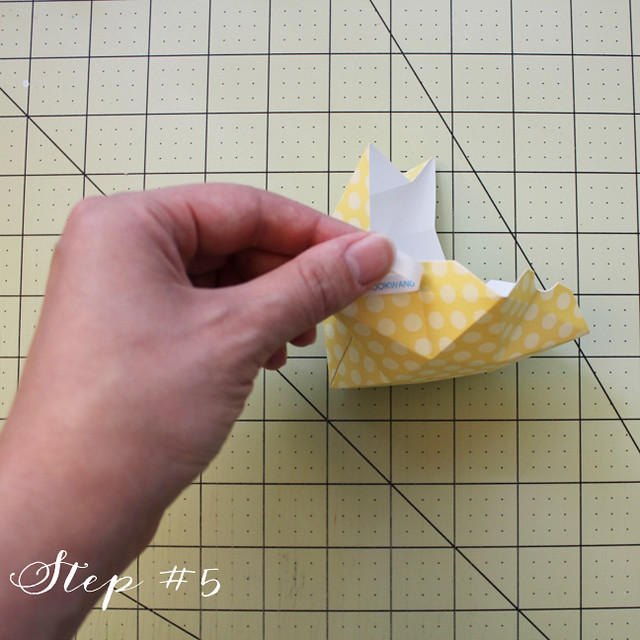
Step #5: Remove adhesive backing and press the corresponding edges together, one side at a time.

Star Box Step 6

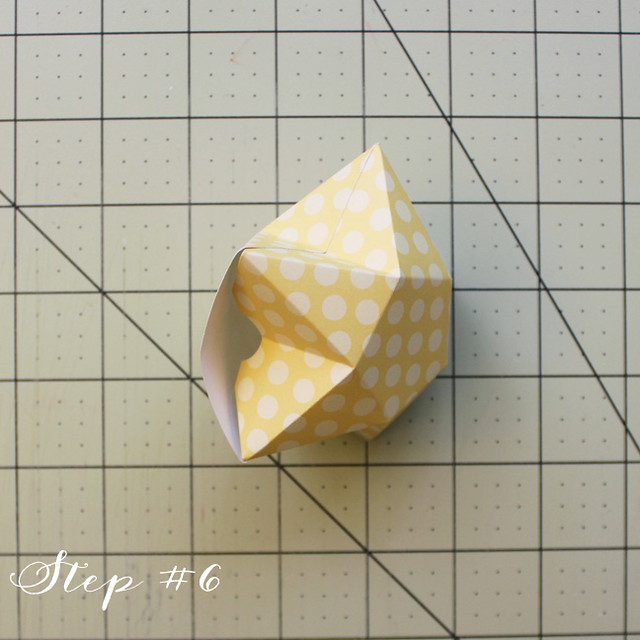
Step #6: The opening side can either be sealed with adhesive or left open so the box can be reused. The flap with the cut-out tucks inside to make it easier to open. The straight flap folds overtop to give a nice, finished edge.

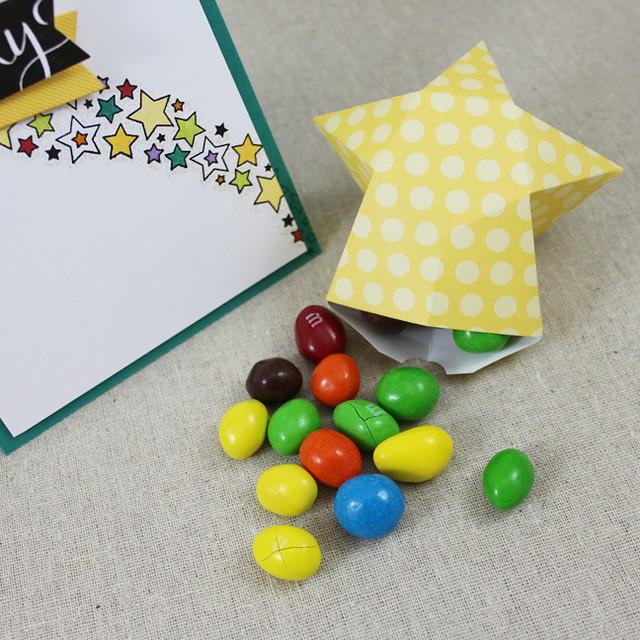
Finished Star Box

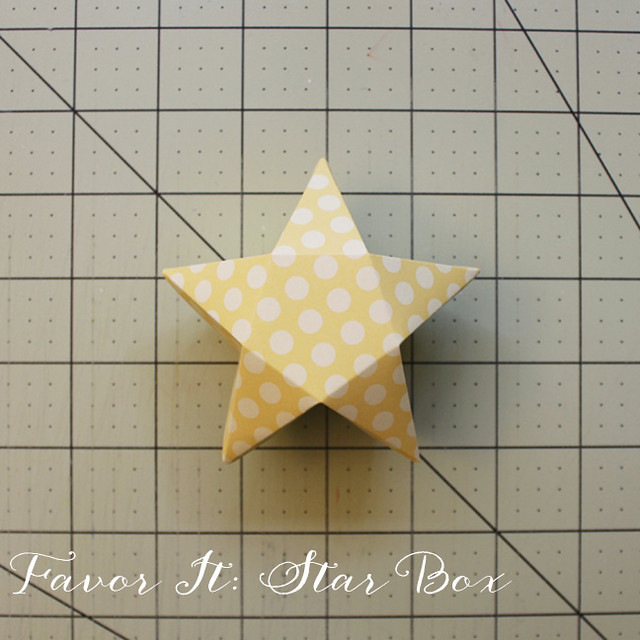
This is what the box looks like when it's complete. It's the perfect size for small candies (a portion of peanut M&Ms fit with plenty of space), jewelry, and other small trinkets.

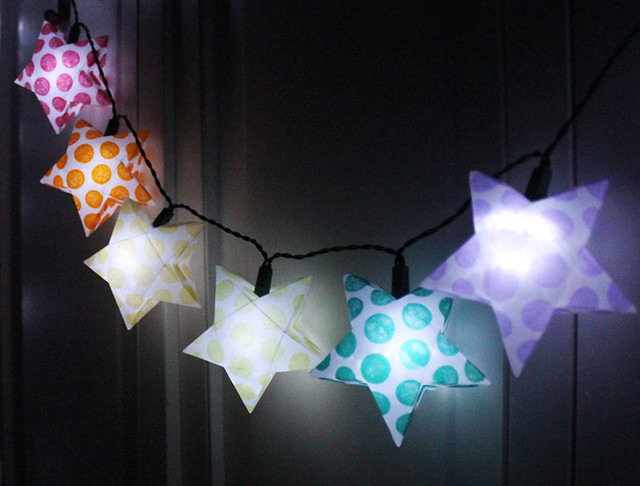
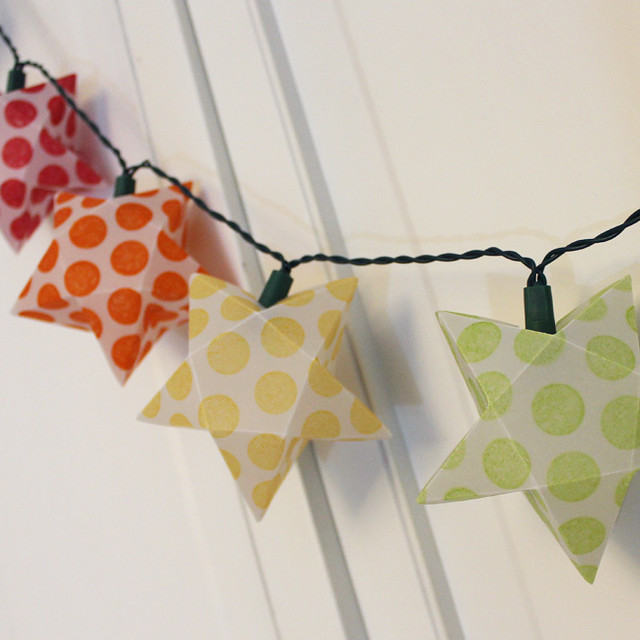
Rainbow Star Paper Lanterns

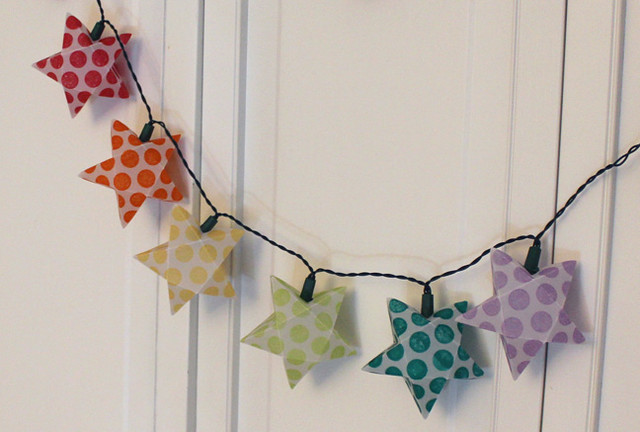
Like I mentioned before, this box is also perfect for dressing up string lights (stick to LEDs for safety though, please).

Rainbow Star Paper Lanterns Dark

I used vellum cardstock and it worked beautifully. I stamped the pieces of vellum with Polka Dot Basics III and let them dry thoroughly before die cutting them with the new Favor It: Star Box die.

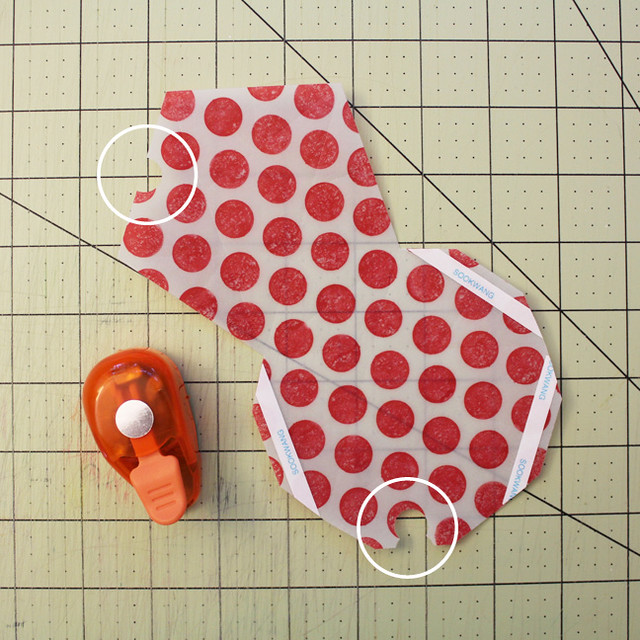
Paper Lantern Alteration
I followed the same assembly instructions with one adjustment. I used a 1/2" circle punch to make space in the open side for the bulb stems. It was a snap and the result looks like one of those fancy-schmancy light sets from a store.

Paper Lantern Close Up

I went with happy rainbow colors to coordinate with the card and gift box ensemble. Didn't they turn out cute?!

Thank you so much for joining me today! I'll see you back here again tomorrow with more of this month's release. In the meantime, make sure to check in with Nichole, Ashley, Betsy, Dawn, Heather, Erin, and Maile to see what they have up their sleeves. Have a great day!

Recipes:
Shine Brighter Ensemble
Stamps: Number The Stars, Background Basics: Galaxy - Papertrey Ink
Cardstock: Tropical Teal, Harvest Gold, Green Parakeet, Harvest Gold Patterned Paper - Papertrey Ink
Ink: True Black, Soft Stone, Tropical Teal, Pure Poppy, Orange Zest, Summer Sunrise, Harvest Gold, Green Parakeet, Amethyst Allure - Papertrey Ink
Other: Number The Stars Banner Die, Favor It: Star Box Die - Papertrey Ink; Clear Spica Pen - Zig; Scor Tape
Rainbow Star String Lights
Stamps: Polka Dot Basics III - Papertrey Ink
Cardstock: Vellum Cardstock - Papertrey Ink
Ink: Tropical Teal, Pure Poppy, Orange Zest, Summer Sunrise, Green Parakeet, Amethyst Allure
Other: Favor It: Star Box Die - Papertrey Ink; Scor Tape