
Good morning, friends, and welcome to this month's Papertrey Ink Stitching Focus. I'm Lizzie Jones, your Stitching Ambassador, and this month I wanted to share a "just-for-funsies" project with you. So often, my stitching projects are functional items that serve a specific purpose. It's easy to forget to make things purely for the joy of creating. So for this month's feature I decided to kick off my shoes and have a little fun with some dies that haven't gotten nearly enough love.
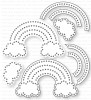
The first product I'm going to showcase today is the Stitched Rainbow Die. This collection of dies is just about as cute as cute can be. There is a solid rainbow shape which makes it a cinch to create rainbow ornaments or softies, but there are also separate stripes and clouds and even "holes only" dies for each of the individual parts. That means adding a rainbow to nearly anything has never been easier!
1. Heather personalized her cheery rainbow hoop by adding her daughter's name using the Tiny Stitched Alphabet Die. She used a Stitched Circle shape as a background for her classic rainbow. It looks wonderful against the patterned fabric, especially with that bold, contrasting stitch! The hearts from the Stitched Smile Cloud Die are such a sweet way to infuse her project with love.
2. Erin used the Stitched Rainbow Die to create a magnificent 3D nightlight meets mobile-in-a-jar design. She stuffed the little clouds and added Stitched Smile Cloud hearts and a Coffee Cozy Details Star shape before tucking it all in a jar with tulle and a string of tiny lights. It's truly amazing and I highly recommend heading over to her blog to see all of the incredible details!
3. Melissa embroidered on delicate color by using soft, pastel threads to assemble her rainbow. She added a sentiment with the Tiny Stitched Alphabet Blocks and encircled her design with the Hoopla: Stitched Scallops. A few Bloomin' Cute flowers, Aqua Mist buttons, and a handful of pearls are such quintessentially Melissa embellishments. She even added a Tremendous Tag stamped with Inspired: Faith to finish her creation. It makes my heart just skip a beat. You?
4. Ashley used the Stitched Circles: Holes die to create a multicolor border for her rainbow hoop. She added the upbeat message from the Stitched Smile Cloud Die below her rainbow, using the same colors once again to reinforce her lighthearted theme. A bright Pure Poppy grosgrain bow is an excellent embellishment to pull the whole design together.
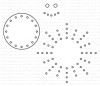
The second die I want to feature today is the Stitched Sunshine Die. Erin designed the sunbeams as a "holes only" die, which means this clever collection looks like a mix of embroidery and felt appliqué once it's all stitched up. She even included an optional smile die that you can use to give your sunshine a friendly grin!
1. Kay created a joyful nature scene by pairing the Stitched Sunshine Die with flowers from the Sewing Staples: Floral Cluster Die Collection. She used the Hoopla: Stitched Circle Bases Die to create a grassy foundation and added gentle, fluffy clouds using the Stitched Rainbow Die. She even made her sunshine extra bright by adding a second layer to the sun using the Stitched Circles Die. The Hoopla: Stitched Scallops are the perfect border for her scene, don't you think? I love that contrasting stitch!
2. Laurie used the Stitched Sunshine Die to add some happy rays to her little car scene. The Stitched Car looks like it's ready for a summertime road trip! She used the Hoopla: Stitched Circle Bases to ground her jolly jalopy and filled in the landscape with a field of Bitty Button Stacks flowers. Cute!
3. In keeping with her extraordinary color sense, Dawn used bright Raspberry Fizz felt and pink thread to create her sunshine. Who says the sun always has to be yellow? She paired the sunshine with the Stitched Smile Cloud Die to rain love on anyone who comes close.
4. Erin's mini hoop proves that the Stitched Sunshine Die is small but mighty! Her 3" hoop is the perfect way to showcase this charming die. She added a stuffed cloud made with the Stitched Rainbow die and an extra bit of love with a heart from the Stitched Smile Cloud Die. It turns out that totally adorable things come in small packages!
The summer is now in full swing and bright, cheerful colors are calling my name. The Stitched Rainbow Die and Stitched Sunshine Die seemed like they would pair well to create a bit of jaunty home decor. After all, you can't have a rainbow without sunshine!
I chose to create a little scene with the two die collections in an embroidery hoop. I used the Hoopla: Stitched Scallops around a Stitched Circles shape (the largest one).
I repeated the colors of the rainbow in the stitching on each scallop. I think this is a really cute way to introduce the colors again. I used Berry Sorbet, Summer Sunrise, Simply Chartreuse, and Tropical Teal for the stripes, Vintage Cream for the clouds, and Harvest Gold for the sunshine.
Speaking of the sunshine, I wanted the sunbeams to stand out just a bit so I stitched them with two strands of Summer Sunrise thread and one strand of Orange Zest thread. The result is just a pop of color without the orange getting too overwhelming.
I did a similar thing with the clouds; instead using two strands of white and one strand of silver. I love metallic threads, but sometimes they can be a pain to use. They tangle, they fall out of the eye of the needle at the most inconvenient times, and for some reason that I still can't seem to figure out, by the end of the project none of the ends are the same length. Ugh! Using just one strand here paired with the white threads worked perfectly. It was much easier to manage and I get just a hint of "silver lining" around the edges of my clouds.
I used the "holes only" die to make stitching my rainbow to the Aqua Mist circle an absolute breeze. All I had to do was pop out the holes and stitch along the lines. Do you want to know my dirty little secret for keeping large felt items still while I'm stitching them into place? Scor-tape. Just a couple of little pieces stuck to the back of that Aqua Mist circle were enough to keep it from shifting while I was putting in my first round of stitches. As long as you keep the adhesive away from any stitching holes your needle will stay clean (and no one has to know...).
The fabric I used for my base is a patterned cotton I found at a local big-box craft store. The neutral, subtle pattern works really nicely with all of the color happening. I chose to use a 7" hoop so more of the patterned fabric was visible, but the whole design would have fit nicely into a 6" hoop too. And, bonus, I picked up a couple of additional swatches of fabric, so there are sure to be more decor projects in my future!
Thank you so much for joining me today! I hope you'll take some time to create something cheerful just for the fun of it. Not everything we make has to be functional or purposeful. Creating should always be fun, but maybe it can be a wee bit indulgent once in awhile too. Go ahead...make something just because it makes you smile. Have a fantastic week, everyone! I'll see you again soon!
Supplies:


3 comments:
Such a fun project! Thank you for featuring the hoopla products, they've been on my wishlist for a while. No time like the present. I also love the prior project reviews you add to your posts each month.
Your design is brilliant, Lizzie, and beautifully done. Love your color choices and great detailed post!
Love this project and with a new baby granddaughter on the way now is the time to get started. Any chance you would be willing to share your embroidery floss color numbers? The longer I spend in the fabric store trying to match them up the less I get done on the project. Thank you in advance.
Post a Comment