Thursday, July 10, 2014

Introducing These United States and the Text Block: Thankful

Good morning and welcome to the first day of Papertrey Ink's July new release countdown (it also happens to be my mister's birthday - a big day to be sure)! I am so excited to be introducing a new stamp set, These United States (with coordinating die collection), as well as a new Text Block die. It's going to be a very full countdown this month! Let's get on to a few projects!

Nichole and Ashley are going to be featuring the Text Block: Thankful die today, so I thought it might be fun to start there.


This first card is a nice quickie that you could pull together if you need a last-minute thank you card. I began by Xyroning and die cutting the Text Block: Thankful shape three times from white cardstock. I layered all of the shapes and adhered them to a Classic Kraft card base that I had stamped with Background Basics: Diagonals.


Then, I die cut the small accent holes in a rainbow of colors and used the tiny circles to inlay a little bit of color. The result is a clean design that you could adapt to be perfect for ladies or gents. It's also fairly flat so it would be a breeze to mail.

My second card has a bit more of an autumnal feel.


I began by die cutting my Text Block shape from two pieces of real birch wood paper. One of the pieces had been sponged with Dark Chocolate ink to give the impression of two different types of wood. I adhered the natural wood shape to a scrap of cardstock and then I used the negatives from the Dark Chocolate piece as an inlay. Next, I stamped the leaves from Leave It Be onto a Rustic White card base and mounted my Text Block: Thankful panel with foam tape. The colors and textures are so warm. I just love it!

Next up is the These United States collection! The stamp set includes sentiments and images that cover everything from a move to a vacation to a deployment and beyond. The coordinating die collection includes a die for each state as well as a large United States die. This collection has so many uses I can barely stand it! I'm going to begin with a personalized coffee cozy. I'm going to try and spread the love to as many states as I can manage over the next few days, so you don't all get sick of seeing Ohio on everything (and I assure you, Ohioans will put Ohio on everything). Today I'm making an Indiana coffee cozy for an aunt who lives in Ft. Wayne.


I die cut the cozy from Aqua Mist felt and the state of Indiana from Vintage Cream felt. Next, I stamped the "pride" sentiment from These United States onto the cozy using Pure Poppy ink. The idea was just to use an ink that would be dark enough to see so I could embroider over it. I would suggest using a color that will blend in with the floss you intend to use. I did a simple backstitch over the sentiment using two strands of red embroidery floss. Then, I attached my Indiana appliqué (handy trick: use a tiny piece of scor-tape to keep your appliqué in place while you stitch; just make sure to keep it away from your sewing path to avoid the dreaded sticky needle). I backstitched around the edges using three strands of warm white embroidery floss and added a french knot in the approximate area of my aunt's home. I finished by stitching up the sides of the cozy.


A gift is incomplete without the proper packaging, right? So I wrapped up the cozy and made a coordinating tag. I die cut the shorter tag from Tag Sale #9 out of Pure Poppy cardstock. Then, I used the Ohio die to die cut a negative shape from the tag. I heat embossed the sentiment using white detail powder and tied it to my package with some baker's twine for a cute finishing touch.

Thank you all so much for joining me today! I hope to see you again tomorrow as I share more projects featuring These United States and the Text Block: Thankful die. In the meantime, Nichole, Ashley, Dawn, Heather, Melissa Phillips, and Melissa Bickford all have more inspiration to share with you today. Have a great day and I'll see you again soon!

Recipes:
Rainbow Detail Grateful Card
Stamps: Background Basics Diagonals
Cardstock: Classic Kraft, Pure Poppy, Orange Zest, Harvest Gold, Simply Chartreuse, Blueberry Sky - Papertrey Ink; white
Ink: VersaMark - Tsukineko
Other: Text Block: Thankful (available July 15th) - Papertrey Ink; Xyron

Autumnal Grateful Card
Stamps: Leave It Be - Papertrey Ink
Cardstock: Rustic White - Papertrey Ink
Ink:  Terracotta Tile, Summer Sunrise, Canyon Clay, Ripe Avocado, Dark Chocolate - Papertrey Ink
Other: Text Block: Thankful (available July 15th) - Papertrey Ink; Real Birch Paper - Creative Imaginations; Xyron

Indiana Pride Cozy & Gift Packaging
Stamps: These United States (available July 15th) - Papertrey Ink
Cardstock: Pure Poppy - Papertrey Ink
Ink: Pure Poppy - Papertrey Ink; VersaMark - Tsukineko
Other: Indiana/Tennessee/Kentucky Die (available July 15th), Ohio/Pennsylvania/Delaware Die (available July 15th), Tag Sale #9, Coffee Cozy Die Aqua Mist Felt, Vintage Cream Felt - Papertrey Ink; White Detail Embossing Powder - Filigree; embroidery floss - DMC

Tuesday, July 8, 2014

July Sneak Peek!

Did you happen to check out Nichole's blog today? She peeked my new set (coming later this month) and the coordinating set of dies!


This one's all about the U S of A. There's a die for each state and a sentiment set that you can use for everything from showing state pride to scrapbooking your vacation memories. I hope you'll stop by to check out my projects over the next several days. See you then!

Thursday, July 3, 2014

Celebrating 30 At The Wilds

Hello again, friends! I wanted to pop in today to share what my super, SUPER awesome fella did for me for my birthday. Mind you, we don't usually pull out all the stops, but it was my 30th so he put extra effort into making sure it was special. It was an incredible trip and I thought it might be fun to share a few photos (well...many really) and stories with all of you.

We spent Tuesday and part of Wednesday at The Wilds. It's an endangered animal preserve and conservation center about an hour and a half east of us. We've been out there a few times over the years and both truly enjoy it (Sean likes to joke that I'm going to drop everything to go to vet school one of these days, so this experience was a treat for me). For this trip Sean booked us a night in the Grand Yurt (essentially a plush hut that overlooks the animal pastures) as well as two tours that I'll get to here in a moment.

We got to the area a little early, so we spent some time at a nearby Audubon overlook. From there we were able to see some of the animals at the facility along with several bird varieties we don't get to see in the city.

We checked in to our yurt in the early afternoon and then loaded into the bed of a pickup to take the first of our tours (the Wildside safari). Our guide, Chris, works as one of the animal handlers at the Wilds and he was very knowledgeable about the critters.


We started the tour down by the Pe're David deer. These deer are an aquatic variety and actually have webbed hooves! Summer happens to be the Pe're David Deers' mating season so we could hear the male deer bellowing their love call late into the evening and early in the morning. It was funny mostly because it sounded like a cross between belching and laughing. Real charmers, those deer.


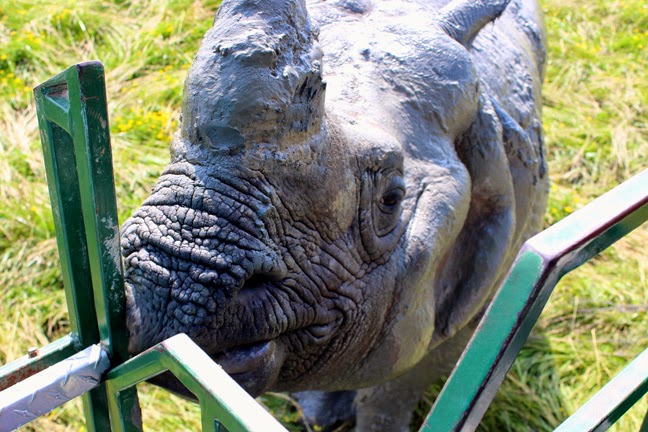
Next, we drove past a female Asian One-Horned Rhino and her calf. They were just relaxing in the tall grass.


We could see the Bactrian Camels up the road, so Chris drove us over for a visit (you can see the yurts in the distance; ours was the one all the way to the left).


Chris called the camels when we drove up and they came to investigate. That little one is Rae Rae.


Her papa is Gobi. He was a very big, very sweet fella.


We were able to pet the camels (some were more friendly than others). Rae Rae was all about getting her head scratched. In all honesty, I think she thought I was smuggling apples in my camera bag.


Next, we started driving through a field toward a small pond. It didn't look like we were going to see much until, suddenly, this guy emerged from the water.


He also liked being petted (and fed apples and sweet potatoes).


He was a little muddy.


From there we headed over to the carnivore section of the facility (it's separate and has its own fencing). On the way there we came upon the Persian Onager (a wild donkey)...


and the Przewalski's Wild Horse. The horses were the very first animals at the facility more than 20 years ago. They are still, to this day, the only equine species that has never been successfully ridden. Chris told us that there is a theory that their untamed temperament may have something to do with an extra chromosomal pair. They certainly are gorgeous creatures.


We saw Cheetahs, Dholes, and African Painted Dogs in the carnivore areas. They were all tougher to see without the binoculars, so this is the best photo I could capture. I was tickled that the alpha female Painted Dog's name was Lizzie. Sean remarked that the alpha dog in his house's name was Lizzie, too. The tour group got a kick out of that.


We started with the Grevy's Zebra on our way back through the herbivores. Their markings were so distinctive and striking. I was surprised at how fuzzy their ears were.


The Fringe Eared Oryx was in the same area.


We travelled up the road a little way until we came to the giraffes. This little one (he was just 4 months old!) was just starting to figure out all the cool things his tongue could do. The whole time we were there he was playing with it; licking his own face and sticking it out as far as it could go.


This was his papa. He was distracted by a lady giraffe in the next pen.


Then we went to a barn and had the opportunity to feed another giraffe (that Chris kept calling "the chosen one") romaine lettuce. He was very funny in that he was happy to be petted and come down to say hello as long as there was lettuce in your other hand. No lettuce, no dice.


Our next encounter was with the White Rhino herd. The Wilds is home to the largest heard of White Rhinos outside of Africa.


There were several babies and they were SO CUTE. They kept trotting around to stay close to their mamas.


Our final visit of the trip was with the Scimitar Horned Oryx. Such graceful creatures. There were several calves in this herd, too, and you could barely see them hopping around in the tall pasture.


We arrived back at the Visitors' Center in the evening and cleaned up before catching dinner. Afterward, we headed back to our yurt and relaxed on the patio. From our yurt you could see several animals that we didn't get a chance to visit on our tour (American Bison, Sichuan Takin, Banteng, Herons).


We stayed out there enjoying the scenery and the animals until we fell asleep in the adirondack chairs watching a storm roll in (luckily we woke up and went inside before it actually arrived).


The next morning we spent some time watching the animals and the birds before heading to breakfast. After breakfast we got all packed up and headed down to the horse barn for the Horseback Safari, our second tour.


Sean was assigned to Lightning, a retired racehorse. Sean had never ridden before so George, our guide, gave him a few extra pointers (and some gentle ribbing) before we headed out.


I was paired with Barney, a lovable chub who would have been happy to hang out and eat grass all day. Trying to get him to keep moving through some of the taller foliage was entertaining. Hilarity ensued.


Our tour took us along the ridge where we had slept the night before and then across the road into The Wilds' Prairie Reclamation area. It was a beautiful area and I would have loved to have taken pictures, but I was busy trying to get Barney to stop eating grass.

It was a wonderful time and a trip that I would absolutely recommend. Sean definitely made my 30th birthday one that I'll never forget. I'm a very lucky girl.

Thanks for stopping by today and hanging in there through all of my ramblings and photos. I'll be back with another crafty post again soon. Take care!

Tuesday, July 1, 2014

July Color Play

Hello, everyone! Isn't it a glorious July morning? That's right, it's July and that means it's time for the Papertrey Ink July Color Play feature. This month we're working with a color palette of Terracotta Tile, Summer Sunrise, Limeade Ice, New Leaf, and Aqua Mist inspired by this photo from Cannelle et VanilleAran Goyoaga's food, photography, and life blog. Isn't her photography gorgeous?


I loved this photo from the moment I saw it. The bright citrus just seems to dance against the neutrals and cooler tones in the frame. These are some of my favorite Papertrey colors and I knew I'd have fun using them together on my Color Play project this month. Also, just like last July 1st, it happens to be my birthday (funny how that works, isn't it?), so today's card is a little birthday ditty for myself (heads up...I think this may become a thing). Ha!


I began by die cutting the mason jar from Friendship Jar and stamped the outline with Aqua Mist ink. Next, I poured some shimmer spray onto a paint palette and tinted it with a couple of drops of Aqua Mist reinker. I painted the tinted shimmer spray directly onto the water image (also from Friendship Jar) and stamped that onto the jar die cut. The result is a softer version of Aqua Mist with a subtle shimmer that I absolutely love (unfortunately, it proved very difficult to capture on camera - if you look closely at the photo below you can sort of see it). There's also a soft mottling in the "water" which is really nice. I set that aside to dry for a few minutes while I stamped on my card base.


I continued by stamping my stems onto a white card base. I traced a jar outline first so I knew where I needed my stems to go and created a bouquet from there. I used rock & roll inking on some of the stems to create a little depth and make everything blend together nicely. This loose arrangement reminds me of the bouquets we've been buying at the farmers market lately. So sweet and just slightly wild. I added my stems to my jar by protecting my card front with a piece of acetate and lining up the stamps as closely as possible. It may note be the most precise technique, but it works for me. Next, I added my tiny flowers (again with rock & roll inking for visual depth). Then, I stamped "birthday" in the space beside my jar using Smokey Shadow ink.


I carefully rolled the jar between my fingers to give it a domed shape and tied a little twine bow around its neck. Then, I adhered it to my card front using a single layer of narrow foam tape along the edges and a triple layer of foam tape in the center. The structure of the adhesive will help the jar remain rounded even if the cardstock wants to flatten back out.


Next, I die cut three "happy" words from Terracotta Tile cardstock using the Wet Paint Cuts Die Collection. I stamped one of the cuts with the "da" from birthday and adhered them together to make the word nice and stable. I then mounted that to the card front with tiny bits of foam tape. I finished the card off by embellishing the flowers with tiny dots of 3D shimmer paint.

That's all for me today, friends. Now, if y'all don't mind, I'm going to go hang out with my super-amazing fella at an endangered animal preserve and conservation center. I'm really looking forward to the special tours we're taking. It seems like 30 is starting of pretty spectacularly from where I'm sitting. Have a great day, everyone!

Recipe:
Stamps: Friendship Jar, Larger Than Life, Wet Paint - Papertrey Ink
Cardstock: Terracotta Tile - Papertrey Ink; white
Ink: Aqua Mist, New Leaf, Limeade Ice, Summer Sunrise, Terracotta Tile, Smokey Shadow - Papertrey Ink
Other: Jar & Lid Die, Wet Paint Cuts Die Collection, Aqua Mist reinker - Papertrey Ink; Pearl Shimmer Spray - Tattered Angels; Crochet Thread; Foam Tape - Scotch; 3D Shimmer Paint - Scribbles

Saturday, June 14, 2014

Bowl Of Sunshine - Day 5

Well, here we are, Friends. It's Day 5 of the June Papertrey Ink new release countdown. Nichole and the Design Team are featuring Bowl Of Sunshine (available June 15th) today, so make sure to visit everyone for their take on this new set. I have a photo-heavy post for you, so settle in and enjoy!

My first project today is a set of kitchen tags. We seem to have several friends in need of a homemade meal, treat, or surprise lately. I thought it might be handy to make some tags to have ready for the next time we make a delivery. These tags make it easy to give a few simple instructions, brief recipes, or notes for the recipient.


I began by die cutting several tags from Classic Kraft, Spring Moss, and white cardstocks. I stamped and heat embossed the sentiment (from Bowl Of Sunshine) onto each colored tag and then followed up with the stitched line strip from Ombre Builders to give a bit of texture.


I die cut bowl and fruit shapes to embellish the front of each tag.


I die cut two upper case "J"s from wood veneer using the Smooth Alphabet to create spoon handles for the soup bowls. I also stained them with Dark Chocolate ink to make them stand out a bit better.


Then, I stamped the white tags with the lines from Journal Accessories using inks that coordinated with the front of each tag. I adhered the white lined tags to the back of each decorated tag to make it easy to write clear, orderly notes.


These tags can be easily tied to casseroles, jars of soup, bottles of juice, drink mixes, etc. for a thoughtful gift for a friend in need (or just because).


You can even include an ingredients list for those folks that are health or allergy conscious. There's nothing better than the gift of something fresh and delicious when you don't have the time to take care of yourself (by the way, this recipe makes more juice than the jar could hold, but it was the first jar I found in our cupboard so I went with it).

My last project today is a welcome to the neighborhood card for someone new on the block.


I began by die cutting and stamping the bowls from Bowl Of Sunshine. Then I heat embossed my sentiment onto a Terra Cotta Tile card front and adhered it to a white card base.


Next, I created a moving box by doing a little creative cutting and folding with a piece of Classic Kraft cardstock. I sponged all of the folds and edges with Classic Kraft ink to create a little depth. Then, I took a piece of packing paper (that's right, the stuff that comes in our boxes every month) and stamped it with Background Basics Newsprint using Smokey Shadow ink. I crumpled the faux newsprint and attached one piece to my card front (only in the center to keep the edges from flattening too much) and another, smaller piece inside my moving box.


I adhered my bowls to a piece of Aqua Mist cardstock using flat and foam adhesives and then mounted my box over top them using narrow strips of foam tape along the edges. I used more foam tape (again, only in the center) to attach the focal panel to the card front. The finished product is so much fun!

Alrighty, friends. That's all for me for this countdown. I hope you've enjoyed my projects this time around. Make sure to check in with Nichole, Ashley, Betsy, Danielle, Dawn, Erin, Heather, Laura, Laurie, Maile, and Melissa for their inspiring projects today. Have a wonderful day and I'll see you again soon!

Recipes:
Kitchen Tags
Stamps: Bowl Of Sunshine (available June 15th), Ombre Builders (available June 15th), Comfort Food, Journal Accessories - Papertrey Ink
Cardstock: Spring Moss, Classic Kraft - Papertrey Ink; white
Ink: Fine Linen, Dark Chocolate, Harvest Gold, Spring Rain, Limeade Ice, Ripe Avocado, Simply Chartreuse, Lavender Moon, Berry Sorbet, Summer Sunrise, Classic Kraft, Fresh Snow, New Leaf, Pure Poppy, Canyon Clay, Terra Cotta Tile - Papertrey Ink; VersaMark - Tsukineko; Rich Cocoa - Memento
Other: Bowl Of Sunshine Die Collection (available June 15th), Smooth Alphabet, Tag Sale #2 Die, Burlap, Summer Sunrise Twill Ribbon - Papertrey Ink; Foam Tape - Scotch; White Detail Embossing Powder - Fiigree; Copic Markers; Wood Veneer; Fresh Juice

Moving Box Card
Stamps: Bowl Of Sunshine (available June 15th), Background Basics Newsprint, Putting Down Roots - Papertrey Ink
Cardstock: Terra Cotta Tile, Classic Kraft, Aqua Mist, Packing Paper - Papertrey Ink; white
Ink: Classic Kraft, Smokey Shadow, Terra Cotta Tile, Orange Zest, Summer Sunrise - Papertrey Ink; VersaMark - Tsukineko
Other: Bowl Of Sunshine Die Collection (available June 15th) - Papertrey Ink; White Detail Embossing Powder - Filigree; Foam Tape - Scotch