Monday, March 31, 2014

Rainbow Birthday Card & A Little Announcement

This is my second post today, so if you're looking for the Papertrey Ink Stamp Designer Showcase you'll need to scroll down a smidge.

Well, hello there! I still can't believe I get to make this announcement, but I've been chosen as one of this year's Paper Crafts Magazine's Stamping Royalty winners! Totally bananas. For realsies.

You see, last year I made a goal for myself to enter card making contests and start submitting for publication. Ideally, I wanted to get something going before my 30th birthday. Then, I spent eightish months largely neglecting my goal. I saw that the Stamping Royalty contest was about to open, so I thought I'd give it a shot. What's the worst that could happen? They say no? Imagine my surprise when I received the email! My husband's eardrums will never be the same.

I wanted to share a card with you all today and a sparkly, rainbow-y birthday card felt fairly apropos.


I love this sentiment and I wanted it to really stand out, so I kept the card pretty simple. I stamped the candle outline repeatedly and went back to fill in with a variety of colors.


The flames were all stamped with the coordinating image and embellished with a bit of glitter. I stamped the sentiment onto a Sketched Shapes die cut and mounted it atop the candles with a strip of foam tape. Easy!

Thank you so much for joining me today and thank you so much to the editors of Paper Crafts! I'll be here in giggly disbelief if anyone needs anything. Take care and I'll see you again soon!

Recipe:
Stamps: Wishes Come True - Papertrey Ink
Cardstock: White - Domtar
Ink: Hibiscus Burst, Limeade Ice, Summer Sunrise, Harvest Gold, Simply Chartreuse, Tropical Teal, Hawaiian Shores, Winter Wisteria, Aqua Mist - Papertrey Ink; Rose Bud, Tuxedo Black - Memento
Other: Sketched Shapes Die Collection - Papertrey Ink; Foam Tape - Scotch; Fine Crystal Glitter - Martha Stewart Crafts

Stamp Designer Showcase - On The Links

Hi there, everyone! I wanted to pop in today to participate in Papertrey Ink's monthly Stamp Designer Showcase. I thought I'd highlight On The Links today, as we're (finally) starting to see sneak peeks of golf weather here in Ohio. These images are also great for Mother's and Father's Days, both just on the horizon. How about we get on to some projects, eh?

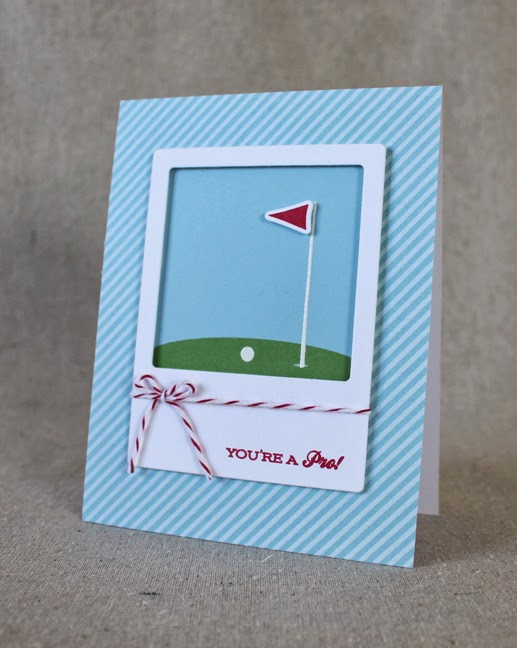
The first card I'm sharing today is a simple "way to go" type of card.


I began by covering a white card base with Spring Rain Striped Paper that I'd trimmed on the diagonal. Next, I die cut my frame and flag shapes from white cardstock. The flag was stamped with the coordinating image and the framed was stamped with a sentiment, both with Pure Poppy ink. I embellished my frame with a bow tied from baker's twine and set it aside.


I then stamped my little scene onto a piece of Spring Rain cardstock that I'd cut just larger than the opening in the frame. The pin pole and the golf ball were both heat embossed using white detail powder. I adhered the scene piece to my card front and then added the frame with foam tape. The flag was also added to the pin pole with foam tape. Perfectly on par, if I do say so myself. Ha!

Next, I have an interactive number to share with you. I paired the golf cart in On The Links with the Movers & Shakers Spinners Die Collection to create a little movement. The dies I used are for spinning, but I used them to create more of a sliding function.


I began by die cutting the golf cart from white cardstock and the hills dies from New Leaf Patterned Papers and cardstock. I adhered the polka dotted paper hill to a cardstock piece and die cut the Movers & Shakers shape from the resulting panel. I stamped and heat embossed my sentiment onto the striped paper hill. Next, I stamped my background scene onto an Aqua Mist card front. I heat embossed the pin pole and created a sand trap with a piece of Scor Tape and some actual sand. The mini flag was achieved by masking off most of the flag when I inked the stamp.


Next, I adhered a polka dotted hill to the card front atop my pin and sand trap. This acted as a patch to hide the card front in the hole created by the Movers & Shakers die. I put the interactive elements together tucked them inside as I attached the die cut hill in place with some foam tape (I hope that makes sense). I adhered my sentiment hill on top with a bit more foam tape (there's a reason I buy this stuff by the football-field-long roll). Next, I stamped my golf cart shape with the coordinating image using Pure Poppy ink. I stamped the cart again onto scrap cardstock using gray ink and trimmed out the wheels. I adhered them onto my image and attached the wheels to the interactive spinner things already on the card.


Finally, I used Glossy Accents to give the wheels a shiny finish. I'm in love with my speedy little golf cart. It's so cute!

Thank you for joining me today! Have a wonderful week and I'll see you again soon.

Recipes:
You're A Pro Card
Stamps: On The Links - Papertrey Ink
Cardstock: Spring Rain, Spring Rain Striped Paper - Papertrey Ink; white
Ink: New Leaf, Pure Poppy - Papertrey Ink; VersaMark - Tsukineko
Other: On The Links Die Collection, Fabulous Frames Die Collection - Papertrey Ink; White Detail Embossing Powder - Filigree; Cherry Baker's Twine - Divine Twine; Foam Tape - Scotch

Golf Cart Card
Stamps: On The Links, Up Up & Away - Papertrey Ink
Cardstock: New Leaf, Aqua Mist, New Leaf Pattern Pack - Papertrey Ink; white
Ink: Pure Poppy, Fresh Snow, Enchanted Evening - Papertrey Ink; VersaMark - Tsukineko; gray pigment - Studio G
Other: On The Links Die Collection, Movers & Shakers Spinners Die Collection, In The Meadow Die Collection - Papertrey Ink; White Detail Embossing Powder - Filigree; Foam Tape - Scotch; Glossy Accents - Ranger; Scor Tape; Sand

Friday, March 21, 2014

Little Floral Coin Purse

Hello, All! I hope you're all having a wonderful day. It's simply gorgeous here today and I'm looking forward to getting outside for a while later this afternoon. I just wanted to pop in today with a little coin purse I put together with the new Coin Purse Die from Papertrey Ink. It's adorable and totally easy!

Lately, we've had a few activities that require lots of patient sitting. I'm not good at patient sitting. I get twitchy and irritable and ask when we'll get where we're going or when we can leave. I'm also really bad at watching TV for the same reasons. Anyway, I knew I was going to have some waiting rooms and car time in my future, so I put together a couple of kits containing cut felt pieces, embroidery thread, needles, scissors, and buttons to keep myself occupied and out of everyone's hair. This is the result of that first kit.


I used Aqua Mist, Limeade Ice, Pure Poppy, and Vintage Cream felts. I used the Beautiful Blooms II #1 Die Collection for my flowers, the Buttoned Up #2 die for my flower center, and the Doodlie Do Die Collection for my leaves. I embroidered most of the decoration onto the leaves before stitching them to the coin purse (the bottom two veins and the stems are all stitched to the purse). That leaves their tips loose enough to give a little movement, but not so loose that I worry about them getting pulled off. I stitched through the flower, felt button, and real button with a couple of stitches to secure them. This purse is a bit more decorative/not as hardy as the other examples you may have seen, but I like not having everything stitched down too tight.

Thanks for popping in today and I hope to see you again soon. Enjoy your weekend!

Recipe:
Felt: Aqua Mist, Limeade Ice, Pure Poppy, Vinage Cream - Papertrey Ink
Dies: Coin Purse Die, Beautiful Blooms II #1 Die Collection, Buttoned Up #2 Die - Papertrey Ink
Other: Harvest Gold Button - Papertrey Ink; Embroidery Floss - DMC; Zipper - Coats & Clark

Friday, March 14, 2014

March Papertrey Ink Countdown - Day 5

Hello, Friends, and welcome to Day 5 of the March Papertrey Ink countdown! I am so glad to hear that you all have been enjoying the peeks of the new products for this month. I can't wait to see how you use the Text Block: Friends Die and Putting Down Roots! I have a couple of additional projects to share with you today, so let's get to it!

Today, I wanted to focus on showing you how using your background sets can add wonderful dimension and texture to the plant pots in this new set. I was partly inspired by these Hive Vases at West Elm.


I have one of these and it lives on our mantle (with or without flowers). I thought it would be fun to recreate the look with dies and stamps.


I started by die cutting the plant pots from Terra Cotta Tile and Canyon Clay cardstocks. I stamped the round planter with the small pattern block in Background Basics: Farm & Barn. I masked off a stripe on the tall planter and stamped it with the medallion background from Bitty Background Blocks. Next, I stamped two of the plants from Putting Down Roots onto Rustic White cardstock using Limeade Ice, Ocean Tides, Pinefeather, and Dark Chocolate inks. I heat embossed the needles on the cactus to give them a more realistic finish.


Then, I adhered the plant panel to a Classic Kraft card base that had been stamped with the sentiment and textured with the Linen & Canvas Impression Plate. I adhered the planters into place and embellished the cactus with a Canyon Clay bloom. I added a Victorian Lace strip in Ocean Tides and embellished the card base with some Rustic Cream Button Twine and a Terra Cotta Tile button.

My second card uses another background to dress up my planter.


On this card I began by stamping a Spring Rain card front with the house from Boards & Beams using Fresh Snow ink. I adhered that to a white card base and added a Photo Finishers strip that had been stamped with my sentiment. I stamped my plant twice, once in Simply Chartreuse and once in Limeade Ice, for a little extra volume.


Then, I die cut the pot and stamped it with the Crackled Mini background using Blueberry Sky ink (that I'd stamped off to soften the color slightly). I also stamped the plant fronds on the front of the pot before adhering it to my card front with foam tape.

My final card of this countdown is a shaker card using the new Text Block: Friends Die.


I began by simply stamping a pattern down the left side of a white card base using Lemon Tart, Harvest Gold, and Summer Sunrise inks. Then, I created the shaker feature by die cutting a piece of Hawaiian Shores cardstock that I had run through my Xyron machine. I adhered that piece to a piece of clear cardstock and created a frame of foam tape on the back of the outer edges. I filled my shaker with an assortment of glitters and sequins for prime shake-ability.

Alright. That does it for me this countdown. Thank you so much for joining me this week! Today is another group post day, so NicholeBetsyDanielleDawnErinHeatherLauraLaurieMaileMelissa, and Melissa have even more to share with you today. Enjoy your weekend and I'll see you again soon!

Recipes:
Southwestern Housewarming Card
Stamps: Putting Down Roots (available March 15th), Bitty Background Blocks, Background Basics: Farm & Barn - Papertrey Ink
Cardstock: Classic Kraft, Rustic White, Ocean Tides, Terra Cotta Tile, Canyon Clay - Papertrey Ink
Ink: Limeade Ice, Ocean Tides, Pinefeather, Dark Chocolate, Terra Cotta Tile, Canyon Clay - Papertrey Ink; VersaMark - Tsukineko
Other: Putting Down Roots Die Collection (available March 15th), Victorian Lace Border Die, Linen & Canvas Impression Plate, Rustic Cream Button Twine, Terra Cotta Tile Button - Papertrey Ink; Foam Tape - Papertrey Ink

New Home Congratulations Card
Stamps: Putting Down Roots (available March 15th), Boards & Beams - Papertrey Ink
Cardstock: Spring Rain - Papertrey Ink; white
Ink: Fresh Snow, Simply Chartreuse, Limeade Ice, Blueberry Sky, Enchanted Evening - Papertrey Ink
Other: Putting Down Roots Die Collection (available March 15th), Photo Finishers Die Collection - Papertrey Ink

True Friend Shaker Card
Stamps: Autumn Pattern Pieces - Papertrey Ink
Cardstock: Hawaiian Shores, Clear cardstock - Papertrey Ink; white
Ink: Lemon Tart, Harvest Gold, Summer Sunrise - Papertrey Ink
Other: Text Block: Friends Die (available March 15th) - Papertrey Ink; Foam Tape - Scotch; Glitter - Martha Stewart Crafts; sequins

Thursday, March 13, 2014

March Papertrey Ink Countdown - Day 4

Good morning and welcome back to Day 4 of the March Papertrey Ink countdown! I have a few more projects to share with you today showcasing the new Putting Down Roots stamp set and Text Block: Friends Dies (available March 15th). Shall we get to it?

I wanted to use the Putting Down Roots pots with other small florals you might already have in your collection. I thought I'd give it a shot today with Mini Blooms and I'm thrilled how it turned out!


I began with the tag. I die cut a Tag Sale #8 Die and stamped it with the flowers from Mini Blooms, pot from Putting Down Roots, and sentiment from Tag-its #2 stamp sets.


I die cut the flower shapes and used a mix of flat and foam adhesives to give the bouquet a bit of dimension. I then added an Aqua Mist layer that I'd cut into a frame. I finished the flowers with a bit of Crystal glitter for some sparkle.

I started the card by stamping the Aqua Mist card front with the large plaid pattern from Autumn Pattern Pieces using Fresh Snow ink. I adhered that to a white card base and set it aside.


Next, I stamped the bouquet onto a strip of white cardstock. Then, I die cut the sentiment banner from Spring Moss cardstock, stamped it with the sentiment from Fillable Frames #4, and added a couple of white stitches with white crochet thread. I adhered the floral panel to the card front and mounted the sentiment atop it with foam tape. I die cut the pot and flowers and stamped them with the coordinating images. I added those to the card front with a mix of flat and foam adhesives, just as I had with the tag. I finished it off with a bit of crystal glitter.

My last project for today features the new Text Block: Friends Die.


I began by Xyroning and die cutting several of the Text Block shapes. I stacked them together for sturdy dimension and glittered the top layer. I then stamped a patterned circle from Polka Dot Basics III on a Soft Stone card base using Raspberry Fizz ink. I layered the glittered Text Block stack over that circle.


Here's the sneaky thing about this card. A hidden pop of color!

That's all for me today. Thank you so much for visiting! Make sure to check in with Nichole, Betsy, Danielle, Dawn, Erin, Heather, Laura, Laurie, Maile, Melissa, and Melissa for even more inspiration. I'll see you again tomorrow!

Recipes:
Mother's Day Bouquet Ensemble
Stamps: Putting Down Roots (available March 15th), Mini Blooms, Tag-its #2, Fillable Frames #4, Autumn Pattern Pieces - Papertrey Ink
Cardstock: Aqua Mist, Spring Moss - Papertrey Ink; white
Ink: Spring Moss, Sweet Blush, Autumn Rose, Scarlet Jewel, Simply Chartreuse, Dark Chocolate, Fresh Snow, Fine Linen - Papertrey Ink
Other: Putting Down Roots Die Collection (available March 15th), Mini Blooms Die Collection, Tag Sale #8, Get A Handle On It Die Collection - Papertrey Ink; Crystal Fine Glitter - Martha Stewart Crafts; Foam Tape - Scotch; White Crochet Thread

Stacked Text Block Card
Stamps: Polka Dot Basics III (available March 15th) - Papertrey Ink
Cardstock: Soft Stone, Raspberry Fizz - Papertrey Ink; white
Ink: Raspberry Fizz - Papertrey Ink
Other: Text Block: Friends Die (available March 15th) - Papertrey Ink; Crystal Fine Glitter - Martha Stewart Crafts; Xyron

Wednesday, March 12, 2014

March Papertrey Ink Countdown - Day 3

Good morning! Welcome back to Day 3 of the March Papertrey Ink countdown. I'm so glad to see you all have been enjoying the new products I have coming out this month. I'm having such fun sharing with you and I have a couple of additional projects on deck today. Let's get to it!

My first project for you today is a little gift ensemble for a new neighbor. You could easily tailor this same idea for a birthday or Mother's Day occasion though, too.


I began by assembling a basket using the Berry Basket Die using Classic Kraft cardstock and a few strips of Scor-tape. Next, I created a basket liner with an 11 1/2" square of muslin. I pulled a few threads around the outside to give it a little bit of a casually decorative edge.


Then, I stamped the cactus image and sentiment from Putting Down Roots (I didn't worry about using waterproof inks since this isn't the sort of thing that would be washed). I stitched on one of the pots using Aqua Mist felt and some embroidery floss and finished it with a Melon Berry button that had a little bit of a floral burst pattern in the center.

Next, I made the coordinating pillow box.


I started by die cutting a box from Rustic White cardstock and stamped it with the same cactus and sentiment as the basket liner. I adhered a felt Aqua Mist pot onto the box with Scor-tape and stitched on another Melon Berry button before assembling the box. You could include a gift card to a local nursery, home improvement store, or home decor shop for your new neighbor in the box. Alternatively, it could be a great way to give someone new to the area a handful of business cards for convenient dry cleaners, landscapers, banks, markets, and other local shops or necessities. Just a thoughtful way to welcome new people to the neighborhood.


I finished the ensemble by tying a bow around a potted cactus (inexpensively purchased at a local nursery - Sean was pumped that this new set meant a few new plants around the house) and filling the basket with a bit of crinkle shred. All in all, a new neighbor gift that totaled between $7 and $35, depending on whether you go the gift card or business card route. Not too shabby!

My second project for you today uses the new Text Block: Friends Die. I knew I wanted to incorporate stripes of color and I figured the easiest way would to be the old Build-A-Pattern-Then-Die-Cut-It route. So that's exactly what I did.


I started by cutting strips of cardstock in varying widths and played around with them until I had an arrangement I liked. Then, I stamped a few of them with polka dot, striped, and argyle patterns for a little added interest. I laid them all out on the sticky side of a piece of label paper and then ran the whole thing through my Xyron.


Note: The label paper (or similar text weight paper) is important for this step! If you use cardstock your finished piece will be too thick to die cut all the way through. Ask me how I know. I die cut the striped panel and adhered it to a piece of vellum cardstock.


Then, I textured a Classic Kraft card base using the Sunrise Impressions 2 Impression Plate, doing my best to center the pattern widthwise. I finished the card by mounting the sentiment panel to the card base with narrow strips of foam tape. The simplicity of the card really lets the pattern of the die cut take center stage.

That's all for me today. I hope you've enjoyed today's projects! I'll be back to share again tomorrow, but in the meantime Nichole Heady, Danielle Flanders, Dawn McVey, Erin LincolnHeather Nichols, Laura Bassen, Melissa Phillips, and Melissa Bickford all have more inspiration for you. Have a great day and I'll see you tomorrow!

Recipes:
New Neighbor Cactus Ensemble
Stamps: Putting Down Roots (available March 15th) - Papertrey Ink
Cardstock: Classic Kraft, Rustic White - Papertrey Ink
Ink: Limeade Ice, Ripe Avocado, Dark Chocolate - Papertrey Ink
Other: Putting Down Roots Die Collection (available March 15th), Berry Basket Die, Essential Pillow Box Die, Aqua Mist Felt, Melon Berry Button, Aqua Mist Saddle Stitched Ribbon - Papertrey Ink; Embroidery Floss - DMC; Scor-tape; muslin

Sunrise Friend Card
Stamps: Background Basics Retro, Background Basics Super Stripes, Polka Dot Basics II, Polka Dot Basics, A Little Argyle - Papertrey Ink
Cardstock: Classic Kraft, Summer Sunrise, Hawaiian Shores, Terra Cotta Tile, Simply Chartreuse, Harvest Gold, Orange Zest, Limeade Ice, Aqua Mist, Vellum, White Adhesive Sheets - Papertrey Ink
Ink: Summer Sunrise, Simply Chartreuse, Canyon Clay, Terra Cotta Tile, Hawaiian Shores - Papertrey Ink
Other: Text Block: Friends Die (available March 15th), Sunrise Impressions 2 Impression Plate - Papertrey Ink; Foam Tape - Scotch; Xyron

Tuesday, March 11, 2014

Introducing The Text Block: Friends Die

Hello again, friends and welcome back to Day 2 of the Papertrey Ink March new release countdown! I mentioned yesterday that I had a couple of things to share this month, but I only introduced Putting Down Roots (hmmm...curious...). Well, that's because I was saving an additional debut for today! I have the pleasure of announcing the second installment of the Text Block Die series. This one is all about friends. We also decided to make a few adjustments to the measurement to make it compatible with your favorite pocket scrapbooking supplies. Ready to see a couple of samples?

I've been loving rainbows lately. I'm not sure if it's the cheerful colors or the hint toward Spring, but rainbows have been on my radar in a big way. I wanted to try and incorporate a rainbow in one of my cards today. I gave it a go and I have to say, I'm pleased at how it turned out!


I began by running swatches of each of my cardstocks through my Xyron machine. I die cut those and used a little creative cutting to get everything to fit together well. I trimmed the words out of my white frame and used it to sort of seal in the edges and give the whole piece a nice, finished edge. Then, I glittered the daylights out of the colorful parts. This achieved two things: it masked any minor seam issues and it made everything sparkly. I backed that finished piece with a piece of clear cardstock just to reinforce the text. I stamped a white card base with the sun and clouds from Up, Up, and Away in opposing corners (signifying good times and not so good times - since a true friend is there for both) and textured it with the Linen & Canvas Impression Plate. Finally, I mounted my glittered word frame onto the card using narrow strips of foam tape. Colorful and shimmery!

For my second project today, I wanted to go with a window card using my new die.


I began by Xyroning and die cutting a piece of white cardstock using the Text Block Friends Die. Then, I die cut several strips of Simply Chartreuse cardstock using the Loop De Loop Border Die. I used those strips to create a decorative border around the Text Block shape and adhered that piece to a panel of clear cardstock. Next, I trimmed a window in an Aqua Mist card front and white card base. I stamped and heat embossed the hearts background from Simple Valentine and adhered my Text Block piece in place with foam adhesive. Then, I die cut another frame from Berry Sorbet cardstock. I heat embossed the heart negative with clear powder to give it a shiny finish and then mounted it in place on my card front with foam adhesive.

That's all for me today, but Nichole is sharing her Text Block: Friends Die projects today, too, so make sure to check in over on her blog. Dawn McVey, Erin Lincoln, Heather Nichols, and Melissa Bickford are also sharing more with their new products over on their blogs today. I'll be back tomorrow with more of Putting Down Roots and the Text Block: Friends Die. I hope to see you then! Enjoy the rest of your day!

Recipes:
Text Block Rainbow Card
Stamps: Up, Up, and Away - Papertrey Ink
Cardstock: Pure Poppy, Orange Zest, Harvest Gold, New Leaf, Hawaiian Shores, Clear Cardstock - Papertrey Ink; white
Ink: Lemon Tart, Aqua Mist - Papertrey Ink; VersaMark - Tsukineko
Other: Text Block: Friends Die (available March 15th), Linen & Canvas Impression Plate - Papertrey Ink; Fine Crystal Glitter - Martha Stewart Crafts; Foam Tape - Scotch; Xyron Machine

Text Block Window Card
Stamps: Simple Valentine - Papertrey Ink
Cardstock: Aqua Mist, Simply Chartreuse, Berry Sorbet - Papertrey Ink; white
Ink: VersaMark - Tsukineko
Other: Text Block: Friends Die (available March 15th), Loop De Loop Border Die - Papertrey Ink; Clear Detail Embossing Powder - Filigree; Foam Tape - Scotch

Monday, March 10, 2014

Introducing Putting Down Roots

Good morning, friends! Welcome to Papertrey Ink's March release countdown. I have a couple of things to introduce to you in the coming days. Today I get to share a brand new stamp set, Putting Down Roots (available March 15th)! This set includes mix 'n match houseplants and pots as well as a few handy sentiments for creating something thoughtful for a new neighbor or homeowner. How about we get to a few projects, eh?

My first project today uses one of the multi-step cacti as its focus.


I began by stamping a piece of white cardstock with the cactus in Simply Chartreuse and Ripe Avocado inks. Then I added the clouds from Up, Up, and Away using Spring Rain ink rolled around their edges. I stamped the sentiment, from Putting Down Roots, in my cloud bank using Dark Chocolate ink. Next I created sand dunes using the In The Meadow dies. I began by Xyroning a strip of Fine Linen and a strip of Classic Kraft cardstock (note: I added the adhesive to the FRONT of my cardstock strips).


I die cut my die shapes and removed the adhesive backing from my cut shapes and sprinkled them with sand for a realistic finish. I adhered them to the cactus panel with a combination of flat and foam adhesives and set that piece aside.


Next, I stamped my Spring Rain card front with the diamond pattern from Irresistible Ikat in Simply Chartreuse ink. I followed up by stamping the small dot from that set with VersaMark and heat embossed them with white detail powder. I textured the Spring Rain panel with the Linen & Canvas impression plate before adhering it to a white card base. I tied a twine bow around the card base and then mounted my cactus panel to my card front with foam tape. I wanted just a pop of extra color, so I stamped my rosette onto a scrap of white cardstock using Summer Sunrise and Canyon Clay inks. I hand trimmed it and added it to my cactus using foam adhesive.

My second card using Putting Down Roots is a very simple housewarming card for those instances when you're running out the door to a party (That never happens to anyone, right? Riiiiight...).


I began by stamping a Classic Kraft card base with polka dots using Fresh Snow ink. Then, I die cut a Half & Half shape and stamped it with one of the background strips from the coordinating set using Spring Moss ink. I adhered that piece to the Kraft card base and set it aside.


Next, I die cut a circle of white cardstock and stamped it with one of the plant images and sentiments from the set. Then, I die cut one of the pots and stamped it with the coordinating image that had been rock 'n roll inked using Canyon Clay and Terra Cotta Tile inks. I then mounted the circle and the pot to the card front with foam adhesive. Easy as pie!

I have one last card for you folks today. I wanted to play around with all of the different plants and pots on this one.


I began by stamping my plants and pots onto Rustic White cardstock using an assortment of inks. Then, I stamped my sentiment and layered the stamped panel with Limeade Ice cardstock before setting it aside.


I textured a panel of Tropical Teal cardstock with the Rustic Burlap Impression Plate and adhered it to a Rustic White card base. I wrapped the base with Aqua Mist saddle stitched ribbon and baker's twine before mounting the stamped plant panel with foam tape.

That's all I have for you today, but Nichole and Betsy are showcasing Putting Down Roots today, so make sure to check in with them. Dawn, Erin, Heather, and Melissa Phillips, Maile, and Melissa Bickford all have projects to share with you today. I hope to see you back here tomorrow! Have a great day!

Recipes:
Desert Neighborhood
Stamps: Putting Down Roots (available March 15th), Irresistible Ikat, Up, Up, and Away - Papertrey Ink
Cardstock: Spring Rain, Classic Kraft, Fine Linen - Papertrey Ink; white
Ink: Simply Chartreuse, Ripe Avocado, Dark Chocolate, Spring Rain, Summer Sunrise, Canyon Clay - Papertrey Ink; VersaMark - Tsukineko
Other: Linen & Canvas Impression Plate, In The Meadow Die Collection, Rustic Jute Twine - Papertrey Ink; White Detail Embossing Powder - Filigree; Foam Tape - Scotch; Sand

Happy Housewarming
Stamps: Putting Down Roots (available March 15th); Half & Half, Polka Dot Basics - Papertrey Ink
Cardstock: Classic Kraft - Papertrey Ink; white
Ink: Ripe Avocado, Spring Moss, Canyon Clay, Terra Cotta Tile, Fresh Snow, Dark Chocolate - Papertrey Ink
Other: Putting Down Roots Die Collection (available March 15th), Half & Half Die Collection - Papertrey Ink; Circle Die - Quickutz; Foam Tape - Scotch

New Home Congratulations
Stamps: Putting Down Roots (available March 15th) - Papertrey Ink
Cardstock: Tropical Teal, Limeade Ice, Rustic White - Papertrey Ink
Ink: Aqua Mist, Tropical Teal, Hawaiian Shores, Limeade Ice, Simply Chartreuse, Ripe Avocado, Pinefeather, New Leaf, Dark Chocolate - Papertrey Ink
Other: Aqua Mist saddle stitched ribbon, Rustic Burlap Impression Plate - Papertrey Ink; Green Apple Baker's Twine - Divine Twine; Foam Tape - Scotch

Wednesday, March 5, 2014

March Sneak Peek

I can't believe it's March. I mean really...what?! Well anyway, I have a little something to share with you coming up here in a few days.


It'll be great for new home cards and such. Or the succulent-lover in your life. Everyone has one of those, right? No? Just me? Ok...it'll be fun! So check back here starting on the 10th. See you soon!

Saturday, March 1, 2014

March Color Play

Good morning, crafty friends, and welcome to this month's Color Play post! I'm so glad to be continuing with this newsletter feature for another year. Finding photos and creating the challenges each month has been a joy for me. I've used colors for these posts that had previously languished on a shelf in my studio. These challenges have taught me that it can be a very good thing to push yourself once in awhile. In fact, I'm doing a little bit of pushing today.


It's no secret that I'm not Raspberry Fizz's biggest fan (I'll leave that to Dawn; it's growing on me, by the way), but when I saw this photo I just knew it would be a fun combo to use. The daring pink door and shutters were so striking, especially when viewed against a fairly neutral stone background. Add in a few pops of bright, leafy green and classic black and white for a solid combination that can go from traditional to trendy and back again.


I began my card today by die cutting a card front overlay from Soft Stone cardstock using the Center Stage Cover Plate. I adhered it in place over a white card base and set it aside. Next, I die cut two of the Garden Grace floral spray shapes from white cardstock. On those shapes I stamped my solid leaves with New Leaf ink and the open blooms with Raspberry Fizz ink. Then, I carefully watercolored my blooms with diluted Raspberry Fizz ink refill. I set them aside to dry while I stamped my sentiment shape. I die cut a Boutique Borders: Sympathy shape from white cardstock and stamped it with the coordinating image in True Black ink. The scrollwork of the Boutique Borders image reminded me of the wrought iron in the inspiration photo's window. Next, I stamped the Mother's Day sentiment from Blooming Button Bits onto the frame. By this time my floral sprays were mostly dry, so I gave them a quick blast of heat with my embossing gun and then stamped the open blooms over the watercolored areas for a second time. I did this because the watercoloring softened the original lines and I wanted the crisper, fresh ink for a bit of contrast.


After all that, I felt like the blooms could use a little something. I finally decided to paint over each flower with shimmer spray. To do that I simply shook up the shimmer spray and poured a small amount onto a paint palette and used it like any other paint. A small detail brush made the process much easier. The result is a very subtle shimmer that I'm very happy with. Finally, I adhered the flowers and sentiment frame to the card front with a combination of foam adhesive and Scor-tape. A tiny self-adhesive pearl that I colored to match finishes off the card nicely.

Thank you for joining me today! I hope you'll share your projects using this month's color scheme over on the brand new Inspiration Archive post on Nichole's blog. You can go there all month to link up your projects made with the newsletter inspiration features in mind. Nichole also has all sorts of news over on her blog today, so you'll definitely want to check in over there. I hope to see you all again soon! Have a great weekend!

Recipe:
Stamps: Garden Grace, Boutique Borders Sympathy, Blooming Button Bits - Papertrey Ink
Cardstock: Soft Stone - Papertrey Ink; white
Ink: Raspberry Fizz, New Leaf, True Black - Papertrey Ink
Other: Center Stage Cover Plate, Garden Grace Die Collection, Boutique Borders Sympathy Die - Papertrey Ink; Pearl Glimmer Mist - Tattered Angels; Self-Adhesive Pearl - Kaiser Craft; Foam Tape - Scotch; Scor-Tape