Saturday, February 15, 2014

Text Block Tips


The Text Block: Birthday die releases tonight (10pm Eastern) on Papertrey Ink's website and I thought y'all might find it helpful if I shared a few tips I learned while working with the die this week:


  • Apply your adhesive (and burnish it to make sure it's nice and secure) before you die cut. You see those tiny, narrow letters? Yes, you could use a glue pen...and then you could curse my name for years to come.
  • I use a Cuttlebug and I had the best results when I die cut up instead of down. My sandwich was: A Plate, Metal Shim, C Plate, Die facing up, Paper, B Plate. Everyone's machine is different, but that's what worked best for me.
  • If you're planning to use the die in some sort of window application make sure to invest in some clear cardstock. You'll still get the see-through effect and you'll stabilize the letters in the process (I'm looking at you "very").
  • The same goes if you want to pop your shape up on foam tape. Just make sure there's something behind your words to act as a stabilizer. Vellum would be another great option.
  • Be gentle when removing your shape from your die. You don't have to use kid gloves, but there are a few spots (the "a very" line primarily) where the connections to the frame are narrow and it would be a shame to tear them. I never did so it's not like you have to be crazy vigilant, but I thought it was worth mentioning.
  • Try different materials! I showed cork, but fun foam, super thin wood veneer (1/64"), stabilized fabric...use your imagination!


Most importantly, HAVE FUN! Enjoy your weekends, friends! See you soon!

Friday, February 14, 2014

Text Block: Birthday Die - Day 6 (Yay! Bonus!)

Hello! Welcome back to Day 6 of the Papertrey Ink 7th Anniversary Release countdown. We started a day early, so this is actually a bonus! Who doesn't love a bonus? I have one more project to share featuring the Text Block: Birthday Die. Shall we?

I wanted to create a card that might appeal to younger folk (and I mean much younger, like children younger), but with a few variations in color this card could really work for just about anybody.


I began by Xyroning and die cutting a Text Block from both Hawaiian Shores and Tropical Teal cardstock. I then stamped the Tropical Teal shape with the stars pattern from Bitty Background Blocks II using Pinefeather ink. I layered the two shapes using the Drop Shadow Die Cuts technique that Betsy Veldman did for a recent Make It Monday video. I also used the same technique for the star embellishment. I didn't have a darker red cardstock that complemented Pure Poppy, so I just colored a scrap of Pure Poppy with a W4 Copic to create a darker shade of cardstock. I set both layered pieces aside while I worked on my card base.


I had a lot of fun with my February Color Play card, so I decided to employ the same technique for today's card. I traced a very light pencil line around the shape of the die to make sure my dots would be visible both inside and outside the frame and then went to town stamping dots (and a few tiny stars) from several sets in a rainbow of colors (Pure Poppy, Summer Sunrise, Harvest Gold, Simply Chartreuse, and Hawaiian Shores). When my dots were finished and the pencil line was erased, I adhered my Text Block shape directly to my card base and then added the star with foam tape. A handful of the dots were embellished with Glossy Accents for added texture and shine.

Well, that's all I have for you this countdown. Thank you so much for joining me all week and I can't wait to see how you all use the Text Block: Birthday Die for yourselves. Make sure to check in with NicholeAshleyBetsyCristinaDanielleDawnErinHeatherLauraMelissa Phillips, and Melissa Bickford for even more inspiration using this month's new releases. See you soon!

Recipe:
Stamps: Bitty Background Blocks II, Birthday Style, It's A Celebration (this set is heading to The Vault after today), Foodie Fun, Holiday Cheer - Papertrey Ink
Cardstock: Pure Poppy, Hawaiian Shores, Tropical Teal - Papertrey Ink
Ink: Pinefeather, Scarlet Jewel, Pure Poppy, Summer Sunrise, Harvest Gold, Simply Chartreuse, Hawaiian Shores - Papertrey Ink
Other: Text Block: Birthday Die (available February 15th), Tremendous Treats Halloween Die Collection - Papertrey Ink; W2 Marker - Copic; Xyron Machine; Glossy Accents - Ranger; Foam Tape - Scotch

Thursday, February 13, 2014

Text Block: Birthday Die - Day 5

Hello, friends! Good morning and welcome back to Day 5 of the Papertrey Ink 7th Anniversary Release countdown. I have another project to share with you featuring the new Text Block: Birthday Die, so let's get to it!

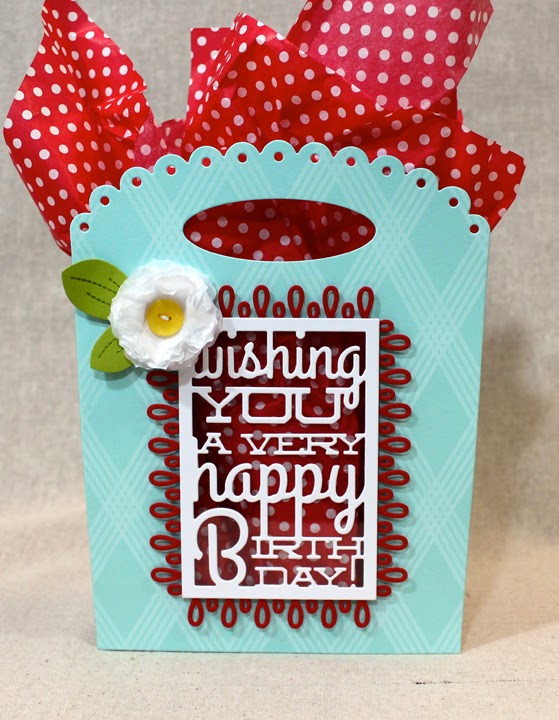
I wanted to branch out a little bit and try something that wasn't a card for today's project. What else goes with birthday gifting better than an adorable window bag? Not much!


I began by die cutting two of the Front & Center #1 shapes from Aqua Mist cardstock. Then, I stamped them with Background Basics: Super Stripes using Fresh Snow ink and set them aside for a moment. Next, I die cut my sentiment frame from a piece of white cardstock that I had run through my Xyron. That piece was adhered to a panel of Clearly Creative cardstock. Then, I traced lightly around the die cut onto the front panel of my gift bag. I used a craft knife to cut inside that line (by about 3/16" or so) to create the window in the front panel. Then, I adhered that panel to a white lunch sack.


To get the window in the bag, I placed a piece of chipboard inside the bag and used the cuts in my Front & Center piece as a guide to trim the gift bag. The chipboard keeps you from inadvertently cutting through both sides of the bag. I removed the chipboard and adhered my back bag panel into place. I adhered my sentiment window into place with thin strips of foam tape. The hole in the bag should be small enough that your window has plenty of area to attach.


The bag still felt a little unfinished, so I created a little flower embellishment using layers of scrunched tissue paper, the middle Beautiful Blooms II #1 die, and a Lemon Tart button stitched through the center. The flower needed a leaf and the new Leave It Be dies were the perfect solution! I stamped my leaf shape with the coordinating detail image and heat embossed it with clear powder. The flower was adhered to the bag front with a bit of foam tape. I finished off my little gift bag by stuffing it with a bit of red and white polka dotty tissue paper.

I'm so glad you joined me today! I have one more day of countdown to share a project with you, so I hope you'll stop by tomorrow to see what I have up my sleeve. Until then, NicholeAshleyBetsyCristinaDanielleDawnErinHeatherLauraMelissa Phillips, and Melissa Bickford all have projects to share with you! Have a wonderful day and I'll see you tomorrow morning!

Recipe:
Stamps: Leave It Be (available February 15th), Background Basics: Super Stripes - Papertrey Ink
Cardstock: Aqua Mist, Simply Chartreuse, Pure Poppy, Clearly Creative Cardstock - Papertrey Ink; white
Ink: Fresh Snow - Papertrey Ink; VersaMark - Tsukineko
Other: Text Block: Birthday Die (available February 15th), Leave It Be Die Collection (available February 15th), Front & Center #1 Die, Loop De Loop II Border Die, Beautiful Blooms II #1 Die Collection, Lemon Tart Button - Papertrey Ink; Foam Tape - Scotch; Clear Embossing Powder - Filigree; White Tissue Paper, Polka Dot Tissue Paper - Target; White Crochet Thread; Xyron; Scor Tape

Wednesday, February 12, 2014

Text Block: Birthday Die - Day 4

Good morning, stampy friends! Welcome back to Day 4 of the Papertrey Ink 7th Anniversary Release countdown. I'm so glad to hear that you've been enjoying my projects this week! The Text Block: Birthday die truly makes this whole "quick and easy" thing totally come together. I've really been enjoying making samples for all of you and I can't wait until you folks start using it for yourselves. I have another project to share with you, so let's get to it!

I wanted to play with watercolor today. I've never really experimented with watercolor, but I'm so glad I decided to jump on the bandwagon! It's super fun (never mind the fact that my hand looks a little like a slasher film prop).


I began by using Berry Sorbet reinker to color wash a scrap of letterpress stock. You could absolutely use watercolor paper, but I didn't have any on hand. I have plenty of scraps of letterpress stock laying around though, so I figured it was worth a shot. I set the watercolored panel aside to dry, but eventually got impatient and started drying it with my heat gun (keeping it real here, folks). Once it was fully dried, I ran it through my Xyron and die cut it with the Text Block: Birthday die. Next, I created a card base from Clearly Creative Cardstock and adhered my block in the center.


Then, I went about creating the inside portion of the card. I stamped the floral sprays from Mini Blooms in Simply Chartreuse ink onto a white card base. Next, I die cut the flower shapes from white stock and stamped them with a trio of Lemon Tart, Sweet Blush, and Berry Sorbet inks. I adhered the flowers overtop their green counterparts, leaving everything flat. Then, I adhered the white base inside the clear base with a strip of Scor Tape (the adhesive is on the back, right up near the fold). I finished the card with a white crochet thread bow. The card itself is nice and simple, but it's colorful enough not to be boring. I also love how the sentiment seems to float over the floral sprays.

Hopefully you've enjoyed today's card! I'll have even more to share with you tomorrow, but in the meantime, Nichole, Ashley, Betsy, Cristina, Danielle, Dawn, Erin, Heather, Laura, Melissa Phillips, and Melissa Bickford all have projects to share with you! Have a wonderful day and I'll see you tomorrow morning!

Recipe:
Stamps: Mini Blooms - Papertrey Ink
Cardstock: Clearly Creative Cardstock - Papertrey Ink; Letterpress Stock - Crane; white
Ink: Berry Sorbet (pad and reinker), Lemon Tart, Sweet Blush, Simply Chartreuse - Papertrey Ink
Other: Text Block: Birthday Die (available February 15th), Mini Blooms Die Collection - Papertrey Ink; Xyron; Glue Pen; White Crochet Thread

Tuesday, February 11, 2014

Text Block: Birthday - Day 3

Good morning, friends, and welcome back to Day 3 of Papertrey Ink's 7th Anniversary release countdown! I have another project to share with you featuring the new Text Block: Birthday Die and, as promised, it's a more traditionally masculine design. Shall we get to it?


I began by die cutting my framed sentiment from self-adhesive cork. This stuff cuts beautifully and it gives your projects a wonderful, earthy texture. The backing also helps stabilize the shape while you're removing the negative parts. Next, I trimmed a piece of Rustic White cardstock to 4 1/4" x 3" and masked off the outer edge, leaving a window in the center. In that space, I stamped two of the leaves from Dawn's new Leave It Be set using Spring Moss and Ripe Avocado inks. By the way, I'm absolutely smitten with this set, folks. It has so many options and the second step images add fantastic detail.


I removed the mask from the outer edge of the Rustic White panel and adhered my cork die cut overtop the leaves. Next, I used the Woodgrain Impression Plate to texture a Ripe Avocado card front and adhered that to a Rustic White card base. I wrapped the base with Rustic Jute Twine and mounted my cork/leaf panel with foam tape. It's nice and simple, but with loads of natural texture.

Thank you so much for joining me today! I'll have more to share with you tomorrow, so be sure to check back. In the meantime, Nichole, Danielle, Dawn, Erin, Heather, Melissa Phillips, and Melissa Bickford all have more to share with you today. See you soon!

Recipe:
Stamps: Leave It Be (available February 15th) - Papertrey Ink
Cardstock: Rustic White, Ripe Avocado - Papertrey Ink
Ink: Spring Moss, Ripe Avocado - Papertrey Ink
Other: Text Block: Birthday Die (available February 15th), Woodgrain Impression Plate, Cork Sheets, Rustic Jute Twine - Papertrey Ink; Foam Tape - Scotch