Thursday, January 16, 2020

The Greetery - Coming Up Roses

Good morning, everyone! Thank you so much for your kind comments yesterday! We're very happy and excited and it's very sweet of all of you to join in our happiness.

Now let's get to something else that makes me very happy...the new release from The Greetery! I have a few more projects to share today featuring this month's Love Letters collection. Let's jump right in!

LizzieJones_TheGreetery_January2020_SketchbookRosesProjects

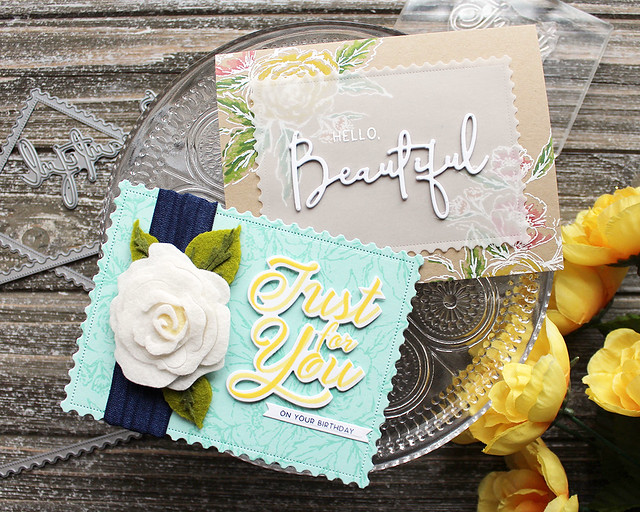
These first two projects show a couple of ways to use the new Sketchbook Roses stamp set. It's gorgeous as a monochromatic background, as a colorful focal point, or even colored with your favorite medium.

LizzieJones_TheGreetery_January2020_SketchbookRoses_HelloBeautifulCard

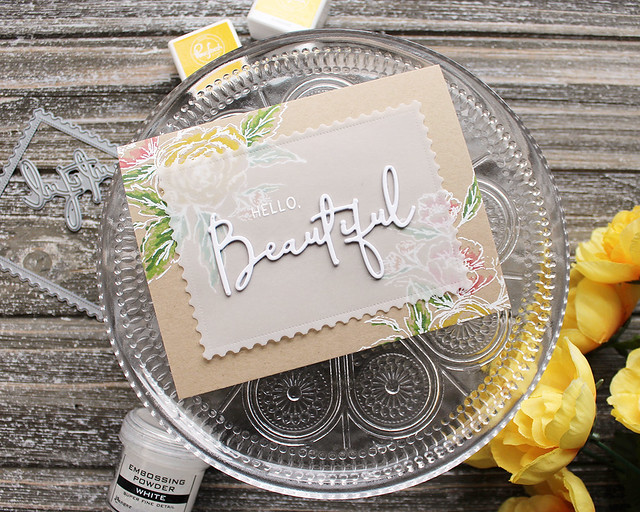
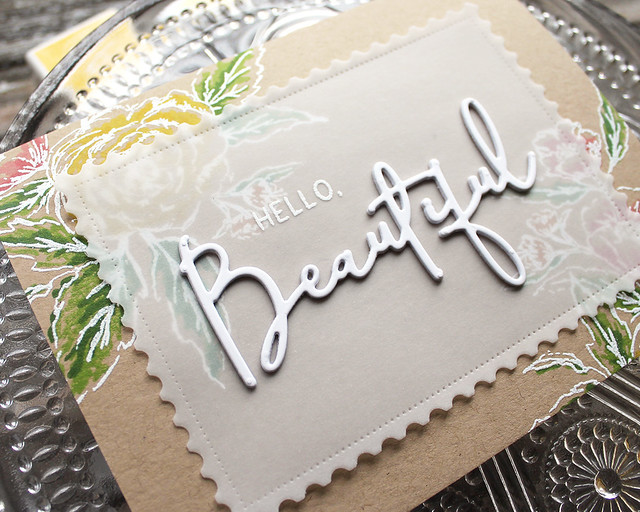
For this first card, I began by first stamping onto Kraft cardstock with Kraft ink. I used the layering stamps to add color to the blooms and leaves before heat embossing over the original Kraft stamping with white powder. The result reminds me of vintage textiles and I love it!

LizzieJones_TheGreetery_January2020_SketchbookRoses_HelloBeautifulCard2

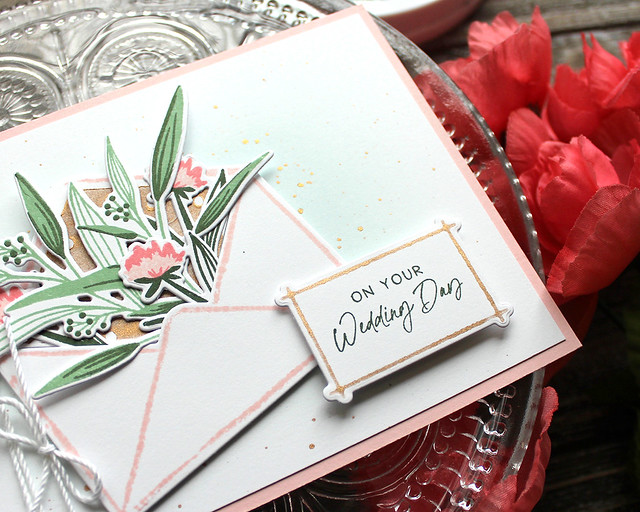
Next, I die cut a vellum layer using the new Postal Frames die. I heat embossed it with part of a sentiment from the Sketchbook Roses and finished with a die cut sentiment, the new Let's Have A Word: Beautiful.

LizzieJones_TheGreetery_January2020_SketchbookRoses_HelloBeautifulCard3

I kept things simple by adhering the vellum layer over the floral card base, hiding the adhesive under the die cut greeting. I'm totally digging all of those pops of crisp white against the earthy Kraft.

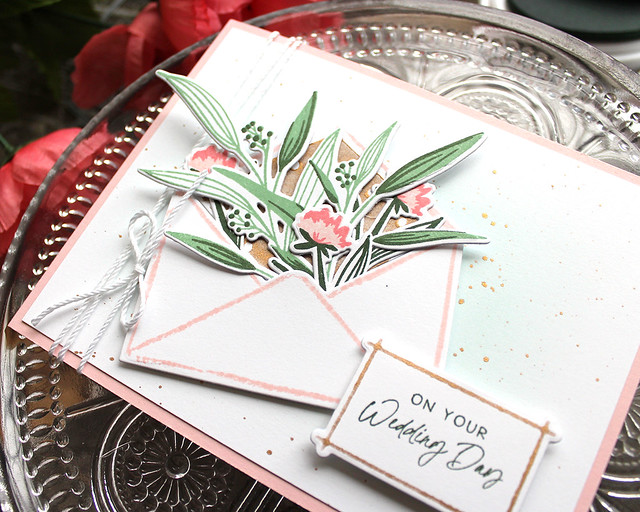
On my second project, I used the Sketchbook Roses set to create an elegant monochromatic background.

LizzieJones_TheGreetery_January2020_SketchbookRoses_BotanicutsRoses_FeltRoseHeadband

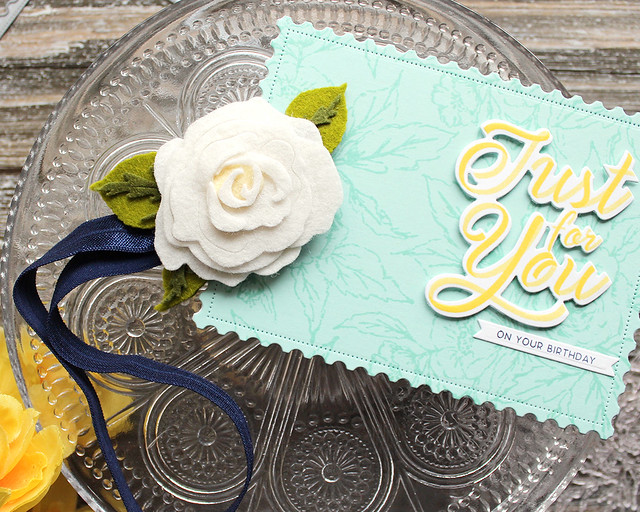
I actually started this project by using the BotaniCuts Rose to create a pretty felt headband. I cut the pieces and layered them according to the layering guide that Betsy put together. The floral parts, I kept as one layer, but I doubled up the leaves to make them a little more stable. I hot glued everything to an elastic band and layered a basic circle on the back to hide all of the unfinished edges.

LizzieJones_TheGreetery_January2020_SketchbookRoses_BotanicutsRoses_FeltRoseHeadband2

To create the card, I die cut the largest Postal Frames shape from a piece of aqua cardstock as well as a piece of thick tag stock (for stability). I stamped the aqua layer with the floral background and attached it to the thicker layer. Then, I added a sentiment from the Written In Ribbons set along with a small companion sentiment from the new Sentiment Suite: Love set. Then, I just wrapped the headband around it a couple of times for gift giving. Easy and cute packaging!

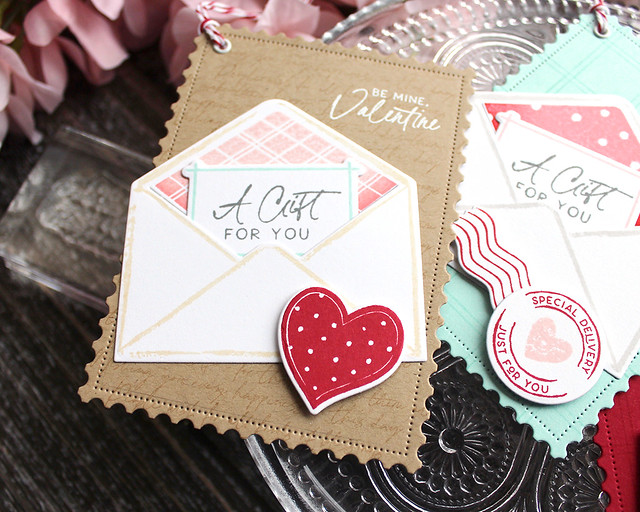
Lastly today, I have another card featuring Written In Ribbons and Sentiment Suite: Love.

LizzieJones_TheGreetery_January2020_WrittenInRibbons_SentimentSuiteLove_HelloCard

Written In Ribbons might be one of my favorite sentiment sets in a long time. The size of the greetings is super generous, making them wonderful focal points. Plus, the optional two-tone effect adds such a lovely, unique detail (you can stamp the sentiments without them if that's your preference on a particular project).

LizzieJones_TheGreetery_January2020_WrittenInRibbons_SentimentSuiteLove_HelloCard2

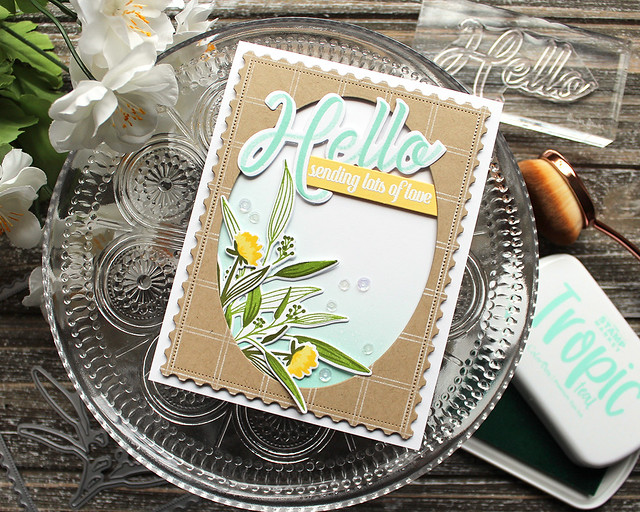
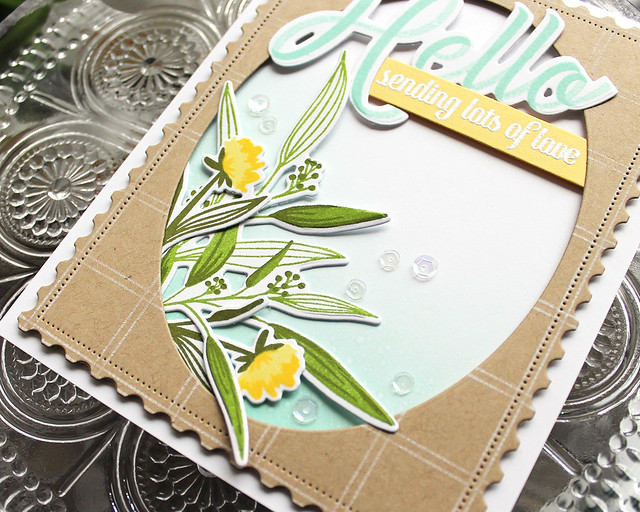
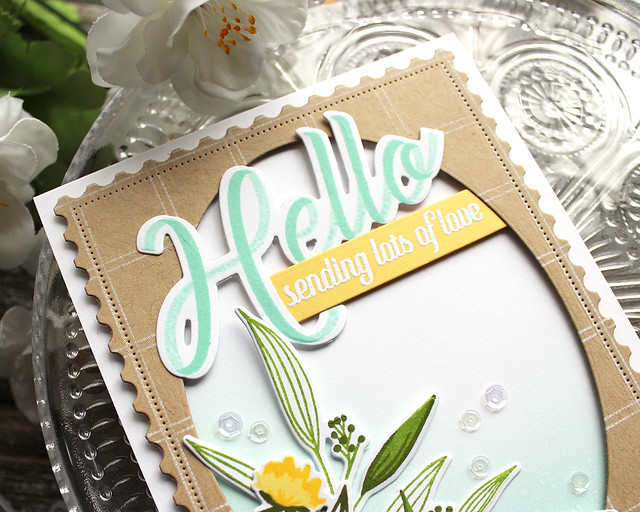
For this card, I created a frame using the Postal Frames and an oval die cut. I stamped the frame with the Windowpane Plaid Background. Next, I sponged a background onto a white card base and adhered the frame in place with foam tape.

LizzieJones_TheGreetery_January2020_WrittenInRibbons_SentimentSuiteLove_HelloCard3

Next, I stamped the Written In Ribbons sentiment and heat embossed the Sentiment Suite greeting onto a strip of yellow cardstock. I also stamped a handful of flowers and foliage from the Signed & Sealed With A Kiss set. I tucked the greenery under the frame and then adhered the sentiment in place. A few clear sequins finished things off nicely.

That's all I have to share with you today. I hope you've enjoyed my projects this month!

Don't forget to leave a comment for your chance to win a $50 gift card to The Greetery's website. Also, make sure to check in on the other ladies to see even more gorgeous projects:

Kay Miller
Laurie Willison
Dawn McVey
Heather Nichols
Keeway Tsao
Angelica Conrad
Kelly Lunceford
Norine Borys
Caly Person

Enjoy shopping tomorrow and I'll see you again soon! Have a great day!

Supplies:
Hello, Beautiful Card

Just For You Card & Felt Rose Headband

Hello Card

Wednesday, January 15, 2020

The Greetery - Pretty & Postal

Good morning, Friends, and welcome back! I know it's been a little bit quiet around here lately, but I have a good reason. Did you see our announcement? If not, you can see it here. Spoiler alert: baby (gender unknown), coming in April (or March, because who knows, but hopefully April)! So, it may stay a little quiet for a bit, but I'll try to check in as much as possible.

In the meantime, today is the first day of The Greetery's January release! There are so many beautiful things heading your way, friends. Truly. I have a few projects to share with you today to give you a sneak peek at what's to come. Let's get to it!

LizzieJones_TheGreetery_January2020_PrettyPostmarks_Signed&SealedWithAKiss_ValentineTags

You all know how much I love a good tag, right? So I had a blast creating these Valentine's Day tags with the new Postal Frames Die and the Signed & Sealed collection.

LizzieJones_TheGreetery_January2020_PrettyPostmarks_Signed&SealedWithAKiss_ValentineTags2

I began by die cutting the Postal Frames Shapes and stamping the watermarked backgrounds on each. The Pretty Postmarks script and Windowpane Plaid Background added perfect, subtle texture to the backdrop of each tag. Then, I heat embossed the tags with a sentiment from the Signed & Sealed With A Kiss set.

LizzieJones_TheGreetery_January2020_PrettyPostmarks_Signed&SealedWithAKiss_ValentineTags3

I used the envelopes and mini framed sentiments from the Signed & Sealed set as the focal point on the tags. I added a bit of sponging to the envelope liners to give them some depth before tucking the mini framed piece into the envelopes (I left them loose so they can be pulled out for a little interactive element).

LizzieJones_TheGreetery_January2020_PrettyPostmarks_Signed&SealedWithAKiss_ValentineTags4

I used images from the Signed & Sealed With A Kiss and Pretty Postmarks sets to embellish each envelope. Keeping the layout the same on each tag helps streamline the process, while using different images and colors keeps them each unique and special.

LizzieJones_TheGreetery_January2020_PrettyPostmarks_Signed&SealedWithAKiss_ValentineTags5

There are some kiddos in our lives that are sure to see these pretty little tags tied to a treat come Valentine's Day!

Next up, I've used that same sweet envelope from Signed & Sealed with the gorgeous florals in Signed & Sealed With A Kiss to create a delicate wedding card.

LizzieJones_TheGreetery_January2020_Signed&SealedWithAKiss_OnYourWeddingDayCard

I stamped and die cut the envelope and added the liner by painting directly onto the liner stamp with copper metallic watercolor. I tucked the foliage from the Signed & Sealed With A Kiss into the envelope (the handy, die-cut slit makes this a snap) and secured the stems on the back. I set that aside for a moment.

LizzieJones_TheGreetery_January2020_Signed&SealedWithAKiss_OnYourWeddingDayCard2

Then, I used the same watercolor technique on the frame. I love how it adds a soft, organic feel to the image. Once die cut, I stamped the sentiment from the Signed & Sealed With A Kiss set.

LizzieJones_TheGreetery_January2020_Signed&SealedWithAKiss_OnYourWeddingDayCard3

Next, I sponged a bit of aqua ink onto a white panel and splattered it with more of the copper watercolor. I am totally smitten with the mix of copper and pink! After it had dried, I attached that panel to a pink card base and tied it with a bit of crochet thread. All that was left to do was attach the envelope and sentiment with foam tape. I love that this card is clean, but still has plenty of texture and details to keep things interesting.

Thank you so much for joining me today! Don't forget to leave a comment for your chance to win a $50 gift card to The Greetery's website. Also, make sure to check in on the other ladies to see even more gorgeous projects:

Kay Miller
Laurie Willison
Dawn McVey
Heather Nichols
Keeway Tsao
Angelica Conrad
Kelly Lunceford

Have a wonderful day and I'll see you back here tomorrow with more of this amazing release!

Supplies:
Valentine's Day Tags


Wedding Day Card