Good morning, everyone! Welcome back for Day 3 of the March Papertrey Ink new release countdown! I'm sharing a few additional projects featuring the Retro Style stamp sets and the Text Block: You Did It die, so let's get started!
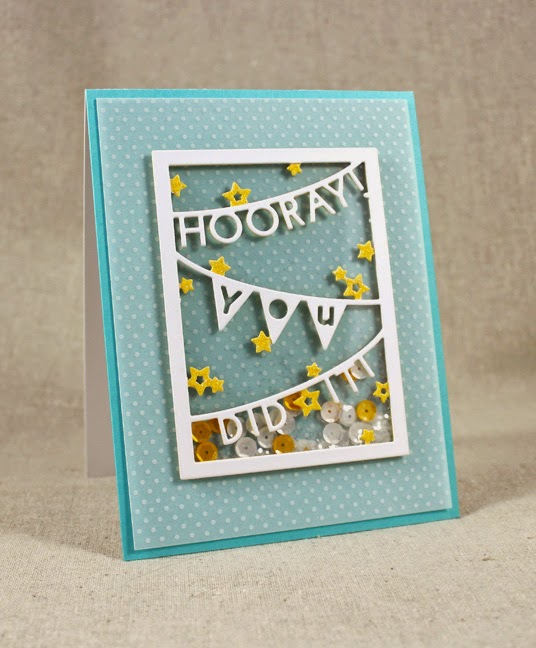
Let's begin today with the Text Block project. This die is perfect for creating shaker cards, so that's what I did with it today.
I began by die cutting two Text Block shapes, one in Harvest Gold and one in white. I cut away the stars on the white shape and layered the two together. Then, I used a glue pen to add glitter to the Harvest Gold stars. I backed that piece with clear cardstock and foam tape to create a shaker box on a layer of vellum that I filled with sequins and chunky glitter.
I added strips of narrow Scor Tape to the back of the vellum under the shaker's frame and adhered it to a Hawaiian Shores card front. It's fairly straightforward, but it's so simple and pretty that I just love it!
My next project today is one I put together for my papa-in-law's birthday.
I started by die cutting the sign shape from Aqua Mist, the bubble layer from Lemon Tart, and the rectangle and polaroid shape from white cardstock. I stamped the bubble layer once with Harvest Gold and once with VersaMark before heat embossing with clear powder. The large sign shape was stamped with the Tropical Teal arrow and the bubble image was layered on with foam tape. Next, I stamped the winged circle onto the white rectangle with Pure Poppy ink and the lights were filled in with a yellow Copic Marker. I added the sentiment to the polaroid frame with True Black and tied that piece with a bit of yellow baker's twine. Then, I stamped a pole and clouds onto a scrap of Aqua Mist cardstock using Tropical Teal and Fresh Snow inks. I assembled all of those piece to a Pure Poppy card front that I'd stamped with the chevron pattern strip in Heather's new Noted set.
Next, I created the center of the winged circle feature. I stamped the sentiment circle onto a white 3/4" circle and added it to the sign with foam tape. Then, I created an epoxy dome using Heather's epoxy embellishments technique with a 3/4" circle of xyroned clear cardstock and a bottle of Glossy Accents. Once that embellishment was dry (12ish hours) I peeled off the adhesive backing and layered it over the sentiment circle. I love the dimension this technique gives!
Today's final project is another graduation card featuring the Retro Style stamps.
I began by heat embossing the signs and poles onto a Spring Rain card base using white detail powder. Then, I went back in and filled in the signs with watermark ink. I wanted a subtle tone-on-tone appearance that would let the central sign stand out. Then, I die cut the sign and several of the accessory shapes from white cardstock.
I stamped those shapes with the coordinating images using Harvest Gold, Hibiscus Burst, Limeade Ice, and New Leaf inks. I assembled the sign with a mix of flat and foam adhesives to give the sign dimension and embellished all of the light bulbs with a glue pen and clear glitter. This card has such a bright, preppy feel and that makes me smile!
That's all I have for you today, but it's a group post day, so Nichole, Amy, Ashley, Betsy, Danielle, Dawn, Heather, Laura, Laurie, Maile, and Melissa all have projects to share that you won't want to miss. I'll see you again tomorrow!
Recipes:
Hooray Shaker Card
Cardstock: Hawaiian Shores, Harvest Gold, Sheer Basics Bitty Dot, Clear Cardstock - Papertrey Ink; white
Other: Text Block: You Did It Die (available March 15th) - Papertrey Ink; Foam Tape - Scotch; Marigold and Marshmallow Sequins - Pretty Pink Posh; Fine Crystal Glitter, Chunky Crystal Glitter - Martha Stewart Crafts; glue pen
Happy Birthday To You Card
Stamps: Retro Style Graduation (available March 15th), Retro Style Birthday Sentiments (available March 15th), Noted (available March 15th), Up, Up, & Away, Background Basics: Super Stripes - Papertrey Ink
Cardstock: Pure Poppy, Aqua Mist, Lemon Tart, Clear Cardstock - Papertrey Ink; white
Ink: Tropical Teal, Pure Poppy, Harvest Gold, Fresh Snow, True Black - Papertrey Ink; VersaMark - Tsukineko
Other: Retro Style Die Collection (available March 15th), Fabulous Frames - Papertrey Ink; Lemon Baker's Twine - Divine Twine; Foam Tape - Scotch; Glossy Accents - Ranger; Clear Embossing Powder - Filigree
To The Grad Card
Stamps: Retro Style Graduation (available March 15th), Retro Style Birthday Sentiments (available March 15th), Background Basics: Super Stripes - Papertrey Ink
Cardstock: Spring Rain - Papertrey Ink; white
Ink: Harvest Gold, Hibiscus Burst, Limeade Ice, New Leaf - Papertrey Ink; VersaMark - Tsukineko
Other: Retro Style Die Collection (available March 15th) - Papertrey Ink; White Embossing Powder - Filigree; Foam Tape - Scotch; Fine Crystal Glitter - Martha Stewart Crafts; glue pen


5 comments:
I am in love with this stamp and die set....love, love, LOVE the retro style...fabulous!
Hi lizzie,
Girl, have you got RETRO down to the T...Love your style!!
Cariños,
María Alba
Love the colorful examples and how you used the vellum.
Great cards, just love the shaker!
Michael C. will love that card!
Post a Comment