Monday, February 8, 2016

Introducing What The Doodle

Good morning, friends! It's Day 4 of the Papertrey Ink 9th anniversary countdown and today we're sharing a look at Betsy's new What The Doodle: Butterfly collection. There are coloring sheets, a stamp set, dies...what more could you ask for?

I chose to do a little coloring today. The coordinating coloring sheets are available on either watercolor paper or smooth Stamper's Select white. I went with the Stamper's Select so I could use my Copics.

Special Day Card

I began by coloring the butterflies using a Berry Sorbet, Harvest Gold, Aqua Mist, and Smokey Shadow color scheme. When I was done with my coloring, I trimmed a little off both edges of the panel, cutting around the butterfly wings, and stamped the sentiment from the What The Doodle: Butterfly set in True Black ink.

Special Day Close Up

Next, I used one of the flower images from that same set to stamp a random pattern onto an Aqua Mist card front. Then, I mounted my butterfly panel onto the Aqua Mist layer using foam tape. I used a clear Wink of Stella pen to add glitter to the butterflies as a finishing touch.

Thank you all so much for joining me today! Make sure to check in on Nichole's blog to see today's announcements (you're not going to want to miss this one). You also want to see who else is joining Dawn and Betsy in today's showcase. I'll see you again soon. Have a great Monday!

Recipes:
Stamps: What The Doodle: Butterfly - Papertrey Ink
Cardstock: Aqua Mist, What The Doodle: Butterfly Coloring Sheets - Papertrey Ink; white
Ink: True Black, Aqua Mist - Papertrey Ink
Other: Foam Tape - Scotch; Clear Wink Of Stella Pen - Zig; Copic Markers

Sunday, February 7, 2016

Introducing Tiny Town Series

Happy Sunday morning, friends! Welcome to this month's first group post for Papertrey Ink's 9th anniversary countdown. Today we're all sharing projects showcasing Betsy's new Tiny Town die series. This series is sure to please! These charming little buildings are like a super sized version of the Petite Places series. They are the perfect size for treat boxes, tags, cards, home decor...the list goes on and on. Today I've chosen to create a personalized place card that will double as a treat box for my Easter brunch table.

Church Placecard Top View

I began by die cutting the primary shape from white cardstock using the Tiny Town: Basics die. I used the Tiny Town: Church to cut an alternate front for my building and stamped the bottom edge of all of those die cut pieces with a grass border from Simply Spring Borders (more on this set soon).

Church Placecard Close Up

I used the window openings dies to add windows to the sides and front of the church. Next, I adhered clear cardstock to the inside of the building and colored in the openings with Copics (from the back) to make them look like stained glass. I assembled the church and embellished it with window frames cut from Aqua Mist cardstock and a door cut from Stormy Sea.

Church Placecard Side View

I felt like the building could use some extra contrast, so I cut the Tiny Town: Scallop Shingles roof from an additional piece of Stormy Sea. I knew I wanted to make my church a treat box, so I cut the roof in half and attached the pieces to either side of the top of the building, leaving the opening unhindered. Next, I cut a handle from white cardstock and attached it to the top of the box with pewter brads. They're easy enough to remove, so my guests won't have too much trouble getting to the treat inside.

Church Placecard Front

I attached the church box to a Stitched Circles shape (the largest in the set) cut from New Leaf patterned paper. I added a personalized name plate by die cutting and stamping a banner from the Bountiful Banners set. The name was stamped with the Fresh Alphabet in Stormy Sea ink. I attached it to the New Leaf circle with a small, L-shaped hinge so that it would pop up at a slight angle. Isn't that adorable?! I am going to have so much fun with these itty bitty buildings.

Thank you so much for joining me today! Make sure to check in with Nichole, Amy, Ashley, Betsy, Danielle, Dawn, Heather, Kay, Laurie, and Melissa for more of this fabulous new series. I'll see you again soon!

Recipe:
Stamps: Simply Spring Borders, Bountiful Banners, Fresh Alphabet - Papertrey Ink
Cardstock: Aqua Mist, Stormy Sea, Clear Cardstock, New Leaf Patterned Paper - Papertrey Ink; white
Ink: Aqua Mist, Stormy Sea, New Leaf - Papertrey Ink
Other: Tiny Town: Basics Die, Tiny Town: Church Die, Tiny Town: Scallop Shingles Die, Stitched Circles Die, Bountiful Banners Die - Papertrey Ink; Copic Markers; Xyron

Saturday, February 6, 2016

Introducing Dress Up Dolls

Good morning, everyone! Welcome back to Day 2 of the Papertrey Ink 9th anniversary countdown! Thank you all so much for your kind words yesterday. I feel truly lucky to be able to have this job and I appreciate every thoughtful word you shared with me. Today Nichole is introducing Betsy Veldman's new Dress Up Dolls series and she invited the rest of us to play along, too (all of the new products being introduced today will be available for sale at 10pm on February 15th). You're going to absolutely fall in love with these adorable little dolls! But if you're not a doll maker, don't worry! These sets are going to be great for cards and tags, maybe even scrapbook pages. Let's get to some projects, shall we?

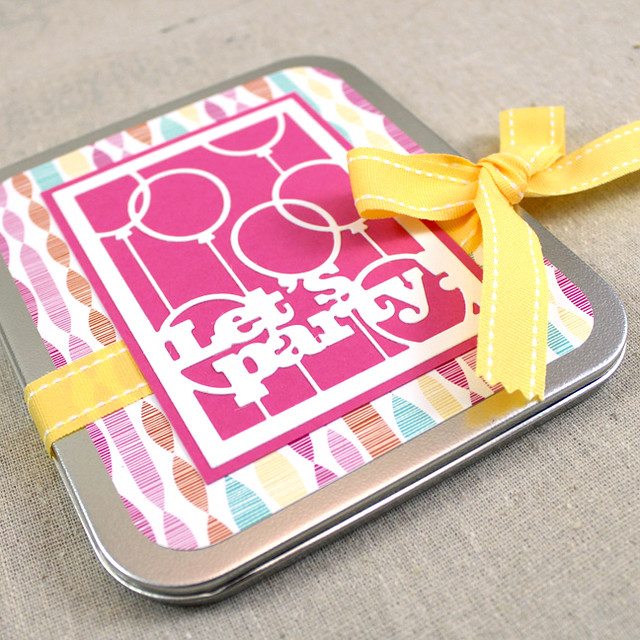
First off, let's start with a little magnetic doll set. This set is perfectly stored in a metal tin, ready for play.

Magnet Doll Tin Exterior

I began by decorating the outside of the tin with a piece of Hooray patterned paper and a Text Block: Party Time shape. I adhered the patterned paper directly to the front of the tin and then wrapped a piece of Harvest Gold ribbon around it before adhering my layered Text Block into place (I only have adhesive on the top and bottom edges of the Text Block so the ribbon can slide). I left everything flat so there would be a smaller chance of damage when traveling.

Magnet Doll Tin Interior

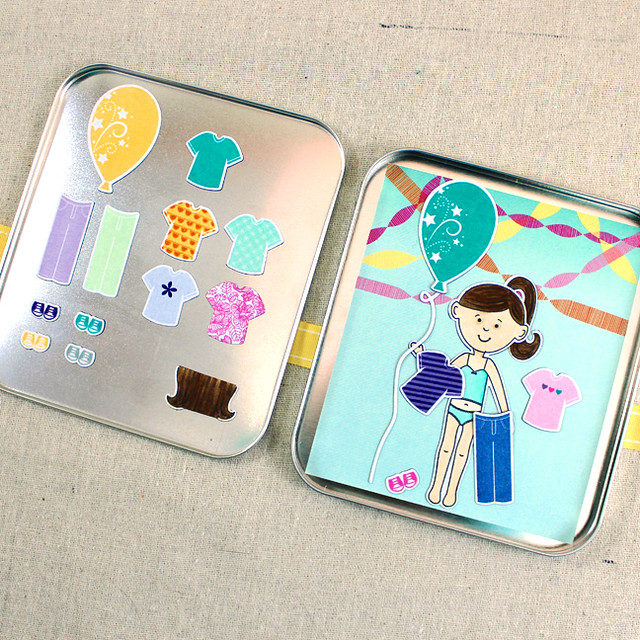
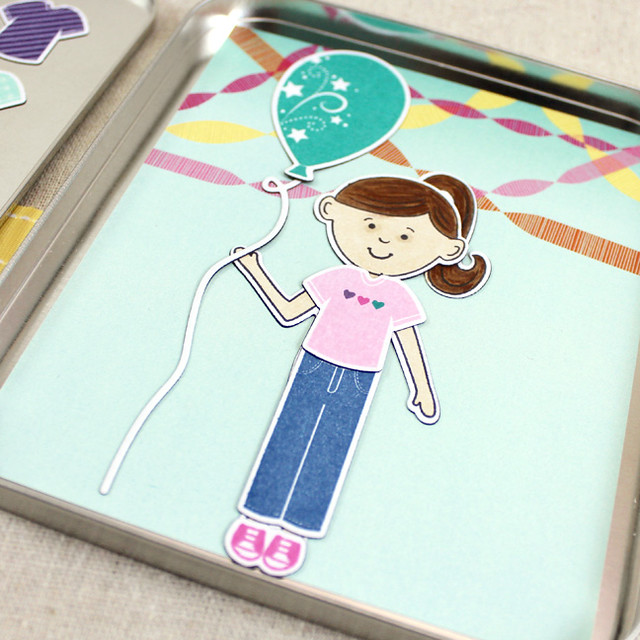
Inside is where the party really starts though! Betsy has designed both girl and boy figures along with basic clothing staples that you can mix and match to your heart's content. I created a little girl and gave her a whole wardrobe full of fun clothes.

Magnet Doll Accessories Close Up

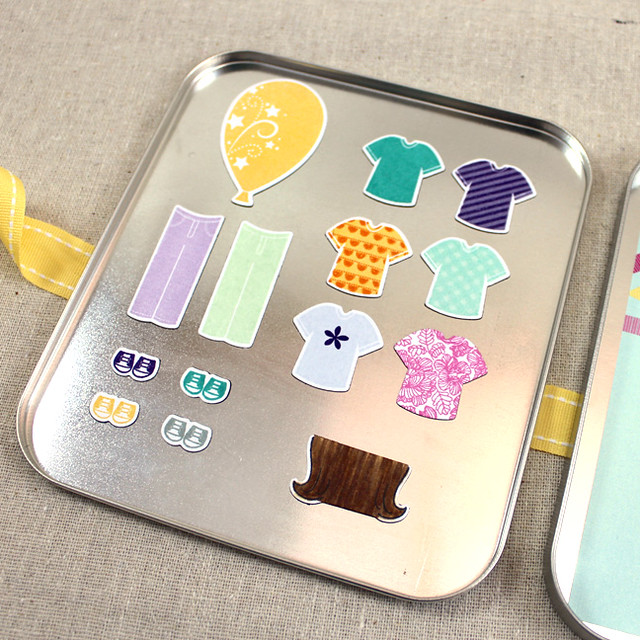
I stamped and die cut the t-shirts (in that order was easiest for me) from Adhesive Sheets paper and then added patterns to her clothes by using a kissing technique. The Bitty Background Blocks sets were totally perfect for that. Betsy has really thought of everything with this set. There are even tiny tennis shoes!

Magnet Doll Set Close Up

I also die cut and colored two hair styles and the little girl herself. It wouldn't be a party without balloons, so I included two balloons and a balloon string in the set, too. Next, I die cut magnet versions of all of the stamped pieces and applied the adhesive paper bits to the magnet shapes. I lined the "scene" side of the tin with another sheet of Hooray patterned paper and placed all of the doll pieces inside. I can't wait until my niece is older so I can give it to her.

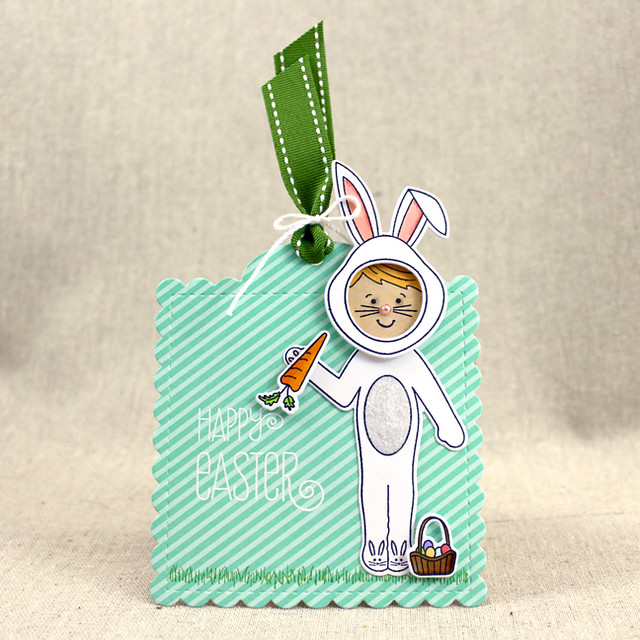
I also wanted to use Betsy's Dress Up Dolls: Easter set to create a tag for my nephew's Easter basket.

Bunny Boy Tag

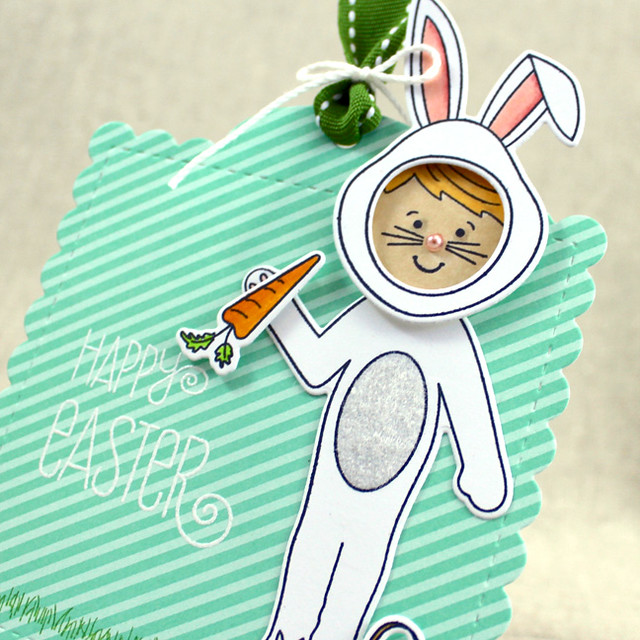
I started by die cutting a Tag Sale: Quilted shape from Aqua Mist patterned paper. On that, I heat embossed a sentiment and stamped a row of grass. Next, I die cut the bunny suit pieces and boy's face from white cardstock. I colored in a few select areas and added flocking to the suit's tummy to make it fuzzy. I also added a bunny nose with a colored-to-match, self-adhesive pearl.

Bunny Boy Tag Close Up

I adhered those piece to the tag using flat and foam adhesives. He needed a few accessories, so I die cut and colored the carrot and Easter basket and added those to the tag with foam adhesive. A little New Leaf ribbon and a crochet thread bow finished it off nicely.

So there you have it! Thank you so much for joining me today. I'll see you back here again soon with more of this month's countdown. In the meantime, Nichole, Betsy, and Melissa all have some Dress Up Doll inspiration to share with you today. Have a wonderful Saturday!

Recipes:
Party Doll Tin
Stamps: Dress Up Dolls: Basics, Bunny Basket, Bitty Background Blocks, Bitty Background Blocks II, Balloon Bash - Papertrey Ink
Cardstock: Hooray Patterned Paper, Adhesive Sheets, Raspberry Fizz - Papertrey Ink; white
Ink: Enchanted Evening, Winter Wisteria, Mint Julep, Spring Rain, Royal Velvet, Summer Sunrise, Orange Zest, Lovely Lady, Raspberry Fizz, Aqua Mist, Hawaiian Shores, Tropical Teal, Plum Pudding - Papertrey Ink; Tuxedo Black - Memento
Other: Dress Up Dolls: Basics Die, Balloon Strings Die, Balloon Bash Die, Text Block: Party Time Die, Harvest Gold Saddle Stitch Ribbon, Magnet Sheets, Metal Tin; Copic Markers; Xyron

Bunny Boy Tag
Stamps: Dress Up Dolls: Basics, Dress Up Dolls: Easter, Simply Spring Borders - Papertrey Ink
Cardstock: Aqua Mist Patterned Paper - Papertrey Ink; white
Ink: New Leaf - Papertrey Ink; Tuxedo Black - Memento; VersaMark - Tsukineko
Other: Dress Up Dolls: Basics Die, Dress Up Dolls: Easter Die, Tag Sale: Quilted Die, New Leaf Saddle Stitch Ribbon - Papertrey Ink; Foam Tape - Scotch; White Embossing Powder - Filigree; Self-adhesive Pearl - Mark Richards; Cotton Ball White Fun Flock - Stampendous; Copic Markers; Crochet Thread

Friday, February 5, 2016

Papertrey Favorites

Good morning, friends! Welcome to the kickoff for this year's Papertrey Ink anniversary festivities. We're celebrating our ninth birthday over the next week and a half and I hope you'll join us for each and every fun-filled day. Today Nichole is introducing the team and issuing a creative challenge over on her blog, so make sure to check in with her and find out how you can join the celebration!

During the summer of 2011, Nichole, Julie, and Jane took a chance and offered a largely unknown stamper and illustrator a place on their product design team. I jumped at that chance and officially joined the team in February of 2012. Then this year, I was thrilled when those same lovely ladies extended an opportunity to join the Release Team as well. I remember getting that email from Nichole and immediately thinking "Be cool...be cool...be cool..." while being anything but cool. I may have danced. I may have squealed. I definitely called my husband. I am so grateful every day to Nichole, Julie, and Jane for allowing me to continue working with them and all of the other wonderful people associated with this fantastic company. I can't wait to see what the coming year will bring.

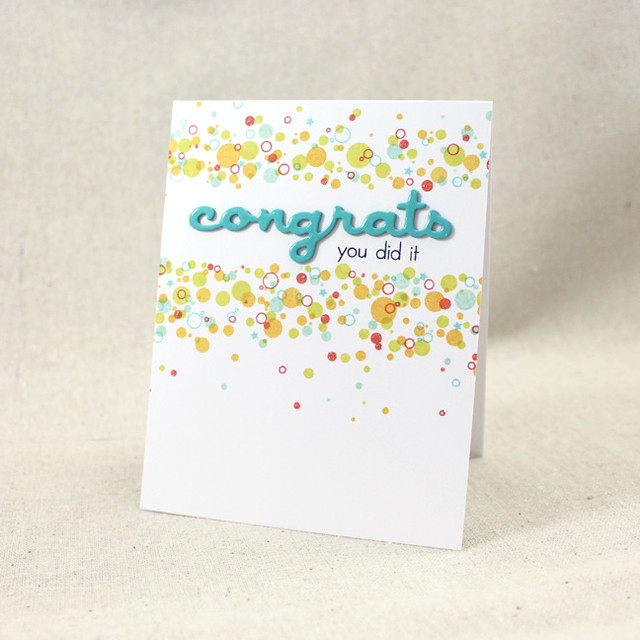
We were asked to choose a favorite card from the past year to use as a color challenge. I almost immediately thought of this one:

Confetti Congrats Card

I had so much fun creating that card and it turned out exactly right. I was so tickled when it was finished! You can see the original post HERE, but I'll make sure to mention all of the supplies at the bottom of this post, too, just in case you don't want to hop all over the place this morning.


The colors I'm playing with today are Hawaiian Shores, Aqua Mist, Limeade Ice, Summer Sunrise, and Berry Sorbet. I just love these bright and sunshiney colors! So much so that I'm playing with them again today.

You've Been On My Mind Card

I began by die cutting the bowls and cherry filler from the Second Helping Of Sunshine set. I stamped those with the coordinating images from that set and the original Bowl Of Sunshine set. Next, I stamped an Aqua Mist panel with the Background Basics: Splats small dots strip in Fresh Snow ink.

You've Been On My Mind Close Up


I stamped the shadow, Outlined frame, and sentiment onto that piece before mounting it to a white card base along with a strip of Limeade Ice Ombre Stripes paper. I finished up by adding the bowls and cherries to the card front with varying depths of foam tape. I love those cure, simple cards that are perfect for jotting a note to a friend, don't you?

Thank you so much for joining me today! I hope to see you back here again very soon with more of the Papertrey Ink anniversary countdown. Make sure to check in with Amy, Ashley, Betsy, Danielle, Dawn, Erin, Heather, Kay, Laurie, Lexi, Maile, Melissa, and (of course) Nichole today! You definitely don't want to miss even one moment of this month's countdown! See you soon!

Recipes:
Confetti Congrats Card
Stamps: Confetti Toss, Wonderful Words: Congrats - Papertrey Ink
Cardstock: Hawaiian Shores - Papertrey Ink; white
Ink: Limeade Ice, Aqua Mist, Summer Sunrise, Hawaiian Shores, Berry Sorbet, True Black - Papertrey Ink
Other: Wonderful Words: Congrats Die - Papertrey Ink; Xyron; Glossy Accents - Ranger; Crystal Glitter - Martha Stewart Crafts

You've Been On My Mind Card
Stamps: Bowl Of Sunshine, Second Helping Of Sunshine, Background Basics: Splats, Outlined - Papertrey Ink
Cardstock: Aqua Mist, Limeade Ice Ombre Stripes Patterned Paper - Papertrey Ink; white
Ink: Limeade Ice, Aqua Mist, Summer Sunrise, Hawaiian Shores, Berry Sorbet, True Black, Fresh Snow - Papertrey Ink; VersaMark - Tsukineko
Other: Bowl Of Sunshine Die, Second Helping Of Sunshine Die - Papertrey Ink; Foam Tape - Scotch; White Detail Embossing Powder - Filigree

Monday, February 1, 2016

February Color Play

Good morning, friends! It's a new month and you know what that means...it's time for the Papertrey Ink Color Play feature. This month we're playing along with this photo:

Source

Isn't that lovely? I was immediately drawn to this photo in part because it included two of Papertrey's newest colors. It's also such a cheerful backdrop that I couldn't help but smile. I thought those pretty pinks would be ideal for giving Dawn's new Bold Blossoms Watercolor Sheets a try, and who can resist the opportunity to color?

Floral Belated Birthday Card

I began by simply adding color to one of the sheets with watercolor markers. I used several colors, mixing here and there to stay as close to the inspiration photo as possible. Once I was finished painting and the panel was dry, I adhered it to a Mint Julep card base. Next, I used the Basic Bookmark #2 die to cut a sentiment banner from another coloring sheet (Save those goof-ups! You can use the back for things like this).

Floral Belated Birthday Close Up

I stamped that with a sentiment from Stylish Sentiments: Birthday in black ink. Then, I stamped the outline flowers from the Bold Blossoms set onto the sentiment banner using ink colors that coordinated with the surrounding flowers. I then tied on a silk bow and attached the sentiment piece to the card front with foam tape. I love how easy these coloring sheets make simple and quick cards!

Well, that's all for me today. I hope you've enjoyed today's post. I'll see you back here again before too long. The Papertrey Ink anniversary festivities are almost here. Are you ready?

Have a great day!

Recipe:
Stamps: Bold Blossoms, Stylish Sentiments: Birthday - Papertrey Ink
Cardstock: Mint Julep, Bold Blossoms Watercolor Sheets - Papertrey Ink
Ink: Berry Sorbet, Lovely Lady, Sweet Blush, Stormy Sea - Papertrey Ink; Versafine Onyx Black - Tsukineko
Other: Basic Bookmark #2 Die, 1/4" Silk Ribbon - Papertrey Ink; Foam Tape - Scotch; Zig Clean Color Markers