Saturday, May 10, 2014

Introducing Summer Sweetness

Hello, friends! Welcome to the first day of the Papertrey Ink May countdown! I am so, so, so excited to share my new set, Summer Sweetness (available May 15th), with you today. I love popsicles. Love them. There are strawberry and peach in our freezer right this minute, in fact. I was so pumped when this set got picked up last fall and I can't wait to share all of the ideas I have for these stamps over the next several days. Let's get started!

My first card today features one of the most iconic popsicles known to ice-pop aficionados everywhere...the Bomb Pop!


I began by die cutting the popsicle from white cardstock and stamped the top and bottom sections in Pure Poppy and Enchanted Evening inks. This stamp is one piece, but the space between them is wide enough to make inking with multiple colors a breeze. I stamped the stick with Classic Kraft ink before I overstamped the colored areas with a glue pad and sprinkled each section with fine glitter in a coordinating color. I followed up with the glue pad in the center section and added fine crystal glitter to fill the void. Then I textured a piece of Spring Rain cardstock with the Star Spangled Impression Plate and adhered a sentiment strip and decorative Pure Poppy strips. That piece was matted with Enchanted Evening cardstock and mounted to a white card base with foam tape. I added the Bomb Pop with foam tape and embellished it with a small baker's twine bow. I can practically hear fireworks! You?

My next card features a fruity trio of popsicles in the process of being nibbled.


I began by stamping three of the rounded popsicle from white cardstock. I stamped one in Lemon Tart, one in Summer Sunrise, and one in Limeade Ice ink with Classic Kraft sticks. Then, I kissed the popsicle stamp with a citrus slice image from Friendship Jar Fillers in a darker shade of ink (Harvest Gold, Orange Zest, and New Leaf) and overstamped on each popsicle to make it look like they had embedded fruit. You could also try this with berries.


Next, I used the scalloped oval from the Limitless Layers 2 1/4" Oval die collection to create "bite" marks out of each pop. I stamped a second stick and my sentiment onto a white card base and then textured it with the Linen & Canvas Impression Plate. I mounted each popsicle to the card base with foam tape to finish it off. Nice and easy!

For my final card today I created bright, colorful patterned paper to act as my focal point.


I began by stamping the popsicles repeatedly onto a piece of white cardstock (the drips are a great way to fill in any trapped white space in your design). Then, I die cut a Photo Finishers strip from Summer Sunrise cardstock. I stamped and heat embossed my sentiment with white embossing powder and then adhered the strip to the patterned panel.


I drew over each drip with a glue pen and sprinkled them with clear embossing powder. I let that dry (the glue gets clear when it's dry) and heat set the powder. This method seems to give the embossed spots much more texture than using VersaMark, so it's a great technique for things like drips. After heat setting my clear powder, I adhered the patterned panel to a Berry Sorbet card front.

Thank you for visiting with me today. Make sure to check in with Nichole and Heather as they share more projects featuring Summer Sweetness. You can also check out projects from Dawn, Erin, Laura, Lexi, Maile, and Melissa Bickford. Have a wonderful day and I'll see you again soon!

Recipes:
Bomb Pop Card
Stamps: Summer Sweetness (available May 15th) - Papertrey Ink
Cardstock: Pure Poppy, Spring Rain, Enchanted Evening - Papertrey Ink; white
Ink: Pure Poppy, Enchanted Evening, Classic Kraft - Papertrey Ink; Essential Glue Pad - Tsukineko
Other: Summer Sweetness Die (available May 15th), Star Spangled Impression Plate - Papertrey Ink; Foam Tape - Scotch; Cherry Baker's Twine - Divine Twine; Carnelian, Crystal, Lapis Lazuli Fine Glitter - Martha Stewart Crafts

Citrus Trio Card
Stamps: Summer Sweetness (available May 15th), Friendship Jar Fillers - Papertrey Ink
Cardstock: white
Ink: Lemon Tart, Harvest Gold, Summer Sunrise, Orange Zest, Limeade Ice, New Leaf, Classic Kraft, True Black - Papertrey Ink
Other: Summer Sweetness Die (available May 15th), Limitless Layers 2 1/4" Oval Die Collection, Linen & Canvas Impression Plate - Papertrey Ink; Foam Tape - Scotch

Melt My Heart Card
Stamps: Summer Sweetness (available May 15th) - Papertrey Ink
Cardstock: Berry Sorbet, Summer Sunrise - Papertrey Ink; white
Ink: Berry Sorbet, Harvest Gold, Summer Sunrise, Limeade Ice, New Leaf, Orange Zest - Papertrey Ink; VersaMark - Tsukineko
Other: Photo Finishers Die - Papertrey Ink; Foam Tape - Scotch; Clear Detail Embossing Powder, White Detail Embossing Powder - Filigree; Glue Pen

Tuesday, May 6, 2014

Popsicle Peek

Good afternoon, friends! I've been a busy girl lately, but I wanted to pop in and share a peek of my newest Papertrey Ink stamp set (coming later this month).


I'm super into popsicles during the warmer months and I thought it might be fun to incorporate those refreshing treats into a stamp set that can be used anytime! You'll just love the possibilities. So come back in a few days and join me for some summertime fun. I can't wait to share! See you soon!

Thursday, May 1, 2014

May Color Play

Good morning, friends, and welcome to the Papertrey Ink May Color Play feature! This month we have a color palette inspired by a delicate flower arrangement.


This month's inspiration photo is so full of incredible texture. I love the lacy appearance of the flowers against the strong dark gray of the background and vase. I wanted to try and incorporate that lacy quality in addition to playing with the color scheme. You'll have to tell me how I did.


I started by stamping my floral pattern onto a white card base. I stamped the vines in Limeade Ice first and then shadowed them with a second round of stamping in Simply Chartreuse. The floral dots were stamped in Lavender Moon and then stamped with the second generation for a bit of extra visual depth. Next, I die cut a Smoky Shadow card front with a Mat Stack 7 die (the middle size) and textured it with the Quatrefoil Cover Plate using the impression plate sandwich in my Cuttlebug.


Then, I stamped the word "Happy" with Smoky Shadow ink into the negative space in the Smoky Shadow layer and mounted that layer to the card base using foam tape. I die cut a Lavender Moon banner using the In Stitches die collection and stamped it with the "birthday" sentiment from Wet Paint. I adhered that to the card front with a combination of flat and foam adhesives to finish it off.

So how did I do? Good use of texture and the color palette? I hope you enjoyed this month's Color Play post! I also hope you'll play along and link up your project over on the Inspiration Archive on Nichole's blog. Thanks for stopping by today and I'll see you again soon. Have a great day!

Recipe:
Stamps: Embellished Elegance, Wet Paint - Papertrey Ink
Cardstock: Smoky Shadow, Lavender Moon - Papertrey Ink; white
Ink: Lavender Moon, Limeade Ice, Simply Chartreuse, Smoky Shadow - Papertrey Ink
Other: Quatrefoil Cover Plate, Mat Stack 7 Die Collection, In Stitches Die Collection - Papertrey Ink; Foam Tape - Scotch

Monday, April 14, 2014

Football Frenzy & Additions - Day 5

Good morning, All, and welcome to Day 5 of the Papertrey Ink April new release countdown! I have two more projects to share with you today featuring Football Frenzy and the coordinating Additions set.

My first card is a Baltimore Ravens birthday card. Someone did in fact mention that his beloved Ravens had been neglected, so I thought I'd throw my papa-in-law a bone with this one.


I began with the jersey. I die cut my shape from white cardstock and stamped the coordinating image in Royal Velvet. I used a fine-tip glue pen to trace along the narrow stripes on the sleeves and then heat embossed them with gold detail powder. The number was added with the Football Frenzy Additions numeral and heat embossed in white. I stamped my sentiment onto a Mat Stack 3 shape using True Black ink and matted it with a Mat Stack 3 Layerz shape that I'd cut from metallic gold cardstock. I added the jersey with foam tape and set that whole piece aside.


Next, I impressed a piece of True Black cardstock with the Center Stage Cover Plate and adhered it to a white card base. I traced along the edge of the cardstock with a gold pen for an extra glitzy touch. Finally, I adhered the Mat Stack panel to the front of the card with foam tape.

My next card is a nod to the home team. Columbus is the heart of Buckeye country. Here it is always football season and if you're not an OSU fan you tend to keep it to yourself. I would be tarred and feathered (by someone...probably family) if I didn't include a Buckeye card somewhere in this countdown.


I began by adhering a piece of Soft Stone polka dot paper to a piece of Soft Stone cardstock. This step is just for stability and isn't totally necessary, but I like to err on the side of caution. From that panel, I die cut a speech bubble using the Sweet Speech Die. I traced the negative onto a card base, and stamped my sentiment in the center of the opening. Then, I adhered clear cardstock to the back of the panel and surrounded the speech bubble hole with foam adhesive to create a shaker "well." I erased my pencil lines and then sprinkled red, white, and silver sequins onto the card front. I adhered the speech bubble panel over top of the little pile of sequins. Next, I die cut the jersey shape and stamped it with Pure Poppy and gray pigment inks. The jersey embellishment was then stamped and heat embossed with white powder. I finished off the card by adhering the jersey into place with foam adhesive.

Well, that's all for me for this countdown. Thank you so much for checking in with me over the past several days! You'll definitely want to check in with NicholeAshleyBetsyDanielleDawnErinHeatherLauraLaurieMaileMelissa, and Lexi for even more inspiration today. I'll see you all again soon. Enjoy the rest of your week!

Recipes:
Baltimore Ravens Birthday Card
Stamps: Football Frenzy, Football Frenzy Additions - Papertrey Ink
Cardstock: True Black, Metallic Gold - Papertrey Ink; white
Ink: Royal Velvet, True Black - Papertrey Ink; VersaMark - Tsukineko; Gray Pigment - Studio G
Other: Football Frenzy Die Collection, Mat Stack 3 Die, Mat Stack 3 Layerz Die, Center Stage Cover Plate - Papertrey Ink; Foam Tape - Scotch; Gold Pen - Marvy; Gold Detail Embossing Powder, White Detail Embossing Powder - Filigree; Glue Pen

Go Bucks Card
Stamps: Football Frenzy, Football Frenzy Additions - Papertrey Ink
Cardstock: Soft Stone, Soft Stone Polka Dot Pattern Paper, Clear Cardstock - Papertrey Ink
Ink: Pure Poppy, True Black - Papertrey Ink; VersaMark - Tsukineko
Other: Football Frenzy Die Collection, Sweet Speech Die - Papertrey Ink; White Detail Embossing Powder - Filigree; Foam Tape - Scotch; sequins

Sunday, April 13, 2014

Football Frenzy & Additions - Day 4

Good morning, Friends, and welcome back for Day 4 of the Papertrey Ink April release countdown! I'm featuring my new set, Football Frenzy, on a couple of additional projects with you today. Shall we get to it?

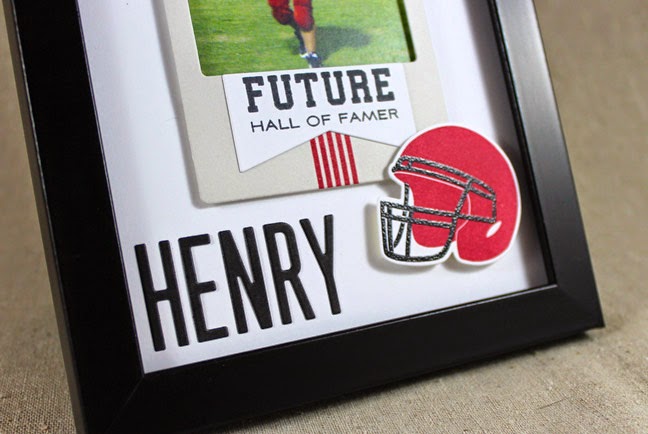
My first project today incorporates a photo into a piece of home decor. I'm not a scrapbooker and haven't been since high school, but I really tried to design this month's sets with the memory keepers in mind.


I began by printing a photo of my brother Henry all decked out in his football gear. That giant man-child will be 15 in just a few weeks and that's really, really hard to imagine. He was so tiny just yesterday! But I digress. Anyway, I die cut a Fabulous Frames polaroid shape and stamped it with Background Basics: Super Stripes. Then, I die cut a notched shape from the same die collection and stamped it with the sentiment from Football Frenzy. I adhered the notched shape to the frame and used foam tape to attach the frame to the photo.


Next, I die cut a triangle using the Hello Sunshine Die Collection from Pure Poppy cardstock. I heat embossed the sentiment with white detail powder and added small strips of cardstock to look like ties. Then, I adhered a toothpick to the back of the flag with Scor-tape. The next element I worked on was the helmet. I die cut the shape from white cardstock and stamped it with True Black and Pure Poppy inks. I then overstamped the face mask with VersaMark and heat embossed with clear powder. I adhered everything to a white 5" x 7" base using flat and foam adhesives.


It still looked like it needed a little something, so I added Henry's name in True Black cardstock letters using the Headline Alphabet Die Collection. I removed the glass from a simple photo frame (due to the dimension of the embellishments) and inserted the Henry tribute. I'm not too worried about dust (nothing a little canned air or the vacuum can't fix), but if you are a shadow box would be a great choice.

My second project today is a graduation card. I'm sure you've seen a couple of sporty graduation cards in the past few days. Nichole has a great one HERE and Erin has another fantastic one HERE, but I wanted to put my own twist on the concept. I decided to use the football in place of the "0" to reinforce the athletic theme (you could do the same with the large baseball image from 7th Inning Stretch).


I began by Xyroning a piece of white cardstock and die cutting it with the Letterman Stitched Number Dies, sticky side (still covered) up. I removed the adhesive backing and sprinkled the letters with white flocking. It's an alternative to felt if you're looking for interesting texture with a little less bulk. I die cut an Enchanted Evening layer using the Letterman Stitched Number Mat Dies. I stitched those together with dark blue embroidery thread and set them aside.


Then, I die cut the football shape from white cardstock and stamped it with the coordinating image using Dark Chocolate ink. I then stitched the laces on the football with white embroidery thread. Next, I cut a white panel and stamped it with the lined, hourglass-y image from Big Ticket Basics in Spring Rain ink. I followed up with the "Class of" strip from For The Graduate in Enchanted Evening ink. I attached that panel to a Classic Kraft card base and added the numbers and football with foam tape.

Thank you for joining me today! I'll be back tomorrow with a couple of additional projects, but in the meantime Nichole, Ashley, Danielle, Dawn, Erin, Heather, Melissa Phillips, and Lexi all have more to share with you. I'll see you again soon! Enjoy your Sunday!

Recipe:
Henry Frame
Stamps: Football Frenzy, Background Basics Super Stripes - Papertrey Ink
Cardstock: Soft Stone, Pure Poppy, True Black - Papertrey Ink; white
Ink: Pure Poppy, True Black - Papertrey Ink; VersaMark - Tsukineko
Other: Football Frenzy Die Collection, Fabulous Frames Die Collection, Hello Sunshine Die Collection - Papertrey Ink; Foam Tape - Scotch; White Detail Embossing Powder, Clear Detail Embossing Powder - Filigree; toothpick

Class Of 2014 Card
Stamps: Football Frenzy, For The Graduate, Big Ticket Basics - Papertrey Ink
Cardstock: Classic Kraft, Enchanted Evening - Papertrey Ink; white
Ink: Enchanted Evening, Spring Rain, Dark Chocolate - Papertrey Ink
Other: Football Frenzy Die Collection, Letterman Stitched Numbers Die Collection, Letterman Stitched Numbers Mats Die Collection - Papertrey Ink; Foam Tape - Scotch; Blue Embroidery Floss, White Embroidery Floss - DMC; White Flocking - Recollections