My first project features Drips & Dribbles. I put away my fair share of Harney & Sons and I'm sure under the right circumstances I'd shed a tear over an up-ended mug.
I began by die cutting the mini tag and mug shapes from Rustic White cardstock and the Loop De Loop border from Sweet Blush. Next, I stamped the mug with its coordinating image using Autumn Rose and Scarlet Jewel inks. I used a bit of a rock 'n roll technique for a bit of depth. Then, I stamped the tiny tag with the small heart from These United States and tied on a bit of twine. I slipped the twine through the slot in the mug and adhered the tag into place with a tiny bit of foam tape. Next, I stamped a panel of Rustic White with the splotches and rings from Drips & Dribbles using Fine Linen ink (at times stamping off once for a softer image). I attached the Sweet Blush border into place along the top edge of the stamped panel and adhered it onto a Kraft card base. Then I stamped my sentiment and added the mug with foam adhesive.
My second card is a wedding card made with the Text Block: Love die.
I began by impressing the die into White Shimmer cardstock and trimmed it out along the outer edge of the impression. I matted it with a piece of True Black and set it aside. Then I stamped the Background Basics: Art Deco pattern in Fresh Snow ink onto a Soft Stone card base. I heat embossed the pattern with clear powder for results that are very subtle and almost pearly. I tied a white ribbon around the card base and mounted my impressed Text Block panel to the card front with foam tape. It's a very simple card, but the shimmery and shiny finishes make it feel sleek and sophisticated.
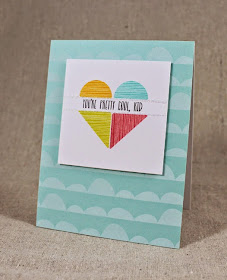
My final card today is a playful, non-traditional Valentine-y number I put together using Block Party.
I began by stamping a heart pattern with the blocks onto a 3" square of white cardstock using Summer Sunrise, Hawaiian Shores, Berry Sorbet, and Limeade Ice inks. I added the sentiment through the middle of the heart using Smokey Shadow ink. Then, I used a fine point glue pen to draw narrow lines along the top and bottom of the sentiment. I embellished those lines with fine glitter and set the panel aside to dry completely.
Next, I stamped the varied scallops trip from Ombre Builders onto Aqua Mist front using Fresh Snow ink. I adhered the card front to a white base and mounted my focal panel with foam tape. It's a fairly straightforward design, but it's versatile enough to work for any kiddo with a simple swap of colors.
I hope you've enjoyed today's post and all of the projects I've shared over the past several days! Make sure to check in with Nichole, Ashley, Betsy, Danielle, Dawn, Erin, Heather, Laura, Laurie, Maile, Melissa Phillips, Lexi, and Melissa Bickford for more inspiration from this month's release. Take care and I'll see you again soon!
Recipes:
Spilled Tea Card
Stamps: Drips & Dribbles, Candy Cane Christmas, These United States - Papertrey Ink
Cardstock: Rustic White, Classic Kraft, Sweet Blush - Papertrey Ink
Ink: Autumn Rose, Sweet Blush, Scarlet Jewel, Fine Linen, Dark Chocolate - Papertrey Ink
Other: Candy Cane Christmas Die Collection, Loop De Loop Border Die, Rustic Cream Twine, Pack Your Bags Die - Papertrey Ink; Foam Tape - Scotch
Splendid Adventure Card
Stamps: Background Basics: Art Deco - Papertrey Ink
Cardstock: Soft Stone, True Black, Shimmer White - Papertrey Ink
Ink: Fresh Snow - Papertrey Ink
Other: Text Block: Love Die - Papertrey Ink; Clear Detail Embossing Powder - Filigree; Foam Tape - Scotch; White Ribbon - May Arts
Pretty Cool Kid Card
Stamps: Block Party, Ombre Builders - Papertrey Ink
Cardstock: Aqua Mist - Papertrey Ink; white
Ink: Summer Sunrise, Hawaiian Shores, Berry Sorbet, Limeade Ice, Fresh Snow, Smokey Shadow - Papertrey Ink
Other: Foam Tape - Scotch; Fine Sugar Cube Glitter - Martha Stewart Crafts; Glue Pen


Love the cards and your ideas
ReplyDeleteLove the "colors" of the Splendid Adventure card,
ReplyDelete