Welcome back, everyone! I'm so glad to hear that you're all enjoying the Tiny Take Out Box and Rustic Burlap Impression Plate (both available August 15th). I have a few more projects to share with you today, so let's get to it!
My first project today is a little Thanksgiving ensemble.
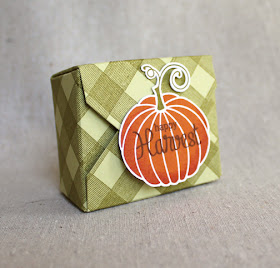
This little decorated box could be used as place cards (full of after-dinner treats) on your holiday table. They would dress up your table and the boxes go together so easily that it would take no time at all! For today I've chosen to stamp my pumpkins with a sentiment from Autumn Acorns, but it could just as easily be a stamped or handwritten name.
I started my box by stamping a piece of Spring Moss cardstock with a plaid pattern from the new Autumn Pattern Pieces stamp set. Then I die cut and assembled my box. Next I stamped my pumpkin (using the rock & roll technique to get some color variation) and hand trimmed it out with detail scissors.
I adhered the pumpkin to the box flap, giving the tab enough space to slide into the slot on the opposite flap. This way the box doesn't have to be torn apart when your recipient goes to open it. Yay!
On the coordinating card, I started by stamping the same plaid pattern onto a strip of Spring Moss cardstock. Then, I punched out four squares of Dark Chocolate cardstock and textured them with the Rustic Burlap Impression Plate.
I adhered the patterned panel of cardstock to a Kraft base stamped with a Thanksgiving sentiment from Autumn Acorns. The textured squares were then mounted atop the patterned panel. Next, I stamped and trimmed out my pumpkin and added it to the card with mounting tape. I finished the card by rounding the bottom corners.
My last project today is an anniversary card pairing Happiness In Bloom and the Rustic Burlap Impression Plate.
I started by creating a frame by die cutting a Mat Stack 1 Layerz shape from Berry Sorbet cardstock. I cut a window in the center using a Limitless Layers 2 1/4" Oval Die and then textured the frame with the Rustic Burlap Impression Plate. I then die cut a second Mat Stack 1 Layerz shape from white cardstock and stamped it with my sentiment ("Happy" from Happiness In Bloom, "Anniversary" from Pretty Peonies).
Next, I stamped my leaves onto a Spring Moss card front using Simply Chartreuse and Ripe Avocado inks. Then, I masked the leaves and stamped my polka dots in Fresh Snow ink before mounting my framed sentiment to my card base. I then die cut the largest flower in the Beautiful Blooms II #1 Die Collection and stamped it with the coordinating image from Happiness In Bloom. I went over the Berry Sorbet ink layer with a glue pad and embellished the surface with glitter. Once that had dried, I stitched on a white button and mounted it to my card using foam tape. I love the contrast of the linear pattern of the Rustic Burlap Impression plate against the playful polka dots!
Well, that's all I have for you today. I hope you'll join me tomorrow as I share more projects with these great new items. In the meantime, make sure to check in with Nichole, Betsy, Dawn, Erin, Heather, Maile, Melissa, and Melissa for even more inspiration. See you tomorrow!
Recipes:
Thanksgiving Ensemble
Stamps: Spooky Sweets, Autumn Acorns, Autumn Pattern Pieces (available August 15th) - Papertrey Ink
Cardstock: Spring Moss, Kraft, Dark Chocolate - Papertrey Ink; white
Ink: Ripe Avocado, Terracotta Tile, Canyon Clay, Dark Chocolate - Papertrey Ink
Other: Tiny Take Out Box (available August 15th), Rustic Burlap Impression Plate (available August 15th) - Papertrey Ink; Corner Chomper - We R Memory Keepers; foam tape - Scotch; 1 1/4" square punch - EK Success
Floral Anniversary Card
Stamps: Happiness In Bloom, Polka Dot Basics, Pretty Peonies - Papertrey Ink
Cardstock: Spring Moss, Berry Sorbet - Papertrey Ink; white
Ink: Berry Sorbet, Spring Moss, Ripe Avocado, Simply Chartreuse, Sweet Blush, Fresh Snow - Papertrey Ink
Other: Rustic Burlap Impression Plate (available August 15th), Happiness In Bloom Die Collection, Beautiful Blooms II #1 Die Collection, Mat Stack 1 Layers Die, Limitless Layers 2 1/4" Oval Die Collection, White Button - Papertrey Ink; Glue Pad - Tsukineko; Embroidery Floss - DMC; foam Tape - Scotch; Super Fine Crystal Glitter - Martha Stewart Crafts


Wow, what great projects! Love that little box and it looks great with the plaid and your perfectly trimmed pumpkin ...with scissors, no less!
ReplyDeleteWow, Lizzie! I am so impressed by your fussy cutting skills!! What a fun holiday ensemble!
ReplyDeleteOH MY!!!!!!!! I LOOOOOOOOOOOOVE that little pumpkin & little take-out box!!!!!!! HOW ADORABLE!!!!!!! :) ABSOLUTELY PERFECT!!!!!!:)
ReplyDeleteSuch pretty creations Lizzie!! I have to say I'm a fan of all things FALL!!
ReplyDeleteAn'Jenic-
Liz's cutting skills are more than impressive!
ReplyDeleteGreat idea for Thanksgiving table setting. If only I knew where we'll be....
Your little takeout box is too cute. I loved yesterday's and today's projects using it. Oh, and I'm loving the burlap IP. I love burlap and now I can literally have it in every color. Yay!
ReplyDeleteHello, I love the Thanksgiving cards. Did you cut the pumpkin free hand?
ReplyDeleteYes, the pumpkin was cut by hand. Slowly and carefully with a sharp pair of scissors.
ReplyDeleteLove this little box. Will you share who the manufacturer of the pumpkin stamp is? THanks!
ReplyDeleteMichelle
PS: appreciate your time and creativity!
ReplyDelete