Pages

Saturday, February 28, 2015

Quick Stitch: Sewing Staples Kit

Good morning, Friends! Today, I have the great pleasure of getting to introduce the Quick Stitch: Sewing Staples Kit, designed by Erin Lincoln for Papertrey Ink. You can find more details about the kit on Nichole's Blog, but here are the basics:


The first Quick Stitch Kit will be released on March 9th and it is entitled "Sewing Staples". Erin has really outdone herself with this one! The stitching dies included help you to make a few different sewing accessories that are not only beautiful, but also super functional. You will have all of your sewing supplies in order just in time for the new stitching products coming out over the next year! Not only will this kit help YOU to get organized, but also make wonderful handmade gifts for friends and family. The team even has a few unconventional uses for these stitching dies that will allow you to take everything in a completely different direction and get more value for your investment in these tools!

I am absolutely smitten with Erin's new Quick Stitch: Sewing Staples Kit! These adorable projects are a breeze thanks to the thoughtfully designed dies and embellishments Erin has included. And I can't even tell you how much fun it's been to create color coordinated bobbins for all of my felt and floss. You're sure to fall in love with this kit from the moment you thread your first needle! How about we get to the fun now, eh?


So the first thing I wanted to do with this kit was make myself a coordinated needle book and scissor keeper. Every crafty girl needs her accessories, am I right? 

I began with the needle book.


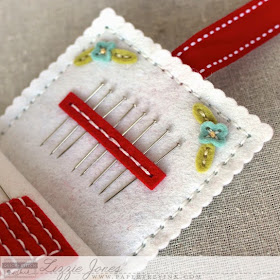
I die cut a front cover from Ocean Tides felt, an inside scalloped cover from Vintage Cream felt, and an inside page (the same shape as the front cover) also from Vintage Cream felt. I used the binding die to add holes down the center of each page for effortless assembly. I also die cut my monogram from Pure Poppy felt, using the Sew Stylish Alphabet 1 die, and assortment of flowers and leaves from Vintage Cream, Harvest Gold, Ocean Tides, Simply Chartreuse, and Pure Poppy.


I also die cut an open pocket, two needle pockets, and a pin holder from Ocean Tides and Pure Poppy. I used the "holes-only" dies to make the floral embellishment on the pocket totally easy. I just lined up the holes and stitched away. The little flower on the needle pocket was freehanded after the needle pocket was stitched into place.


Then, I used the "holes-only" dies for the open pocket and the needle pocket on the inside cover and inside pages. These dies take all the guesswork out of putting this little book together. You can even decide which pockets and features will work best for you for a totally custom arrangement. I used an open pocket on the inside cover to hold my threader and a couple of bar pins. I love having these on hand for brooches and other wearables.


The back pages feature plentiful needle storage and a pin corral, too. I love having an assortment of needles close at hand and my husband loves that I'm not storing them in the arm of my favorite armchair anymore. Heh, heh...ouch.


I added a few more tiny flowers to these pages to dress them up a little. I wanted some embellishment, but I didn't want the flowers to get in the way of the pins and needles, so I kept it fairly minimal. It's just enough, I think.

After all of the pages had been embellished, I sandwiched my ribbon in between my front and inside covers and stitched down the center binding. Erin has included a ribbon slot die, but I liked the idea of just stitching between the layers for simplicity. I then stitched the center pocket together and the inside and outside pages to each other.


I'm in love with how this turned out. It's just plain adorable!

I, of course, needed a scissor keeper to coordinate, so that's what I worked on next.


I die cut two of the top layer from Ocean Tides and two of the scalloped layer from Vintage Cream. Then, I die cut the "holes-only" floral cluster from one of the Ocean Tides pieces. Next, I die cut an assortment of flowers and leaves using Pure Poppy, Vintage Cream, Harvest Gold, Aqua Mist, Simply Chartreuse, and Spring Moss. Following the pattern, I stitched on the flowers and leaves and followed up with the seed beads in the remaining open spaces.


I used contrasting thread to highlight the beautiful details Erin included in these dies. Some of the flowers even have a central hole that is perfect for adding a French knot or additional bead for an extra delicate touch. I finished the scissor keeper by stitching all the layers together according to Erin's fabulous instructions. Her tutorial video is incredibly helpful and super fun to watch.

Erin also included dies and other supplies that enable you to create your own color coordinated floss bobbins. Oh. My. Word. I love these things.


The bobbins come together quickly and they make it incredibly easy to organize your supplies. There's a small rectangle stamp in the Sewing Staples mini stamp set that you use to stamp onto iron-on transfer paper. Then you use the mirror image numbers to stamp the floss codes. A simple die cut, some ironing onto Fresh Snow ribbon, and BOOM...custom floss bobbins with reference tags. I have about 1/3 of my floss finished and the rest prepped. I can't wait to get them done.

The kit also comes with this charming wooden bobbin box. You can paint it, embellish it, use it for gift wrap...the world is your oyster. I wanted to see what would happen if I tried stamping the Sewing Staples mini images onto the transfer paper and then ironing it onto my box.


Here's the result! It's nice and simple. I thought about painting the box first, but I wasn't sure how the paint would handle the heat of the iron, so I left it au natural. If you choose to try this yourself here's a tip: do not glide your iron over the transfer paper. Straight up and down, People. Straight up and down. Trust.

You can also see here how I store unused lengths of separated floss. I only use three of the threads in a strand of floss when I do my stitching, so I wrap the extra three strands around the bobbin to have easily accessible when I need more of a particular color. It cuts down on waste and it's always easy to find.


I also wanted to try my hand at a slightly simplified version of that ensemble. This set uses many of the same elements, just taken down a notch. It would be a great gift for someone who is just getting started in embroidery or cross stitch.


This time I started with the scissor keeper. I did this one out of Spring Moss and Vintage Cream base piece with flowers in Melon Berry, Harvest Gold, and Vintage Cream. All of the leaves are done in Simply Chartreuse. I used the "holes-only" flowers and leaves on the Spring Moss layer first and then went back and stitched on my felt bits. Then, I stitched the scissor keeper up just like the other one. You could leave out the scalloped layer if you wanted to simplify even further, but I love that sweet edge.

Next, I went about creating a needle booklet. I made this one with a combination of cardstock and felt to make it a little more disposable.


I die cut a front cover from white cardstock and an inside cover from Spring Moss. I scored both down the center. Then, I stamped the sentiment from the Sewing Staples mini onto the white piece and die cut that layer with the "holes-only" flower and leaf dies. I love the holes only dies when working with paper. They make the stitching so much easier! I stitched on the flower and leaves and then set that piece aside.


Next, I used the "holes-only" needle pocket and open pocket dies to create the holes in my inside cover. I stitched on the Melon Berry pockets and then stitched the front and inside covers together using contrasting stitching. I hid the knot in the inside crease so it wouldn't be distracting. Just fill with some simple notions and your gift is complete. I packaged the booklet inside a glassine envelope, but you could also just tuck it into the scissor keeper with some nice snips for a cozy crafty package.


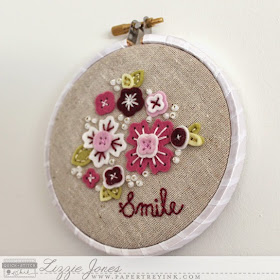
My last ensemble for today is a mini wall art piece. I really enjoy doing these small embroidery hoop pieces and this kit is perfect for putting together a decor piece in no time at all. There's someone in my world going through some really rough stuff, so I thought I'd take this opportunity to whip up something to remind her to smile.


I began by ironing a piece of lightweight Heat N Bond onto the back of a piece of linen. The reason for this is two-fold. Number 1: this will reinforce the holes of the floral cluster so you don't rip through the narrow bits (that said, don't tug the thread too hard). Number 2: the paper backing on the Heat N Bond helps you get a nice, clean cut with the die. I let it cool for a moment or three and then die cut the "holes-only" floral cluster from the center of my linen.


Next, I die cut an assortment of flowers and leaves using Autumn Rose, Scarlet Jewel, Lavender Moon, Vintage Cream, Simply Chartreuse, and Spring Moss. Just as I had with the scissor keeper, I followed the pattern by stitching on the flowers and leaves and following up with the seed beads in the remaining open spaces. I wanted the hanging to give an uplifting message, so I freehanded the "Smile" with some backstitching. If you don't trust yourself to freehand you could always use a disappearing ink pen to draw on your message first. I finished the outer hoop by wrapping it with the Fresh Snow satin to make it look a touch more polished.


My itty bitty gift needed an itty bitty card to send a brief note, so I die cut a piece of white cardstock using the scalloped layer from the needle book die collection. I stamped it with the flowers from the Sewing Staples mini set and a sentiment from Words Of Comfort. I added felt buttons cut from Scarlet Jewel and Lavender Moon felt and tied them on with white floss. It's the perfect size to say "I'm thinking of you." The stitching holes are a sweet detail, too.

Alright, Friends. There you have it! Erin's Quick Stitch: Sewing Staples kit will be available on March 9th at 10pm EST in the Papertrey Ink store so make sure to pick up your own copy then. In the meantime, check in with Erin, Hilary, Rebecca, and Tracy for as much inspiration as you can handle! See you again soon!

More Kit Details:

SEWING STAPLES KIT CONTENTS:
Custom Printed Tote Bag
Sewing Staples: Scissor Keeper die collection
Sewing Staples: Needle Book die collection
Sewing Staples: Floral Cluster die collection
Sewing Staples: Stitched Floss Bobbin die collection
Sewing Staples: Flowers die collection
Sewing Staples stamp set + label
(1) Wooden Bobbin Box
(2) Heavy white 8-1/2" x 11" sheets cover board
(2) Iron-on 8-1/2" x 11" Transfer sheets
(1) spool Fresh Snow Satin Ribbon-5 yards
(1) test tube white 8/0 seed beads
(1) pdf download with full instructions

The total retail cost of the "Sewing Staples" Kit is $110. There will be a limited number of these exclusive kits available, so be sure to get yours while you can! Some individual items will be available for sale at a later date. The "Sewing Staples" Kit will be available for sale beginning on March 9th at 10pm EST, only at Papertrey Ink. Read all the details on Nichole's blog or contact Customer Service with any questions.

Recipes:
Monogram Ensemble:
Felt: Ocean Tides, Pure Poppy, Vintage Cream, Harvest Gold, Aqua Mist, Simply Chartreuse, Spring Moss - Papertrey Ink
Dies: Needle Book Die Collection, Floral Cluster Die Collection, Scissor Keeper Die Collection, Flowers Die Collection, Sew Stylish Alphabet 1 Die - Papertrey Ink
Other: White Seed Beads, Pure Poppy Saddle Stitched Ribbon - Papertrey Ink; Embroidery Floss - DMC; Bar Pins; Threader; Needles

Floss Bobbins & Box:
Stamps: Sewing Staples Mini - Papertrey Ink
Ink: True Black, Pure Poppy, Simply Chartreuse, Ripe Avocado, Harvest Gold - Papertrey Ink
Felt: Ocean Tides, Pure Poppy, Vintage Cream, Harvest Gold, Aqua Mist, Simply Chartreuse, Spring Moss, Limeade Ice - Papertrey Ink
Dies: Stitched Floss Bobbin Die Collection - Papertrey Ink
Other: Iron-on Transfer Paper, Fresh Snow Satin Ribbon, Wooden Bobbin Box - Papertrey Ink; Embroidery Floss - DMC

Beginning Stitcher Ensemble:
Stamps: Sewing Staples Mini - Papertrey Ink
Ink: Simply Chartreuse - Papertrey Ink
Felt: Spring Moss, Harvest Gold, Vintage Cream, Melon Berry, Simply Chartreuse - Papertrey Ink
Cardstock: Spring Moss - Papertrey Ink; white
Dies: Needle Book Die Collection, Floral Cluster Die Collection, Scissor Keeper Die Collection, Flowers Die Collection - Papertrey Ink
Other: Embroidery Floss - DMC; Needles; Threader; Glassine Envelope

Smile Wall Art Ensemble:
Stamps: Sewing Staples Mini, Words Of Comfort - Papertrey Ink
Felt: Autumn Rose, Scarlet Jewel, Lavender Moon, Vintage Cream, Simply Chartreuse, Spring Moss, Classic Kraft - Papertrey Ink
Cardstock: White
Dies: Needle Book Die Collection, Floral Cluster Die Collection, Flowers Die Collection - Papertrey Ink
Other: White Seed Beads, Fresh Snow Satin Ribbon - Papertrey Ink; Embroidery Floss - DMC; Glassine Envelope; Scor Tape; Linen; Heat N Bond - Thermoweb; 4" Embroidery Hoop - Darice

Sunday, February 15, 2015

Introducing The Quick Stitch Kits


Good morning, friends! Today is the 11th day of the Papertrey Ink 8th Anniversary Countdown and we have a highly anticipated final announcement for you. Nichole is introducing Erin Lincoln's new product line, the fabulous Quick Stitch Kits!


I can already tell that Erin's Quick Stitch series is going to be a favorite if mine for a very long time. The details she has incorporated into this Sewing Staples kit are truly gorgeous. She's thought of everything from color coordinated bobbins to storage and delicate embellishments. You're going to adore this kit and all of its possibilities. And this is only the beginning!

A Design Team full of fresh faces has even been recruited to showcase Erin's marvelous kits. You're definitely going to want to get acquainted with these talented ladies (if you aren't already, of course):

Me (!)

Nichole's asked us to pop in with a quick hello today, just to let all of you get to know us a little bit better, so here it goes!

My name's Lizzie and I live in Ohio. I'm married to my high school sweetheart, Sean (awww...), and I design stamps and write the Papertrey Ink monthly newsletter. I enjoy board games, star gazing, and long walks on the beach (just kidding). You can regularly find me loitering around the Papertrey Ink Forum trying to answer questions and generally causing mischief. I've been involved in the paper crafting industry for the past several years, but I don't limit my crafty time to stamps and cardstock. I love creating special embroidery projects for friends and family, so when Nichole mentioned the opportunity to join the Quick Stitch Team I absolutely jumped at the chance!

You'll see more about this beautiful kit later this month, so stay tuned! I'll see you again soon! Have a great day!

Saturday, February 14, 2015

Moments Inked Memory Planner System


Good morning, Papertrey Ink friends! It's Day 10 of the 8th Anniversary Countdown and today comes with a big announcement. Today we get to introduce the Moments Inked Memory Planner System! Not only is there a fabulous new planner on the horizon, but it also comes with a brand new team of all-stars. It doesn't get much better than that, folks! You'll definitely want to head over to Nichole's blog to see the line-up.


I could definitely use some help getting organized, so I am super excited about the Moments Inked Panner! I've tried using different planners and calendars before, but none of them felt very special and I eventually lost interest. This planner combines the function of a daily organizer with journaling, memory keeping, and overall wellness for an essential all-in-one that I am truly delighted to use. It's even color coordinated with all of my Papertrey inks and papers to make creating accessories a breeze!

This is just a fraction of the regular notebook rotation.

So here's my trouble: everything is everywhere. I'm not great at keeping all my tiny bits in the same place. I have small scraps of paper with notes about who to call. Envelopes with dollar amounts that I deposited at the bank (because even my bank went paperless and now you can't even go online to look up where the money came from because there's no deposit slip anymore...obviously I'm not over that yet). Card sketches on post-it notes. Lists on whatever I can find. The mess goes on.

I'm also not great at keeping our schedule straight. My fella and I use Google Calendar to make note of upcoming events, but we're such busy people that anything past noon usually gets bumped to that "+X more" category. That means I don't see those things unless I click on the link which I regularly forget to do. That's how I was surprised when my husband said to me last Monday, "Don't forget. I have that hockey game with Dad tonight." Uh, what?

And if you saw the two of us trying to figure out dinners most nights of the week you would giggle yourself into hysteria. We'll get good about meal planning for a week or two and then fall off the wagon and it's all Oregon Trail up in here. I'll trade you an ox for three sacks of cornmeal.

At this point I realize that I sound like a hot mess and you're all probably ready to abandon me and my broken wagon axle. Heh.


Then a few weeks ago Nichole sent out an email that had me giddy. No joke - I even made Sean sit through a virtual presentation. She told us about this beautiful planning system that she had devised that not only gave you space to organize tasks and make note of special events, but also offered a special area for meal planning, favorite quotes, gratitude journaling, and more. Not only that, but she had also designed a line of stamps and dies to help you personalize your planner and tailor it to suit your lifestyle. Yes, please! I could not wait to get this hot little dandy in my poor, disorganized hands.

So now, friends, we get to take this journey together (I think that might be the last Oregon Trail reference)! I've put together a little video showing you my very first flip through the planner, in case you're interested in some stream of consciousness first impressions.


I also wanted to show you what I thought of the individual features now that I've had a little more time with it. But first, how about a customization project to get us started, eh?

I like having a place to write down notes and tasks so I don't absentmindedly forget to run an errand or make a call at some point during the day. I also love the idea of having something reusable. The Moments Inked: Posted stamp set (designed to work with sticky notes, but totally useful for other applications, too), Basic Page dies, and my laminator made that a snap!


I stamped the Posted list on a piece of Fresh Snow Linen cardstock (matchy, matchy, matchy - yay!) using Ripe Avocado, Smokey Shadow, and Winter Wisteria inks. Then, I laminated the cardstock panel and die cut it using one of the Basic Page dies.


The holes were a little tricky for the die (what with two layers of plastic and one layer of cardstock to contend with), so I needed to help them along with scissors in a few spots, but I think the end result was definitely worth the extra time. I ran the final piece through the laminator one more time just to make sure the edges were secure before popping it into my planner. Now, all I need is a wet erase marker to take notes and a damp cloth to start over.


Remember how earlier I mentioned that I have a tendency to write random notes on little pieces of paper that I then lose? Here's what I came up with to combat that problem. I laminated and die cut a few pieces of patterned paper, in addition to my mini to-do list. I did several colors that would perfectly coordinate with multiple months. The spiral edge on these dies makes it simple to insert or remove the pages so they can be used over and over again. These are perfect for notes or doodles or anything that I would have otherwise written on the back of an envelope.

Now, I want to talk about the different features that I'm really looking forward to using on a daily basis. Let's start with a quick view at the weekly spread.


Here you can see that each day is split into three sections (morning, afternoon, and evening). Sometimes tasks and events don't have specific times. These broad categories allow you to put notes in a general area. If you do have a particular time to note, the "Banners" line of stamps makes adding that simple. Here I've used the Blog Banners mini to create sticker banners to keep blog posts straight. It's one stamp with a coordinating die, so these flags are just a couple of quick steps. That set is seriously going to come in handy. There is also a Family Banners mini that I can imagine being really useful if you have kids. Each kiddo could get their own color!


The daily page is my favorite thing about this planner though. Let's look at today, shall we?


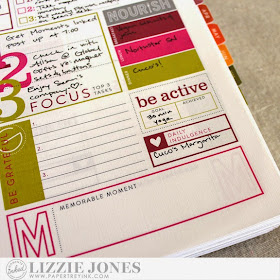
Each daily page is packed with useful, visually beautiful information printed on luxe linen paper. Honestly, it's the details that Nichole has incorporated that make this planner so special. It just feels nice, people.


The Nourish section is one that I am absolutely sure we will use and find helpful. Now, I understand that today's looks a little thin, but that's only because it's a special day. Typically though, I'll be able to sit down once a week or so to plan out our meals. No more trading livestock for beans (last one, I promise)!

I also love the Hydrate icon. I am the Queen of Water Bottles and I have one with me almost constantly, but I sometimes lose track of how much water I've actually consumed. It could be four glasses, it could be eight. Other days, it's just not on my radar and I'll realize mid-afternoon how parched I am. Hopefully this little reminder will keep it from being forgotten.

I also really like that Nichole has included the Focus and Be Prepared sections. It's easy to write out a to-do list that's so intimidating you just plain feel buried. Encouraging yourself to isolate the three most important tasks ahead of you is a great way to feel a little more in control. Using the Be Prepared section to formulate a plan of action for the next day's tasks is another nice way to minimize surprises.


The Be Active is particularly important to me because it's one of those things I've let slide in recent months. When I get busy or feel I'm losing ground, the first thing I drop is exercise. Totally backwards! I'd been running three times a week and doing yoga and pilates consistently until we moved (and my routine was totally blown to smithereens). I'm looking forward to getting back into those activities with more regularity and I think having a reminder front and center will help with that.

I also love that Nichole incorporated some journaling and memory keeping elements into this planner. I'm not a scrapbooker mostly because it feels like a daunting task that I don't have the time to handle. The Be Grateful and Memorable Moment sections introduce bite-sized, doable memory keeping. Plus, now I have a place to write about the cat snoring on the couch so loudly he woke himself up. Who wouldn't want to go back and read that at the end of the year?

A couple of things I mentioned in the video that turned out not to bother me really: the thickness and the ring. The thickness I think will be an asset the more I work with the planner. I'm not likely to lose it or forget it somewhere because it's not the sort of shrinking violet that allows itself to be ignored. It's a little big for my regular handbag, but I still have a Hibiscus Burst tote bag from a CHA past that will work splendidly as a carrying case. The ring is actually not as troublesome as I originally thought. It's flexible so I can sort of push it to the side in order to write on the right-hand pages. No problem at all! And I actually like that it's generously sized to allow for the many add-ins I'm sure to put inside.

So that's my take on the Moments Inked Memory Planner. I can't wait to see how this beautiful planner impacts my organizational skills and I am so grateful for the opportunity to share it with you. Wait! I should put that in my planner! See you again soon.

Recipe:
Laminated Note Pages
Stamps: Moments Inked: Posted - Papertrey Ink
Cardstock: Fresh Snow Linen - Papertrey Ink
Ink: Ripe Avocado, Winter Wisteria, Smokey Shadow - Papertrey Ink
Other: Basic Pages Dies - Papertrey Ink

Blog Banner Flags
Stamps: Moments Inked: Blog Banners - Papertrey Ink
Cardstock: Adhesive Sheets - Papertrey Ink
Ink: Simply Chartreuse, True Black - Papertrey Ink
Other: Banners Die - Papertrey Ink

Friday, February 13, 2015

A Little More Text Block: Mom & Etched Easter Eggs

Good morning, Friends! Thank you so much for joining me for Day 9 of the Papertrey Ink 8th Anniversary Countdown. I have a couple of additional projects to share with you featuring my new Text Block: Mom and Etched Easter Eggs stamp set today. Shall we get to it?

My first project is a Mother's Day card full of flowers. I used an inlay technique that I just love.


I began by stamping a white panel with the floral spray from Garden Grace in Spring Moss, Simply Chartreuse, Harvest Gold, and Lemon Tart inks. I ran that panel through the Xyron and die cut the Text Block: Mom from the panel, reserving the negatives. I stuck the outer frame to an extra scrap of white cardstock and then die cut a Xyroned piece of Simply Chartreuse through the die cut machine with the same die. I placed the Simply Chartreuse Text Block shape into the rectangular space in the floral frame and used the floral negatives to fill in the appropriate spaces. It all fits together so seamlessly!


I mounted the floral/Text Block panel to a Spring Moss card base with foam tape and embellished the roses here and there with a fine point glue pen and some glitter (I'm seriously on a roll with the glitter lately). Then, I die cut two of the butterflies from the Love Lives Here die collection from vellum. I scored them down the center and adhered them to the card front in a layered fashion. I die cut another butterfly from Lemon Tart cardstock and used the small heart shape to fill the negative space in the butterfly. I love how soft and delicate the flowers look!

My second card incorporates a sentiment from Etched Easter Eggs with very simple, yet sophisticated stamping.


I began by die cutting a Mat Stack 6 shape from the middle of a white panel. I placed that on a white card base and marked some of the outlines so I knew where I wanted my stamping to land. I stamped the long ray shape from Out Of The Blue in VersaMark ink to create a cross. Note: I marked the center point to help line up the rays more easily. Then, I sprinkled the wet ink with Perfect Pearls using a soft paintbrush. I used a dried out baby wipe to remove the excess and embellished the center with a self-adhesive pearl (this also hid that pencil mark since I couldn't erase it without ruining the Perfect Pearls).


Next, I heat embossed the sentiment from Etched Easter Eggs with gold detail powder onto the original die cut panel. I textured that panel with the Sunrise Impressions 2 Impression Plate, centering the "sun" in the die cut space. Finally, I mounted the sentiment panel to the card base with foam tape. It's a simple card, but it conveys the message perfectly.

I hope you've enjoyed today's projects! I'll see you back here again tomorrow with more of this month's new release. In the meantime, Nichole, AmyAshley, Betsy, Danielle, Dawn, Heather, Laura, Laurie, Maile, and Melissa have projects to share that you won't want to miss. I'll see you again tomorrow!

Recipes:
Mother's Day Butterfly Card
Stamps: Garden Grace - Papertrey Ink
Cardstock: Simply Chartreuse, Spring Moss, Lemon Tart, Vellum - Papertrey Ink; white
Ink: Spring Moss, Simply Chartreuse, Harvest Gold, Lemon Tart - Papertrey Ink
Other: Text Block: Mom Die (available February 15th), Love Lives Here Die Collection - Papertrey Ink; Fine Crystal Glitter - Martha Stewart Crafts; Foam Tape - Scotch; Xyron

He Is Risen Card
Stamps: Etched Easter Eggs (available February 15th), Out Of The Blue (available February 15th) - Papertrey Ink
Cardstock: white
Ink: VersaMark - Tsukineko
Other: Mat Stack 6 Layerz, Sunrise Impressions 2 Impression Plate - Papertrey Ink; Gold Detail Embossing Powder - Filigree; Perfect Pearl Pigment Powder - Perfect Pearl; Self-Adhesive Pearl - Mark Richards; Foam Tape - Scotch

Thursday, February 12, 2015

Even More Etched Easter Eggs Stamps & Dies

Good morning, friends! Welcome back for Day 8 of the Papertrey Ink 8th Anniversary Countdown! I'm back sharing more of Etched Easter Eggs with you today. I have one project for you today and it's a doozy!


I love decorating for holidays and Easter is no exception. Up until now I didn't have an Easter banner to hang above our fireplace, so I fixed that! This house has, no exaggeration, a combined 15 feet of mantle to decorate. This banner will take care of a few of those!


I began by die cutting the larger pennants from Soft Stone polka dot patterned paper and cardstock. I did the smaller layer from white and the decorative topper from Spring Rain. I adhered the Soft Stone pieces back to back (this is just to give a nice finished edge on both sides) and layered on the white and Spring Rain pieces.


Next, I die cut solid eggs from Lavender Moon, Sweet Blush, Melon Berry, Lemon Tart, Spring Moss, and Aqua Mist. I stamped each one with a patterned egg from Etched Easter Eggs and heat embossed with white detail powder. Then, I carefully die cut a letter from each decorated egg using the Headline Alphabet dies. When die cutting, I used a piece of copy paper to protect the embossing from the cutting plate (just in case the pressure made the waxy surface stick to the plate). It worked like a charm! I set those eggs aside momentarily and got to work on the lacy, glittered eggs that I used as spacers.


I began by die cutting those eggs from Xyroned white cardstock four times and and a piece of Xyroned colored cardstock once. I used Lemon Tart, Aqua Mist, and Lavender Moon for these. I layered the egg die cuts, finishing with the colorful piece on top. I embellished the eggs with clear crystal glitter to give them a bit of sparkle and to allow their true colors to shine through.


Next, I worked on the "happy" pennant. I die cut the word from the Tipped Tops Die collection four times from white cardstock and once from Spring Moss. I adhered those with Glossy Accents, finishing with the Spring Moss on top. Then, I started the assembly process.


I punched small holes in the top corners of each pennant using my Crop-a-dile and spaced them out on a piece of white ruffled-edge ribbon. I looped pieces of waxed white twine around the ribbon and through the holes in the pennants, tying them through Lavender Moon buttons to secure each pennant.


Then, I adhered my decorations into place. I waited until this step to make sure nothing got banged up in the assembly process. The lacey glittered eggs and the "happy" were adhered flat while the embossed eggs were mounted with foam adhesive.


I simply tied loops in the ribbon ends for easy hanging. I love how the banner turned out and I'm excited to display it during the Easter season!

Thank you so much for joining me today! Check back tomorrow to see what I have up my sleeve using the Text Block: Mom die and Etched Easter Eggs Collection. In the meantime, Nichole is sharing even more from this month's new releases over on her blog that you absolutely won't want to miss. See you soon!

Recipe:
Happy Easter Banner
Stamps: Etched Easter Eggs (available February 15th) - Papertrey Ink
Cardstock: Soft Stone, Soft Stone Polka Dot Paper, Spring Rain, Lavender Moon, Sweet Blush, Melon Berry, Lemon Tart, Spring Moss, Aqua Mist - Papertrey Ink; white
Ink: VersaMark - Tsukineko
Other: Etched Easter Egg Die Collection (available February 15th), Egg Die, Headline Alphabet Die, Basic Banners Die Collection, Banner Borders Die, Tipped Tops Die Collection, Lavender Moon Buttons - Papertrey Ink; Fine Crystal Glitter - Martha Stewart Crafts; White Detail Embossing Powder - Filigree; Ruffle Edged Ribbon, Waxed Twine - May Arts; Foam Tape - Scotch; Xyron

Wednesday, February 11, 2015

More Etched Easter Eggs Stamps & Dies

Good morning again, friends! Today is Day 7 of the Papertrey Ink 8th Anniversary Countdown! I'm popping back in today to share more of the Etched Easter Eggs stamps and dies. I'm very excited about today's projects, so let's get to it!

My first card is a colorful little number that came together in a snap!


I began by stamping the eggs in a circle using a pastel rainbow of colors. In order to keep my spacing consistent, I drew a radial pattern very lightly with pencil first. Once the inks had dried, it was no trouble at all to erase my lines. Next, I stamped my sentiment onto strips of vellum and heat embossed with white detail powder. I adhered those strips to the egg panel and trimmed off the excess.


I covered a white card front with Soft Stone patterned paper before mounting the egg panel with foam tape. Finally, I used a very fine tip glue pen to draw over the some of the details on the eggs. I sprinkled the glue lines with clear glitter for some extra sparkle. The clear glitter gives just a hint of shimmer without adding any extra color. It's lovely in person.

My second card features the Etched Easter Egg dies.


I began by running a piece of white cardstock through the Xyron on both sides. I die cut three of the detailed eggs and peeled off one side of backing to adhere them to Melon Berry, Lemon Tart, and Lavender Moon patterned papers. I trimmed around them using the edge of the cardstock as a guide. No sweat. Then, I peeled off the second layer of adhesive backing and sprinkled the eggs with clear glitter. I brushed off the excess and set them aside.


Next, I went about constructing my basket. I began by die cutting a piece of Kraft cardstock with the Berry Basket die. I die cut that piece again, this time with a ring die (from an older Quickutz set, but any nesting circle die would work). I cut a second ring and adhered it to the basket piece. I trimmed the ring down at the level of the pinked basket edge. I stamped that piece and a 1/4" handle with one of the patterns from Ombre Builders using VersaMark. I rotated 90ยบ and stamped again, creating a crosshatch pattern. I adhered my handles and embellished the basket with silk ribbon. Next, I created the basket grass with Circle Scribbles shapes die cut from Spring Moss cardstock. I adhered those to the back of the basket with small strips of Scor Tape.


I created background for my basket by stamping sun rays and a grounding oval (actually the green from On The Links) onto a white card base with Spring Rain ink. I mounted my basket to the card front with narrow strips of foam tape, strategically placed so you don't see them through the holes in the basket, and tucked my Easter Eggs inside. Then, I die cut the word "Happy" and the small banner from Tag Sale #10. I stamped the word "Easter" on to the banner and heat embossed it with white powder. I adhered the two parts of my sentiment together and then placed them at an angle on the card front. I trimmed off the overhanging letter bits and called it good. I love so much about this card. I declared myself a super genius when I came up with the Circle Scribbles grass. Sean humored me. He's a nice fella.

Thank you so much for joining me today! I'll be back tomorrow with more inspiration from this month's new releases. I hope you'll join me. In the meantime, check in with Nichole to see more fantastic announcements. See you soon!

Recipes:
Joyous Easter Card
Stamps: Etched Easter Eggs (available February 15th) - Papertrey Ink
Cardstock: Soft Stone Patterned Paper, Vellum - Papertrey Ink; white
Ink: Sweet Blush, Summer Sunrise, Harvest Gold, Lemon Tart, Limeade Ice, Aqua Mist, Spring Rain, Winter Wisteria - Papertrey Ink; VersaMark - Tsukineko
Other: White Detail Embossing Powder - Filigree; Foam Tape - Scotch; Fine Crystal Glitter - Martha Stewart Crafts; Glue Pen

Easter Basket Card
Stamps: Etched Easter Eggs (available February 15th), Ombre Builders, Hello Sunshine, On The Links - Papertrey Ink
Cardstock: Classic Kraft, Spring Moss, Spring Rain, Lemon Tart Striped Paper, Melon Berry Vine Paper, Lavender Moon Bitty Dot Paper - Papertrey ink; white
Ink: Spring Rain - Papertrey Ink; VersaMark - Tsukineko
Other: Etched Easter Eggs Die Collection (available February 15th), Berry Basket Die, Tipped Tops Die, Tag Sale #10, Circle Scribbles Dies, 1/4" Silk Ribbon - Papertrey Ink; Foam Tape - Scotch; Fine Crystal Glitter - Martha Stewart Crafts; Xyron; Scor Tape; White Detail Embossing Powder - Filigree