Pages

Tuesday, January 27, 2009

In Remembrance

I talked to my mom on the phone the other night and she asked me to make and send a card to one of her dearest friends that recently lost her mother. It was the least I could do. So yesterday I went to the task of creating a sympathy card for Mary.


I have a really hard time with sympathy cards. It's such an unfortunate circumstance, but one in which a heartfelt greeting is truly appropriate. This month Papertrey's releases included a sympathy set (With Sympathy) as well as two smaller additional sets for specific losses (With Sympathy:Loss Of A Child and With Sympathy: Loss Of A Pet). I've learned this week that a beautiful sympathy set makes the task of creating a remembrance card a little easier. Today's card was created using the new full set as well as the Loss Of A Child mini set. The "Know that I am here" sentiment was just enough for the outside of the card while one of the longer sentiments was used inside the card.

I used the same layout for this card as I did for the birthday card the other day. When I'm having a difficult time with a card I will often reuse a recent layout. It gives me a jumping off point and makes the entire creative process run a little more smoothly.

The card base today is made from Kraft. I stamped a piece of Aqua Mist with the Guidelines set in Ocean Tides and a little Brilliance Moonlight White (to tone down the Ocean Tides). The Aqua Mist was layered with a piece of Linen Vellum and embellished with Aqua Mist Saddle Stitched Ribbon and dark brown double-sided satin. That layer was then matted with Dark Chocolate and adhered to the base.

Then, I stamped the stems and floral image from With Sympathy on Kraft in Dark Chocolate, Ocean Tides, and Frost White inks. I punched out that image using an oval Marvy punch (the pink one). I used Dark Chocolate to distress the edges just a smidge. That oval was mounted to the card using foam tape and the sentiments were stamped (both inside and outside) in Ocean Tides ink.

I hope Mary likes it. I hope my mom likes it, too. Maybe today we should all take a little time to remember someone we love that has passed away. Smile at the happy moments they left for you. I miss my Grandma and Aunt Gina, but I know they loved me and I know they were both lovely women that led wonderful full lives. Warm, happy memories...

Recipe:
Cardstock: Aqua Mist, Kraft, Dar Chocolate, Linen Vellum - Papertrey Ink
Ink: Ocean Tides, Dark Chocolate - Papertrey Ink; Moonlight White - Brilliance; Frost White - Colorbox
Stamps: With Sympathy, With Sympathy: Loss Of A Child, Guidelines - Papertrey Ink
Fibers: Aqua Mist Saddle Stitched - Papertrey Ink; dark brown satin - American Crafts
Tools: Notch & Die Set - Basic Grey; Oval Punch (Pink) - Marvy
Other: Foam Tape - Scotch

Sunday, January 25, 2009

Papertrey Blog Hop: Birthday Card Challenge


Tonight is the Papertrey Blog Hop. This month's challenge was to create a birthday card. Man, woman, child...all fair game! I chose to create a birthday card for a child (though I wouldn't mind getting this card myself, either - I like duckies).


The main image is the duckie from Bitty Baby Blessings. I stamped him in Dark Chocolate ink and colored him with colored pencils and mineral spirits (I'm noticing a bird/colored pencil theme to my projects lately). I cut him out and mounted him on a circle I die cut from dark brown Bazzill cardstock.


My card base is Papertrey Kraft that has been stamped with the smallest dot in the Polka Dot Basics set. The vellum layer is Papertrey's Linen Vellum Cardstock that I trimmed with my Basic Grey Notch & Die set. I've had that tool for awhile and I don't use it nearly enough. It gives such a nifty edge and there are so many possibilities! I adhered the vellum to the card base using vellum tape. I love that this vellum is so nice and heavy. It's really forgiving with things like adhesive and can tolerate a lot of handling.

Then, I layered Lemon Tart Saddle Stitched ribbon and dark brown double sided satin to give a little more visual interest to the space directly below the scalloped edge. I finished the card by attaching the duck medallion with foam tape and stamping "happy birthday" in Dark Chocolate ink. Thank you for stopping by today! Take care and I'll see you soon...

Recipe:
Cardstock: Kraft, Linen Vellum Cardstock - Papertrey Ink; Brown - Bazzill; Ultimate White - Strathmore
Ink: Dark Chocolate - Papertrey Ink
Stamps: Bitty Baby Blessings, Polka Dot Basics, Birthday Basics - Papertrey Ink
Fibers: Lemon Tart Saddle Stitched Ribbon - Papertrey Ink; 1/4" double sided satin - American Crafts
Tools: Nesting Circles Dies - Quickutz; Die Cut Machine; Notch & Die Set - Basic Grey
Other: Colored Pencils - Prismacolor; Foam Tape - Scotch

Saturday, January 24, 2009

Minis on Parade

In today's post I'm going to share all of the itty bitty cards that I packed in Sean's suitcase for his trip last week. The four square cards are 3 3/8" square and the rectangle is 2 x 3 1/2. Here we go!


This first one is a circle (the same size as the squares)! I used my Quickutz Cookie Cutter Nesting Circles Dies to cut the base. The little blue ring is also cut using those same dies. I stamped my sweet little birdies and the sentiment in Dark Chocolate ink. I colored with pencils and mineral spirits (as per usual) and die cut with a different set of Quickutz dies.

Recipe:
Cardstock: Fennel - Martha Stewart; Blue Textured - DCWV; Ultimate White - Strathmore
Ink: Dark Chocolate - Papertrey Ink
Stamps: Pretty Birds (Kim Hughes Collection) Cornish Heritage Farms
Tools: Nesting Circles Dies, Nesting Flowers Dies - Quickutz; Die Cut Machine
Other: Colored Pencils - Prismacolor; Foam Tape - Scotch; Mineral Spirits


Number two is a little "fly on home" kind of card. I stamped the images in the same brown ink as the first card. I colored the birdhouse with pencils and mineral spirits and die cut the entire panel with a circle die. Then, I layered my focal images on top of a slightly larger scalloped circle so you just see a tiny bit of dark brown peeking from behind the main image. I layered the whole thing on a Kraft base using foam tape. I rounded the bottom corner for just a tiny bit of detail.

Recipe:
Cardstock: Kraft - Papertrey Ink; Ultimate White - Strathmore; Brown - Bazzill
Ink: Dark Chocolate - Papertrey Ink
Stamps: Pretty Birds (Kim Hughes Collection) - Cornish Heritage Farms; Sentiment - Stampendous
Tools: Nesting Circles - Quickutz; die cut machine; Corner Rounder - EK Success
Other: Colored Pencils - Prismacolor; Foam Tape - Scotch; Mineral Spirits


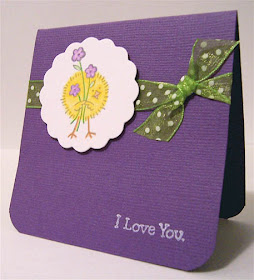
The third card uses a color that I rarely touch...Purple. Sean is a purple fan though, so I thought I would incorporate that little pop of color in the series. He knows it's a special occasion when I use purple. For this card I stamped my chicky-poo in a little Charcoal Ink and colored him with pencils and mineral spirits. The sentiment is stamped in white ink directly onto the card base. I die cut the chick image and adhered it over my lime green polka dotted ribbon with foam tape. The bottom corners were rounded for that last little detail.

Recipe:
Cardstock: Purple - Bazzill; Ultimate White - Strathmore
Ink: Charcoal - Palette, Frost White - Colorbox
Stamps: Chick - Stampendous (I think...I bought it nearly 3 years ago and I unmounted it. I have the block somewhere, but it's two floors away, so I'm not getting up to check. Humph!); Sentiment - Clear $1 Michaels set
Ribbon: Lime green sheer Polka Dots - American Crafts
Tools: Nesting Circles - Quickutz; Die Cut Machine, Corner Rounder - EK Success
Other: Colored Pencils - Prismacolor; Mineral Spirits; Foam Tape - Scotch


Card number four was Sean's favorite. I stamped the focal images (with a little masking to make the bird sit in the nest - they're separate images) in the brown ink and colored again with the pencils and mineral spirits. I've been doing a lot of coloring lately. In fact, I colored all of these images while we watched episodes of The Wire together. He never had a clue. I'm so sly (HA!). The bird was die cut using one of my Quickutz dies and layered on top of a scalloped circle. The matted image was mounted on the card base with foam tape. The sentiment is stamped on the base using the same dark brown ink from the main image. This time all four corners are rounded to make this mini a little softer.

Recipe:
Cardstock: Blue - DCWV; Ultimate White - Strathmore; Brown - Bazzill
Ink: Dark Chocolate - Papertrey Ink
Stamps: Pretty Birds (Kim Hughes Collection) Cornish Heritage Farms; Sentiment - Stampendous
Tools: Nesting Circles, Nesting Flowers - Quickutz, Die Cut Machine, Corner Rounder - EK Success
Other: Colored Pencils - Prismacolor, Mineral Spirits, Foam Tape - Scotch


Last but not least - Card number five may be my favorite of the series. This one is a tall narrow card that opens on the short end. Oh for cuteness! The focal image was stamped in Charcoal and colored with pencils and mineral spirits. I cut out the image leaving a narrow white border all around the edge. The fiber is wrapped around the base and adhered under the focal image with a little adhesive and foam tape. The sentiment is stamped directly on the base using white ink.

Recipe:
Cardstock: Red - Bazzill; Ultimate White - Strathmore
Ink: Charcoal - Palette; Frost White - Colorbox
Stamps: Hearts & Flowers image - Stampendous; Sentiment - Heidi Grace Sentiment set (Fiskars)
Other: Colored Pencils - Prismacolor; Mineral Spirits; Yellow fiber - CTMH; Foam Tape - Scotch

Whew! There it is. Wow, that took awhile. I hope you enjoyed the mini card series. Next time your favorite somebody is away, try hiding a little note in their suitcase, briefcase, lunch box, or handbag. It makes them feel good and it makes you feel good, too! Until next time, take care...

Friday, January 23, 2009

The Camera Is Dead

Really it's just the battery, but I still won't be able to take photos of Sean's mini cards until tomorrow (he got home from his trip last night). So sorry! There are five little cards so hopefully it will be worth the wait. Take care and I'll be back tomorrow.

Wednesday, January 21, 2009

Love Is In The Air

Yesterday, I mentioned receiving my first order from Cornish Heritage Farms. I love these stamps. I've always loved the way rubber stamps, but I've come to prefer the convenience and ease of use associated with photopolymer. Unmounted stamps (such as the ones I ordered from Cornish Heritage Farms) are the best of both worlds. There is no cumbersome wood block and you have the fab-u-lous clarity you get from rubber. Wahoo! I ordered the Pretty Birds and Spring Trees sets from the Kim Hughes Collection. I absolutely love her style and I love playing with these images. Today's card features stamps from the Pretty Birds set. It is fairly simple, but I had a lot of fun putting it together.


First, I positioned my birds and the sentiment on a large acrylic block. I knew I wanted to include a punched paper heart between the birds' beaks so I did a test stamp on a piece of scrap paper. When I was happy with the position, I stamped the images in charcoal ink onto smooth white cardstock. I like the smooth white best for stamping and for images that I intend to color. If I don't have smooth cardstock on hand I will often flip over a piece of Bazzill and use the smoother side for my project. It works relatively well - even on solid images.

Then, I colored my birds and the sentiment using Prismacolor Pencils and mineral spirits. The Pretty Birds set has several images that just scream to be colored! I think that may be one of my favorite things about the set.

To make my focal image pop I used a mat of Papertrey Ink's Pure Poppy cardstock. I used my Threading Water punch to add the scalloped detail at the bottom. I rounded the corners and then adhered the layers to the card front using foam tape.

Finally, the heart was punched from Pure Poppy and added to the space between the birds (also with foam tape). Like I said - pretty simple, but I think I am pleased. I hope you all have a great day and I'll see you next time...

Recipe:
Cardstock: Blue - Bazzill Basics; Ultimate White - Strathmore; Pure Poppy - Papertrey Ink
Ink: Charcoal - Palette
Stamps: Pretty Bird (Kim Hughes Collection) - Cornish Heritage Farms
Tools: Threading Water Border Punch - Fiskars, mini folk heart punch, corner rounder - EK Success
Other: Colored Pencils - Prismacolor; Foam Tape - Scotch; mineral spirits

Tuesday, January 20, 2009

My Muse Is In California


Sean's on a business trip and I'm finding it difficult to settle into a rhythm. I don't sleep very well when he's not home and that makes me a little cranky and uninspired. Humph... I was working on some colored images last night when our power suddenly blew, so not much happened with those. Thankfully the power came back on at around 2:00 this morning. You all should have seen my face when I realized that not only did I have to sleep alone, but the electric blanket wasn't going to work either.

I made Sean a series of mini cards that I hid all over his suitcase, but I didn't want to show those until he had a chance to find them. I'll be sure to get a photo when he arrives back home. They were all either 3 3/8 square or 2 x 3 1/2. All in itty bitty glassine envelopes. Cute!

I ordered my very first stamps from Cornish Heritage Farms last week and I've been playing with those. I had no idea how long it took to cut down red rubber! I've never had Stampin' Up, so I guess I never realized. It was well worth all of the effort though. The stamps are great to work with and Kim Hughes has some fabulous designs. It will most certainly not be my last order!

Well, I guess that's all I have to say for now. Hopefully I can work myself into posting a project later today. Until then, take care and Happy Inauguration Day!

Wednesday, January 14, 2009

Variations On A Theme

Today I went to the dentist for the first time in...um...6 and a half years. I was terrified. And they were backed up by nearly 3 hours, so I sat in a tiny waiting room for two and half hours with the cast of the next Christopher Guest film waiting for Parker Posy to make her entrance and fidgeting like a junkie. It was awesome.

Luckily, my compulsive brushing, flossing, and rinsing has served me well. No cavities and the dentist said, and I quote "Are you sure you don't use an electric toothbrush? You have absolutely no build-up." Score one for neurotics everywhere! I do have impacted wisdom teeth in my lower jaw, but she told me I don't have to get them removed because they're not causing any problems. Whew!

In other news...Today's card is the same layout as Saturday's baby card. This time we have a sweet little birthday confection. I replaced the ribbon with bright blue ric rac. The patterned paper I used for the cupcake is an oldie from American Crafts. I've been hoarding that particular paper forever. To lighten it up and add a little shimmer I used my Sakura glitter pen on all of the black dots and then covered the glitter with Glossy Accents.


The cupcake wrapper is just Bazzill cardstock that I ran through my paper crimper. I love using this technique for cupcakes! It adds such texture, dimension, and realism. The candle wick is 1/16" blue satin ribbon. I have no idea where it came from, but it's been in my ribbon box for at least a year.

The sentiment is from a clear Wordsworth set. The polka dots are from Papertrey's Polka Dot Basics set. The cupcake parts are templates that I designed myself. Thanks so much for checking in today! If you are a fellow stamper, Papertrey is releasing a new round of stamps tonight at midnight. See you there!

Recipe:
Cardstock: Orange, Blue, Yellow - Bazzill; Ultimate White - Strathmore
Stamps: Polka Dot Basics - Papertrey Ink; Happy Birthday Sentiment - Wordsworth
Ink: Frost White - Colorbox
Fibers: blue ric rac - Wrights; narrow blue satin - unknown
Patterned Paper - American Crafts
Tools: Paper Crimper - Fiskars
Other: Foam Tape - Scotch; glitter pen - Sakura

Monday, January 12, 2009

I've been spackling!


So, we bought our house because we loved all of the architectural detail, but we knew it was going to be a lot of work. For example, in the kitchen the previous owners put up hardwood paneling on three walls. Unfortunately they didn't hang it very well and there are gaps and seams in between all of the boards. If it were simply stained you probably wouldn't see the gaps, but it's painted white, so you see every line. We want to repaint, but we know the flaws in the wall will still be visible even with the new paint. Yesterday, fueled by HGTV and a set of New Year's goals, I ran to the hardware store and bought spackle. I've been filling in the lines as if the spackle were caulk. It already looks so much better! Off to the bathroom (same problem)...

Saturday, January 10, 2009

Bringing Home Baby

Not us. No babies here. I think I just heard my mother faint.

Today I have a baby card. This is a poor, rejected magazine submission. It's ok. I still love it.


My happy little lion here was stamped in Burnt Umber ink and colored using Prismacolor Pencils and a bit of mineral spirits. "Hey Big" was stamped directly onto the Lemon Tart base using the same ink from the lion. The blue letters are of the flocked variety. I like the texture they add to the card face. Nice and soft. Just like a baby.

I stamped the polka dots onto Aqua Mist cardstock and added a white layer for a little dimension. Topped off with a nice knotted length of Summer Sunrise twill and we're in business. The lion is mounted on top of everything using foam tape.

Thank you for checking in on this lovely Saturday morning. Take it easy...

Recipe:
Cardstock: Lemon Tart, Aqua Mist - Papertrey Ink; Ultimate White - Strathmore
Ink: Burnt Umber - Palette; Frost White - Colorbox
Stamps: Little Boy set - Sandylion; Simple Alphabet, Polka Dot Basics - Papertrey
Ribbon: Summer Sunrise Twill - Papertrey Ink
Other: Flocked Alphabet - Making Memories; Foam Tape - Scotch

Catching up

My absence was longer than I expected, and for that I apologize. I admit, it was nice to take some time away from blogging and photo taking. I spent the last few weeks focusing on my home and my family and making things for the people I love. I got a bread maker for Christmas from my parents-in-law and it has been awesome. My goal is to never buy a loaf of grocery store bread again. So far I have made 6 or 7 loaves. One was a sharp cheddar and onion loaf and the rest have been variations on the white bread theme. The cheddar and onion makes a mean grilled cheese!

We've had dinners with friends (Devon, your dessert and your ciabatta were awesome), evenings out on the town, and quiet nights alone at home. So far 2009 has been marked with cozy domesticity and I am particularly pleased about that. I'll be happy to get back into the swing of things shortly, but I may be a little spotty in my posting for a little while longer. I'm still relishing in the happy homey moments. Until next time, take care.